SpringCloud microservice technology stack. Dark horse follow-up 11
- today's goal
- 1. What is a multi-level cache
- 2. JVM process cache
- 3. Introduction to Lua grammar
- 4. Implement multi-level caching
- 5. Cache synchronization
today's goal

1. What is a multi-level cache
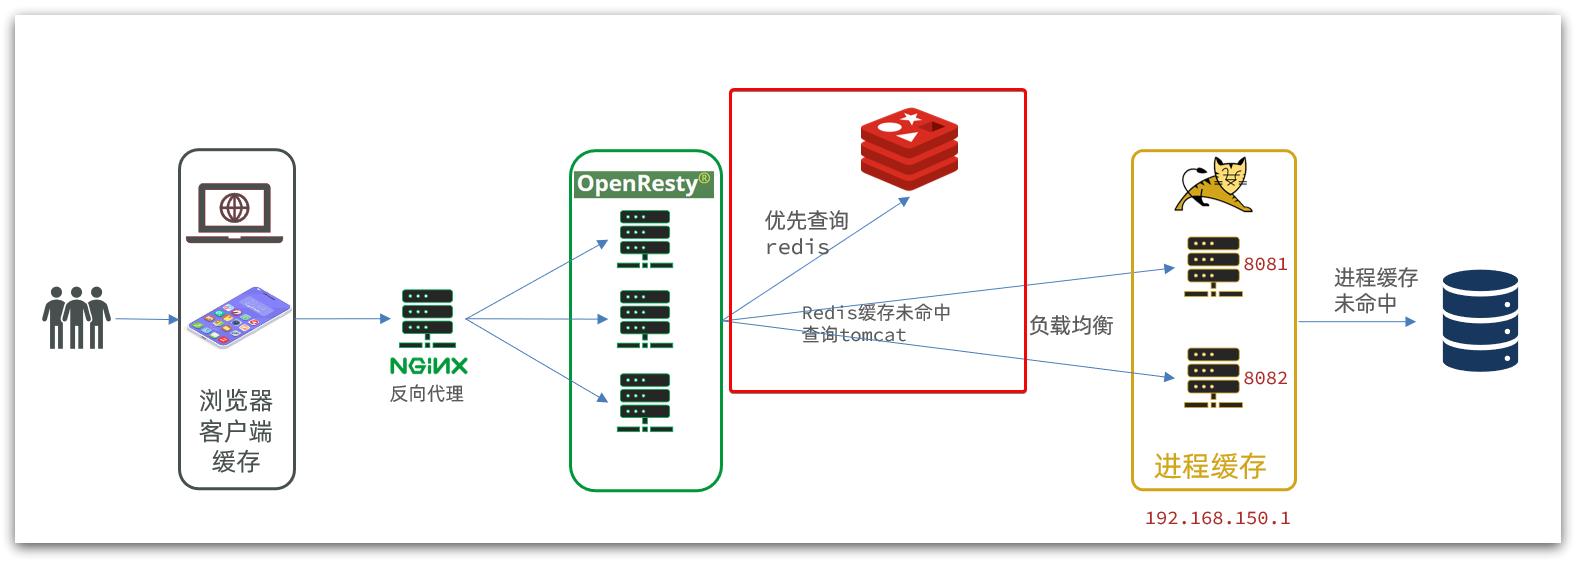
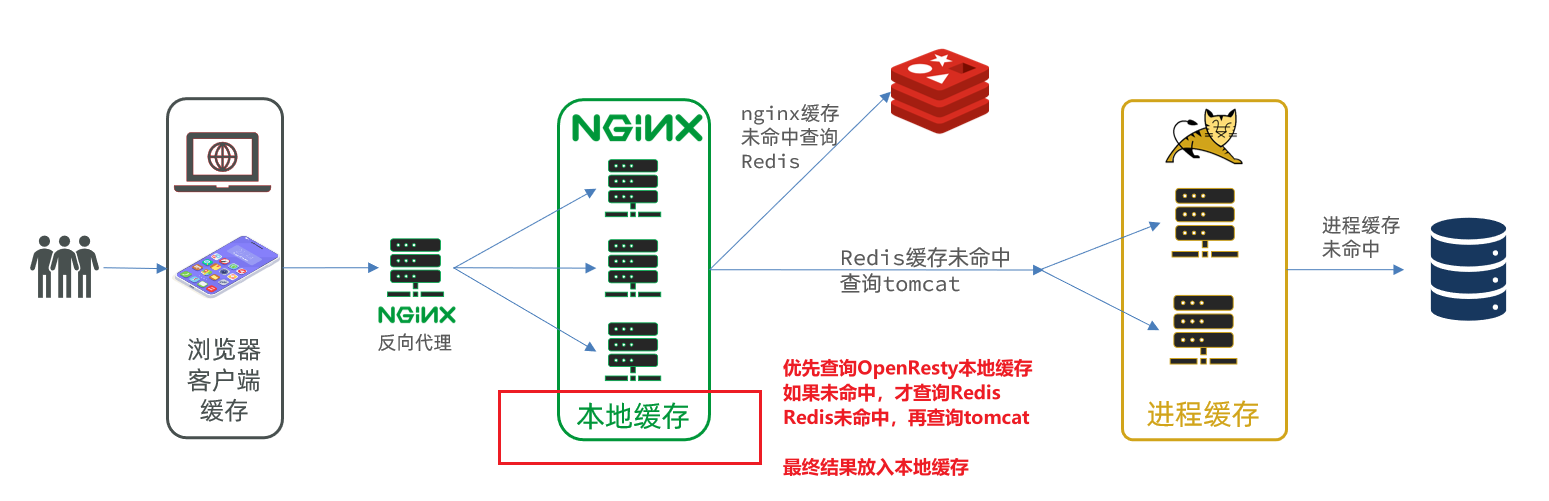
The traditional caching strategy is generally to query Redis first after the request reaches Tomcat, and then query the database if it misses, as shown in the figure:
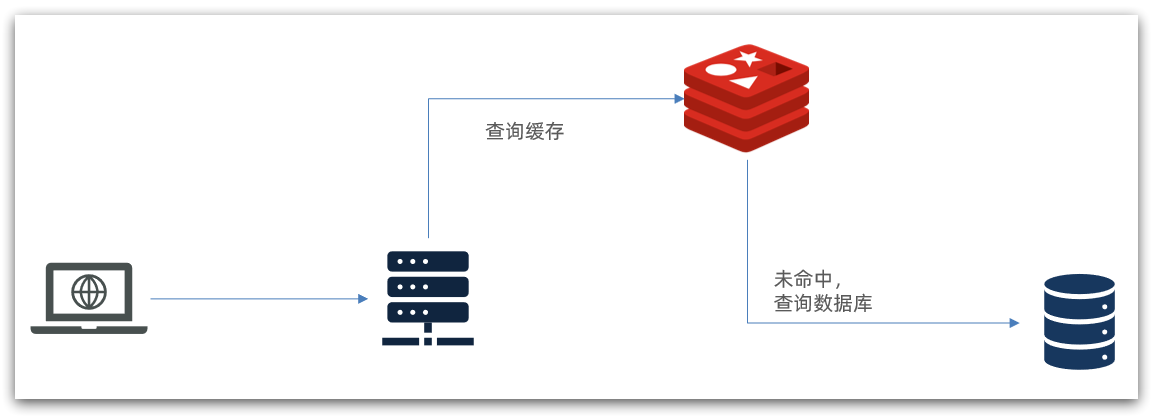
There are the following problems:
•The request must be processed by Tomcat, and the performance of Tomcat becomes the bottleneck of the whole system
•When the Redis cache fails, it will have an impact on the database
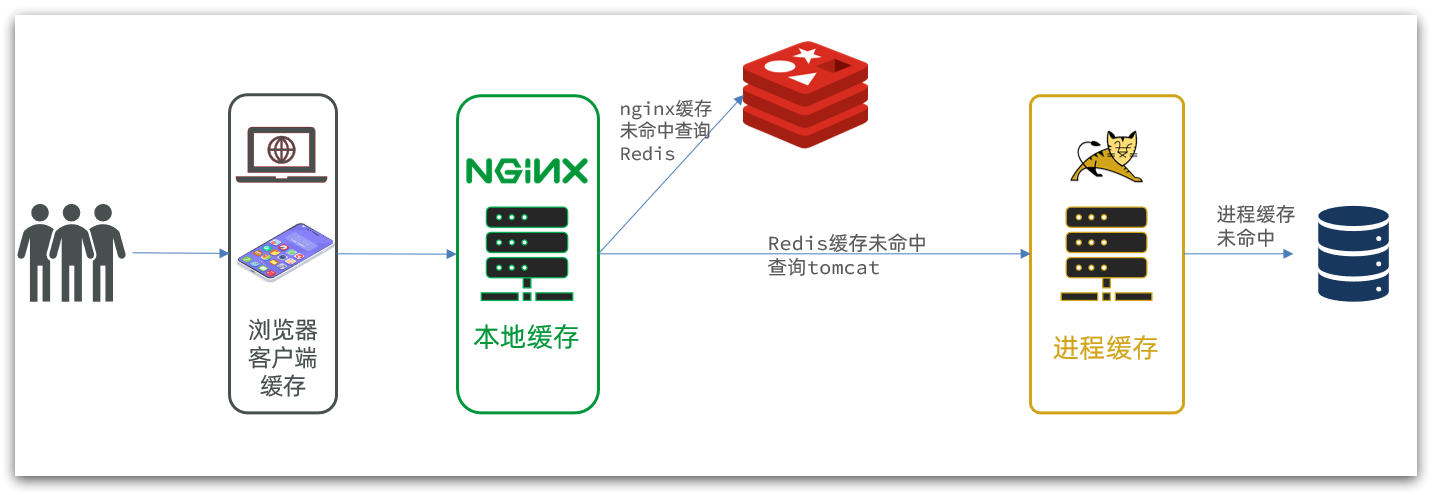
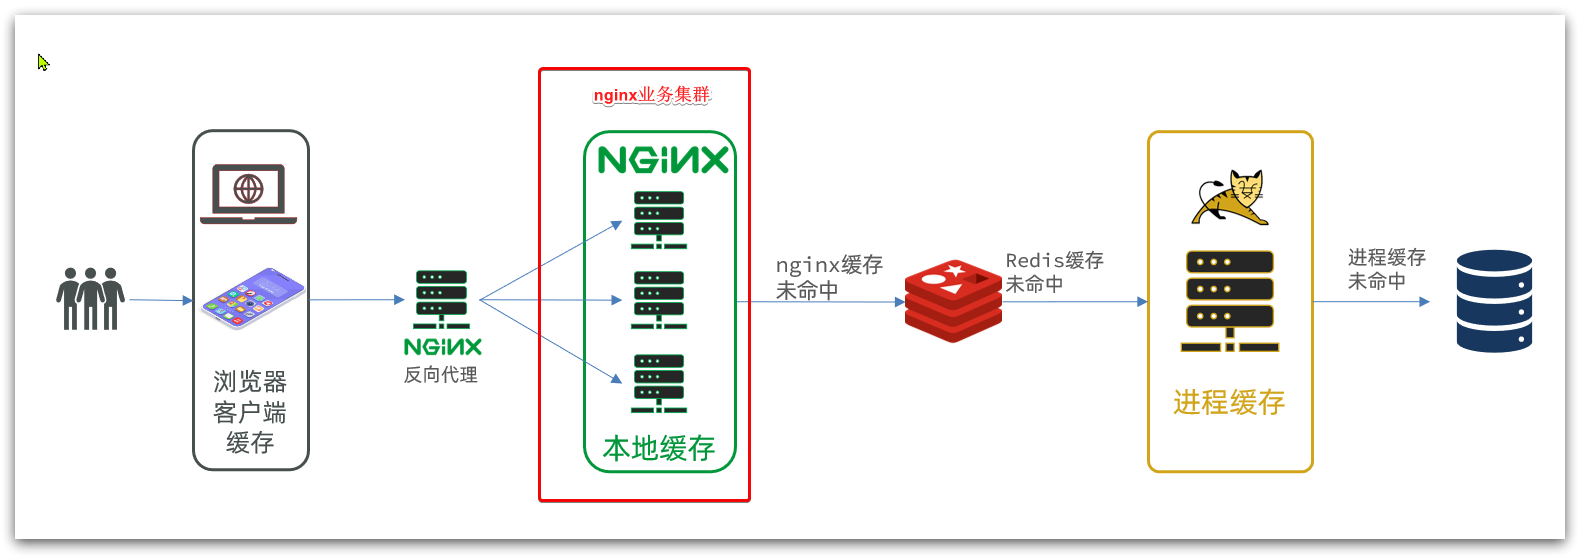
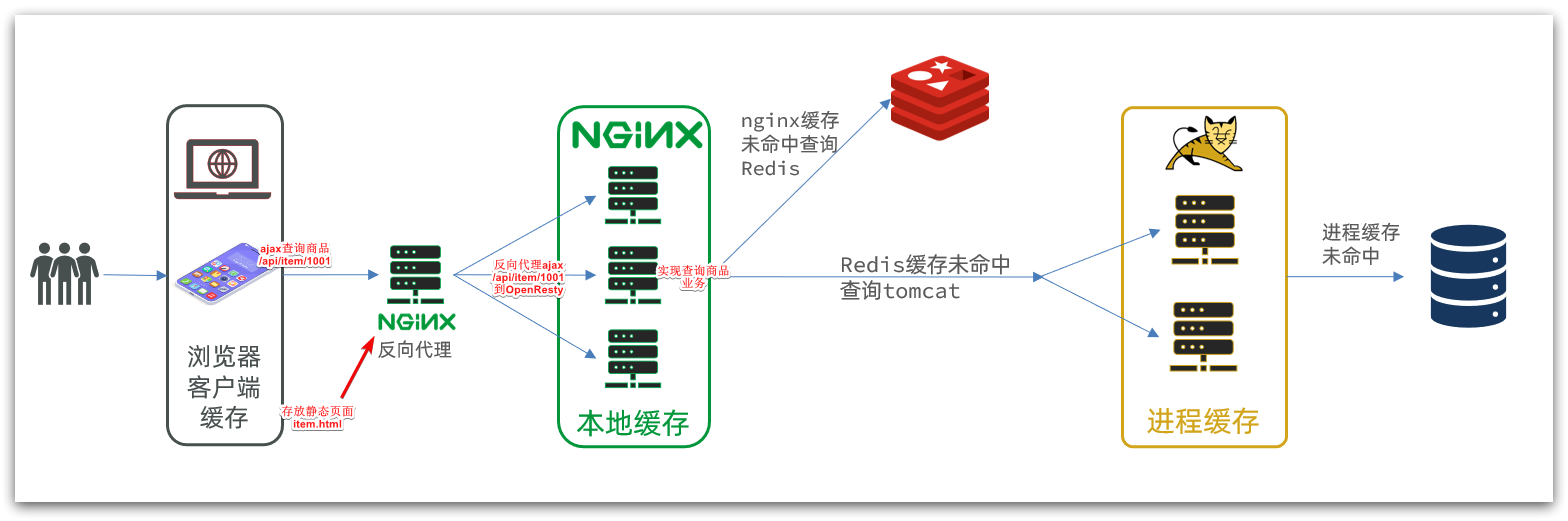
Multi-level cache is to make full use of each link of request processing, add cache separately, reduce the pressure on Tomcat, and improve service performance:
- When the browser accesses static resources, it preferentially reads the browser's local cache
- When accessing non-static resources (ajax query data), access the server
- After the request reaches Nginx, read the Nginx local cache first
- If the Nginx local cache misses, then query Redis directly (without Tomcat)
- Query Tomcat if Redis query misses
- After the request enters Tomcat, the JVM process cache is first queried
- Query the database if the JVM process cache misses
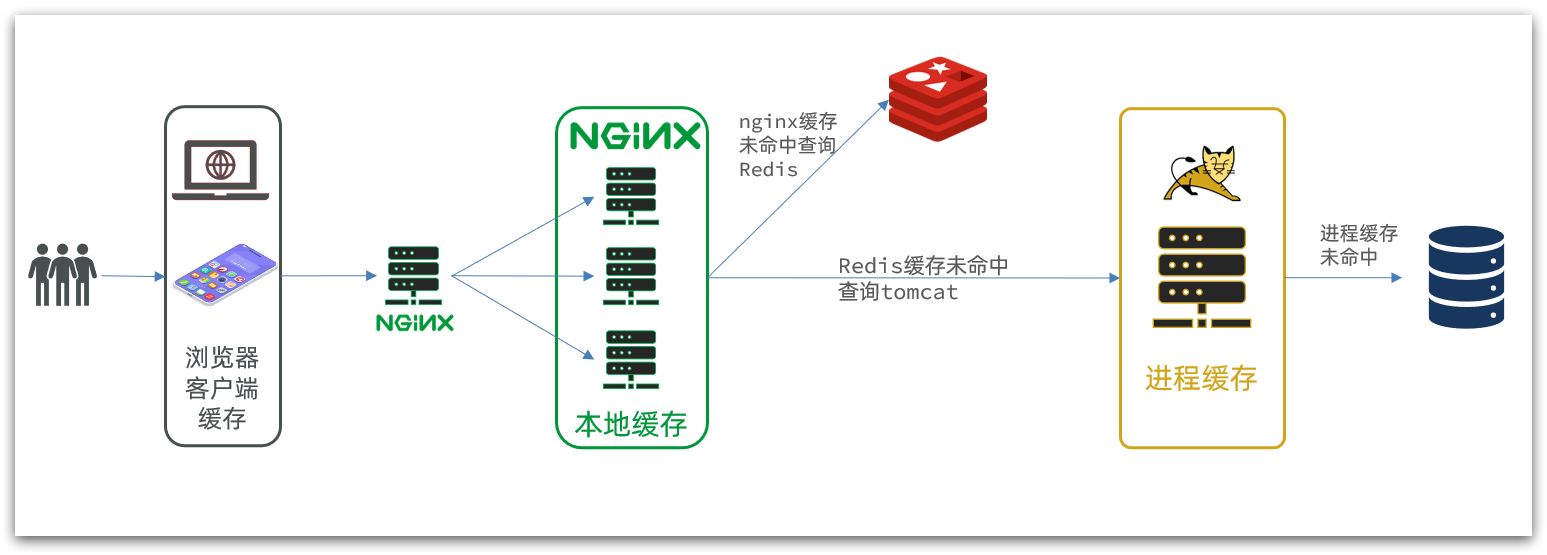
In the multi-level cache architecture, Nginx needs to write the business logic of local cache query, Redis query, and Tomcat query. Therefore, such nginx service is no longer a reverse proxy server , but a web server for writing business .
Therefore, such a business Nginx service also needs to build a cluster to improve concurrency, and then have a special nginx service as a reverse proxy, as shown in the figure:
In addition, our Tomcat service will also be deployed in cluster mode in the future:
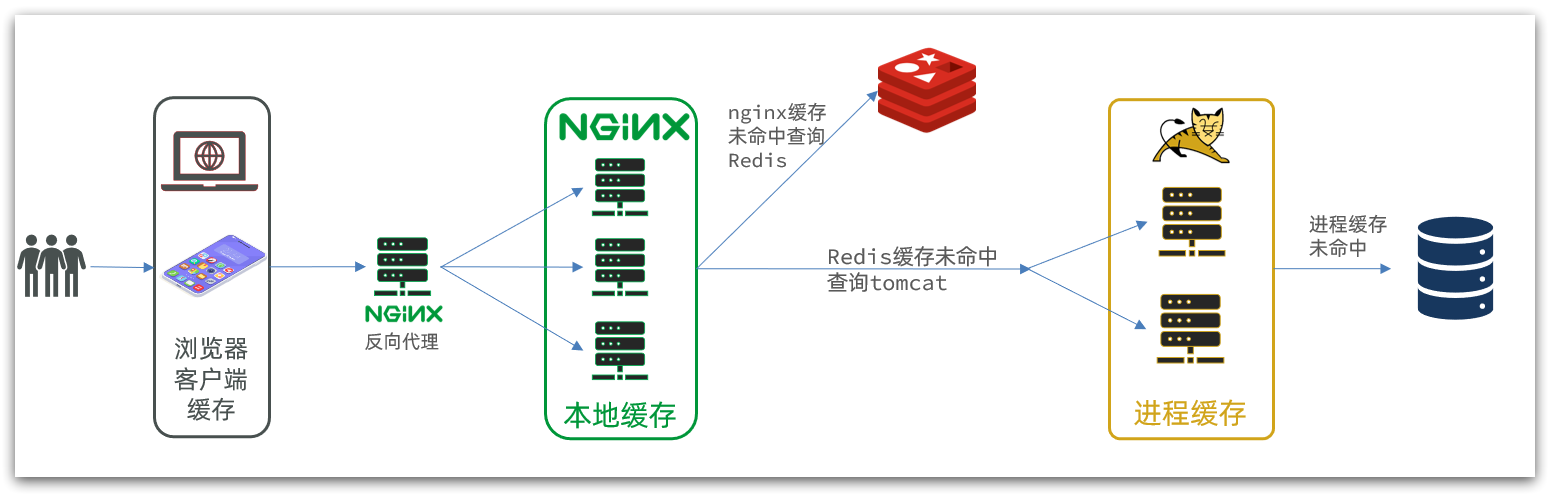
It can be seen that there are two keys to multi-level caching:
-
One is to write business in nginx to realize nginx local cache, Redis, Tomcat query
-
The other is to implement the JVM process cache in Tomcat
Among them, Nginx programming will use the OpenResty framework combined with languages such as Lua.
This is also the difficulty and focus of today's lesson.

2. JVM process cache
In order to demonstrate the case of multi-level caching, we first prepare a commodity query business.
2.1. Import case
Refer to the pre-class materials: "Case Import Instructions.md"

Case import instructions
In order to demonstrate multi-level caching, we first import a case of product management, which includes the CRUD function of products. We will add multi-level caching for query items in the future.
2.1.1. Install MySQL
Later data synchronization needs to use the master-slave function of MySQL, so you need to use Docker to run a MySQL container in a virtual machine.
2.1.1.1. Prepare directory
In order to facilitate the later configuration of MySQL, we first prepare two directories for mounting the data and configuration file directories of the container:
because it was installed before, here I renamed it mysql_cluster
# 进入/tmp目录
cd /tmp
# 创建文件夹
mkdir mysql_cluster
# 进入mysql目录
cd mysql_cluster
2.1.1.2. Run command
After entering the mysql_cluster directory, execute the following Docker command:
docker run \
 -p 3306:3306 \
 --name mysql \
 -v $PWD/conf:/etc/mysql_cluster/conf.d \
 -v $PWD/logs:/logs \
 -v $PWD/data:/var/lib/mysql_cluster \
 -e MYSQL_ROOT_PASSWORD=123 \
 --privileged \
 -d \
 mysql:5.7.25
view container
docker ps

2.1.1.3. Modify configuration
Add a my.cnf file in the /tmp/mysql_cluster/conf directory as the mysql configuration file:
# 创建文件
touch /tmp/mysql_cluster/conf/my.cnf

The content of the file is as follows:
[mysqld]
skip-name-resolve
character_set_server=utf8
datadir=/var/lib/mysql_cluster
server-id=1000

2.1.1.4. Restart
After configuration changes, the container must be restarted:
docker restart mysql_cluster
2.1.2. Import SQL
Next, use the Navicat client to connect to MySQL, and then import the sql file provided by the pre-class materials:
pay attention to connect with the ip address of the virtual machine
It contains two tables:
- tb_item: product table, including basic information of the product
- tb_item_stock: commodity inventory table, including commodity inventory information
The reason why the inventory is separated is because the inventory is information that is updated frequently, and there are many write operations. Other information is modified very infrequently.
Connect to the database through ip

Create a database called heima
and then import sql.
Commodity

inventory

2.1.3. Import Demo project
Import the project provided by the pre-class materials below:

The project structure is shown in the figure:
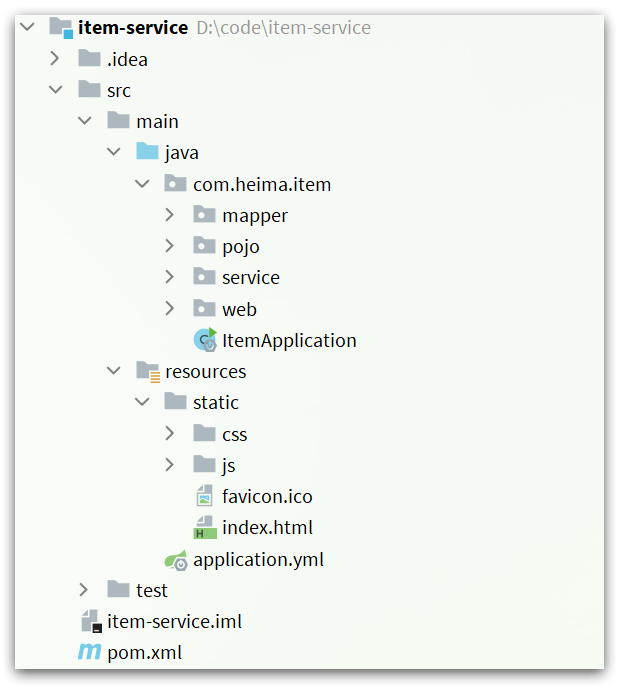
the business includes:
- Query products by page
- new product
- modify product
- modify inventory
- delete item
- Query products by id
- Query inventory by id
All business is implemented using mybatis-plus, please modify the business logic yourself if necessary.
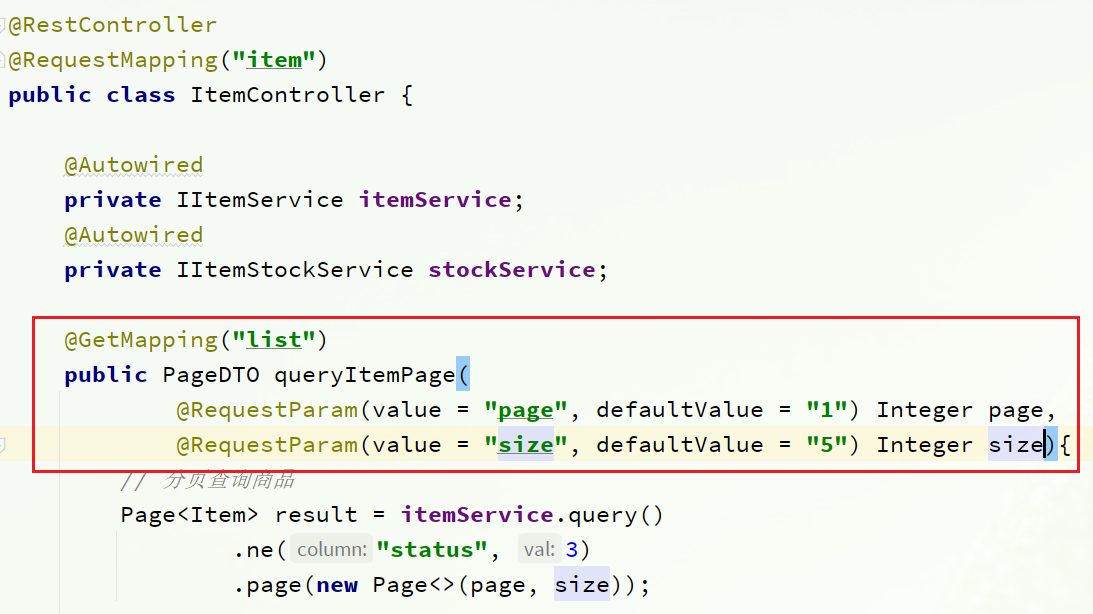
2.1.3.1. Query products by page
You can see the interface definition in com.heima.item.webthe package ItemController:
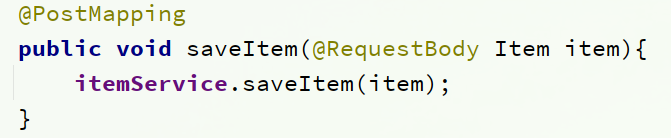
2.1.3.2. New products
You can see the interface definition in com.heima.item.webthe package ItemController:
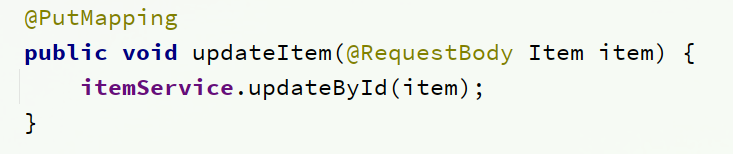
2.1.3.3. Modify the product
You can see the interface definition in com.heima.item.webthe package ItemController:
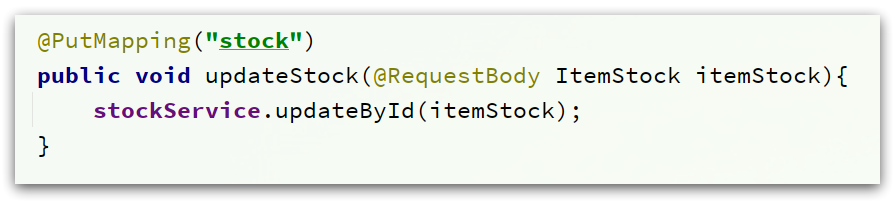
2.1.3.4. Modify inventory
You can see the interface definition in com.heima.item.webthe package ItemController:
2.1.3.5. Delete product
You can see the interface definition in com.heima.item.webthe package ItemController:

Here, logical deletion is used to modify the product status to 3
2.1.3.6. Query products by id
You can see the interface definition in com.heima.item.webthe package ItemController:
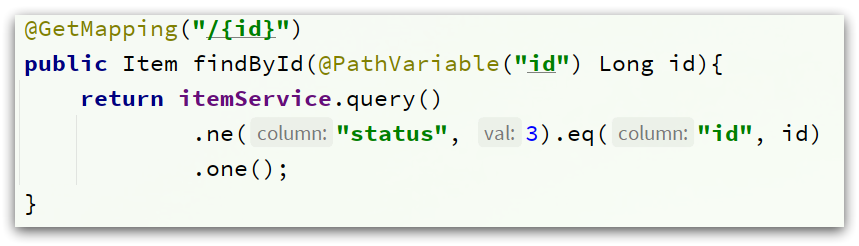
Only product information is returned here, not including inventory
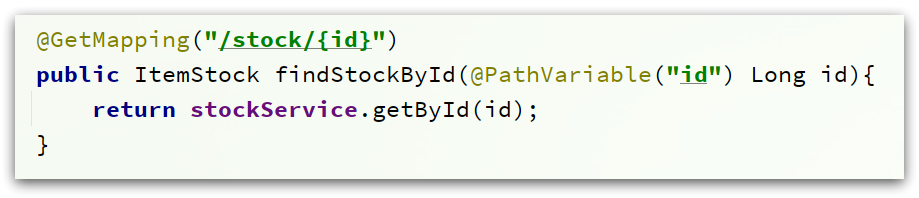
2.1.3.7. Query inventory according to id
You can see the interface definition in com.heima.item.webthe package ItemController:
2.1.3.8. Startup
Pay attention to modify the mysql address information configured in the application.yml file:
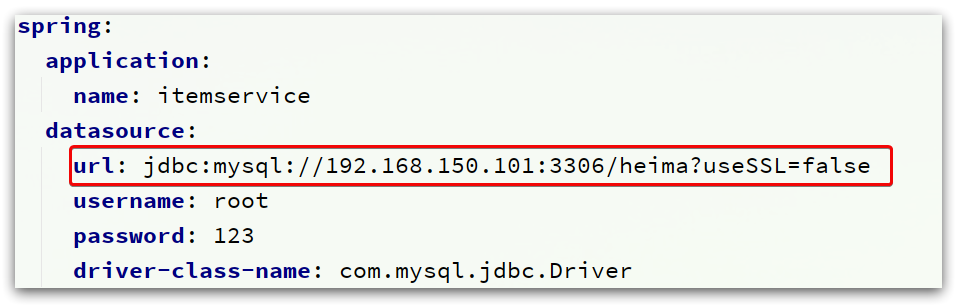
It needs to be modified to your own virtual machine address information, as well as account number and password.
After modification, start the service and visit: http://localhost:8081/item/10001 to query data
View product information
http://localhost:8081/item/10001

View stock information
http://localhost:8081/item/stock/10002

2.1.4. Import product query page
Commodity query is a shopping page, which is separated from the product management page.
The deployment method is as shown in the figure:
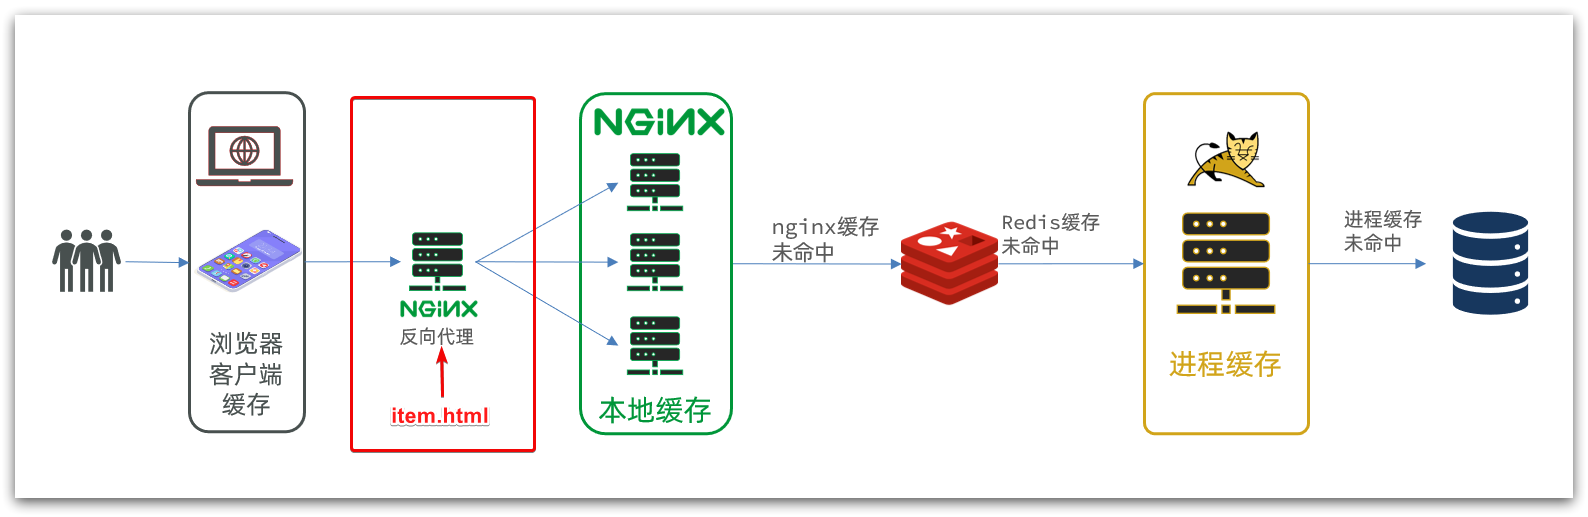
we need to prepare a reverse proxy nginx server, as shown in the red box above, and put the static product page in the nginx directory.
The data required by the page is queried to the server (nginx business cluster) through ajax.
2.1.4.1. Running nginx service
Here I have prepared nginx reverse proxy server and static resources for you.
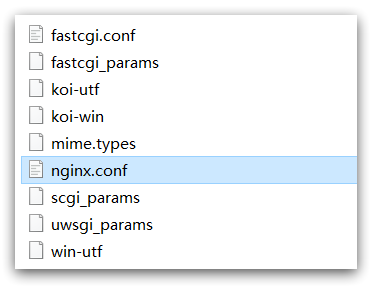
We find the nginx directory of the pre-class materials:

Copy it to a non-Chinese directory and run the nginx service.
Nginx is port 80. Generally, port 80 is more likely to be occupied. We modify the nginx.conf file to
randomly set an unoccupied port number

and modify it as follows:

Run the command:
start nginx.exe
Visit, see nginx welcome page
localhost:8934

then visit
http://localhost:8934/item.html?id=10001
You can:
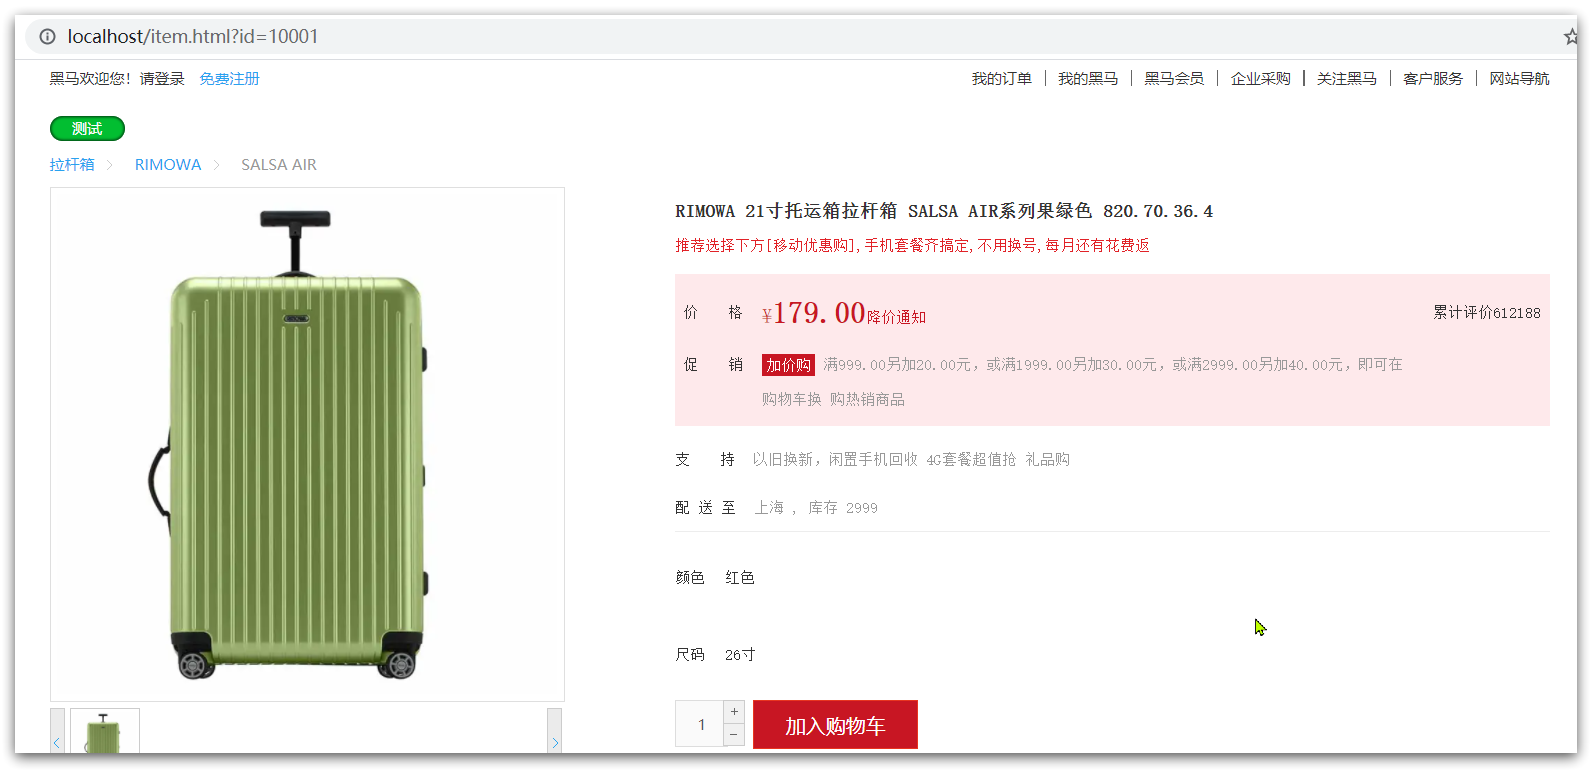
2.1.4.2. Reverse proxy
Now, the page is displayed with fake data. We need to send an ajax request to the server to query product data.
Open the console, you can see that the page has initiated ajax query data:
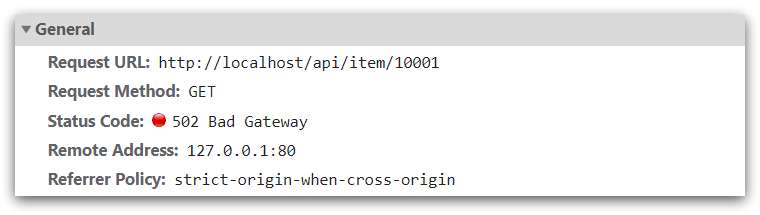
And this request address is also port 80, so it is reverse-proxyed by the current nginx.
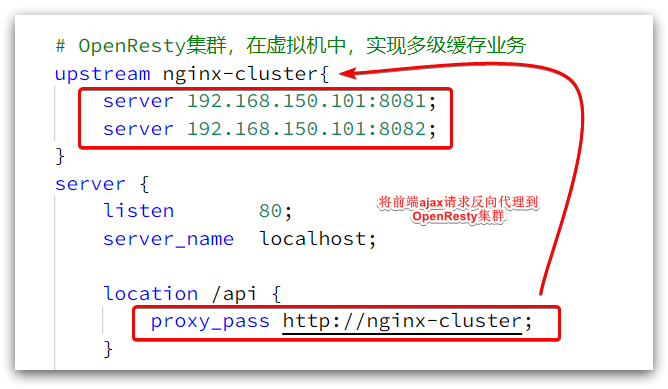
View the nginx.conf file in the nginx conf directory:
The key configurations are as follows:
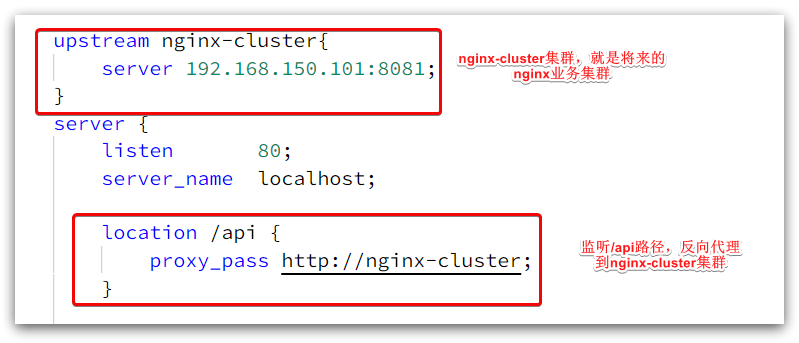
Among them, 192.168.150.101 is my virtual machine IP, which is where my Nginx business cluster will be deployed: the
complete content is as follows:
#user  nobody;
worker_processes  1;

events {
    worker_connections  1024;
}

http {
    include       mime.types;
    default_type  application/octet-stream;

    sendfile        on;
    #tcp_nopush     on;
    keepalive_timeout  65;

    upstream nginx-cluster{
        server 192.168.150.101:8081;
    }
    server {
        listen       80;
        server_name  localhost;

	location /api {
            proxy_pass http://nginx-cluster;
        }

        location / {
            root   html;
            index  index.html index.htm;
        }

        error_page   500 502 503 504  /50x.html;
        location = /50x.html {
            root   html;
        }
    }
}
2.2. Getting to know Caffeine
Cache plays a vital role in daily development. Because it is stored in memory, the reading speed of data is very fast, which can greatly reduce the access to the database and reduce the pressure on the database. We divide caches into two categories:
- Distributed cache, such as Redis:
- Advantages: larger storage capacity, better reliability, and can be shared between clusters
- Disadvantage: accessing the cache has network overhead
- Scenario: The amount of cached data is large, the reliability requirements are high, and it needs to be shared between clusters
- Process local cache, such as HashMap, GuavaCache:
- Advantages: read local memory, no network overhead, faster
- Disadvantages: limited storage capacity, low reliability, cannot be shared
- Scenario: high performance requirements, small amount of cached data
Today we will use the Caffeine framework to implement the JVM process cache.
Caffeine is a high-performance local cache library developed based on Java 8 that provides a near-optimal hit rate. Currently, Spring's internal cache uses Caffeine. GitHub address: https://github.com/ben-manes/caffeine
The performance of Caffeine is very good. The following figure is the official performance comparison:
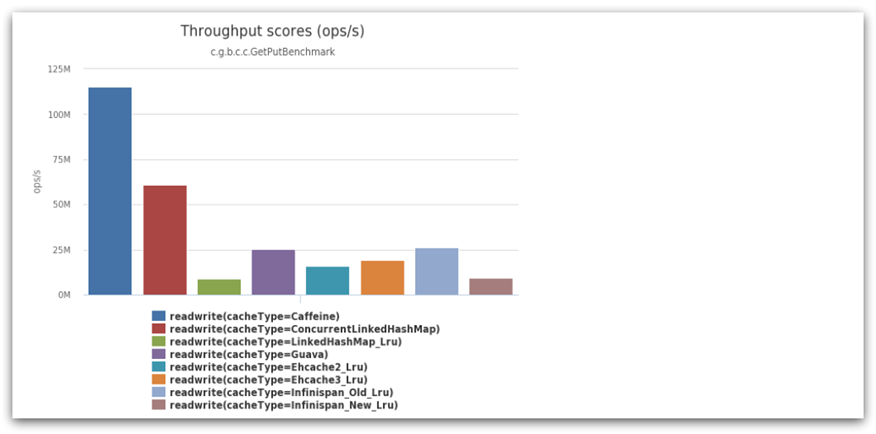
you can see that the performance of Caffeine is far ahead!
The basic API used by the cache:
@Test
    public void testBasic() {


        // 构建cache对象
        Cache<String, String> cache = Caffeine.newBuilder().build();

        // 存数据
        cache.put("gf", "迪丽热巴");
        String gf = cache.getIfPresent("gf");
        System.out.println("获取到数据:" + gf);

        // 另一种获取不到就去数据库中查询,然后返回
        String defaultGF = cache.get("defaultGF", key -> {


            return "柳岩";
        });
        System.out.println("获取到默认数据:" + defaultGF);

    }
search result
获取到数据:迪丽热巴
获取到默认数据:柳岩
Since Caffeine is a kind of cache, it must have a cache clearing strategy, otherwise the memory will always be exhausted.
Caffeine provides three cache eviction strategies:
-
Capacity-based : set an upper limit on the number of caches
// 创建缓存对象
Cache<String, String> cache = Caffeine.newBuilder()
    .maximumSize(1) // 设置缓存大小上限为 1
    .build();
Example:
CaffeineTest.java
 @Test
    public void testByVolume() {


        Cache<String, String> cache = Caffeine.newBuilder().maximumSize(1).build();
        cache.put("derrick", "rose");
        cache.put("kobe", "byrant");
        cache.put("machel", "jordan");

        String derrick = cache.getIfPresent("derrick");
        String kobe = cache.getIfPresent("kobe");
        String machel = cache.getIfPresent("machel");
        System.out.println("derrick:" + derrick);
        System.out.println("kobe:" + kobe);
        System.out.println("machel:" + machel);
    }
operation result
derrick:rose
kobe:byrant
machel:jordan
Here it is found that there is no upper limit on the capacity of the running results. This is because it takes time to clean up after the upper limit. We increase the sleep time and find that after the increase, only the last one

-
Time-based : Set the effective time of the cache
// 创建缓存对象
Cache<String, String> cache = Caffeine.newBuilder()
    // 设置缓存有效期为 10 秒,从最后一次写入开始计时
    .expireAfterWrite(Duration.ofSeconds(10))
    .build();
Basic example:
CaffeineTest.java
    @Test
    public void testByTime() throws InterruptedException {


        Cache<Object, Object> cache = Caffeine.newBuilder().expireAfterWrite(Duration.ofSeconds(1)).build();

        // 存数据
        cache.put("gf", "柳岩");
        System.out.println("gf:" + cache.getIfPresent("gf"));
        // 休眠一会儿
        Thread.sleep(2000L);
        System.out.println("gf:" + cache.getIfPresent("gf"));
    }
The output result
will be cleared after it is found that it exceeds 1 second
gf:柳岩
gf:null
- Reference-based : Set the cache as a soft or weak reference, and use GC to reclaim the cached data. Poor performance, not recommended.
Note : By default, when a cached element expires, Caffeine will not automatically clean and evict it immediately. Instead, the eviction of stale data is done after a read or write operation, or during idle time.
2.3. Realize JVM process cache
2.3.1. Requirements
Use Caffeine to achieve the following requirements:
- Add a cache to the business of querying products based on id, and query the database when the cache misses
- Add a cache to the business of querying commodity inventory based on id, and query the database when the cache misses
- Cache initial size is 100
- The cache limit is 10000
2.3.2. Implementation
First of all, we need to define two Caffeine cache objects to save the cache data of commodities and inventory respectively.
com.heima.item.configDefine the class under the item-service package CaffeineConfig:
package com.heima.item.config;

import com.github.benmanes.caffeine.cache.Cache;
import com.github.benmanes.caffeine.cache.Caffeine;
import com.heima.item.pojo.Item;
import com.heima.item.pojo.ItemStock;
import org.springframework.context.annotation.Bean;
import org.springframework.context.annotation.Configuration;

@Configuration
public class CaffeineConfig {


    @Bean
    public Cache<Long, Item> itemCache(){


        return Caffeine.newBuilder()
                .initialCapacity(100)
                // 分隔符便于阅读
                .maximumSize(10_000)
                .build();
    }

    @Bean
    public Cache<Long, ItemStock> stockCache(){


        return Caffeine.newBuilder()
                .initialCapacity(100)
                .maximumSize(10_000)
                .build();
    }
}
Then, modify com.heima.item.webthe ItemController class under the package in item-service and add caching logic:
@RestController
@RequestMapping("item")
public class ItemController {


    @Autowired
    private IItemService itemService;
    @Autowired
    private IItemStockService stockService;

    @Autowired
    private Cache<Long, Item> itemCache;
    @Autowired
    private Cache<Long, ItemStock> stockCache;

    // ...其它略

    @GetMapping("/{id}")
    public Item findById(@PathVariable("id") Long id) {


        return itemCache.get(id, key -> itemService.query()
                .ne("status", 3).eq("id", key)
                .one()
        );
    }

    @GetMapping("/stock/{id}")
    public ItemStock findStockById(@PathVariable("id") Long id) {


        return stockCache.get(id, key -> stockService.getById(key));
    }
}
restart service
access
http://localhost:8081/item/10001
Found that there are logs of query sql statements.

Clear the logs and visit again. If there are no logs, it means that the cache has taken effect.

3. Introduction to Lua grammar
Nginx programming needs to use the Lua language, so we must first get started with the basic syntax of Lua.
3.1. Getting to know Lua for the first time
Lua is a lightweight and compact scripting language written in standard C language and open in the form of source code. It is designed to be embedded in applications to provide flexible expansion and customization functions for applications. Official website: Lua official website

Lua is often embedded in programs developed in C language, such as game development, game plug-ins, etc.
Nginx itself is also developed in C language, so it also allows expansion based on Lua.
3.1.HelloWorld
CentOS7 has installed the Lua language environment by default, so you can run Lua code directly.
1) In any directory of the Linux virtual machine, create a hello.lua file

2) Add the following content
print("Hello World!")
3) run

3.2. Variables and loops
Learning any language is inseparable from variables, and the declaration of variables must first know the type of data.
3.2.1. Lua data types
The common data types supported in Lua include:
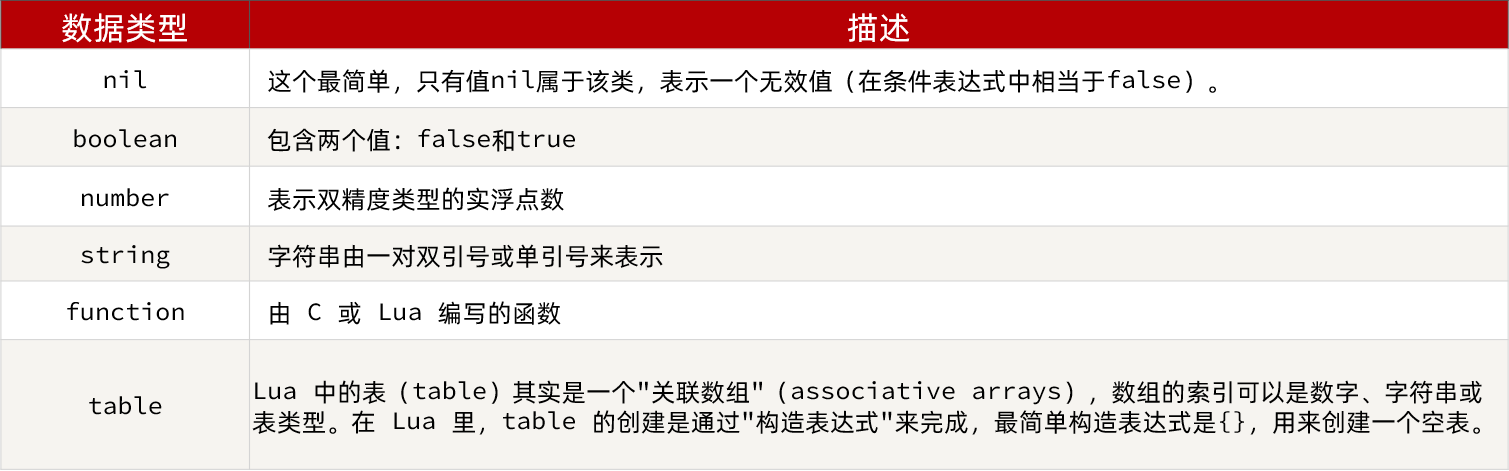
In addition, Lua provides the type() function to determine the data type of a variable:
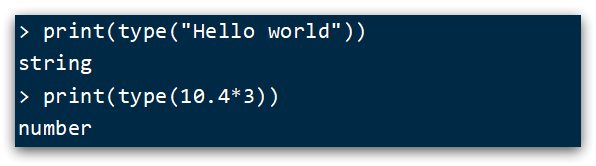
the printed results are as follows:

3.2.2. Declaring variables
Lua does not need to specify the data type when declaring variables, but uses local to declare variables as local variables:
-- 声明字符串,可以用单引号或双引号,
local str = 'hello'
-- 字符串拼接可以使用 ..
local str2 = 'hello' .. 'world'
-- 声明数字
local num = 21
-- 声明布尔类型
local flag = true
The table type in Lua can be used both as an array and as a map in Java. An array is a special table, and the key is just an array subscript:
-- 声明数组 ,key为角标的 table
local arr = {

    'java', 'python', 'lua'}
-- 声明table,类似java的map
local map =  {

    name='Jack', age=21}
The array subscripts in Lua start from 1, and the access is similar to that in Java:
-- 访问数组,lua数组的角标从1开始
print(arr[1])
Tables in Lua can be accessed using keys:
-- 访问table
print(map['name'])
print(map.name)
Note that declaring variables and printing should be on the same line
lua
local str3 = 'hi' .. 'i am' print(str3)

Example:
local arr = {

    'java','Pathon','C++'} print(arr[1])

Declare global variables
arr = {

    'hello','worl','java'}
print(arr[1])

declare table
map = {

    name = 'jack',age = 20}
# 打印元素
print(map['name'])
print(map.name)

3.2.3. Cycle
Ctrl + C can exit the Lua command
For table, we can use for loop to traverse. However, arrays and ordinary table traversal are slightly different.
Iterate over the array:
-- 声明数组 key为索引的 table
local arr = {

    'java', 'python', 'lua'}
-- 遍历数组
for index,value in ipairs(arr) do
    print(index, value)
end
Traverse ordinary table
-- 声明map,也就是table
local map = {

    name='Jack', age=21}
-- 遍历table
for key,value in pairs(map) do
   print(key, value)
end
Example, edit hello.lua

code show as below:
local arr = {

    'java','C++','Python'}
local map = {

    name='jack',age=22}

for index,value in ipairs(arr) do
print(index,value)
end


for key,value in pairs(map) do
print(key,value)
end
result:

3.3. Conditional control, function
Conditional control and function declarations in Lua are similar to those in Java.
3.3.1. Functions
Syntax for defining a function:
function 函数名( argument1, argument2..., argumentn)
    -- 函数体
    return 返回值
end
For example, define a function to print an array:
function printArr(arr)
    for index, value in ipairs(arr) do
        print(value)
    end
end
Example: Continue to modify hello.lua
local function printArr(arr)
 for index,value in ipairs(arr) do
 print(index,value)
end
end

local ints = {

    1,2,3,4,5,6,7}
printArr(ints)
result

3.3.2. Condition control
Java-like conditional control, such as if, else syntax:
if(布尔表达式)
then
   --[ 布尔表达式为 true 时执行该语句块 --]
else
   --[ 布尔表达式为 false 时执行该语句块 --]
end
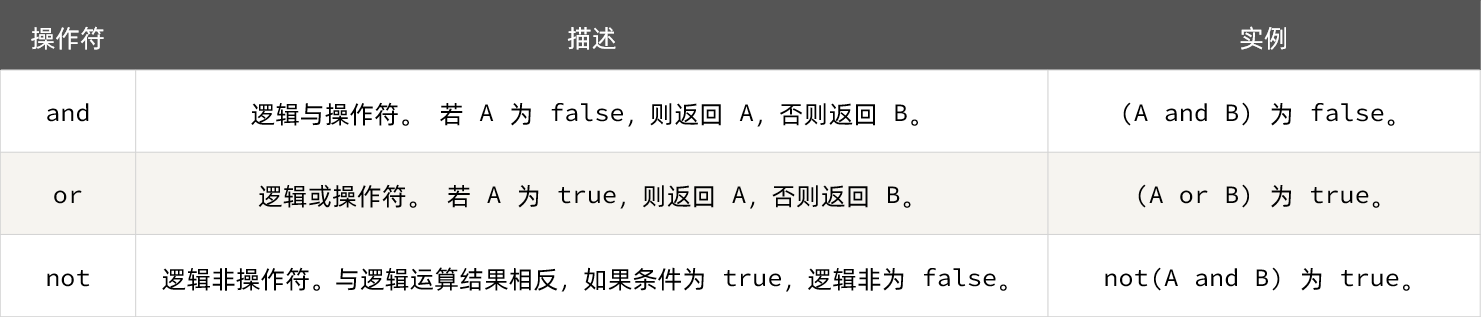
Unlike java, logical operations in Boolean expressions are based on English words:
3.3.3. Case
Requirement: Customize a function that can print table, and when the parameter is nil, print error message
not example
function printArr(arr)
    if not arr then
        print('数组不能为空!')
    end
    for index, value in ipairs(arr) do
        print(value)
    end
end
another way of writing
local arr = {

    'java','python','C++'}
local arrnull = nil


function printArr(arr)
 if(nil == arr)
   then print('错误信息')
 else
  for index,value in ipairs(arr) do
    print(index,value)
  end
 end
end

printArr(arrnull)
printArr(arr)
Result:

and example:
local banana = 30

local apple = 20

if(banana == 30 and apple == 10)
then
   print('方案一')
else
  print('方案二')
end
result:
方案二
4. Implement multi-level caching
The realization of multi-level caching is inseparable from Nginx programming, and Nginx programming is inseparable from OpenResty.
4.1. Install OpenResty
OpenResty® is a high-performance web platform based on Nginx, which is used to easily build dynamic web applications, web services and dynamic gateways that can handle ultra-high concurrency and high scalability. Has the following characteristics:
- With full functionality of Nginx
- Based on the Lua language, it integrates a large number of excellent Lua libraries and third-party modules
- Allows the use of Lua to customize business logic and custom libraries
Official website: https://openresty.org/cn/

To install Lua, you can refer to "Installing OpenResty.md" provided by the pre-class materials:
Install OpenResty
4.1.1. Installation
First your Linux virtual machineInternet connection is required
1) Install the development library
First, install the dependent development library of OpenResty and execute the command:
yum install -y pcre-devel openssl-devel gcc --skip-broken
2) Install the OpenResty repository
You can add openrestythe repository so that you can easily install or update our packages in the future (via yum check-updatethe command). Run the following command to add our repository:
yum-config-manager --add-repo https://openresty.org/package/centos/openresty.repo
If prompted that the command does not exist, run:
yum install -y yum-utils
Then repeat the above command
3) Install OpenResty
The package can then be installed like this, e.g openresty.:
yum install -y openresty
4) Install the opm tool
opm is a management tool of OpenResty, which can help us install a third-party Lua module.
If you want to install the command-line tools opm, you can install openresty-opmthe package :
yum install -y openresty-opm
5) Directory structure
By default, the directory where OpenResty is installed is:/usr/local/openresty
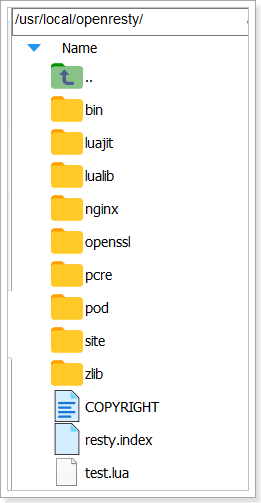
Have you seen the nginx directory inside? OpenResty integrates some Lua modules based on Nginx.

6) Configure the environment variables of nginx
Open the configuration file:
vi /etc/profile
Add two lines at the bottom:
export NGINX_HOME=/usr/local/openresty/nginx
export PATH=${NGINX_HOME}/sbin:$PATH
NGINX_HOME: followed by the nginx directory under the OpenResty installation directory
and then let the configuration take effect:
source /etc/profile
4.1.2. Up and running
The bottom layer of OpenResty is based on Nginx. View the nginx directory of the OpenResty directory. The structure is basically the same as that of nginx installed in Windows:
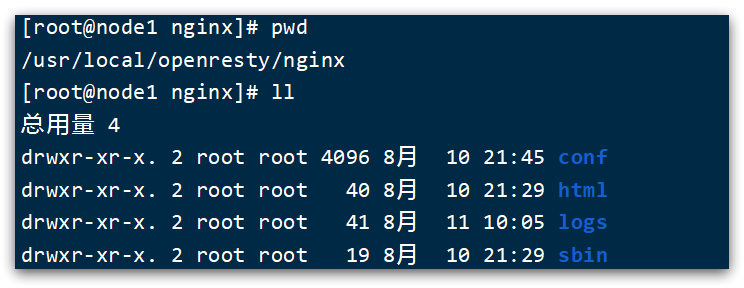
so the operation mode is basically the same as that of nginx:
# 启动nginx
nginx
# 重新加载配置
nginx -s reload
# 停止
nginx -s stop
There are too many comments in the default configuration file of nginx, which will affect our subsequent editing. Here, delete the comment part in nginx.conf and keep the valid part.
Modify /usr/local/openresty/nginx/conf/nginx.confthe file as follows:
#user  nobody;
worker_processes  1;
error_log  logs/error.log;

events {
    worker_connections  1024;
}

http {
    include       mime.types;
    default_type  application/octet-stream;
    sendfile        on;
    keepalive_timeout  65;

    server {
        listen       8081;
        server_name  localhost;
        location / {
            root   html;
            index  index.html index.htm;
        }
        error_page   500 502 503 504  /50x.html;
        location = /50x.html {
            root   html;
        }
    }
}
Enter the command in the Linux console to start nginx:
nginx
Then visit the page: http://192.168.150.101:8081, pay attention to replace the ip address with your own virtual machine IP:

4.1.3. Remarks
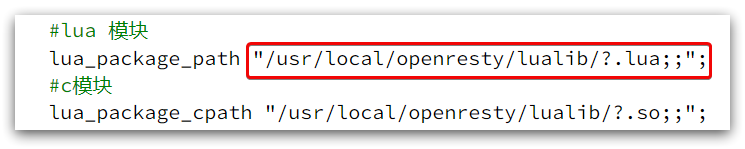
Load the lua module of OpenResty:
Continue to modify the nginx.conf file to add
#lua 模块
lua_package_path "/usr/local/openresty/lualib/?.lua;;";
#c模块
lua_package_cpath "/usr/local/openresty/lualib/?.so;;";

Modify the monitoring request see below
common.lua
-- 封装函数,发送http请求,并解析响应
local function read_http(path, params)
    local resp = ngx.location.capture(path,{


        method = ngx.HTTP_GET,
        args = params,
    })
    if not resp then
        -- 记录错误信息,返回404
        ngx.log(ngx.ERR, "http not found, path: ", path , ", args: ", args)
        ngx.exit(404)
    end
    return resp.body
end
-- 将方法导出
local _M = {


    read_http = read_http
}
return _M
Release the Redis connection API:
-- 关闭redis连接的工具方法,其实是放入连接池
local function close_redis(red)
    local pool_max_idle_time = 10000 -- 连接的空闲时间,单位是毫秒
    local pool_size = 100 --连接池大小
    local ok, err = red:set_keepalive(pool_max_idle_time, pool_size)
    if not ok then
        ngx.log(ngx.ERR, "放入redis连接池失败: ", err)
    end
end
API for reading Redis data:
-- 查询redis的方法 ip和port是redis地址,key是查询的key
local function read_redis(ip, port, key)
    -- 获取一个连接
    local ok, err = red:connect(ip, port)
    if not ok then
        ngx.log(ngx.ERR, "连接redis失败 : ", err)
        return nil
    end
    -- 查询redis
    local resp, err = red:get(key)
    -- 查询失败处理
    if not resp then
        ngx.log(ngx.ERR, "查询Redis失败: ", err, ", key = " , key)
    end
    --得到的数据为空处理
    if resp == ngx.null then
        resp = nil
        ngx.log(ngx.ERR, "查询Redis数据为空, key = ", key)
    end
    close_redis(red)
    return resp
end
To enable shared dictionaries:
# 共享字典,也就是本地缓存,名称叫做:item_cache,大小150m
lua_shared_dict item_cache 150m;
4.2. OpenResty quick start
The multi-level cache architecture we hope to achieve is shown in the figure:
in:
-
Nginx on windows is used as a reverse proxy service to proxy the ajax request of the front-end query product to the OpenResty cluster
-
OpenResty cluster is used to write multi-level cache business
4.2.1. Reverse proxy process
Now, the product detail page is using fake product data. However, in the browser, you can see that the page initiates an ajax request to query real product data.
This request is as follows:
The request address is localhost, the port is 80, and it is received by the Nginx service installed on windows. Then proxy to the OpenResty cluster:
We need to write business in OpenResty, query product data and return to the browser.
But this time, we first receive the request in OpenResty and return fake product data.
4.2.2. OpenResty listens for requests
Many functions of OpenResty depend on the Lua library in its directory. You need to specify the directory of the dependent library in nginx.conf and import the dependencies:
1) Add the loading of OpenResty's Lua module
Modify /usr/local/openresty/nginx/conf/nginx.confthe file, add the following code under http:
#lua 模块
lua_package_path "/usr/local/openresty/lualib/?.lua;;";
#c模块
lua_package_cpath "/usr/local/openresty/lualib/?.so;;";
2) Listen to the /api/item path
Modify /usr/local/openresty/nginx/conf/nginx.confthe file, add a monitor for the path /api/item under the server of nginx.conf:
location  /api/item {
    # 默认的响应类型
    default_type application/json;
    # 响应结果由lua/item.lua文件来决定
    content_by_lua_file lua/item.lua;
}

This monitoring is similar to doing path mapping in SpringMVC @GetMapping("/api/item").
Instead content_by_lua_file lua/item.lua, it is equivalent to calling the item.lua file, executing the business in it, and returning the result to the user. It is equivalent to calling service in java.
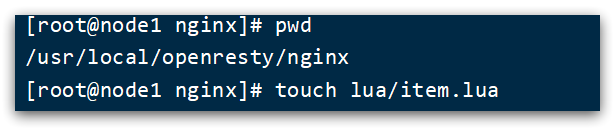
4.2.3. Write item.lua
1) /usr/loca/openresty/nginxCreate a folder in the directory: lua

2) /usr/loca/openresty/nginx/luaUnder the folder, create a new file: item.lua
3) Write item.lua, return false data
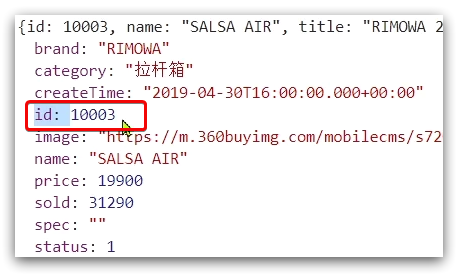
in item.lua, use ngx.say() function to return data to Response, and change the interface to 26-inch and 199 prices
ngx.say('{"id":10001,"name":"SALSA AIR","title":"RIMOWA 26寸托运箱拉杆箱 SALSA AIR系列果绿色 820.70.36.4","price":19900,"image":"https://m.360buyimg.com/mobilecms/s720x720_jfs/t6934/364/1195375010/84676/e9f2c55f/597ece38N0ddcbc77.jpg!q70.jpg.webp","category":"拉杆箱","brand":"RIMOWA","spec":"","status":1,"createTime":"2019-04-30T16:00:00.000+00:00","updateTime":"2019-04-30T16:00:00.000+00:00","stock":2999,"sold":31290}')

4) Reload configuration
nginx -s reload
Refresh the product page:
http://localhost:8934/item.html?id=10001
You can see the effect:

4.3. Request parameter processing
In the previous section, we received front-end requests in OpenResty, but returned fake data.
To return real data, you must query the product information according to the product id passed from the front end.
So how to get the commodity parameters passed by the front end?
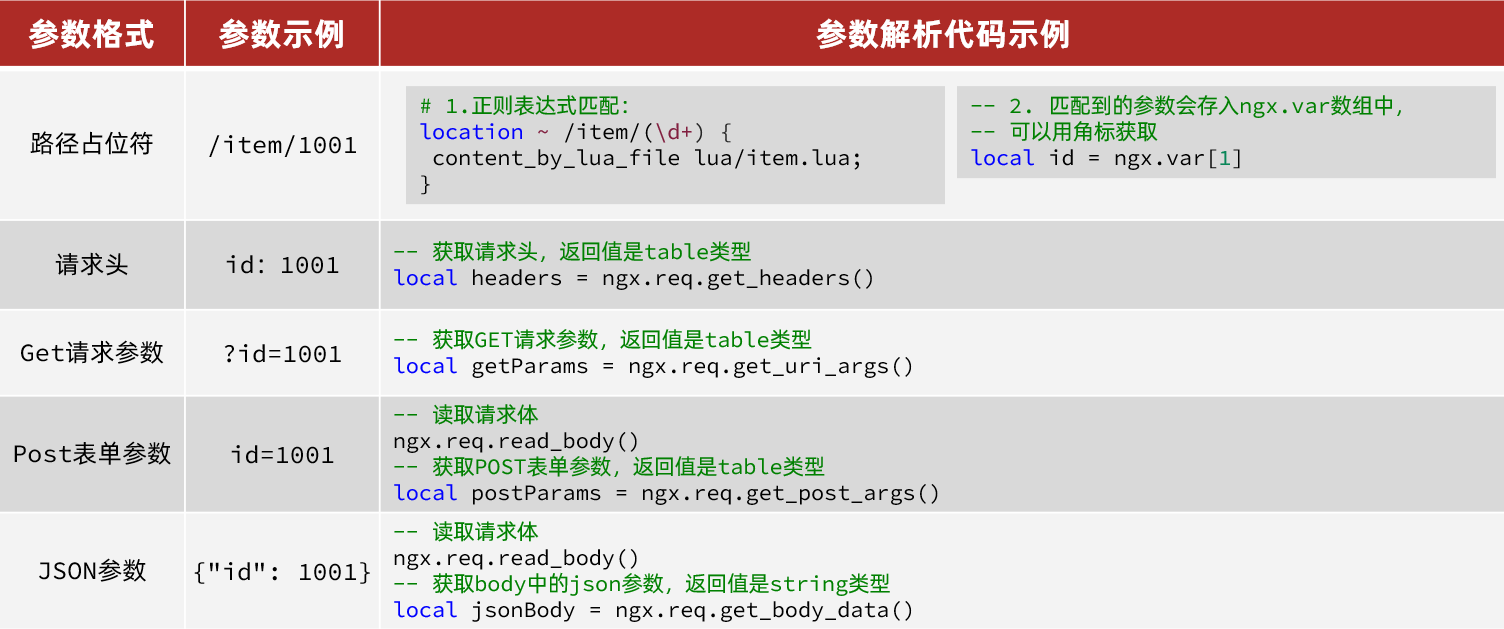
4.3.1. API for obtaining parameters
OpenResty provides some APIs to obtain different types of front-end request parameters:
4.3.2. Get parameters and return
The ajax request initiated at the front end is shown in the figure:
You can see that the product id is passed as a path placeholder, so you can use regular expression matching to get the ID
1) Get the product id
Modify /usr/loca/openresty/nginx/nginx.confthe code that monitors /api/item in the file, and use regular expressions to get the ID:
location ~ /api/item/(\d+) {
    # 默认的响应类型
    default_type application/json;
    # 响应结果由lua/item.lua文件来决定
    content_by_lua_file lua/item.lua;
}

2) Splice the ID and return
Modify /usr/loca/openresty/nginx/lua/item.luathe file, get the id and splice it into the result to return:

-- 获取商品id
local id = ngx.var[1]
-- 拼接并返回
ngx.say('{"id":' .. id .. ',"name":"SALSA AIR","title":"RIMOWA 21寸托运箱拉杆箱 SALSA AIR系列果绿色 820.70.36.4","price":17900,"image":"https://m.360buyimg.com/mobilecms/s720x720_jfs/t6934/364/1195375010/84676/e9f2c55f/597ece38N0ddcbc77.jpg!q70.jpg.webp","category":"拉杆箱","brand":"RIMOWA","spec":"","status":1,"createTime":"2019-04-30T16:00:00.000+00:00","updateTime":"2019-04-30T16:00:00.000+00:00","stock":2999,"sold":31290}')
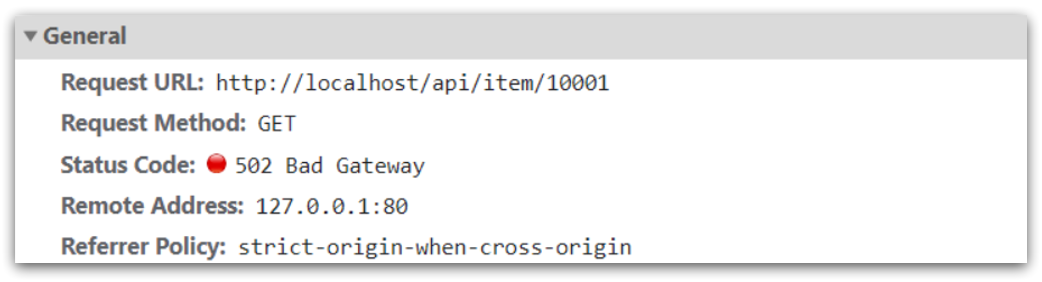
3) Reload and test
Run the command to reload the OpenResty configuration:
nginx -s reload
access
http://localhost:8934/item.html?id=10002

Refresh the page to see that the ID is already included in the result:
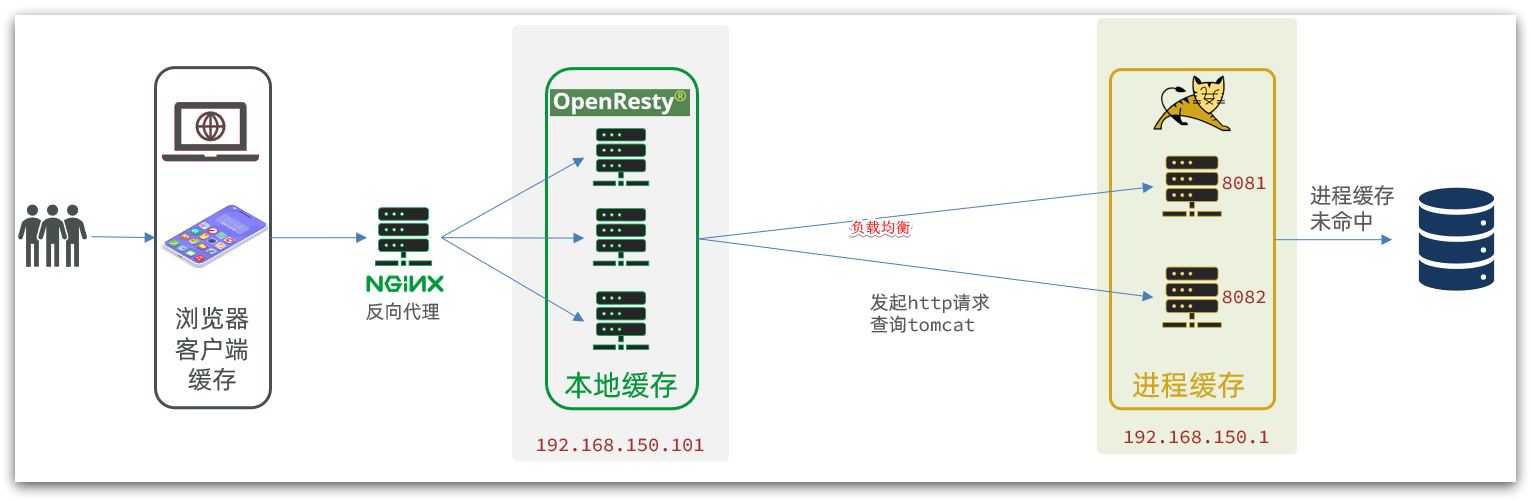
4.4. Query Tomcat
After getting the product ID, we should go to the cache to query the product information, but we have not yet established nginx and redis caches. Therefore, here we first go to tomcat to query product information according to the product id. We realize the part shown in the figure:
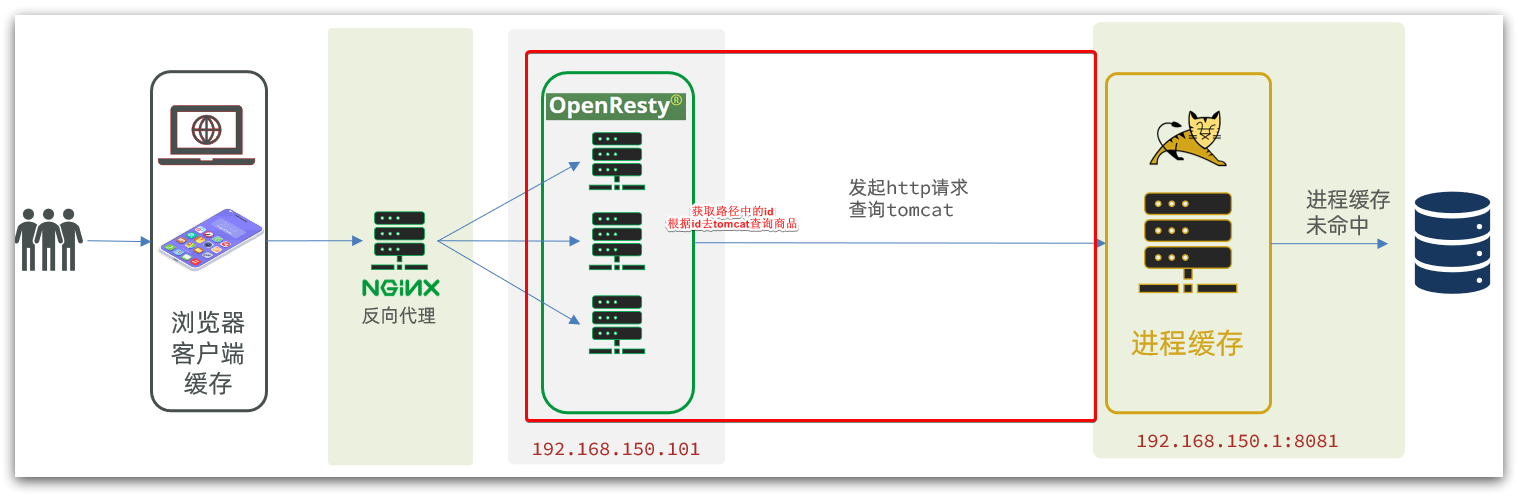
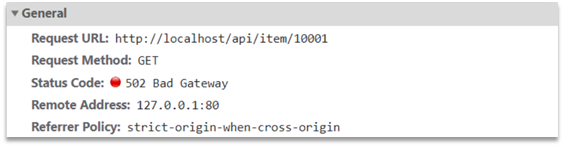
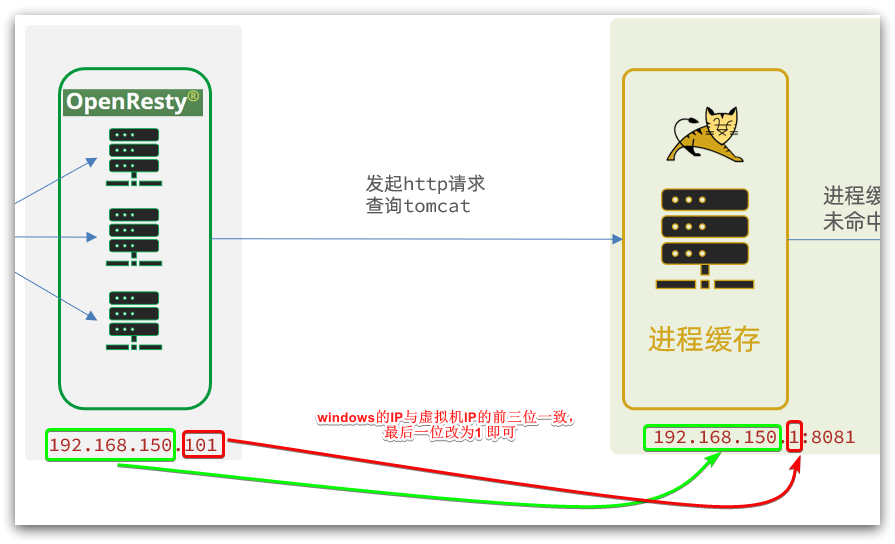
It should be noted that our OpenResty is on a virtual machine, and Tomcat is on a Windows computer.The two IPs must not be confused.
The demand cases are as follows:

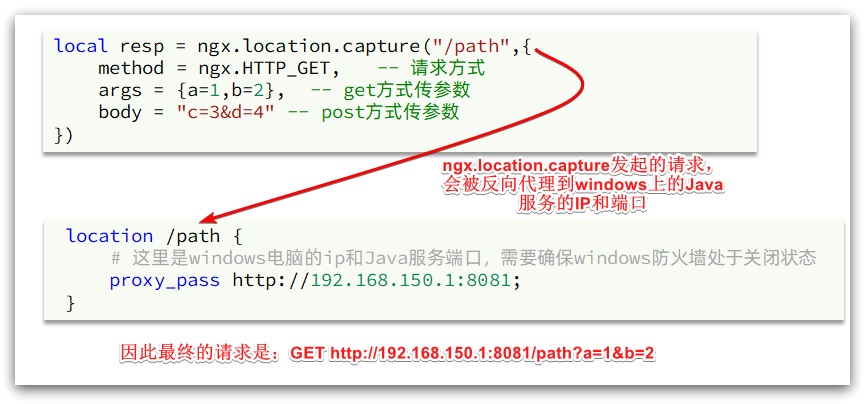
4.4.1. API for sending http requests
nginx provides an internal API for sending http requests:
local resp = ngx.location.capture("/path",{


    method = ngx.HTTP_GET,   -- 请求方式
    args = {

    a=1,b=2},  -- get方式传参数
})
The returned response content includes:
- resp.status: response status code
- resp.header: response header, which is a table
- resp.body: response body, which is the response data
Note: The path here is a path, not including IP and port. This request will be monitored and processed by the server inside nginx.
But we want this request to be sent to the Tomcat server, so we need to write a server to reverse proxy this path:
 location /path {
     # 这里是windows电脑的ip和Java服务端口,需要确保windows防火墙处于关闭状态
     proxy_pass http://192.168.150.1:8081;
 }
The principle is shown in the figure:
4.4.2. Package http tools
Next, we encapsulate a tool for sending Http requests, and query tomcat based on ngx.location.capture.
1) Add reverse proxy to windows Java service
Because the interfaces in item-service all start with /item, we listen to the /item path and proxy to the tomcat service on windows.
Modify /usr/local/openresty/nginx/conf/nginx.confthe file and add a location:
Note that this is the ip of the machine
location /item {
    proxy_pass http://192.168.150.1:8081;
}
In the future, as long as we call ngx.location.capture("/item"), we will be able to send requests to the tomcat service of windows.
2) Encapsulation tool class
As we said before, OpenResty will load the tool files in the following two directories when it starts:
Therefore, custom http tools also need to be placed in this directory.
In /usr/local/openresty/lualibthe directory, create a new common.lua file:
vi /usr/local/openresty/lualib/common.lua
The content is as follows:
-- 封装函数,发送http请求,并解析响应
local function read_http(path, params)
    local resp = ngx.location.capture(path,{


        method = ngx.HTTP_GET,
        args = params,
    })
    if not resp then
        -- 记录错误信息,返回404
        ngx.log(ngx.ERR, "http请求查询失败, path: ", path , ", args: ", args)
        ngx.exit(404)
    end
    return resp.body
end
-- 将方法导出
local _M = {


    read_http = read_http
}
return _M
This tool encapsulates the read_http function into a variable of the table type _M and returns it, which is similar to exporting.
When using, you can use require('common')to import the function library, where common is the file name of the function library.
3) Realize product query
Finally, we modify /usr/local/openresty/nginx/lua/item.luathe file and use the function library just encapsulated to query tomcat:
-- 引入自定义common工具模块,返回值是common中返回的 _M
local common = require("common")
-- 从 common中获取read_http这个函数
local read_http = common.read_http
-- 获取路径参数
local id = ngx.var[1]
-- 根据id查询商品
local itemJSON = read_http("/item/".. id, nil)
-- 根据id查询商品库存
local itemStockJSON = read_http("/item/stock/".. id, nil)
We test to return a product information first

After restarting, you can see that the page changes
http://localhost:8934/item.html?id=10003

The result of the query here is a json string, and contains two json strings of goods and inventory. What the page finally needs is to splice the two json into one json:
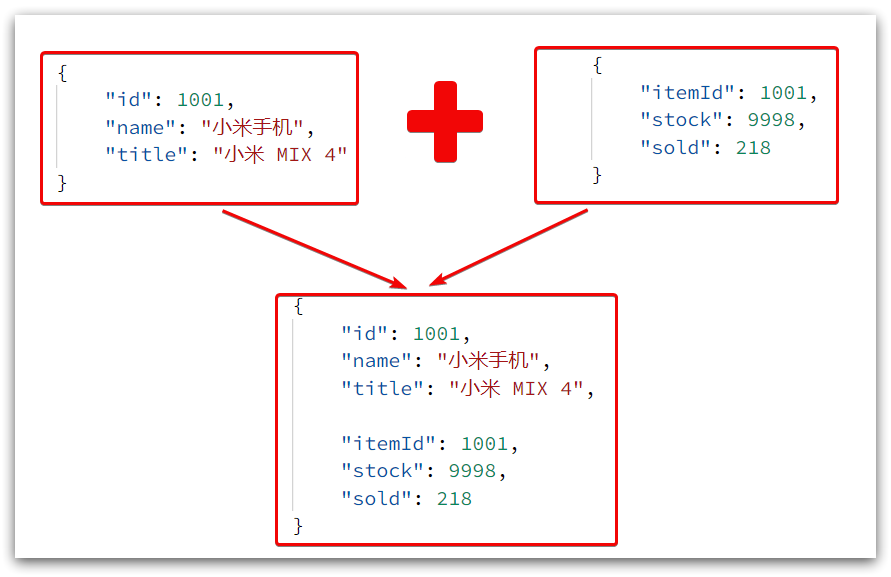
This requires us to convert JSON into a lua table first, and then convert it to JSON after completing data integration.
4.4.3. CJSON tool class
OpenResty provides a cjson module to handle JSON serialization and deserialization.
Official address: https://github.com/openresty/lua-cjson/
1) Import the cjson module:
local cjson = require "cjson"
2) Serialization:
local obj = {


    name = 'jack',
    age = 21
}
-- 把 table 序列化为 json
local json = cjson.encode(obj)
3) Deserialization:
local json = '{"name": "jack", "age": 21}'
-- 反序列化 json为 table
local obj = cjson.decode(json);
print(obj.name)
4.4.4. Realize Tomcat query
Next, we modify the previous business in item.lua and add json processing function:
-- 导入common函数库
local common = require('common')
local read_http = common.read_http
-- 导入cjson库
local cjson = require('cjson')

-- 获取路径参数
local id = ngx.var[1]
-- 根据id查询商品
local itemJSON = read_http("/item/".. id, nil)
-- 根据id查询商品库存
local itemStockJSON = read_http("/item/stock/".. id, nil)

-- JSON转化为lua的table
local item = cjson.decode(itemJSON)
local stock = cjson.decode(stockJSON)

-- 组合数据
item.stock = stock.stock
item.sold = stock.sold

-- 把item序列化为json 返回结果
ngx.say(cjson.encode(item))

restart nginx
nginx -s reload
access
http://localhost:8934/item.html?id=10004
It is found that both sold and stock have value

4.4.5. ID-based load balancing
In the code just now, our tomcat is deployed on a single machine. In actual development, tomcat must be in cluster mode:
Therefore, OpenResty needs to load balance the tomcat cluster.
The default load balancing rule is polling mode, when we query /item/10001:
- For the first time, the tomcat service on port 8081 will be accessed, and a JVM process cache will be formed inside the service
- For the second time, the tomcat service on port 8082 will be accessed. There is no JVM cache inside the service (because the JVM cache cannot be shared), and the database will be queried.
- …
You see, because of polling, the JVM cache formed by querying 8081 for the first time does not take effect, and it will not take effect until the next access to 8081, and the cache hit rate is too low.
what to do?
If the same product can access the same tomcat service every time it is queried, then the JVM cache will definitely take effect.
In other words, we need to do load balancing based on the product id instead of polling.
1) Principle
Nginx provides an algorithm for load balancing based on request paths:
Nginx performs a hash operation according to the request path, and takes the remainder of the obtained value from the number of tomcat services. If the remainder is a few, it will access the number of services to achieve load balancing.
For example:
- Our request path is /item/10001
- The total number of tomcat is 2 (8081, 8082)
- The result of the remainder of the hash operation on the request path /item/1001 is 1
- Then access the first tomcat service, which is 8081
As long as the id remains unchanged, the result of each hash operation will not change, so the same product can be guaranteed to access the same tomcat service all the time, ensuring that the JVM cache takes effect.
2) Realize
Modify /usr/local/openresty/nginx/conf/nginx.confthe file to achieve load balancing based on ID.
First, define the tomcat cluster and set up path-based load balancing:
upstream tomcat-cluster {
    hash $request_uri;
    server 192.168.150.1:8081;
    server 192.168.150.1:8082;
}
Then, modify the reverse proxy for the tomcat service, and the target points to the tomcat cluster:
location /item {
    proxy_pass http://tomcat-cluster;
}
Reload OpenResty
nginx -s reload
3) test
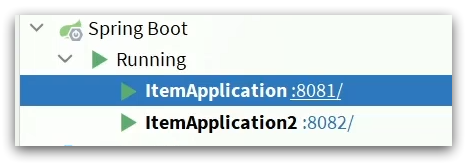
Start two tomcat services:
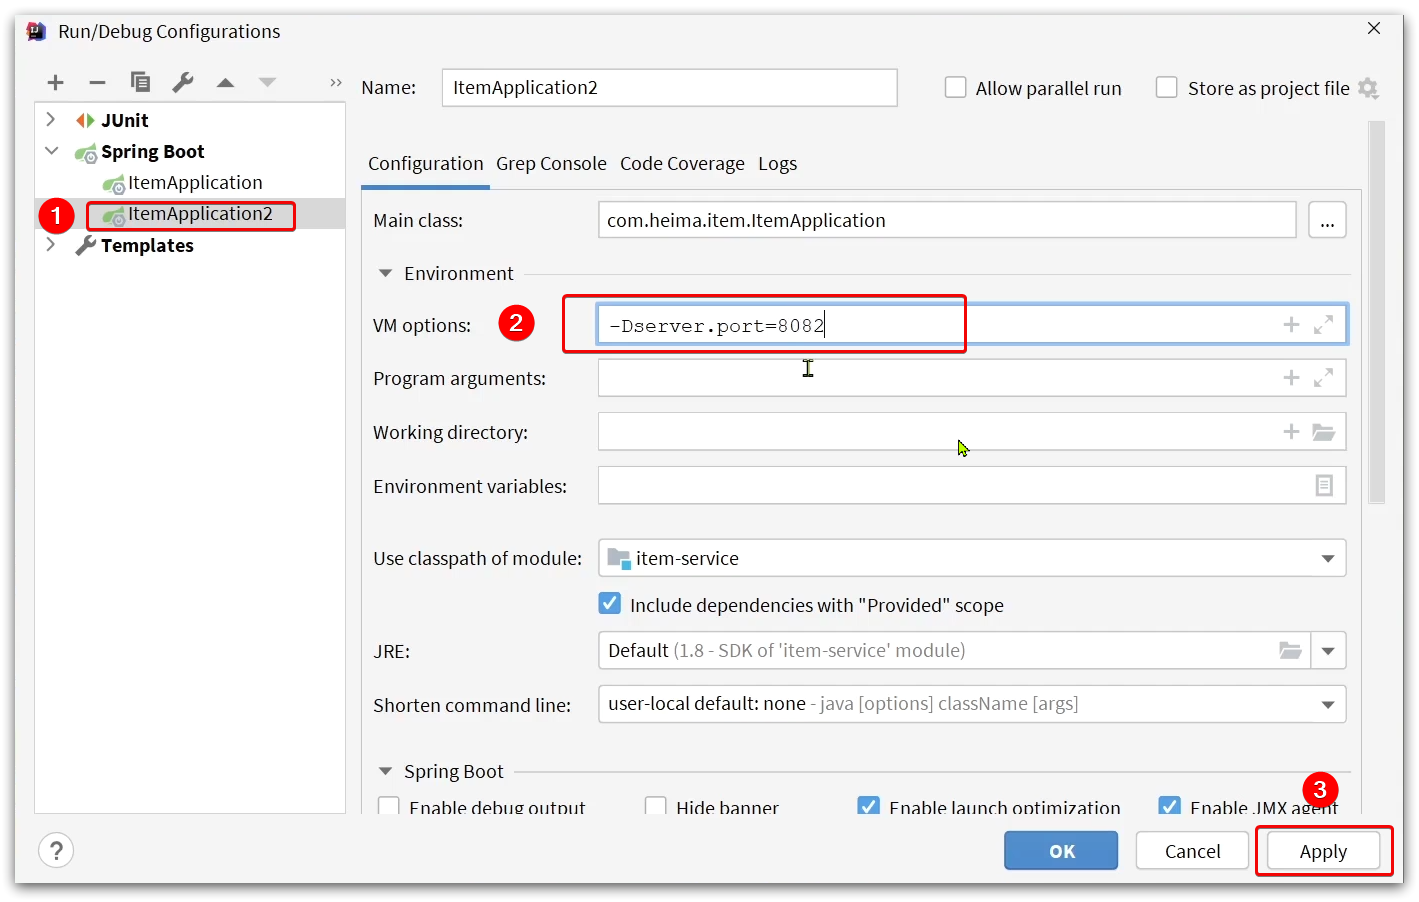
Simultaneously start:
After clearing the log, visit the page again
http://localhost:8934/item.html?id=10004
You can see products with different ids, and you have accessed different tomcat services:
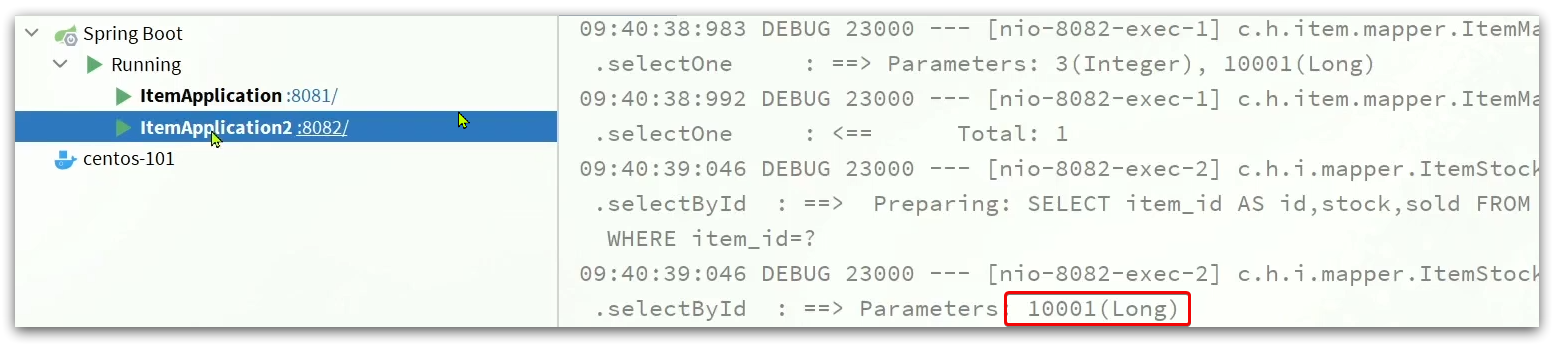
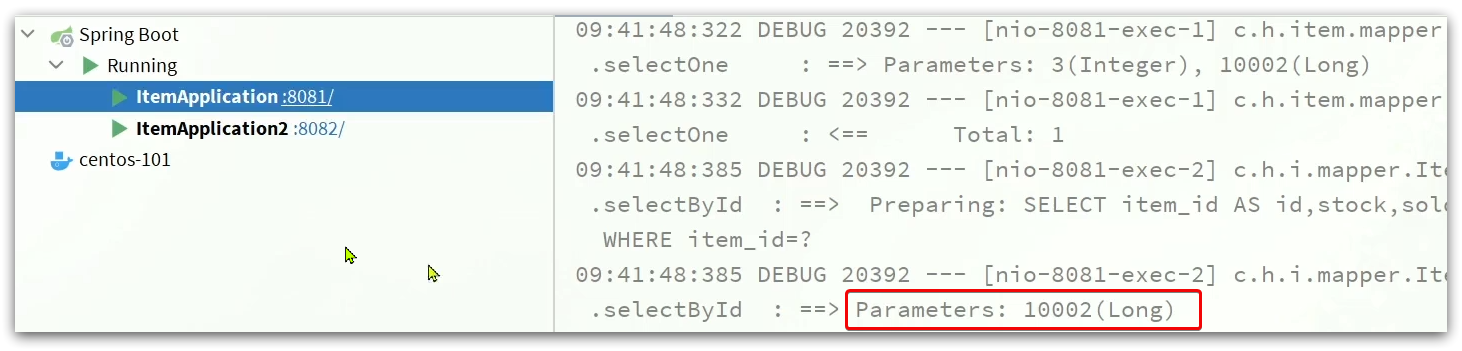
for the same product id, multiple visits will have a cache
4.5. Redis cache warm-up
Redis cache will face cold start problem:
Cold start : When the service is just started, there is no cache in Redis. If all product data is cached at the first query, it may bring great pressure to the database.
Cache warm-up : In actual development, we can use big data to count hot data accessed by users, and query and save these hot data in advance in Redis when the project starts.
We have a small amount of data, and there is no function related to data statistics. Currently, all data can be put into the cache at startup.
1) Use Docker to install Redis, enable background operation and persistence
docker run --name redis -p 6379:6379 -d redis redis-server --appendonly yes
2) Introduce Redis dependency in item-service service
<dependency>
    <groupId>org.springframework.boot</groupId>
    <artifactId>spring-boot-starter-data-redis</artifactId>
</dependency>
3) Configure the Redis address
spring:
  redis:
    host: 192.168.150.101
4) Write the initialization class
Cache warming needs to be completed when the project starts, and must be obtained after RedisTemplate.
Here we use the InitializingBean interface to implement, because InitializingBean can be executed after the object is created by Spring and all member variables are injected.
package com.heima.item.config;

import com.fasterxml.jackson.core.JsonProcessingException;
import com.fasterxml.jackson.databind.ObjectMapper;
import com.heima.item.pojo.Item;
import com.heima.item.pojo.ItemStock;
import com.heima.item.service.IItemService;
import com.heima.item.service.IItemStockService;
import org.springframework.beans.factory.InitializingBean;
import org.springframework.beans.factory.annotation.Autowired;
import org.springframework.data.redis.core.StringRedisTemplate;
import org.springframework.stereotype.Component;

import java.util.List;

@Component
public class RedisHandler implements InitializingBean {


    @Autowired
    private StringRedisTemplate redisTemplate;

    @Autowired
    private IItemService itemService;
    @Autowired
    private IItemStockService stockService;

    private static final ObjectMapper MAPPER = new ObjectMapper();

    @Override
    public void afterPropertiesSet() throws Exception {


        // 初始化缓存
        // 1.查询商品信息
        List<Item> itemList = itemService.list();
        // 2.放入缓存
        for (Item item : itemList) {


            // 2.1.item序列化为JSON
            String json = MAPPER.writeValueAsString(item);
            // 2.2.存入redis
            redisTemplate.opsForValue().set("item:id:" + item.getId(), json);
        }

        // 3.查询商品库存信息
        List<ItemStock> stockList = stockService.list();
        // 4.放入缓存
        for (ItemStock stock : stockList) {


            // 2.1.item序列化为JSON
            String json = MAPPER.writeValueAsString(stock);
            // 2.2.存入redis
            redisTemplate.opsForValue().set("item:stock:id:" + stock.getId(), json);
        }
    }
}
After starting, check redis and find that the preheating is successful

4.6. Query Redis cache
Now that the Redis cache is ready, we can implement the logic of querying Redis in OpenResty. As shown in the red box in the figure below:
When the request enters OpenResty:
- Query the Redis cache first
- If the Redis cache misses, then query Tomcat
4.6.1. Package Redis tools
OpenResty provides a module to operate Redis, we can use it directly as long as we import this module. But for convenience, we encapsulate the Redis operation into the previous common.lua tool library.
Modify /usr/local/openresty/lualib/common.luathe file:
1) Introduce the Redis module and initialize the Redis object
-- 导入redis
local redis = require('resty.redis')
-- 初始化redis
local red = redis:new()
red:set_timeouts(1000, 1000, 1000)
2) The encapsulation function is used to release the Redis connection, which is actually put into the connection pool
-- 关闭redis连接的工具方法,其实是放入连接池
local function close_redis(red)
    local pool_max_idle_time = 10000 -- 连接的空闲时间,单位是毫秒
    local pool_size = 100 --连接池大小
    local ok, err = red:set_keepalive(pool_max_idle_time, pool_size)
    if not ok then
        ngx.log(ngx.ERR, "放入redis连接池失败: ", err)
    end
end
3) Encapsulate function, query Redis data according to key
-- 查询redis的方法 ip和port是redis地址,key是查询的key
local function read_redis(ip, port, key)
    -- 获取一个连接
    local ok, err = red:connect(ip, port)
    if not ok then
        ngx.log(ngx.ERR, "连接redis失败 : ", err)
        return nil
    end
    -- 查询redis
    local resp, err = red:get(key)
    -- 查询失败处理
    if not resp then
        ngx.log(ngx.ERR, "查询Redis失败: ", err, ", key = " , key)
    end
    --得到的数据为空处理
    if resp == ngx.null then
        resp = nil
        ngx.log(ngx.ERR, "查询Redis数据为空, key = ", key)
    end
    close_redis(red)
    return resp
end
4) export
-- 将方法导出
local _M = {


    read_http = read_http,
    read_redis = read_redis
}
return _M
The complete common.lua:
-- 导入redis
local redis = require('resty.redis')
-- 初始化redis
local red = redis:new()
red:set_timeouts(1000, 1000, 1000)

-- 关闭redis连接的工具方法,其实是放入连接池
local function close_redis(red)
    local pool_max_idle_time = 10000 -- 连接的空闲时间,单位是毫秒
    local pool_size = 100 --连接池大小
    local ok, err = red:set_keepalive(pool_max_idle_time, pool_size)
    if not ok then
        ngx.log(ngx.ERR, "放入redis连接池失败: ", err)
    end
end

-- 查询redis的方法 ip和port是redis地址,key是查询的key
local function read_redis(ip, port, key)
    -- 获取一个连接
    local ok, err = red:connect(ip, port)
    if not ok then
        ngx.log(ngx.ERR, "连接redis失败 : ", err)
        return nil
    end
    -- 查询redis
    local resp, err = red:get(key)
    -- 查询失败处理
    if not resp then
        ngx.log(ngx.ERR, "查询Redis失败: ", err, ", key = " , key)
    end
    --得到的数据为空处理
    if resp == ngx.null then
        resp = nil
        ngx.log(ngx.ERR, "查询Redis数据为空, key = ", key)
    end
    close_redis(red)
    return resp
end

-- 封装函数,发送http请求,并解析响应
local function read_http(path, params)
    local resp = ngx.location.capture(path,{


        method = ngx.HTTP_GET,
        args = params,
    })
    if not resp then
        -- 记录错误信息,返回404
        ngx.log(ngx.ERR, "http查询失败, path: ", path , ", args: ", args)
        ngx.exit(404)
    end
    return resp.body
end
-- 将方法导出
local _M = {


    read_http = read_http,
    read_redis = read_redis
}
return _M
4.6.2. Realize Redis query
Next, we can modify the item.lua file to query Redis.
The query logic is:
- Query Redis based on id
- Continue to query Tomcat if the query fails
- Return query results
1) Modify /usr/local/openresty/lua/item.luathe file and add a query function:
-- 导入common函数库
local common = require('common')
local read_http = common.read_http
local read_redis = common.read_redis
-- 封装查询函数
function read_data(key, path, params)
    -- 查询本地缓存
    local val = read_redis("127.0.0.1", 6379, key)
    -- 判断查询结果
    if not val then
        ngx.log(ngx.ERR, "redis查询失败,尝试查询http, key: ", key)
        -- redis查询失败,去查询http
        val = read_http(path, params)
    end
    -- 返回数据
    return val
end
2) Then modify the business of commodity query and inventory query:
3) Complete item.lua code:
-- 导入common函数库
local common = require('common')
local read_http = common.read_http
local read_redis = common.read_redis
-- 导入cjson库
local cjson = require('cjson')
-- 封装查询函数
function read_data(key, path, params)
-- 查询本地缓存
local val = read_redis("127.0.0.1", 6379, key)
-- 判断查询结果
if not val then
ngx.log(ngx.ERR, "redis查询失败,尝试查询http, key: ", key)
-- redis查询失败,去查询http
val = read_http(path, params)
end
-- 返回数据
return val
end
-- 获取路径参数
local id = ngx.var[1]
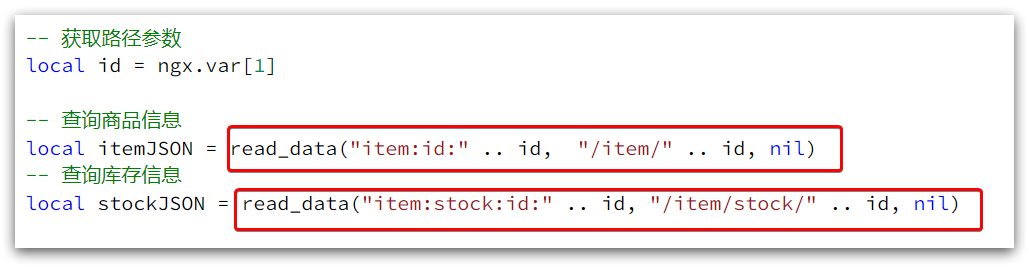
-- 查询商品信息
local itemJSON = read_data("item:id:" .. id, "/item/" .. id, nil)
-- 查询库存信息
local stockJSON = read_data("item:stock:id:" .. id, "/item/stock/" .. id, nil)
-- JSON转化为lua的table
local item = cjson.decode(itemJSON)
local stock = cjson.decode(stockJSON)
-- 组合数据
item.stock = stock.stock
item.sold = stock.sold
-- 把item序列化为json 返回结果
ngx.say(cjson.encode(item))
After all configurations are complete, restart nginx
nginx -s reload
access first
http://localhost:8934/item.html?id=10002
Then stop the two tomcats of IDEA and access them through redis cache, and find that they are correct

4.7. Nginx local cache
Now, there is only the last link in the entire multi-level cache, which is the local cache of nginx. As shown in the picture:
4.7.1. Local cache API

OpenResty provides Nginx with the function of shard dict , which can share data among multiple workers of nginx and realize the caching function.
1) Open the shared dictionary and add the configuration under http in nginx.conf in the virtual machine:
 # 共享字典,也就是本地缓存,名称叫做:item_cache,大小150m
 lua_shared_dict item_cache 150m;
2) Operate the shared dictionary:
-- 获取本地缓存对象
local item_cache = ngx.shared.item_cache
-- 存储, 指定key、value、过期时间,单位s,默认为0代表永不过期
item_cache:set('key', 'value', 1000)
-- 读取
local val = item_cache:get('key')
4.7.2. Realize local cache query
1) Modify /usr/local/openresty/lua/item.luathe file, modify the read_data query function, and add local cache logic:
-- 导入共享词典,本地缓存
local item_cache = ngx.shared.item_cache

-- 封装查询函数
function read_data(key, expire, path, params)
    -- 查询本地缓存
    local val = item_cache:get(key)
    if not val then
        ngx.log(ngx.ERR, "本地缓存查询失败,尝试查询Redis, key: ", key)
        -- 查询redis
        val = read_redis("127.0.0.1", 6379, key)
        -- 判断查询结果
        if not val then
            ngx.log(ngx.ERR, "redis查询失败,尝试查询http, key: ", key)
            -- redis查询失败,去查询http
            val = read_http(path, params)
        end
    end
    -- 查询成功,把数据写入本地缓存
    item_cache:set(key, val, expire)
    -- 返回数据
    return val
end
2) Modify the business of querying goods and inventory in item.lua to implement the latest read_data function:

In fact, there are more cache time parameters. After the expiration, the nginx cache will be automatically deleted, and the cache can be updated next time you visit.
Here, the timeout period for the basic information of the product is set to 30 minutes, and the inventory is set to 1 minute.
Because the inventory update frequency is high, if the cache time is too long, it may be quite different from the database.
3) Complete item.lua file:
-- 导入common函数库
local common = require('common')
local read_http = common.read_http
local read_redis = common.read_redis
-- 导入cjson库
local cjson = require('cjson')
-- 导入共享词典,本地缓存
local item_cache = ngx.shared.item_cache

-- 封装查询函数
function read_data(key, expire, path, params)
    -- 查询本地缓存
    local val = item_cache:get(key)
    if not val then
        ngx.log(ngx.ERR, "本地缓存查询失败,尝试查询Redis, key: ", key)
        -- 查询redis
        val = read_redis("127.0.0.1", 6379, key)
        -- 判断查询结果
        if not val then
            ngx.log(ngx.ERR, "redis查询失败,尝试查询http, key: ", key)
            -- redis查询失败,去查询http
            val = read_http(path, params)
        end
    end
    -- 查询成功,把数据写入本地缓存
    item_cache:set(key, val, expire)
    -- 返回数据
    return val
end

-- 获取路径参数
local id = ngx.var[1]

-- 查询商品信息
local itemJSON = read_data("item:id:" .. id, 1800,  "/item/" .. id, nil)
-- 查询库存信息
local stockJSON = read_data("item:stock:id:" .. id, 60, "/item/stock/" .. id, nil)

-- JSON转化为lua的table
local item = cjson.decode(itemJSON)
local stock = cjson.decode(stockJSON)
-- 组合数据
item.stock = stock.stock
item.sold = stock.sold

-- 把item序列化为json 返回结果
ngx.say(cjson.encode(item))
restart nginx
nginx -s reload
Monitor log information
cd /usr/local/openresty/nginx/logs
tail -f error.log
then visit
http://localhost:8934/item.html?id=10003
The log is as follows:

Visit again, no error
http://localhost:8934/item.html?id=10003

Delete the 10003 cache in redis

and visit again
http://localhost:8934/item.html?id=10003
The access is still successful, because nginx has a local cache, it only takes 16ms

5. Cache synchronization
In most cases, what the browser queries is cached data. If there is a large difference between the cached data and the database data, serious consequences may occur.
So we must ensure the consistency of database data and cache data, which is the synchronization between cache and database.
5.1. Data synchronization strategy
There are three common ways to cache data synchronization:
Set validity period : Set a validity period for the cache, and it will be automatically deleted after expiration. update when querying again
- Advantages: simple and convenient
- Disadvantages: poor timeliness, may be inconsistent before the cache expires
- Scenario: business with low update frequency and low timeliness requirements
Synchronous double write : directly modify the cache while modifying the database
- Advantages: strong timeliness, strong consistency between cache and database
- Disadvantages: code intrusion, high coupling;
- Scenario: Cache data that requires high consistency and timeliness
**Asynchronous notification: **Send an event notification when the database is modified, and related services modify the cached data after listening to the notification
- Advantages: low coupling, multiple cache services can be notified at the same time
- Disadvantages: general timeliness, there may be intermediate inconsistencies
- Scenario: General timeliness requirements, multiple services need to be synchronized
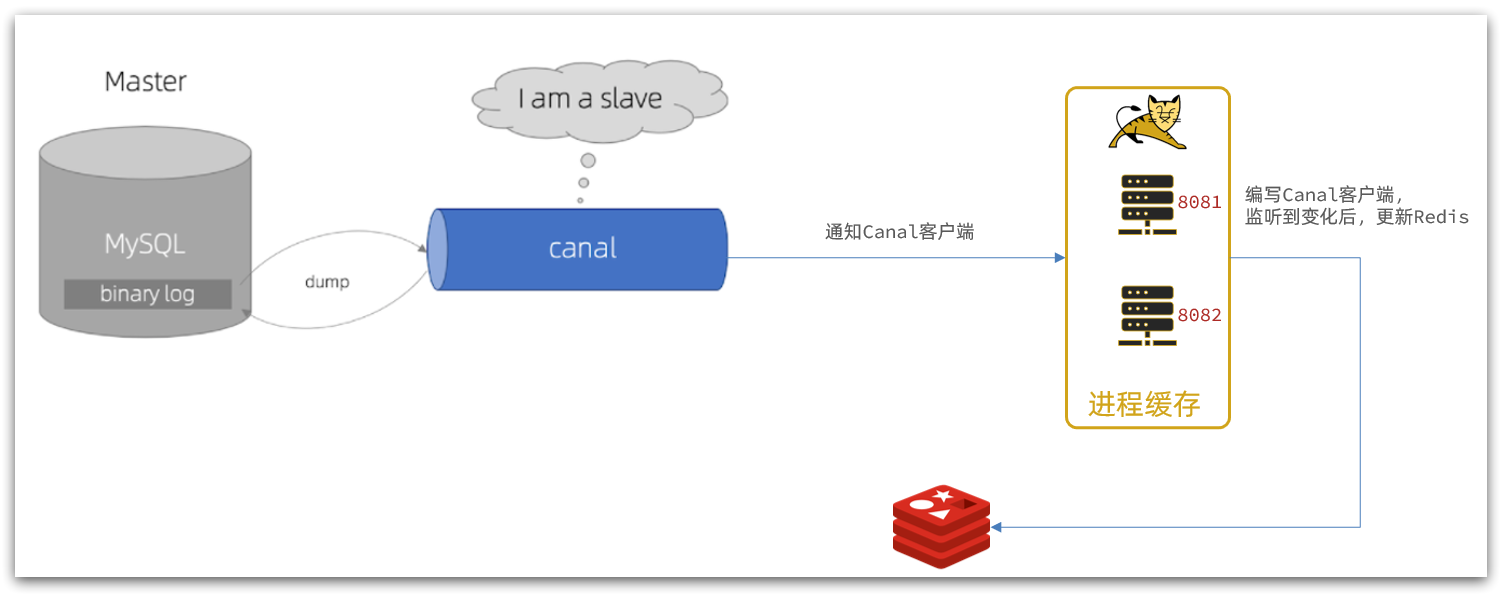
The asynchronous implementation can be implemented based on MQ or Canal:
1) MQ-based asynchronous notification:
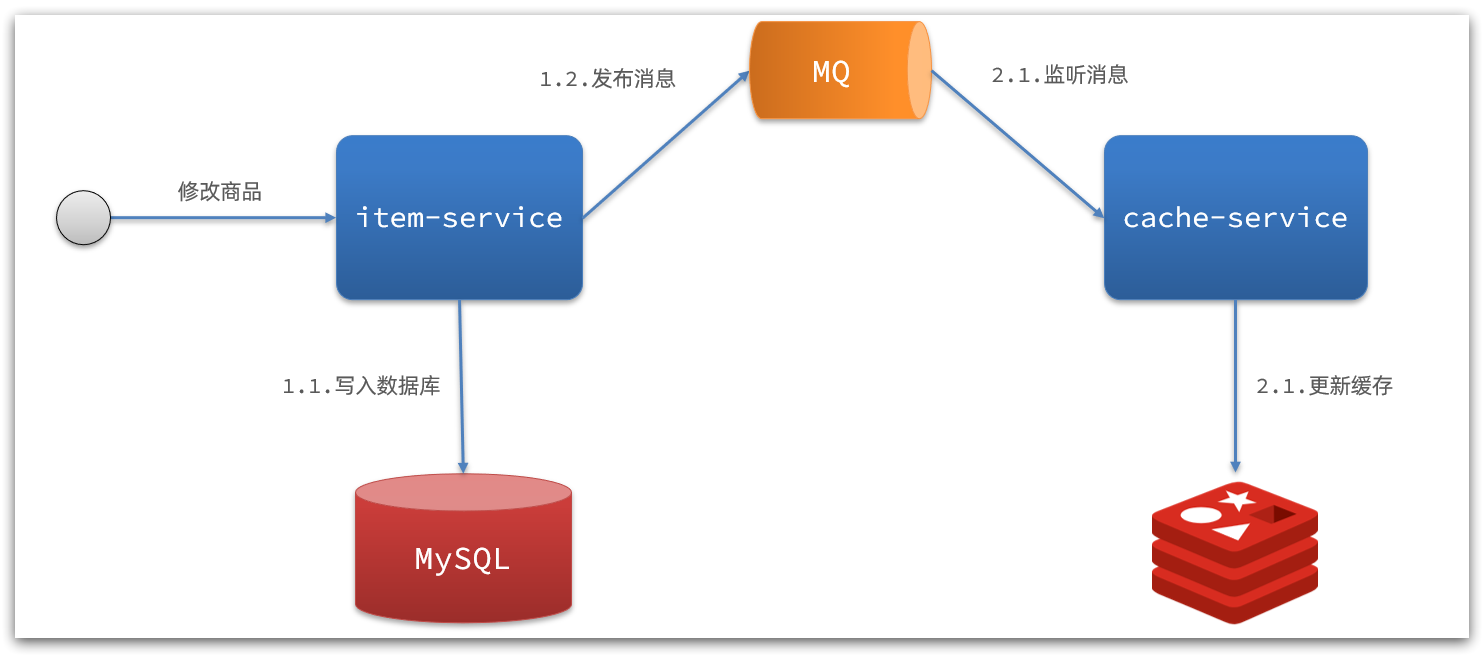
Interpretation:
- After the commodity service finishes modifying the data, it only needs to send a message to MQ.
- The cache service listens to the MQ message, and then completes the update of the cache
There is still a small amount of code intrusion.
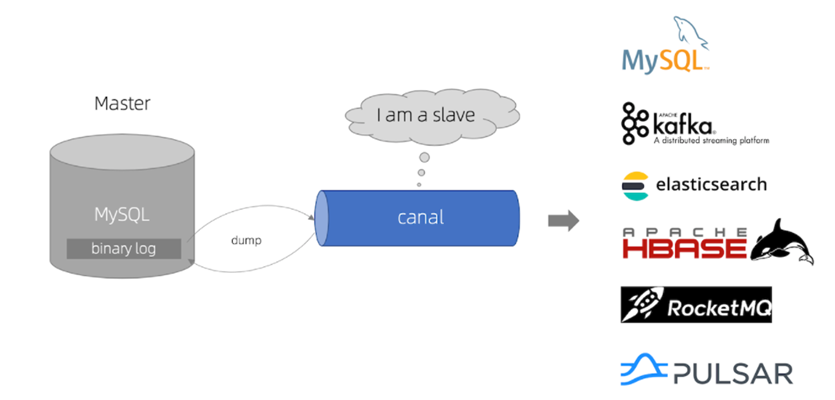
2) Interpretation of notification based on Canal
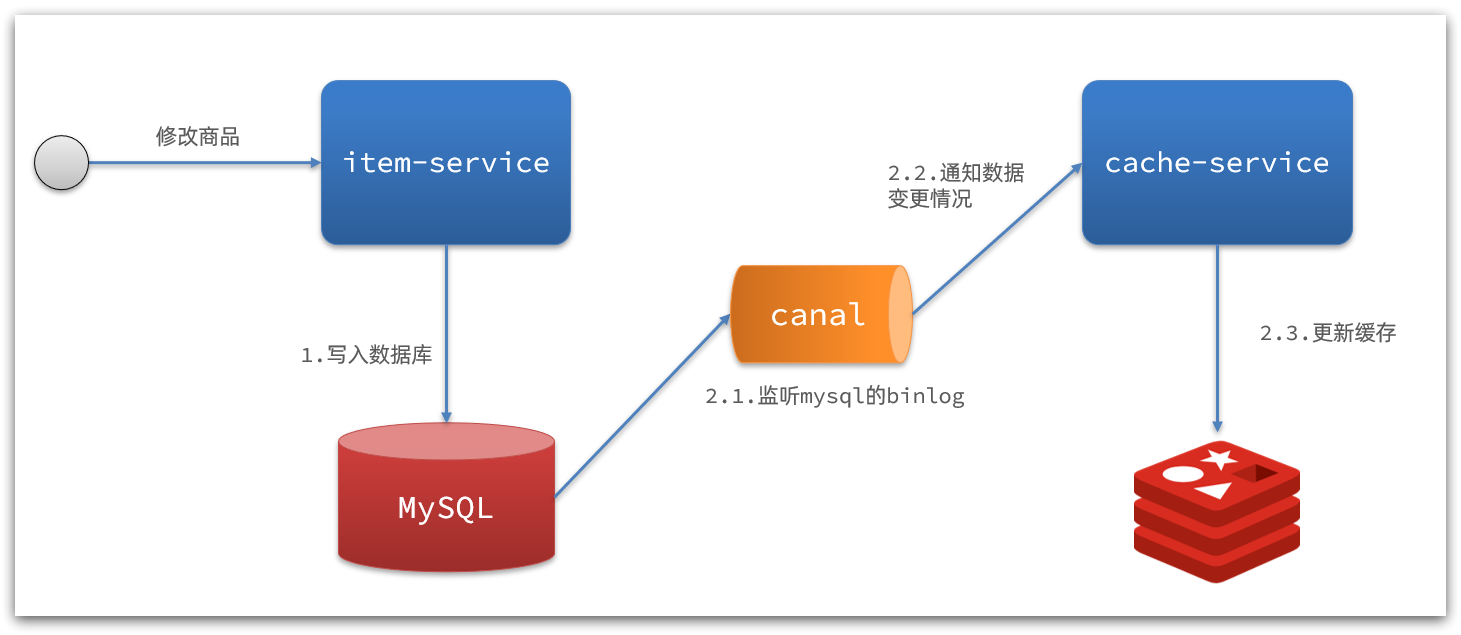
:
- After the commodity service completes the commodity modification, the business ends directly without any code intrusion
- Canal monitors MySQL changes, and immediately notifies the cache service when a change is found
- The cache service receives the canal notification and updates the cache
code zero intrusion
5.2. Install Canal
5.2.1. Understanding Canal
Canal [kə'næl] , translated as waterway/pipe/ditch, canal is an open source project under Alibaba, developed based on Java. Provides incremental data subscription & consumption based on database incremental log analysis. GitHub address: https://github.com/alibaba/canal
Canal is implemented based on mysql master-slave synchronization. The principle of MySQL master-slave synchronization is as follows:
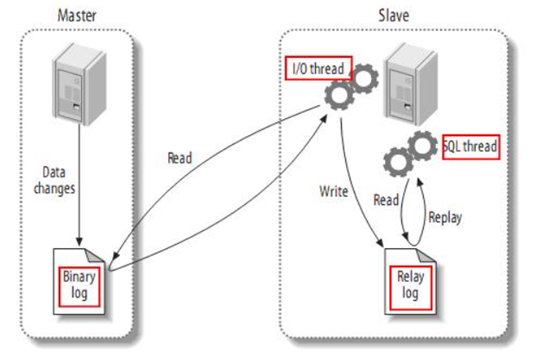
- 1) MySQL master writes data changes to the binary log (binary log), and the recorded data is called binary log events
- 2) MySQL slave copies the master's binary log events to its relay log (relay log)
- 3) MySQL slave replays the events in the relay log and reflects the data changes to its own data
And Canal pretends to be a slave node of MySQL, so as to monitor the binary log changes of the master. Then notify the Canal client of the obtained change information, and then complete the synchronization of other databases.
5.2.2. Install Canal
To install and configure Canal, refer to the pre-class documentation:

Install and configure Canal
Next, we will open the master-slave synchronization mechanism of mysql and let Canal simulate the salve
1. Open MySQL master-slave
Canal is based on the master-slave synchronization function of MySQL, so the master-slave function of MySQL must be enabled first.
Here is an example of mysql running with Docker:
1.1. Open binlog
Open the log file mounted on the mysql container, mine is in /tmp/mysql_cluster/confthe directory:
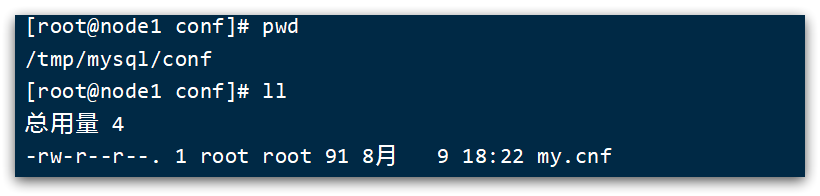
modify the file:
vi /tmp/mysql_cluster/conf/my.cnf
Add content:
log-bin=/var/lib/mysql_cluster/mysql-bin
binlog-do-db=heima
Interpretation of configuration:
log-bin=/var/lib/mysql_cluster/mysql-bin: Set the storage address and file name of the binary log file, called mysql-binbinlog-do-db=heima: Specify which database to record binary log events, here record the heima library
Restart mysql_cluster after the configuration is complete
docker restart mysql_cluster
final effect:

[mysqld]
skip-name-resolve
character_set_server=utf8
datadir=/var/lib/mysql
server-id=1000
log-bin=/var/lib/mysql/mysql-bin
binlog-do-db=heima
1.2. Set user permissions
Next, add an account that is only used for data synchronization. For security reasons, only the operation permission for the heima library is provided here.
create user canal@'%' IDENTIFIED by 'canal';
GRANT SELECT, REPLICATION SLAVE, REPLICATION CLIENT,SUPER ON *.* TO 'canal'@'%' identified by 'canal';
FLUSH PRIVILEGES;

Just restart the mysql container
docker restart mysql
Test whether the setting is successful: In the mysql console or Navicat, enter the command:
show master status;

2. Install Canal
2.1. Create a network
We need to create a network to put MySQL, Canal, and MQ in the same Docker network:
docker network create heima
Let mysql join this network:
docker network connect heima mysql
2.2. Install Canal
The canal image compression package is provided in the pre-class materials:

you can upload it to the virtual machine, and then import it through the command:

docker load -i canal.tar
Then run the command to create the Canal container:
docker run -p 11111:11111 --name canal \
-e canal.destinations=heima \
-e canal.instance.master.address=mysql:3306  \
-e canal.instance.dbUsername=canal  \
-e canal.instance.dbPassword=canal  \
-e canal.instance.connectionCharset=UTF-8 \
-e canal.instance.tsdb.enable=true \
-e canal.instance.gtidon=false  \
-e canal.instance.filter.regex=heima\\..* \
--network heima \
-d canal/canal-server:v1.1.5
illustrate:
-p 11111:11111: This is canal's default listening port-e canal.instance.master.address=mysql:3306: Database address and port, if you don’t know the mysql container address, you candocker inspect 容器idcheck it by-e canal.instance.dbUsername=canal:database username-e canal.instance.dbPassword=canal: database password-e canal.instance.filter.regex=: The name of the table to monitor
Syntax supported by table name listener:
mysql 数据解析关注的表,Perl正则表达式.
多个正则之间以逗号(,)分隔,转义符需要双斜杠(\\)
常见例子:
1.  所有表:.*   or  .*\\..*
2.  canal schema下所有表: canal\\..*
3.  canal下的以canal打头的表:canal\\.canal.*
4.  canal schema下的一张表:canal.test1
5.  多个规则组合使用然后以逗号隔开:canal\\..*,mysql.test1,mysql.test2
After startup, check the log
docker logs -f canal

input command
docker exec -it canal bash
Check the operation log
tail -f canal-server/logs/canal/canal.log
tail -f canal-server/logs/heima/heima.log

5.3. Monitor Canal
Canal provides clients in various languages. When Canal detects binlog changes, it will notify the Canal client.
We can use the Java client provided by Canal to listen to Canal notification messages. When a change message is received, the cache is updated.
But here we will use the third-party open source canal-starter client on GitHub. Address: https://github.com/NormanGyllenhaal/canal-client
Perfect integration with SpringBoot, automatic assembly, much simpler and easier to use than the official client.
5.3.1. Introducing dependencies:
<dependency>
    <groupId>top.javatool</groupId>
    <artifactId>canal-spring-boot-starter</artifactId>
    <version>1.2.1-RELEASE</version>
</dependency>
5.3.2. Write configuration:
canal:
  destination: heima # canal的集群名字,要与安装canal时设置的名称一致
  server: 192.168.150.101:11111 # canal服务地址
5.3.3. Modify the Item entity class
Complete the mapping between Item and database table fields through @Id, @Column, and other annotations:
package com.heima.item.pojo;

import com.baomidou.mybatisplus.annotation.IdType;
import com.baomidou.mybatisplus.annotation.TableField;
import com.baomidou.mybatisplus.annotation.TableId;
import com.baomidou.mybatisplus.annotation.TableName;
import lombok.Data;
import org.springframework.data.annotation.Id;
import org.springframework.data.annotation.Transient;

import javax.persistence.Column;
import java.util.Date;

@Data
@TableName("tb_item")
public class Item {


    @TableId(type = IdType.AUTO)
    @Id
    private Long id;//商品id
    @Column(name = "name")
    private String name;//商品名称
    private String title;//商品标题
    private Long price;//价格(分)
    private String image;//商品图片
    private String category;//分类名称
    private String brand;//品牌名称
    private String spec;//规格
    private Integer status;//商品状态 1-正常,2-下架
    private Date createTime;//创建时间
    private Date updateTime;//更新时间
    @TableField(exist = false)
    @Transient
    private Integer stock;
    @TableField(exist = false)
    @Transient
    private Integer sold;
}
5.3.4. Writing listeners
EntryHandler<T>Write a listener by implementing the interface to listen to Canal messages. Note two points:
- The implementation class
@CanalTable("tb_item")specifies the table information to monitor - The generic type of EntryHandler is the entity class corresponding to the table
package com.heima.item.canal;

import com.github.benmanes.caffeine.cache.Cache;
import com.heima.item.config.RedisHandler;
import com.heima.item.pojo.Item;
import org.springframework.beans.factory.annotation.Autowired;
import org.springframework.stereotype.Component;
import top.javatool.canal.client.annotation.CanalTable;
import top.javatool.canal.client.handler.EntryHandler;

@CanalTable("tb_item")
@Component
public class ItemHandler implements EntryHandler<Item> {


    @Autowired
    private RedisHandler redisHandler;
    @Autowired
    private Cache<Long, Item> itemCache;

    @Override
    public void insert(Item item) {


        // 写数据到JVM进程缓存
        itemCache.put(item.getId(), item);
        // 写数据到redis
        redisHandler.saveItem(item);
    }

    @Override
    public void update(Item before, Item after) {


        // 写数据到JVM进程缓存
        itemCache.put(after.getId(), after);
        // 写数据到redis
        redisHandler.saveItem(after);
    }

    @Override
    public void delete(Item item) {


        // 删除数据到JVM进程缓存
        itemCache.invalidate(item.getId());
        // 删除数据到redis
        redisHandler.deleteItemById(item.getId());
    }
}
The operations on Redis here are all encapsulated in the RedisHandler object, which is a class we wrote when we were doing cache warm-up. The content is as follows:
package com.heima.item.config;

import com.fasterxml.jackson.core.JsonProcessingException;
import com.fasterxml.jackson.databind.ObjectMapper;
import com.heima.item.pojo.Item;
import com.heima.item.pojo.ItemStock;
import com.heima.item.service.IItemService;
import com.heima.item.service.IItemStockService;
import org.springframework.beans.factory.InitializingBean;
import org.springframework.beans.factory.annotation.Autowired;
import org.springframework.data.redis.core.StringRedisTemplate;
import org.springframework.stereotype.Component;

import java.util.List;

@Component
public class RedisHandler implements InitializingBean {


    @Autowired
    private StringRedisTemplate redisTemplate;

    @Autowired
    private IItemService itemService;
    @Autowired
    private IItemStockService stockService;

    private static final ObjectMapper MAPPER = new ObjectMapper();

    @Override
    public void afterPropertiesSet() throws Exception {


        // 初始化缓存
        // 1.查询商品信息
        List<Item> itemList = itemService.list();
        // 2.放入缓存
        for (Item item : itemList) {


            // 2.1.item序列化为JSON
            String json = MAPPER.writeValueAsString(item);
            // 2.2.存入redis
            redisTemplate.opsForValue().set("item:id:" + item.getId(), json);
        }

        // 3.查询商品库存信息
        List<ItemStock> stockList = stockService.list();
        // 4.放入缓存
        for (ItemStock stock : stockList) {


            // 2.1.item序列化为JSON
            String json = MAPPER.writeValueAsString(stock);
            // 2.2.存入redis
            redisTemplate.opsForValue().set("item:stock:id:" + stock.getId(), json);
        }
    }

    public void saveItem(Item item) {


        try {


            String json = MAPPER.writeValueAsString(item);
            redisTemplate.opsForValue().set("item:id:" + item.getId(), json);
        } catch (JsonProcessingException e) {


            throw new RuntimeException(e);
        }
    }

    public void deleteItemById(Long id) {


        redisTemplate.delete("item:id:" + id);
    }
}
Restart the test
and see that there is always output in the IDEA console:

access
http://localhost:8081/item/10001

Look at the static in IDEA

direct interview
http://localhost:8081/
Modify the first item

Modify size and price

Visit here again
http://localhost:8081/item/10001

Check redis again and find that the synchronous modification is successful

. Summary:
