Write directory title here
- Chapter 4 JAVA NIO in-depth analysis
-
- 4.1 Basic Introduction of Java NIO
- 4.2 Comparison of NIO and BIO
- 4.3 Schematic diagram of the three core principles of NIO
- 4.4 NIO Core 1: Buffer
- 4.5 NIO Core II: Channel (Channel)
- 4.6 NIO Core 3: Selector
- 4.7 Analysis of NIO non-blocking network communication principle
- 4.8 NIO non-blocking network communication entry case
- 4.9 NIO network programming application example - group chat system
- Chapter 5 In-depth Analysis of JAVA AIO
- Chapter 6 BIO, NIO, AIO Course Summary
Chapter 4 JAVA NIO in-depth analysis
Before explaining the use of NIO to realize the communication architecture, we need to understand the basic characteristics and use of NIO.
4.1 Basic Introduction of Java NIO
-
Java NIO (New IO), also known as java non-blocking IO, is a new IO API introduced since Java 1.4, which can replace the standard Java IO API. NIO has the same function and purpose as the original IO, but it is used in a completely different way. NIO supports buffer- oriented , channel -based IO operations. NIO will perform file read and write operations in a more efficient manner. NIO can be understood as non-blocking IO. The read and write of traditional IO can only block the execution. The thread cannot do other things during the read and write IO. For example, when calling socket.read(), if the server has not transmitted data, the thread will stop. It is always blocked, and the socket can be configured in non-blocking mode in NIO.
-
NIO-related classes are placed under the java.nio package and sub-packages, and many classes in the original java.io package are rewritten.
-
NIO has three core parts: Channel (channel), Buffer (buffer), Selector (selector)
-
The non-blocking mode of Java NIO enables a thread to send a request or read data from a channel, but it can only get the currently available data. If no data is currently available, nothing will be obtained instead of keeping the thread blocked. So until the data becomes readable, the thread can continue to do other things. The same is true for non-blocking writes. A thread requests to write some data to a channel, but does not need to wait for it to be completely written. The thread can do other things at the same time.
-
Popular understanding: NIO can handle multiple operations with one thread. Suppose there are 1000 requests, depending on the actual situation, 20 or 80 threads can be allocated for processing. Unlike the previous blocking IO, 1000 have to be allocated.
4.2 Comparison of NIO and BIO
- BIO processes data in a streaming manner, while NIO processes data in a block manner, and the efficiency of block I/O is much higher than that of stream I/O
- BIO is blocking, NIO is non-blocking
- BIO operates based on byte stream and character stream, while NIO operates based on Channel (channel) and Buffer (buffer). Data is always read from the channel to the buffer, or written from the buffer to the channel. Selector (selector) is used to monitor events of multiple channels (for example: connection request, data arrival, etc.), so multiple client channels can be monitored using a single thread.
| NIO | BIO |
|---|---|
| Buffer-oriented (Buffer) | Stream-oriented (Stream) |
| Non-blocking (Non Blocking IO) | Blocking IO (Blocking IO) |
| Selectors |
4.3 Schematic diagram of the three core principles of NIO
NIO has three core parts: Channel (channel), Buffer (buffer), Selector (selector)
Buffer buffer
A buffer is essentially a block of memory to which data can be written and then read from. This piece of memory is packaged as a NIO Buffer object, and a set of methods are provided for easy access to this piece of memory. Compared with direct operations on arrays, the Buffer API is easier to operate and manage.
Channel (channel)
The channel of Java NIO is similar to the stream, but there are some differences: data can be read from the channel, and data can be written to the channel. But stream (input or output) reading and writing are usually one-way. Channels can be read and written non-blockingly, and channels can support reading or writing buffers, as well as asynchronous reading and writing.
Selector selector
Selector is a Java NIO component that can inspect one or more NIO channels and determine which channels are ready for reading or writing. In this way, a single thread can manage multiple channels, thereby managing multiple network connections and improving efficiency.
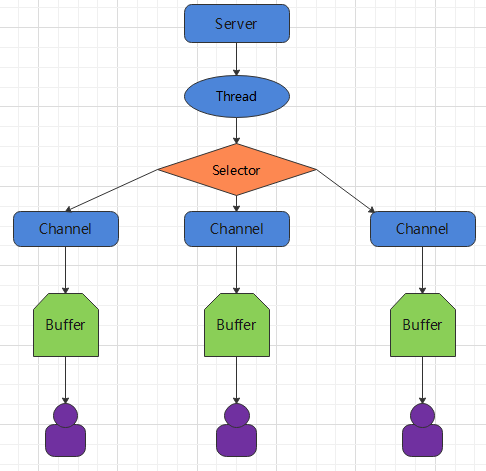
- Each channel corresponds to a Buffer.
- A thread corresponds to a Selector, and a Selector corresponds to multiple channels (connections).
- Which channel the program switches to is determined by an event.
- Selector will switch on each channel according to different events.
- Buffer is a memory block, and the bottom layer is an array.
- The reading and writing of data is done through Buffer. The BIO is either an input stream or an output stream, which cannot be bidirectional, but the NIO Buffer can be read or written.
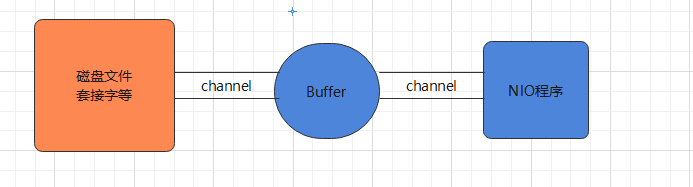
- The core of the Java NIO system lies in: channel (Channel) and buffer (Buffer). A channel represents an open connection to an IO device (eg file, socket). If you need to use the NIO system, you need to obtain the channel used to connect the IO device and the buffer used to hold the data. Then operate the buffer and process the data. In short, Channel is responsible for transmission, and Buffer is responsible for accessing data.
4.4 NIO Core 1: Buffer
Buffer
A container for a specific primitive data type. Defined by the java.nio package, all buffers are subclasses of the Buffer abstract class. The Buffer in Java NIO is mainly used to interact with the NIO channel. Data is read from the channel into the buffer and written from the buffer into the channel.
Buffer class and its subclasses
Buffer is like an array, which can hold multiple data of the same type. According to different data types, there are the following common subclasses of Buffer:
- ByteBuffer
- CharBuffer
- ShortBuffer
- IntBuffer
- LongBuffer
- FloatBuffer
- DoubleBuffer
The above Buffer classes all use similar methods to manage data, but the data types they manage are different. Both obtain a Buffer object through the following methods:
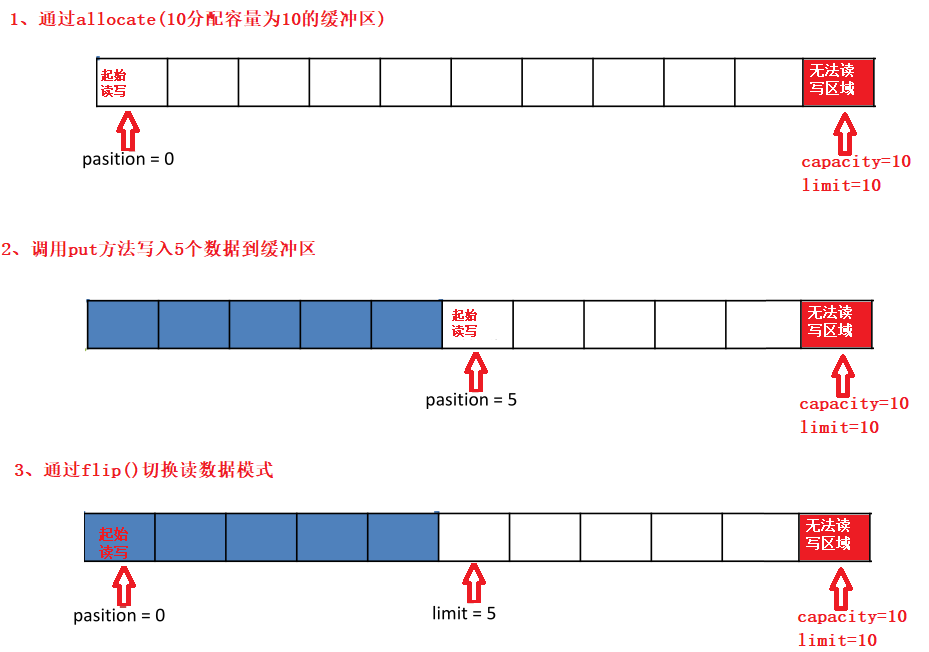
static XxxBuffer allocate(int capacity) : 创建一个容量为capacity 的 XxxBuffer 对象
Basic properties of the buffer
Important concepts in Buffer:
- Capacity : As a memory block, Buffer has a certain fixed size, also known as "capacity". The buffer capacity cannot be negative and cannot be changed after creation.
- Limit (limit) : Indicates the size of the operable data in the buffer (data cannot be read or written after the limit). A buffer's limit cannot be negative and cannot be greater than its capacity. In write mode, the limit is equal to the capacity of the buffer. In read mode, limit is equal to the amount of data written .
- position : The index of the next data to be read or written. The buffer's position cannot be negative and cannot be larger than its limit.
- Mark (mark) and reset (reset) : The mark is an index, specify a specific position in the Buffer through the mark() method in the Buffer, and then restore to this position by calling the reset() method. Mark, position,
limit , the capacity obeys the following invariants: 0 <= mark <= position <= limit <= capacity - Illustration:
You can see that counting starts from 0.
Buffer common methods
Buffer clear() 清空缓冲区并返回对缓冲区的引用
Buffer flip() 将缓冲区的界限设置为当前位置,并将当前位置重置为 0
int capacity() 返回 Buffer 的 capacity 大小
boolean hasRemaining() 判断缓冲区中是否还有元素
int limit() 返回Buffer的界限(limit) 的位置
Buffer limit(int n) 将设置缓冲区界限为 n, 并返回一个具有新limit的缓冲区对象
Buffer mark() 对缓冲区设置标记
int position() 返回缓冲区的当前位置position
Buffer position(int n) 将设置缓冲区的当前位置为n,并返回修改后的Buffer对象
int remaining() 返回 position 和 limit 之间的元素个数
Buffer reset() 将位置 position 转到以前设置的 mark 所在的位置
Buffer rewind() 将位置设为为 0, 取消设置的 mark
Buffer data manipulation
Buffer 所有子类提供了两个用于数据操作的方法:get()、put()方法获取Buffer中的数据
get() :读取单个字节
get(byte[] dst):批量读取多个字节到 dst 中
get(int index):读取指定索引位置的字节(不会移动 position)放入到数据Buffer中
put(byte b):将给定单个字节写入缓冲区的当前位置
put(byte[] src):将 src 中的字节写入缓冲区的当前位置
put(int index, byte b):将指定字节写入缓冲区的索引位置(不会移动position)
Using Buffer to read and write data generally follows the following four steps:
- 1. Write data to Buffer
- 2. Call the flip() method to switch to read mode
- 3. Read data from Buffer
- 4. Call the buffer.clear() method or buffer.compact() method to clear the buffer
New Module
Module name: nio_buffer

New class

Case presentation
API simple application
BufferTest.java
public class BufferTest {


    @Test
    public void test01() {


        // 1.分配一个缓冲区,容量是10
        ByteBuffer buffer = ByteBuffer.allocate(10);

        // 2.
        System.out.println("当前缓冲区的起始位置:" + buffer.position()); // 0
        System.out.println("当前缓冲器的限制位置:" + buffer.limit()); // 10
        System.out.println("当前缓冲器的容量:" + buffer.capacity()); // 10
        System.out.println("------------------------------");
        // 3.缓冲区中添加数据
        String name = "itheima";
        buffer.put(name.getBytes());
        System.out.println("put后缓冲区的起始位置:" + buffer.position()); // 7
        System.out.println("put后缓冲器的限制位置:" + buffer.limit()); // 10
        System.out.println("put后缓冲器的容量:" + buffer.capacity()); // 10
        System.out.println("------------------------------");

        // 4.flip()方法 将缓冲区的界限设置为当前位置,并将当前位置重置为0 可读模式
        buffer.flip();
        System.out.println("flip后缓冲区的起始位置:" + buffer.position()); // 0
        System.out.println("flip后缓冲器的限制位置:" + buffer.limit()); // 7
        System.out.println("flip后缓冲器的容量:" + buffer.capacity()); // 10
        System.out.println("------------------------------");

        // 5. get读取数据
        char ch = (char) buffer.get();
        System.out.println("字符ch:" + ch); // i
        System.out.println("get后缓冲区的起始位置:" + buffer.position()); // 1
        System.out.println("get后缓冲器的限制位置:" + buffer.limit()); // 7
        System.out.println("get后缓冲器的容量:" + buffer.capacity()); // 10

    }
}
Output result:
当前缓冲区的起始位置:0
当前缓冲器的限制位置:10
当前缓冲器的容量:10
------------------------------
put后缓冲区的起始位置:7
put后缓冲器的限制位置:10
put后缓冲器的容量:10
------------------------------
flip后缓冲区的起始位置:0
flip后缓冲器的限制位置:7
flip后缓冲器的容量:10
------------------------------
字符ch:i
get后缓冲区的起始位置:1
get后缓冲器的限制位置:7
get后缓冲器的容量:10
API simple application 2
BufferTest.java
    @Test
    public void test02() {


        // 1.分配一个缓冲区容量为10
        ByteBuffer byteBuffer = ByteBuffer.allocate(10);
        System.out.println("缓冲区的起始位置:" + byteBuffer.position()); // 0
        System.out.println("缓冲区的限制位置:" + byteBuffer.limit()); // 10
        System.out.println("缓冲区的容量:" + byteBuffer.capacity()); // 10
        System.out.println("------------------------------");

        String name = "itheima";
        byteBuffer.put(name.getBytes());
        System.out.println("put后缓冲区的起始位置:" + byteBuffer.position()); // 7
        System.out.println("put后缓冲区的限制位置:" + byteBuffer.limit()); // 10
        System.out.println("put后缓冲区的容量:" + byteBuffer.capacity()); // 10
        System.out.println("------------------------------");

        // 2.清除缓冲区
        byteBuffer.clear();
        System.out.println("clear后缓冲区的起始位置:" + byteBuffer.position()); // 0
        System.out.println("clear后缓冲区的限制位置:" + byteBuffer.limit()); // 10
        System.out.println("clear后缓冲区的容量:" + byteBuffer.capacity()); // 10
        System.out.println((char) byteBuffer.get()); // i 这里并不会清除,而只是把position变回了0,覆盖写操作才会清除原有数据
        System.out.println("------------------------------");
    }
Output result:
缓冲区的起始位置:0
缓冲区的限制位置:10
缓冲区的容量:10
------------------------------
put后缓冲区的起始位置:7
put后缓冲区的限制位置:10
put后缓冲区的容量:10
------------------------------
clear后缓冲区的起始位置:0
clear后缓冲区的限制位置:10
clear后缓冲区的容量:10
i
API simple application 3
BufferTest.java
@Test
    public void test03() {


        // 3.定义一个缓冲区
        String name = "itheima";
        ByteBuffer byteBuffer = ByteBuffer.allocate(10);
        byteBuffer.put(name.getBytes());
        byteBuffer.flip();
        // 读取数据
        byte[] bytes = new byte[2];
        byteBuffer.get(bytes);
        String rs = new String(bytes);
        System.out.println(rs); // it
        System.out.println("当前缓冲区的起始位置:" + byteBuffer.position()); // 2 说明读取了前2个位置了(0,1),这个时候从第3个位置2开始
        System.out.println("当前缓冲区的限制位置:" + byteBuffer.limit()); // 7 itheima flip之后,前7个位置可以读取
        System.out.println("当前缓冲区的容量:" + byteBuffer.capacity()); // 10
        System.out.println("------------------------------");

        // mark
        byteBuffer.mark(); // 标记此刻的位置2
        byte[] bs = new byte[3];
        byteBuffer.get(bs);
        System.out.println(new String(bs)); // hei
        System.out.println("当前缓冲区的起始位置:" + byteBuffer.position()); // 5
        System.out.println("当前缓冲区的限制位置:" + byteBuffer.limit()); // 7
        System.out.println("当前缓冲区的容量:" + byteBuffer.capacity()); // 10
        System.out.println((char) byteBuffer.get()); // m
        System.out.println("------------------------------");

        // reset
        byteBuffer.reset();
        if (byteBuffer.hasRemaining()) {


            System.out.println(byteBuffer.remaining()); // 5
        }
    }
Output result:
it
当前缓冲区的起始位置:2
当前缓冲区的限制位置:7
当前缓冲区的容量:10
------------------------------
hei
当前缓冲区的起始位置:5
当前缓冲区的限制位置:7
当前缓冲区的容量:10
m
------------------------------
5
Direct and non-direct buffers
What is direct memory and non-direct memory
According to the description of the official document:
byte byfferThere are two types, one is based on direct memory (that is, non-heap memory); the other is non-direct memory (that is, heap memory). For direct memory, the JVM will have higher performance in IO operations, because it directly acts on the IO operations of the local system. Instead of direct memory, that is, the data in the heap memory, if IO operations are to be performed, it will first be copied from the memory of the process to the direct memory, and then processed by local IO.
From the perspective of data flow, indirect memory is the following chain of action:
本地IO-->直接内存-->非直接内存-->直接内存-->本地IO
And direct memory is:
本地IO-->直接内存-->本地IO
Obviously, when doing IO processing, such as sending a large amount of data over the network, direct memory will be more efficient. Direct memory is created using allocateDirect , but it requires higher performance than applying for ordinary heap memory. However, this part of the data is outside the JVM, so it doesn't take up application memory. So, when you have a large amount of data to cache, and its life cycle is very long, then it is more suitable to use direct memory. Generally speaking, if it does not bring obvious performance improvements, it is recommended to use heap memory directly. Whether a byte buffer is direct or non-direct can be determined by calling its isDirect() method.
scenes to be used
- 1 There is a large amount of data to be stored, and its life cycle is very long.
- 2 Suitable for frequent IO operations, such as network concurrency scenarios.
4.5 NIO Core II: Channel (Channel)
Channel Channel Overview
Channel (Channel): defined by the java.nio.channels package. Channel represents the connection opened by the IO source and target. Channels are similar to traditional "streams". It's just that the Channel itself cannot directly access data, and the Channel can only interact with the Buffer.
1. NIO channels are similar to streams, but some differences are as follows:
-
Channels can read and write at the same time, while streams can only read or write
-
Channels can read and write data asynchronously
-
Channels can read data from buffers and write data to buffers:
2. The stream in BIO is unidirectional. For example, the FileInputStream object can only read data, while the channel (Channel) in NIO is bidirectional, and can be read or written.
3. Channel is an interface in NIO
public interface Channel extends Closeable{

    }
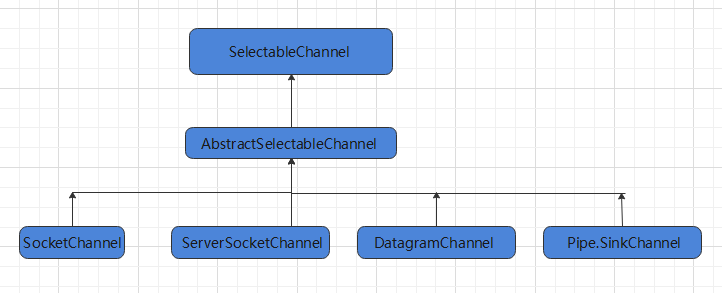
Commonly used Channel implementation classes
- FileChannel: A channel for reading, writing, mapping, and manipulating files.
- DatagramChannel: read and write data channels in the network through UDP.
- SocketChannel: read and write data in the network through TCP.
- ServerSocketChannel: It can monitor new incoming TCP connections and create a SocketChannel for each new incoming connection.
【ServerSocketChannel is similar to ServerSocket, SocketChannel is similar to Socket】
FileChannel class
One way to obtain a channel is to call the getChannel() method on an object that supports channels . The classes that support channels are as follows:
- FileInputStream
- FileOutputStream
- RandomAccessFile
- DatagramSocket
- Socket
- Another way for ServerSocket
to obtain a channel is to use the static method newByteChannel() of the Files class to obtain a byte channel. Or open and return the specified channel through the static method open() of the channel
Common methods of FileChannel
int read(ByteBuffer dst)从Channel中读取数据到ByteBuffer
long read(ByteBuffer[] dsts) 将Channel中的数据“分散”到ByteBuffer[]
int write(ByteBuffer src) 将ByteBuffer中的数据写入到Channel
long write(ByteBuffer[] srcs) 将ByteBuffer[]中的数据“聚集”到 Channel
long position() 返回此通道的文件位置
FileChannel position(long p) 设置此通道的文件位置
long size() 返回此通道的文件的当前大小
FileChannel truncate(long s) 将此通道的文件截取为给定大小
void force(boolean metaData) 强制将所有对此通道的文件更新写入到存储设备中
The new Module
nio_channel

project structure is as follows:

Case 1 - write data to local file
Requirements: Use the previously learned ByteBuffer (buffer) and FileChannel (channel) to write "hello, dark horse Java programmer!" into data.txt.
@Test
    public void test() {


        FileOutputStream fileOutputStream = null;
        FileChannel fileChannel = null;
        try {


            // 1.字节输出流通向目标文件
            fileOutputStream = new FileOutputStream("data01.txt");
            // 2.得到字节输出流的通道
            fileChannel = fileOutputStream.getChannel();
            // 3.分配缓冲区
            String text = "hello,黑马Java程序员!";
            ByteBuffer byteBuffer = ByteBuffer.allocate(1024);
            byteBuffer.put(text.getBytes());
            byteBuffer.flip();
            fileChannel.write(byteBuffer);

        } catch (IOException e) {


            e.printStackTrace();
        } finally {


            try {


                fileChannel.close();
                fileOutputStream.close();
            } catch (IOException e) {


                e.printStackTrace();
            }
        }
    }
Write the result:

Case 2-Local file read data
Requirement: Use the previously learned ByteBuffer (buffer) and FileChannel (channel) to read the data in data01.txt into the program and display it on the console screen
@Test
    public void test3() {


        FileInputStream fileInputStream = null;
        FileChannel channel = null;
        try {


            // 1. 定义一个文件输入流,与源文件接通
            fileInputStream = new FileInputStream("data01.txt");
            // 2.得到文件输入流的文件通道
            channel = fileInputStream.getChannel();

            // 3. 定义一个缓冲区
            ByteBuffer byteBuffer = ByteBuffer.allocate(1024);
            // 4.读取数据到缓冲区
            int count = channel.read(byteBuffer);
            // 方式一:
            //System.out.println(new String(byteBuffer.array(), 0, count));

            // 方式二:
            byteBuffer.flip();
            System.out.println(new String(byteBuffer.array(), 0, byteBuffer.remaining()));
        } catch (Exception e) {


            e.printStackTrace();
        } finally {


            try {


                channel.close();
                fileInputStream.close();
            } catch (IOException e) {


                e.printStackTrace();
            }
        }
    }
result:
hello,黑马Java程序员!
Case 3 - use Buffer to complete file copy
Use FileChannel (channel) to complete the file copy.
/**
     * @param
     * @return void
     * @description //文件拷贝
     * @date 2023/4/5 22:08
     * @author wty
     **/
    @Test
    public void test4() {


        FileInputStream fileInputStream = null;
        FileOutputStream fileOutputStream = null;
        FileChannel fileChannel = null;
        FileChannel fileOutputStreamChannel = null;
        try {


            // 定义一个文件
            File file = new File("D:\\1.txt");
            File target = new File("D:\\server\\2.txt");
            // 得到一个文件输入和输出流
            fileInputStream = new FileInputStream(file);

            fileOutputStream = new FileOutputStream(target);


            // 先创建通道
            fileChannel = fileInputStream.getChannel();
            fileOutputStreamChannel = fileOutputStream.getChannel();
            // 创建缓冲区
            ByteBuffer byteBuffer = ByteBuffer.allocate(2048);
            int count = 0;
            // 开始读取数据
            while (true) {


                // 必须先清空缓冲区,再写入数据
                byteBuffer.clear();
                if ((count = fileChannel.read(byteBuffer)) == -1) {


                    break;
                }
                byteBuffer.flip();

                // 把数据写出通道
                fileOutputStreamChannel.write(byteBuffer);
            }


        } catch (Exception e) {


            e.printStackTrace();
        } finally {


            try {


                fileOutputStreamChannel.close();
                fileChannel.close();
                fileOutputStream.close();
                fileInputStream.close();
                System.out.println("拷贝完成!");
            } catch (IOException e) {


                e.printStackTrace();
            }
        }
    }
result:

Case 4 - Scatter and Gather
Scattered reading (Scatter): refers to reading the data of the Channel channel into multiple buffers
Gathering refers to "gathering" the data in multiple Buffers to the Channel.
@Test
    public void test5() {


        FileInputStream fileInputStream = null;
        FileOutputStream fileOutputStream = null;
        FileChannel fileInputStreamChannel = null;
        FileChannel fileOutputStreamChannel = null;
        try {


            // 1. 定义字节输入管道
            fileInputStream = new FileInputStream("data01.txt");
            // 2. 字节输出管道
            fileOutputStream = new FileOutputStream("data03.txt");
            // 3.定义多个缓冲区
            ByteBuffer byteBuffer1 = ByteBuffer.allocate(4);
            ByteBuffer byteBuffer2 = ByteBuffer.allocate(1024);

            // 4. 缓冲区放入数组
            ByteBuffer[] byteBuffers = {

    byteBuffer1, byteBuffer2};

            // 5.从通道中读取数据分散到各个缓冲区
            fileInputStreamChannel = fileInputStream.getChannel();
            fileOutputStreamChannel = fileOutputStream.getChannel();

            fileInputStreamChannel.read(byteBuffers);

            // 6.从每个缓冲区中查看是否有数据读取到
            for (ByteBuffer byteBuffer : byteBuffers) {


                // 切换到读数据模式
                byteBuffer.flip();
                System.out.println(new String(byteBuffer.array(), 0, byteBuffer.remaining()));
            }

            // 7.聚集写入到通道
            fileOutputStreamChannel.write(byteBuffers);


        } catch (IOException e) {


            e.printStackTrace();
        } finally {


            try {


                fileOutputStreamChannel.close();
                fileInputStreamChannel.close();
                fileOutputStream.close();
                fileInputStream.close();
                System.out.println("文件复制完成");
            } catch (IOException e) {


                e.printStackTrace();
            }
        }

    }
View Results:

Case 5 - transferFrom()
Copy the original channel data from the target channel
@Test
    public void test06() {


        FileInputStream fileInputStream = null;
        FileOutputStream fileOutputStream = null;

        FileChannel fileInputStreamChannel = null;
        FileChannel fileOutputStreamChannel = null;
        try {


            // 1.获取文件源
            fileInputStream = new FileInputStream("data01.txt");
            fileOutputStream = new FileOutputStream("data03.txt");

            // 2.获取通道
            fileInputStreamChannel = fileInputStream.getChannel();
            fileOutputStreamChannel = fileOutputStream.getChannel();

            // 3.复制数据
            fileOutputStreamChannel.transferFrom(fileInputStreamChannel, fileInputStreamChannel.position(), fileInputStreamChannel.size());

        } catch (Exception e) {


            e.printStackTrace();
        } finally {


            try {


                fileOutputStreamChannel.close();
                fileInputStreamChannel.close();
                fileOutputStream.close();
                fileInputStream.close();
            } catch (IOException e) {


                e.printStackTrace();
            }
        }
    }
Delete target files before testing

Test: found that the replication was successful

Case 6 - transferTo()
Copy the original channel data to the target channel
@Test
    public void test07() {


        FileInputStream fileInputStream = null;
        FileOutputStream fileOutputStream = null;

        FileChannel fileInputStreamChannel = null;
        FileChannel fileOutputStreamChannel = null;
        try {


            // 1.获取文件源
            fileInputStream = new FileInputStream("data01.txt");
            fileOutputStream = new FileOutputStream("data03.txt");

            // 2.获取通道
            fileInputStreamChannel = fileInputStream.getChannel();
            fileOutputStreamChannel = fileOutputStream.getChannel();

            // 3.复制数据
            fileInputStreamChannel.transferTo(fileInputStreamChannel.position(), fileInputStreamChannel.size(), fileOutputStreamChannel);

        } catch (Exception e) {


            e.printStackTrace();
        } finally {


            try {


                fileOutputStreamChannel.close();
                fileInputStreamChannel.close();
                fileOutputStream.close();
                fileInputStream.close();
            } catch (IOException e) {


                e.printStackTrace();
            }
        }
    }
Realize the result:

4.6 NIO Core 3: Selector
Selector overview
Selector (Selector) is a multiplexer of SelectableChannle objects, Selector can monitor the IO status of multiple SelectableChannels at the same time, that is to say, using Selector can make a single thread manage multiple Channels. Selector is the core of non-blocking IO.
- Java's NIO uses non-blocking IO methods. You can use one thread to handle multiple client connections, and you will use the Selector (selector).
- Selector can detect whether there are events on multiple registered channels (note: multiple Channels can be registered to the same Selector in the form of events), if an event occurs, it will get the event and then process each event accordingly. In this way, only one single thread can be used to manage. Manage multiple channels, that is, manage multiple connections and requests.
- Only when the connection/channel actually has a read and write event, the read and write will be performed, which greatly reduces the system overhead, and does not need to create a thread for each connection, and does not need to maintain multiple threads.
- The overhead caused by context switching between multiple threads is avoided.
Application of Selector
Create Selector: Create a Selector by calling the Selector.open() method.
Selector selector = Selector.open();
Register the channel with the selector: SelectableChannel.register(Selector sel, int ops)
//1. 获取通道
ServerSocketChannel ssChannel = ServerSocketChannel.open();
//2. 切换非阻塞模式
ssChannel.configureBlocking(false);
//3. 绑定连接
ssChannel.bind(new InetSocketAddress(9898));
//4. 获取选择器
Selector selector = Selector.open();
//5. 将通道注册到选择器上, 并且指定“监听接收事件”
ssChannel.register(selector, SelectionKey.OP_ACCEPT);
When register(Selector sel, int ops) is called to register the channel to the selector, the selector's monitoring event for the channel needs to be specified by the second parameter ops. The types of events that can be listened to (indicated by four constants that can use SelectionKey):
- read: SelectionKey.OP_READ (1)
- 写 : SelectionKey.OP_WRITE (4)
- connection: SelectionKey.OP_CONNECT (8)
- Receive: SelectionKey.OP_ACCEPT (16)
- If you register to listen to more than one event, you can use the "bit OR" operator to connect.
int interestSet = SelectionKey.OP_READ|SelectionKey.OP_WRITE
4.7 Analysis of NIO non-blocking network communication principle
Selector diagram and feature description
Selector can achieve: One I/O thread can concurrently process N client connections and read and write operations, which fundamentally solves the traditional synchronous blocking I/O one connection one thread model, architecture performance, elastic scalability and reliability have been greatly improved.

Server process
- 1. When the client connects to the server, the server will get the SocketChannel through the ServerSocketChannel: 1. Obtain the channel
ServerSocketChannel ssChannel = ServerSocketChannel.open();
- 2. Switch to non-blocking mode
ssChannel.configureBlocking(false);
- 3. Binding connection
ssChannel.bind(new InetSocketAddress(9999));
- 4. Get the selector
Selector selector = Selector.open();
- 5. Register the channel to the selector, and specify "listen to receive events"
ssChannel.register(selector, SelectionKey.OP_ACCEPT);
-
- Polling to get "ready" events on selectors
  //轮询式的获取选择器上已经“准备就绪”的事件
   while (selector.select() > 0) {


          System.out.println("轮一轮");
          //7. 获取当前选择器中所有注册的“选择键(已就绪的监听事件)”
          Iterator<SelectionKey> it = selector.selectedKeys().iterator();
          while (it.hasNext()) {


              //8. 获取准备“就绪”的是事件
              SelectionKey sk = it.next();
              //9. 判断具体是什么事件准备就绪
              if (sk.isAcceptable()) {


                  //10. 若“接收就绪”,获取客户端连接
                  SocketChannel sChannel = ssChannel.accept();
                  //11. 切换非阻塞模式
                  sChannel.configureBlocking(false);
                  //12. 将该通道注册到选择器上
                  sChannel.register(selector, SelectionKey.OP_READ);
              } else if (sk.isReadable()) {


                  //13. 获取当前选择器上“读就绪”状态的通道
                  SocketChannel sChannel = (SocketChannel) sk.channel();
                  //14. 读取数据
                  ByteBuffer buf = ByteBuffer.allocate(1024);
                  int len = 0;
                  while ((len = sChannel.read(buf)) > 0) {


                      buf.flip();
                      System.out.println(new String(buf.array(), 0, len));
                      buf.clear();
                  }
              }
              //15. 取消选择键 SelectionKey
              it.remove();
          }
      }
  }
client process
-
- get channel
SocketChannel sChannel = SocketChannel.open(new InetSocketAddress("127.0.0.1", 9999));
-
- Toggle non-blocking mode
sChannel.configureBlocking(false);
-
- Allocate a buffer of the specified size
ByteBuffer buf = ByteBuffer.allocate(1024);
-
- send data to server
		Scanner scan = new Scanner(System.in);
		while(scan.hasNext()){


			String str = scan.nextLine();
			buf.put((new SimpleDateFormat("yyyy/MM/dd HH:mm:ss").format(System.currentTimeMillis())
					+ "\n" + str).getBytes());
			buf.flip();
			sChannel.write(buf);
			buf.clear();
		}
		//关闭通道
		sChannel.close();
4.8 NIO non-blocking network communication entry case
Create a new Module
named: nio_selector

Requirements: The server receives the client's connection request and receives events sent by multiple clients.
code example
/**
  客户端
 */
public class Client {


    public static void main(String[] args) {


        SocketChannel socketChannel = null;
        try {


            // 1.获取通道
            socketChannel = SocketChannel.open(new InetSocketAddress(InetAddress.getLocalHost(), 8888));
            // 2.切换非阻塞模式
            socketChannel.configureBlocking(false);
            // 3.分配指定缓冲区大小
            ByteBuffer byteBuffer = ByteBuffer.allocate(1024);
            // 4.发送数据给服务端
            Scanner scanner = new Scanner(System.in);
            while (true) {


                System.out.println("请输入:");
                String str = scanner.nextLine();
                byteBuffer.put(("波妞:" + str).getBytes());
                byteBuffer.flip();
                socketChannel.write(byteBuffer);
                byteBuffer.clear();
            }
        } catch (IOException e) {


            e.printStackTrace();
        } finally {


            try {


                socketChannel.close();
            } catch (IOException e) {


                e.printStackTrace();
            }
        }
    }
}
Server
/**
 服务端
 */
public class Server {


    public static void main(String[] args) {


        ServerSocketChannel serverSocketChannel = null;
        try {


            // 1.获取通道
            serverSocketChannel = ServerSocketChannel.open();
            System.out.println("服务端等待监听…………");
            // 2.切换至非阻塞模式
            serverSocketChannel.configureBlocking(false);
            // 3.指定连接的端口
            serverSocketChannel.bind(new InetSocketAddress(8888));
            // 4.获取选择器Selector
            Selector selector = Selector.open();
            // 5.将通道注册到选择器上,并且开始指定监听事件
            serverSocketChannel.register(selector, SelectionKey.OP_ACCEPT);
            // 6.使用Selector选择器轮询已经就绪的事件
            while (selector.select() > 0) {


                // 7.获取选择器中的所有注册的通道中已经就绪好的事件
                Iterator<SelectionKey> iterator = selector.selectedKeys().iterator();
                // 8.遍历准备好的事件
                while (iterator.hasNext()) {


                    SelectionKey selectionKey = iterator.next();
                    // 9.判断该事件具体是什么
                    if (selectionKey.isAcceptable()) {


                        // 10.直接获取当前接入的客户端通道
                        SocketChannel socketChannel = serverSocketChannel.accept();
                        // 11.切换成非阻塞模式
                        socketChannel.configureBlocking(false);
                        // 12.将本客户端注册到选择器,并且监听读事件
                        socketChannel.register(selector, SelectionKey.OP_READ);
                    } else if (selectionKey.isReadable()) {


                        // 13.获取当前选择器的读事件
                        SocketChannel socketChannel = (SocketChannel) selectionKey.channel();
                        // 14.读取数据
                        ByteBuffer byteBuffer = ByteBuffer.allocate(1024);
                        int count = 0;
                        while ((count = socketChannel.read(byteBuffer)) > 0) {


                            byteBuffer.flip();
                            System.out.println(new String(byteBuffer.array(), 0, count));
                            // 清除,归位
                            byteBuffer.clear();
                        }
                    }
                    iterator.remove();
                }
            }

        } catch (IOException e) {


            e.printStackTrace();
        } finally {


            try {


                serverSocketChannel.close();
            } catch (IOException e) {


                e.printStackTrace();
            }
        }
    }
}
Output result:
Client:

Server:

4.9 NIO network programming application example - group chat system
New module: The nio_chat

project structure is as follows:

Target
Requirements: Further understanding of NIO non-blocking network programming mechanism to realize multi-group chat
- Write a NIO group chat system to realize the communication requirements between the client and the client (non-blocking)
- Server side: It can monitor the user's online and offline, and realize the message forwarding function
- Client: Through the channel, messages can be sent to all other client users without blocking, and at the same time, messages forwarded by other client users through the server can be accepted
Server code implementation
public class Server {


    // 1.定义一些成员变量、选择器、服务端通道、端口
    private Selector selector;
    private ServerSocketChannel serverSocketChannel;
    private static final int PORT = 8888;

    public Server() {


        try {


            // a.创建选择器
            this.selector = Selector.open();
            // b.获取通道
            this.serverSocketChannel = ServerSocketChannel.open();
            // c.绑定客户端连接的端口
            serverSocketChannel.bind(new InetSocketAddress(PORT));
            // d.设置非阻塞的通信模式
            serverSocketChannel.configureBlocking(false);
            // f.注册通道到选择器上
            serverSocketChannel.register(selector, SelectionKey.OP_ACCEPT);
        } catch (IOException e) {


            e.printStackTrace();
        }
    }

    public static void main(String[] args) {


        // 1.创建服务端对象
        Server server = new Server();
        // 2.开始监听各种消息,连接、群聊、离线消息
        server.listen();


    }

    /**
     * 监听事件
     */
    private void listen() {


        try {


            while (selector.select() > 0) {


                // a.获取所有选择器中的注册事件
                Iterator<SelectionKey> iterator = selector.selectedKeys().iterator();
                // b.开始遍历这些事件
                while (iterator.hasNext()) {


                    SelectionKey selectionKey = iterator.next();
                    if (selectionKey.isAcceptable()) {


                        // 客户端接入请求
                        SocketChannel socketChannel = serverSocketChannel.accept();
                        socketChannel.configureBlocking(false);
                        socketChannel.register(selector, SelectionKey.OP_READ);
                    } else if (selectionKey.isReadable()) {


                        // 处理客户端消息,然后接收并且转发
                        readClientData(selectionKey);

                    }
                    iterator.remove();
                }
            }
        } catch (Exception e) {


            e.printStackTrace();
        }
    }

    /**
     * 接收当前客户端消息的信息,转发给其它全部客户端通道
     *
     * @param selectionKey
     */
    private void readClientData(SelectionKey selectionKey) {


        SocketChannel socketChannel = null;
        try {


            socketChannel = (SocketChannel) selectionKey.channel();
            // 创建缓冲区对象,接收客户端通道的数据
            ByteBuffer byteBuffer = ByteBuffer.allocate(1024);
            int count = 0;
            while ((count = socketChannel.read(byteBuffer)) > 0) {


                byteBuffer.flip();
                String message = new String(byteBuffer.array(), 0, count);
                System.out.println("接收到消息:" + message);
                // 把这个消息推送给全部客户端接收
                sendMessageToAllClient(message, socketChannel);

                byteBuffer.clear();

            }
        } catch (IOException e) {


            // 当前客户端离线,取消注册
            selectionKey.cancel();
            try {


                System.out.println("有人离线了:" + socketChannel.getRemoteAddress());
                socketChannel.close();
            } catch (IOException ex) {


                ex.printStackTrace();
            }
        }
    }

    /**
     * 把当前客户端的消息推送给全部在线注册的Channel
     *
     * @param message
     * @param socketChannel
     */
    private void sendMessageToAllClient(String message, SocketChannel socketChannel) throws IOException {


        System.out.println("服务端开始转发消息,当前处理的线程是:" + Thread.currentThread().getName());
        for (SelectionKey key : selector.keys()) {


            Channel channel = key.channel();
            // 不要拿自己的通道
            if (channel instanceof SocketChannel && channel != socketChannel) {


                // 将字节包装到缓冲区中
                ByteBuffer byteBuffer = ByteBuffer.wrap(message.getBytes());
                ((SocketChannel) channel).write(byteBuffer);
            }
        }

    }
}
Client code implementation
public class Client {


    // 1.定义客户端相关属性
    private Selector selector;
    private static final int PORT = 8888;
    private SocketChannel socketChannel;

    public Client() {


        try {


            // a.创建选择器
            selector = Selector.open();
            // b.连接服务器
            socketChannel = SocketChannel.open(new InetSocketAddress(InetAddress.getLocalHost(), 8888));
            // c.设置非阻塞模式
            socketChannel.configureBlocking(false);
            socketChannel.register(selector, SelectionKey.OP_READ);
            System.out.println("当前客户端创建完毕");
        } catch (IOException e) {


            e.printStackTrace();
        }
    }

    public static void main(String[] args) {


        Client client = new Client();
        // 定义一个线程用来监听服务端发送的消息
        new Thread(new Runnable() {


            @Override
            public void run() {


                try {


                    client.readInfo();
                } catch (IOException e) {


                    e.printStackTrace();
                }
            }
        }).start();

        Scanner scanner = new Scanner(System.in);
        while (scanner.hasNext()) {


            String message = scanner.nextLine();
            try {


                client.sendToServer(message);
            } catch (IOException e) {


                e.printStackTrace();
            }

        }
    }

    /**
     * 发送消息给服务端
     *
     * @param message
     */
    private void sendToServer(String message) throws IOException {


        socketChannel.write(ByteBuffer.wrap(("波妞说:" + message).getBytes()));
    }

    /**
     * 监听事件
     */
    private void readInfo() throws IOException {


        while (selector.select() > 0) {


            Iterator<SelectionKey> iterator = selector.selectedKeys().iterator();
            while (iterator.hasNext()) {


                SelectionKey selectionKey = iterator.next();
                if (selectionKey.isReadable()) {


                    SocketChannel channel = (SocketChannel) selectionKey.channel();
                    ByteBuffer byteBuffer = ByteBuffer.allocate(1024);
                    channel.read(byteBuffer);
                    System.out.println(new String(byteBuffer.array()).trim());
                }
            }
            iterator.remove();
        }
    }

}
Test:
start the server first, then start the client.
Client 1

Client 2

Server

summary
Chapter 5 In-depth Analysis of JAVA AIO
5.1 AIO programming
- Java AIO (NIO 2.0): Asynchronous and non-blocking, the server implementation mode is one effective request and one thread, and the client's I/O request is completed by the operating system (OS) first and then notifies the server application to start the thread for processing.
AIO
异步非阻塞,基于NIO的,可以称之为NIO2.0
    BIO                   NIO                              AIO
Socket                SocketChannel                    AsynchronousSocketChannel
ServerSocket          ServerSocketChannel	       AsynchronousServerSocketChannel
Unlike NIO, when performing read and write operations, you only need to directly call the read or write method of the API. These two methods are asynchronous. For read operations, when there is a stream to read, the operating system will Pass the readable stream into the buffer of the read method. For the write operation, when the operating system finishes writing the stream passed by the write method, the operating system actively notifies the application
That is, it can be understood that the read/write methods are asynchronous, and the callback function will be called actively after completion. In JDK1.7, this part is called NIO.2, which mainly adds the following four asynchronous channels under the Java.nio.channels package:
	AsynchronousSocketChannel
	AsynchronousServerSocketChannel
	AsynchronousFileChannel
	AsynchronousDatagramChannel
Chapter 6 BIO, NIO, AIO Course Summary
BIO、NIO、AIO:
-
Java BIO: Synchronous and blocking , the server implementation mode is one thread per connection, that is, when the client has a connection request, the server needs to start a thread for processing. If the connection does not do anything, it will cause unnecessary thread overhead, of course it can Improved through the thread pool mechanism.
-
Java NIO: Synchronous and non-blocking , the server implementation mode is one thread per request, that is, the connection requests sent by the client will be registered on the multiplexer, and the multiplexer will start when it polls for I/O requests on the connection One thread does the processing.
-
Java AIO (NIO.2): Asynchronous and non-blocking . The server implementation mode is one thread for one effective request. The I/O requests of the client are all completed by the OS first, and then the server application is notified to start the thread for processing.
Application scenario analysis of BIO, NIO, and AIO:
-
The BIO method is suitable for architectures with a relatively small and fixed number of connections. This method has relatively high requirements on server resources, and concurrency is limited to applications. It was the only choice before JDK1.4, but the program is intuitive, simple and easy to understand.
-
The NIO method is suitable for architectures with a large number of connections and relatively short connections (light operations), such as chat servers. Concurrency is limited to applications, and programming is more complicated. JDK1.4 began to support it.
-
The AIO method is used in architectures with a large number of connections and relatively long connections (heavy operations), such as album servers, which fully invoke the OS to participate in concurrent operations, and the programming is more complicated. JDK7 began to support it. Netty!