1. Why intranet penetration is required
FRP is a high-performance reverse proxy application that can be used for intranet penetration, and supports tcp, udp, http, https protocols.
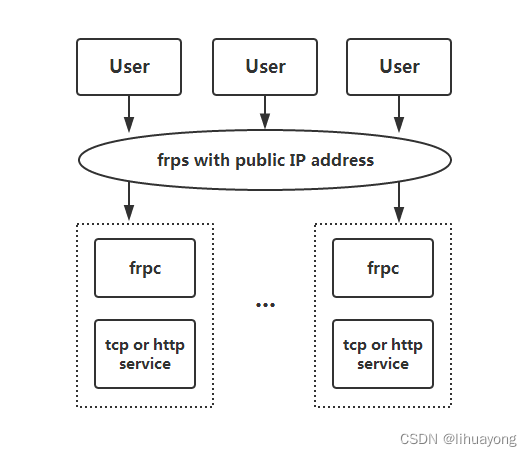
Usage scenario: The public network server listens to a certain port and waits for the intranet server to connect. After the intranet server is successfully connected, the user accesses a certain port on the public network, and all the content accessed will be forwarded to the intranet server, that is, all requests will go through The public network server forwards once, but it is not really a complete internal network penetration.
To be more specific, if I am at home or in the office and develop the WeChat payment function, after the payment is successful, WeChat will call back our code, and WeChat will definitely not be able to access the computer in my home or office, because my computer is not on the public network. Is the local area network, how to do it?
At this time, you can use FRP intranet penetration. The implementation plan is to buy a Tencent cloud server or a cloud server from other manufacturers, build an FRP server on the cloud server, and build an FRP client on my computer. The business port of the FRP server is opened. At this time, tell WeChat to call back my FRP server business port. After FRP receives the request, it forwards the request to my computer. This is done. The payment callback is also equivalent to my The LAN has an external network entrance.
Post an official architecture diagram
2. Build the environment
My construction environment is used for http requests
Server version: CentOS Stream 8 64bit
FRP version: frp_0.46.0_linux 64 bits
My computer: MAC M1
FRP open source project: https://github.com/fatedier/frp
3. Installation
3.1 Server download
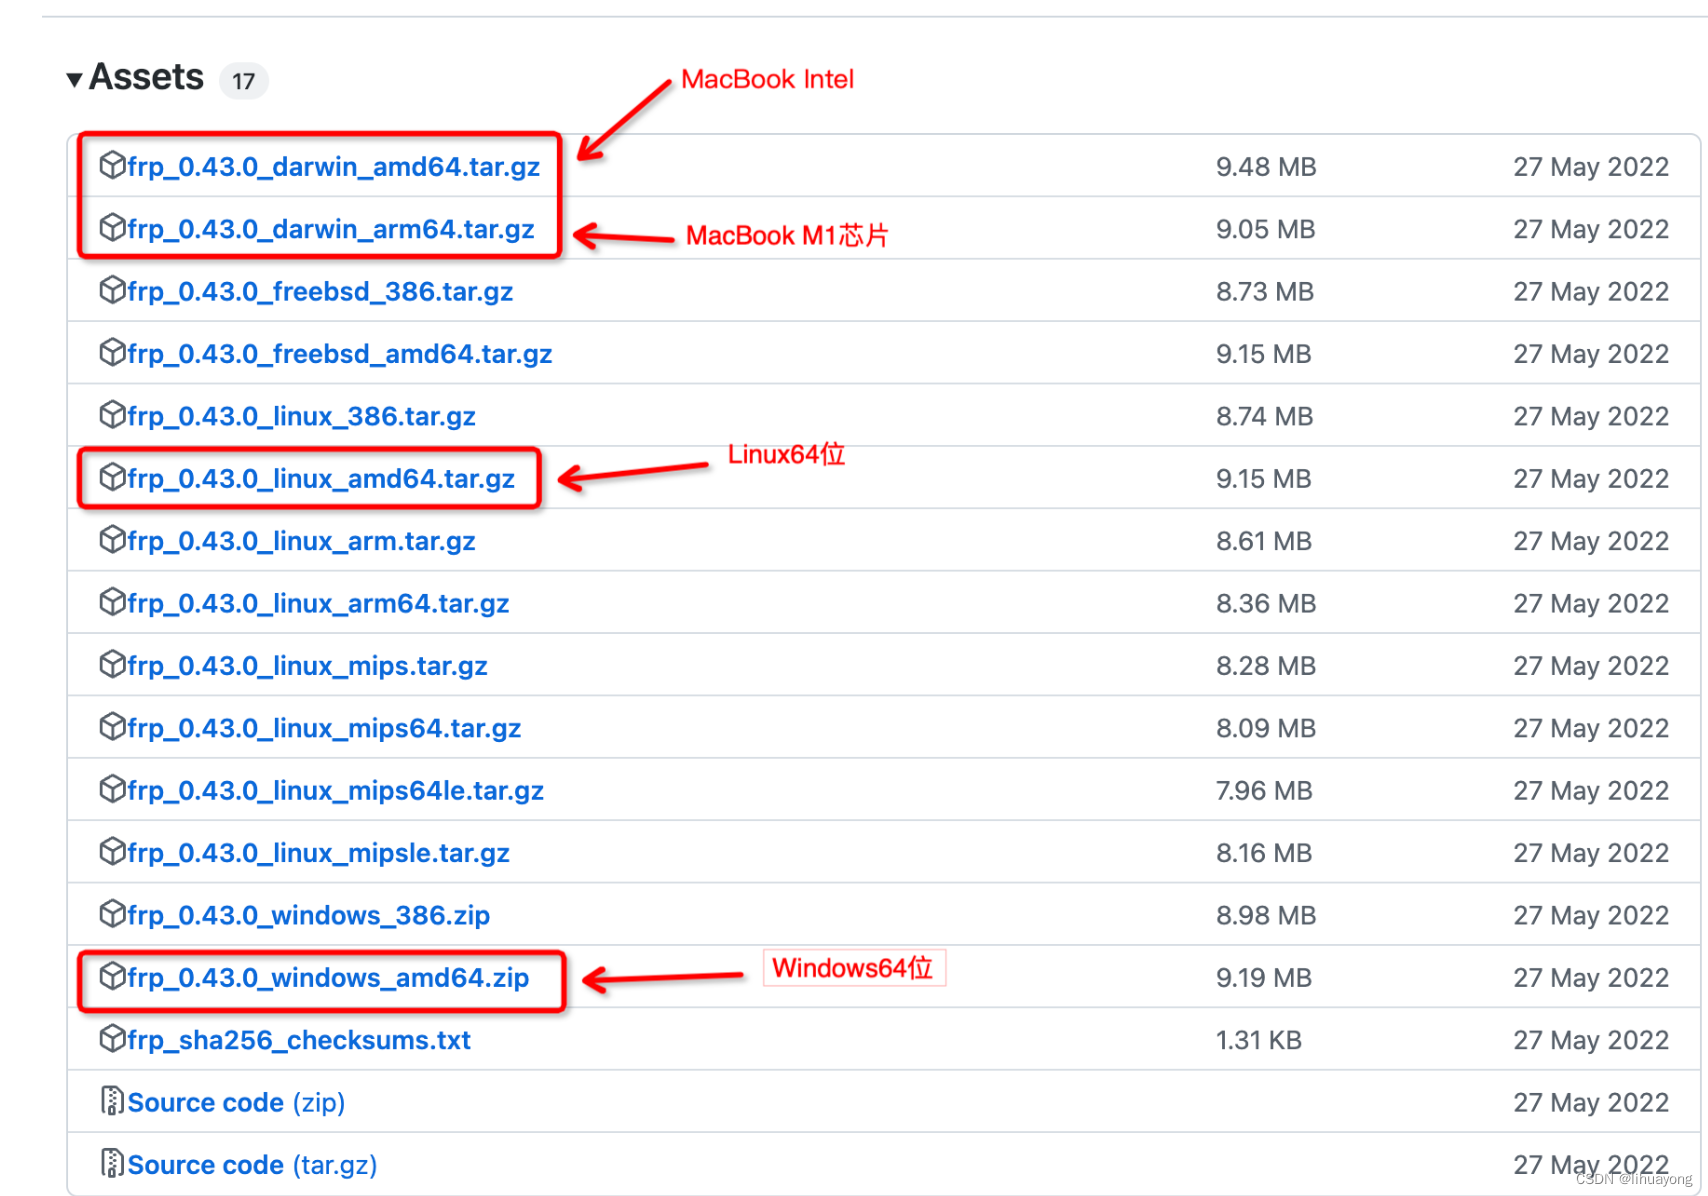
All versions: https://github.com/fatedier/frp/releases
Use a screenshot of frp_0.43 to illustrate
the server to execute the download
wget https://github.com/fatedier/frp/releases/download/v0.46.0/frp_0.46.0_darwin_arm64.tar.gz
3.2 Configuring the server
Decompress directly on the server side, then configure and run
tar -zxvf frp_0.46.0_darwin_arm64.tar.gz
mv frp_0.46.0_darwin_arm64 /usr/local/frp
Modify the FRP server configuration
vim frps.ini
[common]
# 用于客户端和服务端连接的端口,自己指定
bind_port = 7342
# 用于客户端和服务端连接的口令,自己指定
token = 18fx9AG*********kx11e
# 服务端仪表板的端口,自己指定
dashboard_port = 7343
# 打开仪表板页面登录的用户名和密码
dashboard_user = aaa
dashboard_pwd = *****
# 这个端口就是服务器开放到外网的,业务端口
vhost_http_port = 8081
3.3 configure systemctl
You can also skip configuring systemctl and start it directly with the following command line
cd /usr/local/frp
./frps -c ./frps.ini
The server configures systemctl to control frps, and starts
vim /etc/systemd/system/frps.service
[Unit]
# 服务名称,可自定义
Description = frps service
After = network.target syslog.target
Wants = network.target

[Service]
Type = simple
# 启动frps的命令,需修改为您的frps的安装路径
ExecStart = /usr/local/frp/frps -c /usr/local/frp/frps.ini

[Install]
WantedBy = multi-user.target
Start the server frps command
# 启动frps
systemctl start frps
# 开机自动启动frps
systemctl enable frps
# 重启frps
systemctl restart frps
# 停止frps
systemctl stop frps
# 查看frps状态
systemctl status frps
3.4 Client download
It is the same package as the download from the server, the same decompression, no more details
3.5 Configure client
frpc.ini configuration
[common]
# FRP服务器IP,改为自己的服务器IP
server_addr = 43.143.111.11
# FRP服务器bind_port端口
server_port = 7342
authentication_method = token
token = 18fx9AG*********kx11e

[web]
type = http
local_ip = 127.0.0.1
local_port = 8081
remote_port = 8081
# FRP服务器IP,可以不需要域名
custom_domains = 43.143.111.11
3.6 Start the client
Command line execution, /Users/***/Downloads/frp directory is my client installation directory
/Users/***/Downloads/frp/frpc -c /Users/***/Downloads/frp/frpc.ini
The startup is successful, and the client command line will output the following information
2023/01/06 11:21:42 [I] [service.go:298] [d4f0e8d8ab60ccf7] login to server success, get run id [d4f0e8d8ab60ccf7], server udp port [0]
2023/01/06 11:21:42 [I] [proxy_manager.go:142] [d4f0e8d8ab60ccf7] proxy added: [web]
2023/01/06 11:21:42 [I] [control.go:172] [d4f0e8d8ab60ccf7] [web] start proxy success
The FRP configuration is complete and the startup is successful, so that you can access it from anywhere
http://43.143.111.11:8081/***
This request will be forwarded to your own computer,
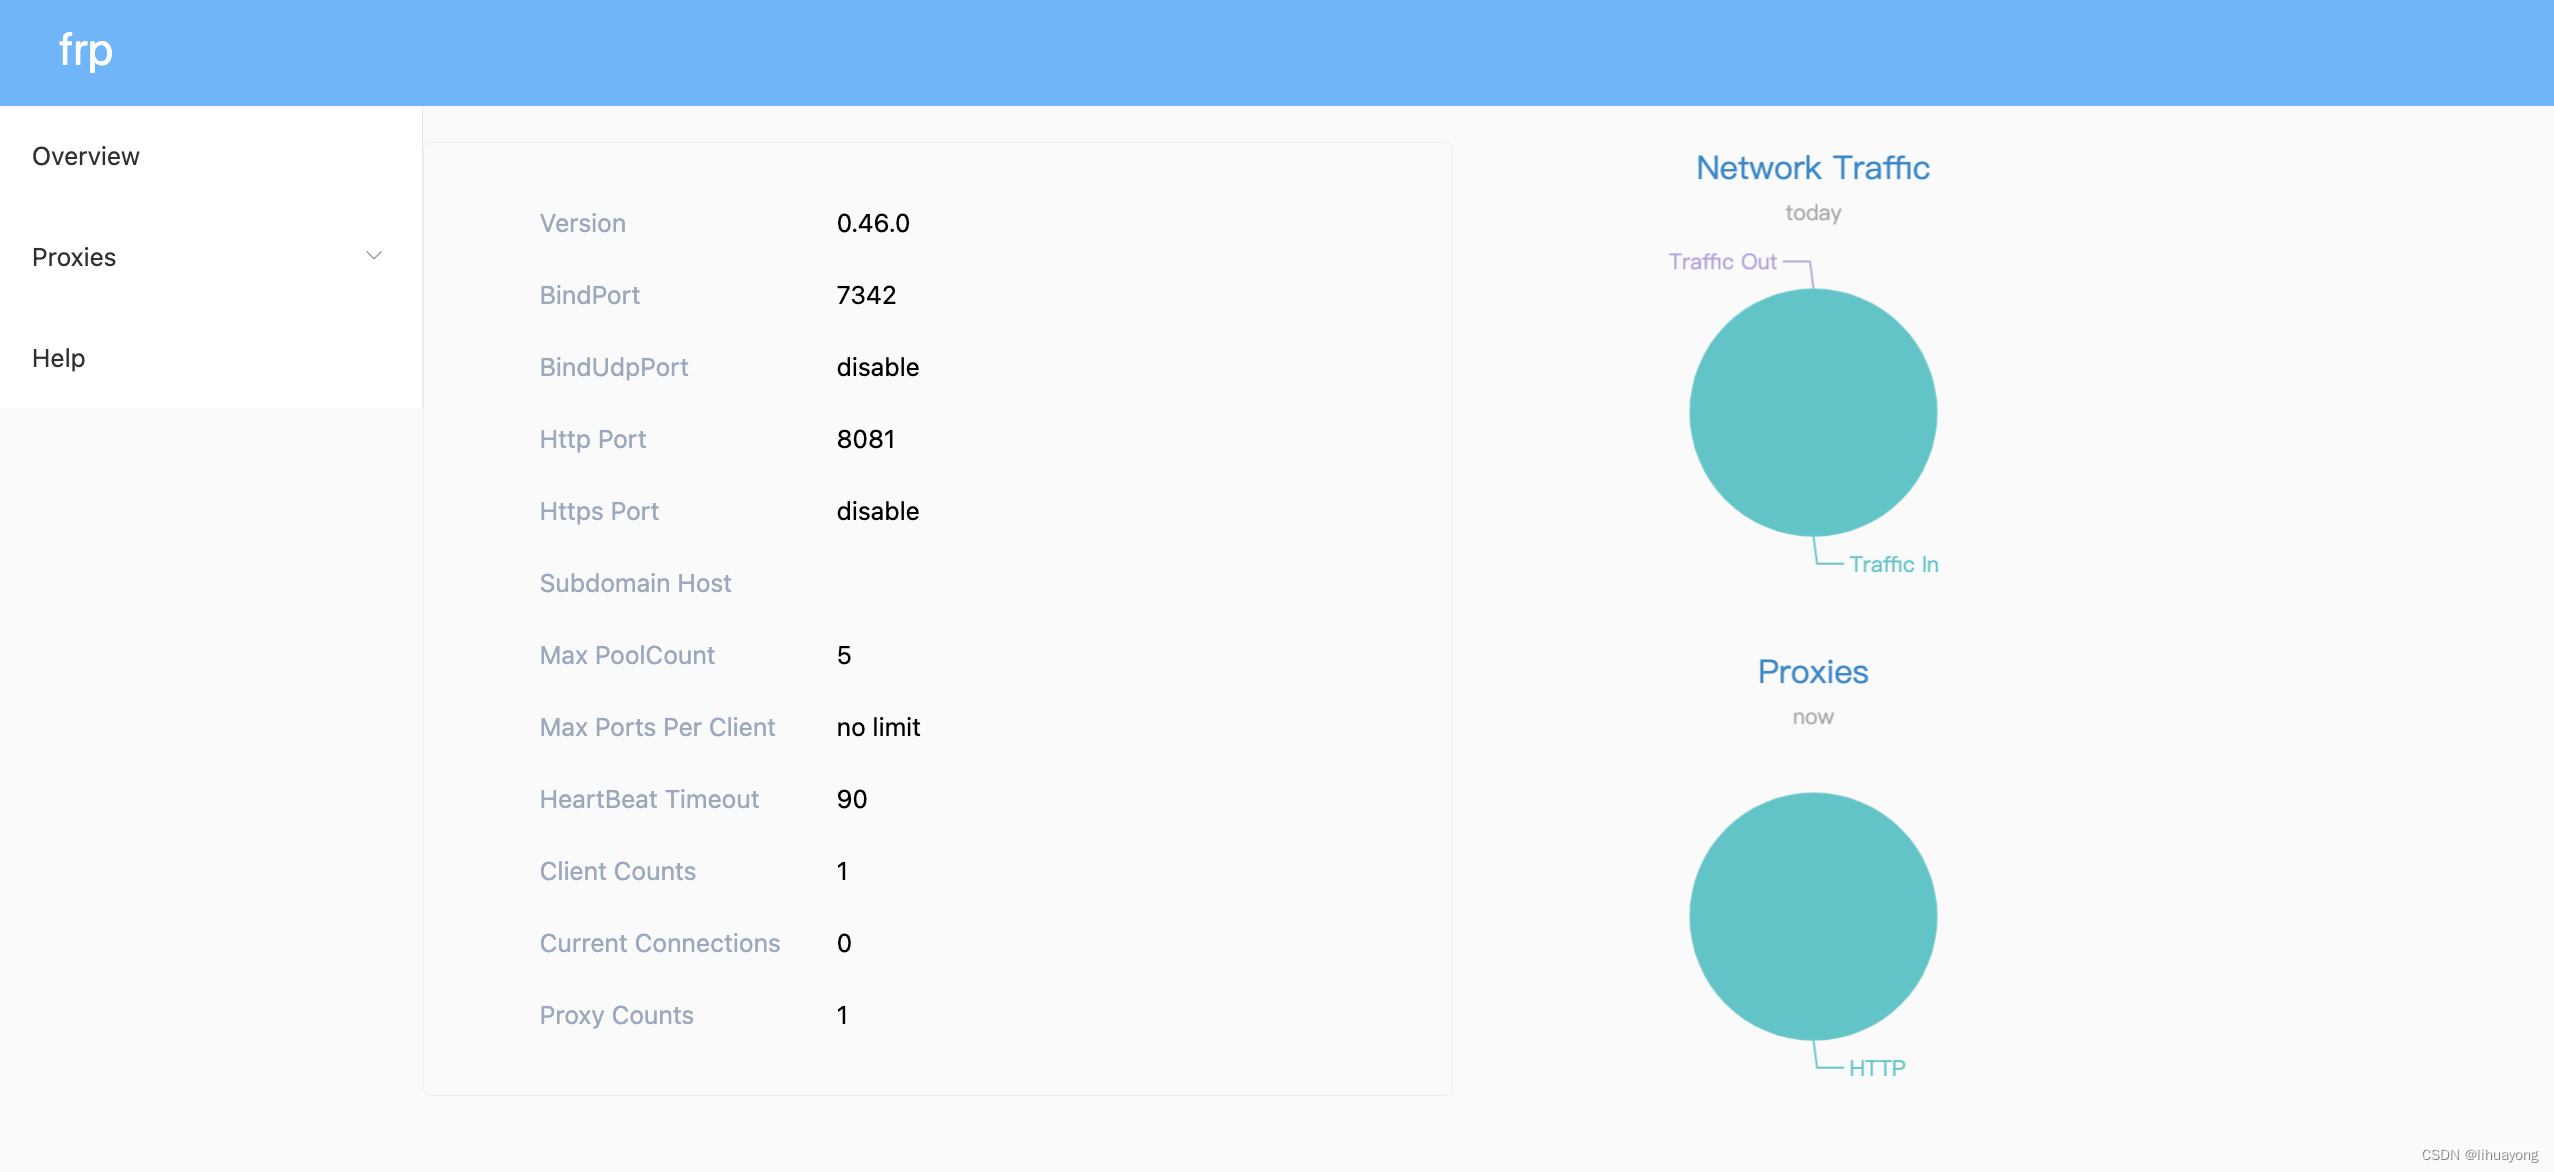
3.7 Dashboard
Visit the address below to view the dashboard of the http connection
http://43.143.111.11:7343
Four, pay attention
- Port 8081 on the cloud server must be opened in the security policy or firewall configuration on the cloud server.
- The service on port 8081 of your own machine should be started