1. Text
1. Elementui layout framework
2. Use elementui+vue+axios to complete a case.
2. elementui layout framework
Element, a Vue 2.0-based desktop component library for developers, designers and product managers.
In other words: Element is based on vue2.0 and provides various components (such as form table menu navigation...), using these components can better complete the function and layout.
We will talk about whoever we use these components. You should mainly see how I use these components, then you can use this way when you use other components.
2.1 How to use elementui components
(1) It is necessary to introduce the files of vue and elementui into the corresponding webpage
Note: == must first introduce vue before introducing element==
 <!--引入element得css样式-->
    <link type="text/css" rel="stylesheet" href="css/index.css"/>
    <!--引入vue得js文件 这个必须在element之前引入-->
    <script type="text/javascript" src="js/vue.js"></script>
    <!--element得js文件-->
    <script type="text/javascript" src="js/index.js"></script>
(2) Set the form component
<!DOCTYPE html>
<html lang="en">
<head>
<meta charset="UTF-8">
<title>Title</title>
<!--引入element得css样式-->
<link type="text/css" rel="stylesheet" href="css/index.css"/>
<!--引入vue得js文件 这个必须在element之前引入-->
<script type="text/javascript" src="js/vue.js"></script>
<!--element得js文件-->
<script type="text/javascript" src="js/index.js"></script>
</head>
<body>
<!--创建一个标签使vue挂载到该标签上-->
<div id="app">
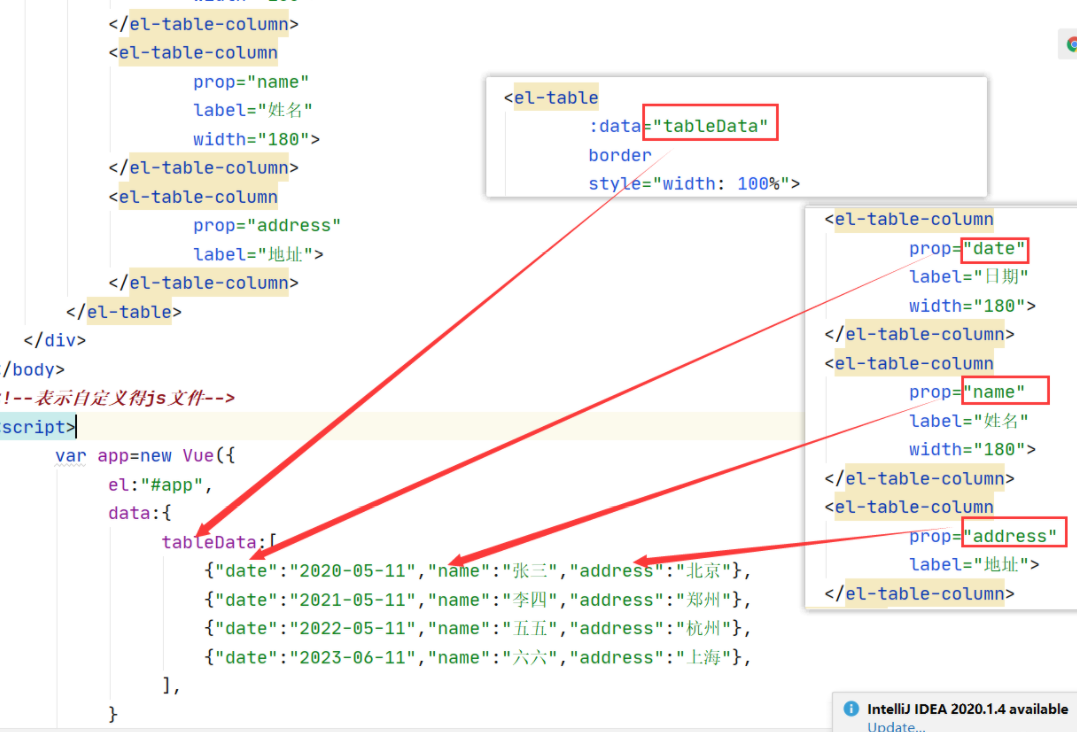
<!--:data==绑定了vue中定义得数据tableData
border表示设置表格边框
el-table-column:表示列标签
prop:该属性得名称必须和tableData中对象得属性名一致。
label:表格得标题
width: 设置列得宽度
-->
<el-table
:data="tableData"
border
style="width: 100%">
<el-table-column
prop="date"
label="日期"
>
</el-table-column>
<el-table-column
prop="name"
label="姓名"
>
</el-table-column>
<el-table-column
prop="address"
label="地址">
</el-table-column>
<el-table-column
fixed="right"
label="操作"
>
<template slot-scope="scope">
<el-button type="text" size="small">查看</el-button>
<el-button type="text" size="small">编辑</el-button>
</template>
</el-table>
</div>
</body>
<!--表示自定义得js文件-->
<script>
var app=new Vue({
el:"#app",
data:{
tableData:[
{"date":"2020-05-11","name":"张三","address":"北京"},
{"date":"2021-05-11","name":"李四","address":"郑州"},
{"date":"2022-05-11","name":"五五","address":"杭州"},
{"date":"2023-06-11","name":"六六","address":"上海"},
],
}
})
</script>
</html>Change the above operation text into a button form:
<el-table-column
                   fixed="right"
                   label="操作"
                   >
     <template slot-scope="scope">
         <el-button type="success" size="small" icon="el-icon-edit" plain>编辑</el-button>
         <el-button type="danger"  size="small" icon="el-icon-delete" plain>删除</el-button>
     </template>
</el-table-column>
The browser does not display the style of the icon: we need to import the following three files into the project

3. elementui+axios+ background code
Our table data above are all dead data. In our actual development, the table data should be obtained from the background database.
-- 创建数据库
create database vue01;
-- 切换数据库到vue01
use vue01;
-- 创建表
create table t_dept(
     dept_id int primary key auto_increment COMMENT '部门号',
		 dept_name varchar(20) COMMENT '部门名称',
		 loc varchar(20) COMMENT '部门所在地'
);
create table t_emp(
    emp_id int primary key auto_increment COMMENT '员工编号',
		emp_name varchar(20) COMMENT '员工姓名',
		emp_sex TINYINT COMMENT '性别 0表示男 1表示女',
		emp_age int  COMMENT '年龄',
		emp_salary DECIMAL(7,2) COMMENT '工资',
		dept_id int COMMENT '关联的部门号'
);
-- 添加数据
insert into t_dept values
(null,'研发部','郑州'),(null,'市场部','杭州'),(null,'人事部','北京')

insert into t_emp values
(null,'张三',0,25,1666.65,1),
(null,'李四',1,26,2555.65,2),
(null,'王五',0,32,6666.65,3),
(null,'赵六',0,36,8888.65,1)
(2) Create an employee entity class
package com.aaa.entity;

/**
 * @program: vue01-qy151
 * @description: 员工表的实体类
 * @author: ysh
 * @create: 2022-05-26 15:21
 **/
public class Emp {
    //员工编号
    private int empId;
    //员工姓名
    private String empName;
    //性别
    private int empSex;
    //年龄
    private int empAge;
    //薪水
    private Double empSalary;
    //部门号
    private int deptId;

    public int getEmpId() {
        return empId;
    }

    public void setEmpId(int empId) {
        this.empId = empId;
    }

    public String getEmpName() {
        return empName;
    }

    public void setEmpName(String empName) {
        this.empName = empName;
    }

    public int getEmpSex() {
        return empSex;
    }

    public void setEmpSex(int empSex) {
        this.empSex = empSex;
    }

    public int getEmpAge() {
        return empAge;
    }

    public void setEmpAge(int empAge) {
        this.empAge = empAge;
    }

    public Double getEmpSalary() {
        return empSalary;
    }

    public void setEmpSalary(Double empSalary) {
        this.empSalary = empSalary;
    }

    public int getDeptId() {
        return deptId;
    }

    public void setDeptId(int deptId) {
        this.deptId = deptId;
    }
}
(3) employee's dao
/**
     * 查询所有员工信息
     * @return 所有员工信息
     */
    public List<Emp> findAll(){
        List<Emp> list = new ArrayList<>();
        try {
            getConn();
            String sql="select * from t_emp";
            ps=connection.prepareStatement(sql);
            rs=ps.executeQuery();
            while(rs.next()){
                 Emp emp=new Emp();
                 emp.setEmpId(rs.getInt("emp_id"));
                 emp.setEmpName(rs.getString("emp_name"));
                 emp.setEmpAge(rs.getInt("emp_age"));
                 emp.setEmpSalary(rs.getDouble("emp_salary"));
                 emp.setEmpSex(rs.getInt("emp_sex"));
                 emp.setDeptId(rs.getInt("dept_id"));
                 list.add(emp);
            }
        } catch (Exception e) {
            e.printStackTrace();
        } finally {
            closeAll();
        }
        return list;
    }
(4) Test dao method
package com.aaa.test;

import com.aaa.dao.EmpDao;
import org.junit.Test;

/**
 * @program: vue01-qy151
 * @description:
 * @author: ysh
 * @create: 2022-05-26 15:30
 **/
public class TestEmpDao {
    private EmpDao empDao=new EmpDao();
    @Test
    public void testFindAll(){
        System.out.println(empDao.findAll());
    }
}
(5)controller
package com.aaa.controller;

import com.aaa.dao.EmpDao;
import com.aaa.entity.Emp;
import com.alibaba.fastjson.JSON;

import javax.servlet.ServletException;
import javax.servlet.annotation.WebServlet;
import javax.servlet.http.HttpServlet;
import javax.servlet.http.HttpServletRequest;
import javax.servlet.http.HttpServletResponse;
import java.io.IOException;
import java.io.PrintWriter;
import java.util.List;

@WebServlet(name = "EmpServlet",urlPatterns = "/EmpServlet")
public class EmpServlet extends HttpServlet {
    private EmpDao empDao=new EmpDao();
    @Override
    protected void service(HttpServletRequest req, HttpServletResponse resp) throws ServletException, IOException {
         req.setCharacterEncoding("utf-8");
         resp.setContentType("text/html;charset=utf-8");
         //接受处理的标识
         String method = req.getParameter("method");
         if("delete".equals(method)){

         }else{
             //查询所有的操作
             queryAll(req,resp);
         }
    }

    private void queryAll(HttpServletRequest req, HttpServletResponse resp)throws ServletException, IOException {
        List<Emp> list = empDao.findAll();
        //把java集合转换为json对象。---fastjson
        String result = JSON.toJSONString(list);
        PrintWriter writer = resp.getWriter();
        //输出给客户
        writer.print(result);
        //关闭资源
        writer.flush();
        writer.close();
    }
}
(6) Display to the web page
<!DOCTYPE html>
<html lang="en">
<head>
    <meta charset="UTF-8">
    <title>Title</title>
    <!--引入element得css样式-->
    <link type="text/css" rel="stylesheet" href="css/index.css"/>
    <!--引入vue得js文件 这个必须在element之前引入-->
    <script type="text/javascript" src="js/vue.js"></script>
    <script type="text/javascript" src="js/axios.min.js"></script>
    <!--element得js文件-->
    <script type="text/javascript" src="js/index.js"></script>
</head>
<body>
   <!--创建一个标签使vue挂载到该标签上-->
   <div id="app">
       <!--:data==绑定了vue中定义得数据tableData
           border表示设置表格边框
           el-table-column:表示列标签
              prop:该属性得名称必须和tableData中对象得属性名一致。
              label:表格得标题
              width: 设置列得宽度
       -->
       <el-table
               :data="tableData"
               border
               style="width: 100%">
           <el-table-column
                   prop="empId"
                   label="员工编号"
                   >
           </el-table-column>
           <el-table-column
                   prop="empName"
                   label="员工姓名"
                   >
           </el-table-column>
           <el-table-column
                   prop="empSex"
                   label="性别">
           </el-table-column>
           <el-table-column
                   prop="empAge"
                   label="年龄">
           </el-table-column>
           <el-table-column
                   prop="empSalary"
                   label="薪水">
           </el-table-column>
           <el-table-column
                   prop="deptId"
                   label="部门编号">
           </el-table-column>
           <el-table-column
                   fixed="right"
                   label="操作"
                   >
               <template slot-scope="scope">
                   <el-button type="success" size="small" icon="el-icon-edit" plain>编辑</el-button>
                   <el-button type="danger"  size="small" icon="el-icon-delete" plain>删除</el-button>
               </template>
           </el-table-column>
       </el-table>
   </div>
</body>
<!--表示自定义得js文件-->
<script>
      var app=new Vue({
           el:"#app",
           data:{
                tableData:[],
           },
           //页面加载完毕后执行;
           created(){
               this.initTable();
           },
           methods:{
               //初始化表格数据
               initTable(){
                    var that=this;
                    //通过axios后台服务发送异步请求
                    axios.post("EmpServlet").then(function(result){
                          if(result.data.code===2000){//===:比较值和引用是否相同
                              that.tableData=result.data.data;
                          }else{

                          }
                    })
               }
           }
      })
</script>
</html>
We found that the above gender is displayed as a number. How to display male and female? We need to customize the column
<el-table-column
                   prop="empSex"
                   label="性别">
               <template slot-scope="scope">
                   <el-tag size="medium"> {

   { scope.row.empSex==0?"男":"女" }}</el-tag>
               </template>
           </el-table-column>
4. delete
(1) front end

  var qs=Qs;               axios.post("EmpServlet",qs.stringify({"method":"delete","id":id})).then(function(result){
          that.initTable();
 })
The parameters submitted by the underlying post of axios will be encapsulated into the request payload request carrier. Using request.getParamter cannot accept the parameters of the request carrier, and request.getParamter can only accept query param parameters and form data parameters. We can use qs to convert the parameters of the request carrier into form data parameters. conversion steps
(1) Introduce qs into the web page
<script type="text/javascript" src="js/qs.min.js"></script>
(2) Rewrite the Qs object and assign a parameter
var qs=Qs;
( 3) Convert the request payload using the stringify method
qs.stringify({"":"","":""})
(2)servlet
private void delete(HttpServletRequest req, HttpServletResponse resp)  throws ServletException, IOException{
        String id = req.getParameter("id");
        int row=empDao.delete(id);
        PrintWriter writer = resp.getWriter();
        if(row==1){ //删除成功
            CommonResult commonResult=new CommonResult(2000,"删除成功",null);
            writer.print(JSON.toJSONString(commonResult));
        }else{ //删除失败
            CommonResult commonResult=new CommonResult(5000,"删除失败",null);
            writer.print(JSON.toJSONString(commonResult));
        }
        writer.flush();
        writer.close();
    }
(3) dao
   //删除操作
    public int delete(String id) {
        String  sql ="delete from t_emp where emp_id=?";
        return edit(sql,id);
    }
5. Add function
Clicking the Add button displays a popup layer

 <el-dialog
            title="添加员工"
            :visible.sync="addDialogVisible"
            width="30%"
           >
        <!--:model==绑定表单数据-->
        <el-form :model="addform">
            <el-form-item label="姓名" label-width="40px">
                <el-input v-model="addform.empName" autocomplete="off"></el-input>
            </el-form-item>
            <el-form-item label="性别" label-width="40px">
                <el-radio v-model="addform.empSex" :label="0">男</el-radio>
                <el-radio v-model="addform.empSex" :label="1">女</el-radio>
            </el-form-item>
            <el-form-item label="年龄" label-width="40px">
                <el-input v-model="addform.empAge" autocomplete="off"></el-input>
            </el-form-item>
            <el-form-item label="薪水" label-width="40px">
                <el-input v-model="addform.empSalary" autocomplete="off"></el-input>
            </el-form-item>
        </el-form>
        <span slot="footer" class="dialog-footer">
            <el-button @click="addDialogVisible = false">取 消</el-button>
            <el-button type="primary" @click="">确 定</el-button>
        </span>
    </el-dialog>
(2) Add click event
 //添加的点击事件
            addEmp(){
                 var qs=Qs;
                 var that=this;
                 axios.post("EmpServlet?method=insert",qs.stringify(this.addform)).then(function(result){
                         if(result.data.code===2000){
                               that.$message.success(result.data.msg);
                               that.initTable();//重新加载表格
                               that.addDialogVisible=false;
                         }
                 })
            }
(3) Add servlets
//添加
    private void insert(HttpServletRequest req, HttpServletResponse resp)  throws ServletException, IOException{
        String name = req.getParameter("empName");
        String sex = req.getParameter("empSex");
        String age = req.getParameter("empAge");
        String salary = req.getParameter("empSalary");
        Emp emp = new Emp(name,Integer.parseInt(sex),Integer.parseInt(age),Double.parseDouble(salary));
        int row=empDao.add(emp);
        PrintWriter writer = resp.getWriter();
        if(row==1){ //添加成功
            CommonResult commonResult=new CommonResult(2000,"添加成功",null);
            writer.print(JSON.toJSONString(commonResult));
        }else{ //添加失败
            CommonResult commonResult=new CommonResult(5000,"添加失败",null);
            writer.print(JSON.toJSONString(commonResult));
        }
        writer.flush();
        writer.close();
    }
(4) code of dao
 /**
     * 添加功能
     * @param emp
     * @return
     */
    public int add(Emp emp) {
        String sql="insert into t_emp(emp_name,emp_sex,emp_age,emp_salary) values(?,?,?,?)";
        return edit(sql,emp.getEmpName(),emp.getEmpSex(),emp.getEmpAge(),emp.getEmpSalary());
    }
6. Modify function
(1) Click to edit the echo data
<!--修改员工的对话框-->
    <el-dialog
            title="修改员工"
            :visible.sync="editDialogVisible"
            width="30%"
    >
        <!--:model==绑定表单数据-->
        <el-form :model="editform" :rules="addRules" ref="addRuleForm">
            <el-form-item label="姓名" label-width="80px" prop="empName">
                <el-input v-model="editform.empName" autocomplete="off"></el-input>
            </el-form-item>
            <el-form-item label="性别" label-width="80px">
                <el-radio v-model="editform.empSex" :label="0">男</el-radio>
                <el-radio v-model="editform.empSex" :label="1">女</el-radio>
            </el-form-item>
            <el-form-item label="年龄" label-width="80px" prop="empAge">
                <el-input v-model.number="editform.empAge" autocomplete="off"></el-input>
            </el-form-item>
            <el-form-item label="薪水" label-width="80px">
                <el-input v-model="editform.empSalary" autocomplete="off"></el-input>
            </el-form-item>
        </el-form>
        <span slot="footer" class="dialog-footer">
            <el-button @click="editDialogVisible = false">取 消</el-button>
            <el-button type="primary" @click="editEmp">确定修改</el-button>
        </span>
    </el-dialog>
Note: ==:visible.sync="editDialogVisible" must define editDialogVisible in vue data :model="editform" ensures that editform== is defined in vue data
<el-button @click="edit(scope.row)" type="success" size="small" icon="el-icon-edit" plain>编辑</el-button>

  //修改按钮点击事件
            edit(row){
                  //1.显示修改弹出层
                  this.editDialogVisible=true;
                  //2.数据回显
                  this.editform=row;
            },
(2) Click the Confirm Modification button
<el-button type="primary" @click="editEmp">确定修改</el-button>//确认修改
editEmp(){
var that=this;
var qs=Qs;
this.$refs['editRuleForm'].validate((valid) => {
if (valid) { //表单校验通过
axios.post("EmpServlet?method=edit",qs.stringify(this.editform)).then(function(result){
if(result.data.code===2000){
that.$message.success(result.data.msg);//弹出成功的消息
that.editDialogVisible=false; //隐藏修改对话框
that.initTable(); //重新加载表格数据
}
})
}
});
},servlet:
//修改操作
    private void edit(HttpServletRequest req, HttpServletResponse resp)throws ServletException, IOException{
        String name = req.getParameter("empName");
        String sex = req.getParameter("empSex");
        String age = req.getParameter("empAge");
        String salary = req.getParameter("empSalary");
        String  id = req.getParameter("empId");
        Emp emp = new Emp(Integer.parseInt(id),name,Integer.parseInt(sex),Integer.parseInt(age),Double.parseDouble(salary));
        int row=empDao.update(emp);
        PrintWriter writer = resp.getWriter();
        if(row==1){ //删除成功
            CommonResult commonResult=new CommonResult(2000,"修改成功",null);
            writer.print(JSON.toJSONString(commonResult));
        }else{ //删除失败
            CommonResult commonResult=new CommonResult(5000,"修改失败",null);
            writer.print(JSON.toJSONString(commonResult));
        }
        writer.flush();
        writer.close();
    }
dao:
/**
     * 修改功能
     * @param emp
     * @return
     */
    public int update(Emp emp) {
        String sql = "update t_emp set emp_name=?,emp_sex=?,emp_age=?,emp_salary=? where emp_id=?";
        return edit(sql,emp.getEmpName(),emp.getEmpSex(),emp.getEmpAge(),emp.getEmpSalary(),emp.getEmpId());
    }
7. Login
<!DOCTYPE html>
<html lang="en">
<head>
    <meta charset="UTF-8">
    <title>登录页面</title>
    <!--引入element得css样式-->
    <link type="text/css" rel="stylesheet" href="css/index.css"/>
    <!--引入vue得js文件 这个必须在element之前引入-->
    <script type="text/javascript" src="js/vue.js"></script>
    <script type="text/javascript" src="js/qs.min.js"></script>
    <script type="text/javascript" src="js/axios.min.js"></script>
    <!--element得js文件-->
    <script type="text/javascript" src="js/index.js"></script>
    <style>
        /*body{
            background: url("imgs/1.webp") no-repeat;
        }*/
         body,.box{
             overflow: hidden;
             height: 100%;
         }
        .box{
             background: url("imgs/1.webp") no-repeat;
        }
        #loginBox {
            width: 450px;
            height: 300px;
            background: white;
            border-radius: 3px;
            position: absolute;
            left: 50%;
            top: 50%;
            transform: translate(-50%, -50%);
        }
       #loginBox>.avatar_box{
            height: 130px;
            width: 130px;
            border: 1px solid #eee;
            border-radius: 50%;
            padding: 10px;
            box-shadow: 0 0 10px #ddd;
            position: absolute;
            left: 50%;
            transform: translate(-50%, -50%);
            background-color: #fff;
        }
         #loginBox>.avatar_box>img {
             width: 100%;
             height: 100%;
             border-radius: 50%;
             background-color: #eee;
         }
         .login_form {
             position: absolute;
             bottom: 0;
             width: 100%;
             padding: 0 20px;
             box-sizing: border-box;
         }
    </style>
</head>
<body background="imgs/3.webp">
<div class="box">
    <div id="loginBox">
        <!-- 头像 -->
        <div class="avatar_box">
             <img src="imgs/1.jpg" />
        </div>
        <el-form label-width="80px" :model="loginForm" :rules="rules" ref="loginFormRef" class="login_form">
            <el-form-item label="账号:" prop="username">
                <el-input v-model="loginForm.username"></el-input>
            </el-form-item>
            <el-form-item label="密码:" prop="password">
                <el-input v-model="loginForm.password"></el-input>
            </el-form-item>
            <el-form-item>
                <el-button type="primary" @click="submitForm()">登录</el-button>
            </el-form-item>
        </el-form>
    </div>
</div>

<script>
    var app = new Vue({
        el: ".box",
        data: {
            loginForm: {},
            //校验规则
            rules: {
                username: [
                    {required: true, message: "请输入账号", trigger: "blur"},
                    {min: 5, max: 12, message: "账号的长度必须{5~12}", trigger: "blur"},
                ],
                password: [
                    {required: true, message: "请输入密码", trigger: "blur"},
                    {min: 6, max: 12, message: "密码的长度必须{6~12}", trigger: "blur"},
                ]
            }
        },
        methods: {
            submitForm() {
                var that = this;
                var qs = Qs;
                this.$refs['loginFormRef'].validate((valid) => {
                    if (valid) {
                        axios.post("UserServlet?method=login", qs.stringify(this.loginForm)).then(function (result) {
                            if (result.data.code === 2000) {
                                that.$message.success(result.data.msg);
                                location.href = "element01.html"
                            } else {
                                that.$message.error(result.data.msg);
                            }
                        });
                    }
                })
            }
        }
    })
</script>
</body>
</html>
(2)servlet
 private void login(HttpServletRequest req, HttpServletResponse resp)throws ServletException, IOException {
        PrintWriter writer = resp.getWriter();
        String username = req.getParameter("username");
        String password = req.getParameter("password");

        if("admin".equals(username)&&"123456".equals(password)){
            HttpSession session = req.getSession();
            session.setAttribute("username",username);
            CommonResult commonResult=new CommonResult(2000,"登录成功",null);
            writer.print(JSON.toJSONString(commonResult));
        }else{
            CommonResult commonResult=new CommonResult(5000,"账号或密码错误",null);
            writer.print(JSON.toJSONString(commonResult));
        }
        writer.flush();
        writer.close();
    }
8. Form validation
The Form component provides the form validation function, you only need to pass in the agreed validation rules through rulesthe property , and propset the Form-Item property to the field name to be validated
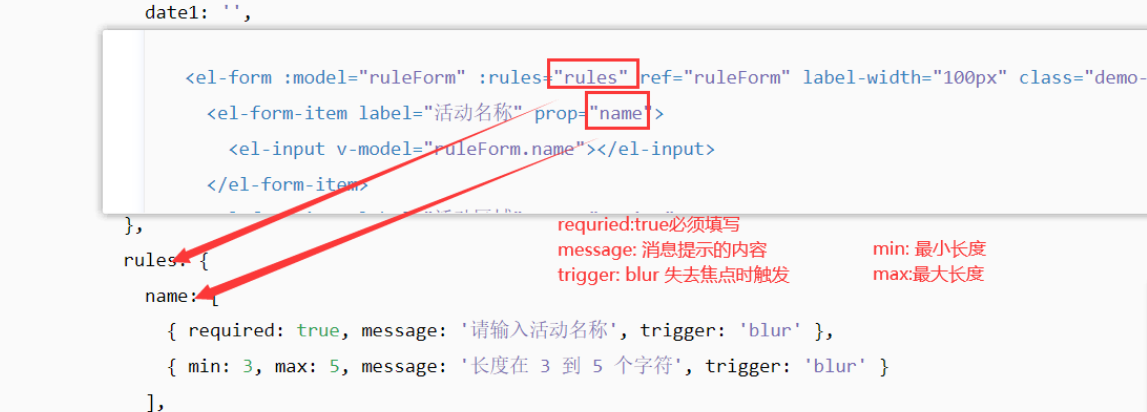
If the validation of the form is not met, the form submission should not be allowed
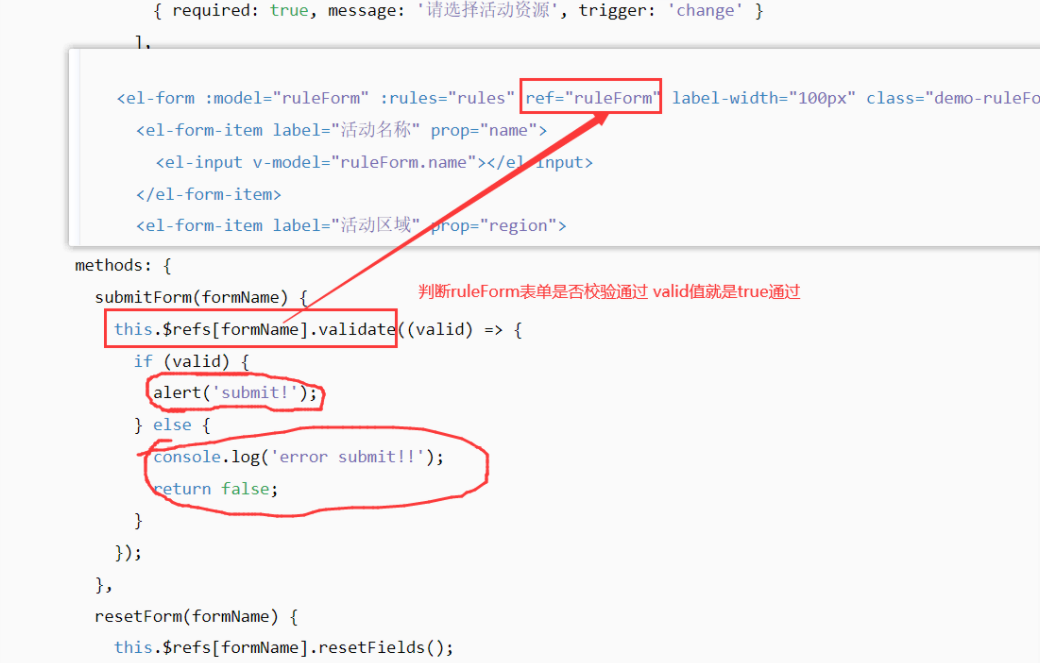
//添加的点击事件
            addEmp(){
                this.$refs['addRuleForm'].validate((valid) => {
                    if (valid) { //表单校验通过
                        var qs=Qs;
                        var that=this;
                        axios.post("EmpServlet?method=insert",qs.stringify(this.addform)).then(function(result){
                            if(result.data.code===2000){
                                that.$message.success(result.data.msg);
                                that.initTable();//重新加载表格
                                that.addDialogVisible=false; //隐藏弹出层
                            }
                        })
                    }
                });

            }
9. Add login filter
package com.qy151.filter;

import javax.servlet.*;
import javax.servlet.annotation.WebFilter;
import javax.servlet.http.HttpServletRequest;
import javax.servlet.http.HttpServletResponse;
import java.io.IOException;

/**
 * @unthor : YSH
 * @date : 13:44 2022/5/29
 */
@WebFilter(filterName = "UserFilter",urlPatterns = "/*")
public class UserFilter implements Filter {

    public void init(FilterConfig filterConfig) throws ServletException {

    }


    public void doFilter(ServletRequest servletRequest, ServletResponse servletResponse, FilterChain filterChain) throws IOException, ServletException {
        HttpServletRequest request= (HttpServletRequest) servletRequest;
        HttpServletResponse response= (HttpServletResponse) servletResponse;
        //1.接受请求路径
        String path = request.getRequestURI();
        //2.设置放行的路径
        if(path.contains("login.html")
                ||path.contains("UserServlet")
                ||path.endsWith(".js")
                ||path.endsWith(".css")
                ||path.endsWith(".jpg")
                ||path.endsWith(".gif")
                ||path.endsWith(".jpeg")
                ||path.endsWith(".webp")
                ||path.endsWith(".png")){
            filterChain.doFilter(request,response);
            return;
        }
        //3.判断用户是否登录
        Object username = request.getSession().getAttribute("username");
        if(username!=null){
            filterChain.doFilter(request,response);
            return;
        }

        //4.跳转到登录页面
        response.sendRedirect("login.html");

    }


    public void destroy() {

    }
}