There are a lot of 3D models used in industrial production of charts and models. In a large environment, building countless identical or different models is also quite a headache for programmers. Using HT to help you solve a big problem, countless examples can be found on the official website http://hightopo.com/demos/index.html .
Demo address of this article: http://hightopo.com/guide/guide/plugin/obj/examples/example_objajax.html
This time our example is to extract a small part of the ideas from these examples, as an analysis for everyone, take a look at the example renderings of this implementation:
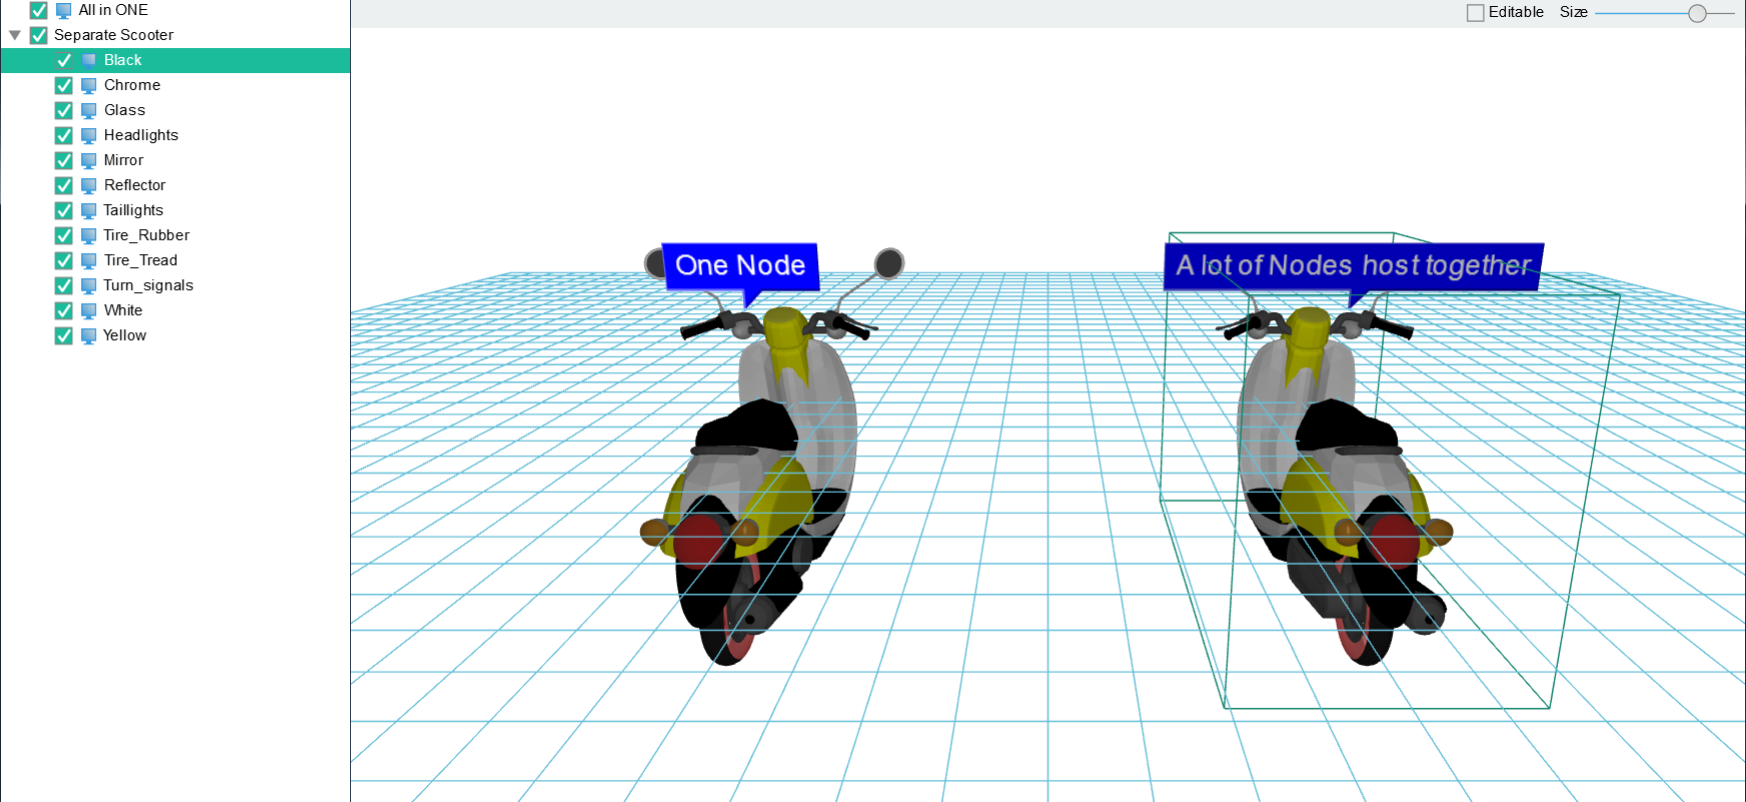
This example uses the tree component ht.widget.TreeView in HT and the ht.Default.loadObj function that loads OBJ format files in HT to load the two motorcycles in the figure. We use the code to parse parts of this example from scratch.
First observe the interface display of this example, you will find that the interface is composed of left and right parts, and the right side is composed of upper and lower parts. This split mode has a good solution in HT, and can fully use ht.widget .SplitView layers the interface, you can also use ht.widget.BorderPane to divide the interface into top, middle and bottom. Here we use both methods because it is an example:
dataModel = new ht.DataModel();//Data model
g3d = new ht.graph3d.Graph3dView(dataModel);//3d component
toolbar = new ht.widget.Toolbar(item); //Toolbar
borderPane = new ht.widget.BorderPane();//Panel component
borderPane.setTopView(toolbar);//toolbar on the top
borderPane.setCenterView(g3d);//g3d is placed in the middle part
treeView = new ht.widget.TreeView(dataModel); //tree component
mainSplit = new ht.widget.SplitView(treeView, borderPane, 'h', 0.2); //Split components
The item in the toolbar also follows the HT setting rules. The item is an array, and each element in the array is a part of the toolbar. In this example, the toolbar has only 2 elements, which is also representative enough:
item = [
    {
        label: 'Editable',
        type: 'check',
        action: function(){
            g3d.setEditable(this.selected);
        }
    },
    {
        id: 'size',
        label: 'Size',
        slider: {
            width: 120,
            min: 1,
            max: 60,
            value: 1,
            thickness: 1,
            onValueChanged: function(){
            if(rawS3){
                var value = this.getValue();
                dataModel.each(function(data){
                if(data instanceof ht.Node){
                    data.s3(rawS3[0] * value, rawS3[1] * value, rawS3[2] * value);
                    data.s({
                        'note.scale': value/20,
                        'note.t3': [0, -value, value]
                    });
                }
            });
        }
    }
];
We can set the object format type by setting the item element in the toolbar, where type can be set to check, toggle and radio, which represent check boxes, toggle buttons and radio buttons respectively, here we set Editable to check box, you can set whether it is editable by controlling this element. The rear slider is also the ht.Slider slider encapsulated in HT to bind the size of the OBJ object, and the size of the OBJ can be controlled by controlling the slider. For details, please refer to HT for Web Toolbar Components Manual .
Next, you need to add the outermost component into the bottom div. For those who have not read my article, I will explain that the root layer of all HT components is a div component, which can be obtained through the getView function of the component. By default And custom interaction time monitoring is generally added on the div (getView().addEventListener(type, func, false)), the rendering layer is generally provided by canvas, the user can directly set the css style on the root div and canvas layer, or add The new HTML component is placed on the root div and rendered together as a sibling component of the canvas. For details, please refer to the HT for Web Getting Started Manual .
Then import the OBJ format file into the model by using the ht.widget.loadObj function:
ht.Default.loadObj('obj/scooter.obj', 'obj/scooter.mtl', {//The inseparable motorcycle on the left
    cube: true,
    center: true,
    shape3d: 'scooter',
    finishFunc: function(modelMap, array, rawS3){
        window.rawS3 = rawS3;
        if(modelMap){
            var node = new ht.Node();
            node.setName('All in ONE');
            node.s({
                 'shape3d': 'scooter',
                 'wf.visible': 'selected',
                 'note': 'One Node',
                 'note.face': 'center',
                 'note.position': 7,
                 'note.background': 'blue',
                 'note.autorotate': 'y'
            });
            node.s3(rawS3);
            node.p3(-300, 0, 0);
            dataModel.add(node);
        }
        checkLoaded();
    }
});
The ht.Default.loadObj function has three parameters, objUrl OBJ file path, mtlUrl MTL file path, params JSON structure parameter, parmas parameter can set the control information of the third parameter ht.Default.parseObj(text, mtlMap, params), also That is to say, the control information carried by the third parameter in the ht.Default.parseObj function can be used in the third parameter params in the ht.Default.loadObj function, and the sync and finishFunc parameters are added, and the finishFUnc parameter is used Function for callback processing after loading, with parameters modelMap, array and rawS3, can do anything in finishFunc! For details, please refer to the HT for Web OBJ manual .
In this example, there are two motor motorcycle models, one is a whole model that cannot be split, and the other is a model that can be split into parts. Next, let's see how to split the models in the OBJ file:
ht.Default.loadObj('obj/scooter.obj', 'obj/scooter.mtl', {//The motor that can be divided on the right

    cube: true,
    center: true,
    finishFunc: function(modelMap, array, rawS3){
        if(modelMap){
            var lastNode = null,
            firstNode = null,
            parentNode = new ht.Data();

            parentNode.setName('Separate Scooter');
            dataModel.add(parentNode);

            for(var name in modelMap){
                var model = modelMap[name];
                var shape3d = 'scooter:' + name;
                ht.Default.setShape3dModel(shape3d, model);

                var node = new ht.Node();
                node.setName(name);
                node.setParent(parentNode);
                node.s({
                    'shape3d': shape3d,
                    'wf.visible': 'selected'
                });
                node.setHost (lastNode);
                lastNode = node;
                if(!firstNode){
                    firstNode = node;
                }
                node.s3(rawS3);
                dataModel.add(node);
            }
            if (lastNode) {
                firstNode.setHost (lastNode);
                firstNode.p3(300, 0, 0);
                firstNode.s({
                    'note': 'A lot of Nodes host together',
                    'note.face': 'center',
                    'note.position': 7,
                    'note.background': 'blue'
                });
            }
        }
        checkLoaded();
    }
});
We can obtain the return value parsed by the ht.Default.parseObj function through modelMap. This value is usually the json object of the map structure returned after parsing the file in obj format. Each material corresponds to a model information. For details, please refer to HT for Web OBJ Handbook .
We use the ht.Default.parseObj function to parse and obtain the model information of each material. By traversing the entire model, we obtain the individual model information and name it, so that we can display the name of each model, and also for each model. Part of the model is controlled.
The checkLoaded function that appears in line 45 of the above code is a function that facilitates the expansion and merging of control tree components. We use a lot of the concept of "tree" in various fields such as industry, so this example is also used as an explanation:
function checkLoaded(){
    loadTask--;
    if(loadTask === 0){
        treeView.expandAll();
        treeView.selectAll();

        ht.Default.startAnim({
            action: function(t){
                toolbar.v('size', 50*t);
            }
        });
    }
}
Because we only use two main nodes in the "tree" part, All in one and Seperate Scooter, we define the loadTask variable to be 2. The above code means that if both models are loaded, then the tree component treeView will be expanded. , and select all, and then use the code to control the value in the toolbar to 50*t to adjust the size of the model.
For the tree component treeView, HT encapsulates a lot of help components to make development faster. For example, the setSortFunc function used in this example is used to set the sorting; the setCheckMode function is used to set the check mode. Check will think of a multi-select box. Here, HT does set the multi-select box by setting the setCheckMode function. The parameters of this function can be:
- null: default value, check selection mode is not enabled
- default: The default selection method of the check mode, that is, click to select or unselect, only affects the data object currently clicked
- children: The check mode will affect both the clicked data object and its child objects
- descendant: This check mode will affect both the clicked data object and all its descendant objects
- all: The check mode will affect both the clicked data object, and all its parent and descendant objects
If you still do not understand, you can try to comment out this function, you can clearly understand what it does. Or check out the HT for Web tree components manual .
The above is the example of today. The example in actual development will be more complicated and the logic will be more, but through HT, everything becomes so easy!