In the last post, we learned about the operation and phenomenon of ESP32 running multitasking, which is actually a real-time operating system. So, in this post, we will use the "LM75a" temperature sensor to learn about the IIC bus of ESP32.
First of all, we found through esp32_technical_referance that the I2C bus of esp32 has the following features:
• Supports master mode and slave mode
• Supports multi-master and multi-slave communication
• Supports standard mode (100 kbit/s)
• Supports fast mode (400 kbit/s)
• Support 7-bit and 10-bit addressing
• Support turn off SCL clock to realize continuous data transmission
• Support programmable digital noise filtering function
The I2C controller of ESP32 can work in Master mode or Slave mode, we only take Master mode as an example here. 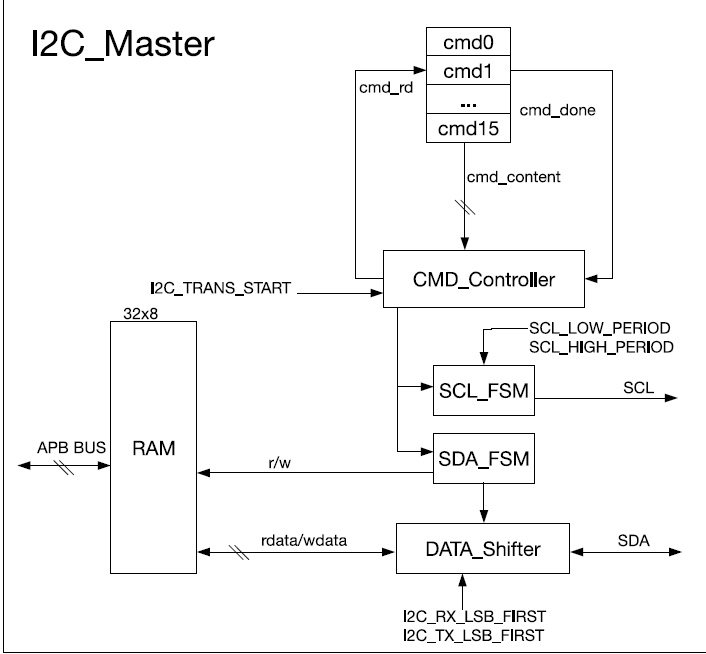
The above picture shows the basic structure of ESP32 I2C Master mode, including 32X8 Bit RAM, 16 command registers (cmd0 ~ cmd15) and a CMD_Controller, 2 bus controllers, 2 bus filters and a data shift register.
It looks very complicated, but in actual operation, only the command register has the most direct contact with us. Personal feeling, um.
The details related to registers are introduced here. Interested friends can check esp32_technical_referance by themselves, then let’s talk about how to operate and experiment.
First of all, call the library function to initialize the I2C bus (similar to stm32). 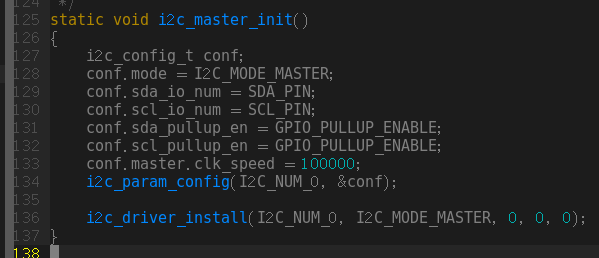
This initialization structure also looks very simple
initialization mode: Master
IO port pins: ESP32 has two I2C pins, which are mapped to 18 19 25 26 respectively. We choose I2C0 here, that is, I2C_NUM_0 , which corresponds to pins 18 and 19.
Bus pull-up enable: enable
bus speed: 100K
Call the initialization i2c_param_config() function to return the initialized structure parameters. Special attention here is whether the first parameter selects I2C0 or I2C1. The former corresponds to I2C_NUM_0, and the latter corresponds to I2C_NUM_0. which corresponds to I2C_NUM_0.
Then call i2c_driver_install () to install the I2C driver.
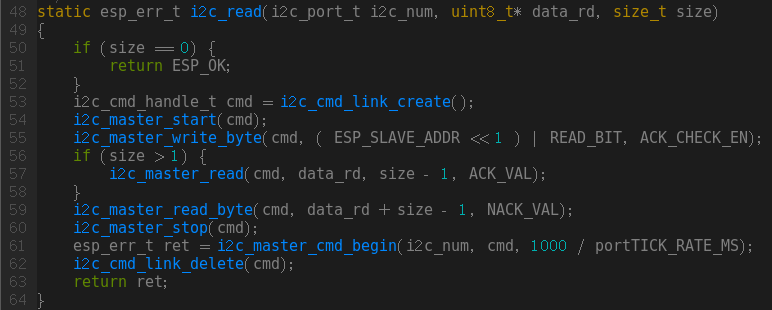
After the initialization is completed, start to write the read and write functions of I2C. Before writing these two functions, let's take a look at the two pictures. 
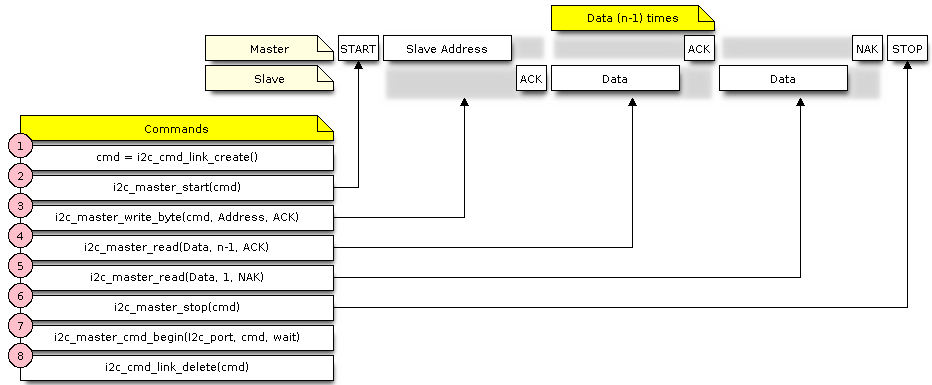
These two pictures are the guide pictures for read and write operations in the official API Reference. What is the function? Therefore, I will not talk about the usage of each function in detail. Friends who don't understand can take a look at the official API Reference. Then combine the pictures to see how these two functions are written. 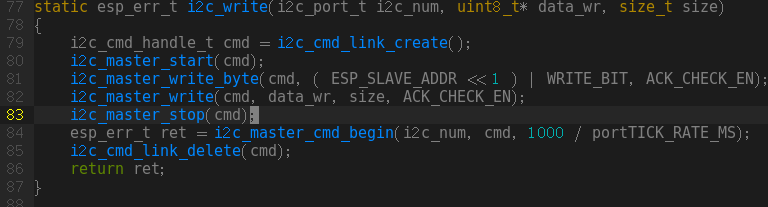
OK, the read and write functions are also available, then let’s talk about Lm75a
LM75a is a temperature sensor with an I2C bus interface, which can be accurate to 0.125 degrees Celsius, with high accuracy and very cheap. What we are going to use is that there are a total of 5 registers in it. There are actually only four registers that can be seen. 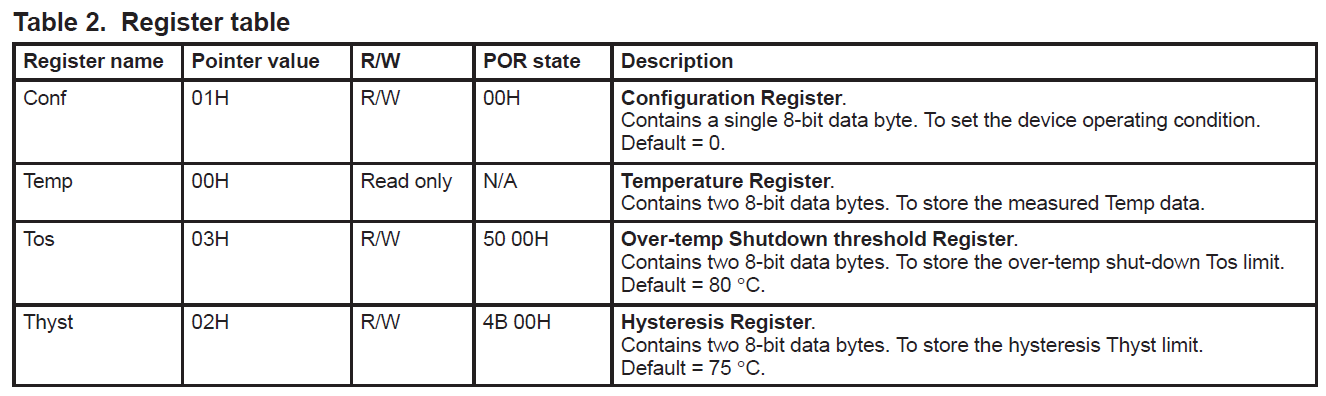
If I don't understand the error manual, these registers are accessed through a pointer register, so you can see the four The register addresses are arranged so neatly.
We only need to use the Temp register, which is used to store the temperature value.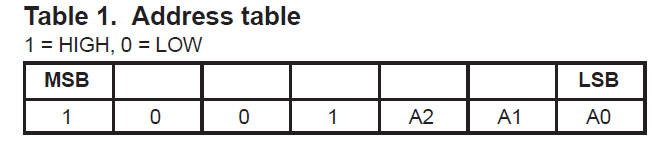
Then this is the slave address selection. I connected them to GND, so the Slave_ADDR is 0x48.
Finally, it is the formula to calculate the temperature. See the manual. ) 
Well, the sensor has been introduced, and you can start writing the task function. The 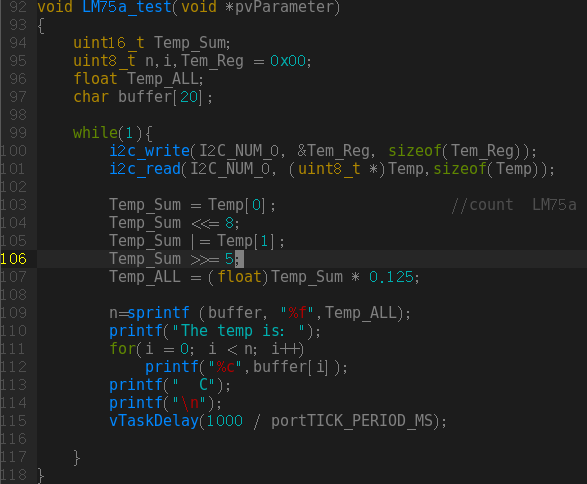
function is easy to understand. It should be noted that the middle section is the function that calculates the temperature value. If you don’t understand it, you can privately message me.
Finally, initialize the bus in the main function, create a task, 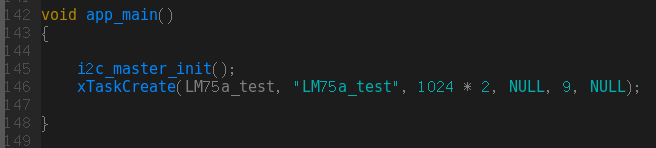
add the necessary debugging header files and delete the redundant things in the official routine. The 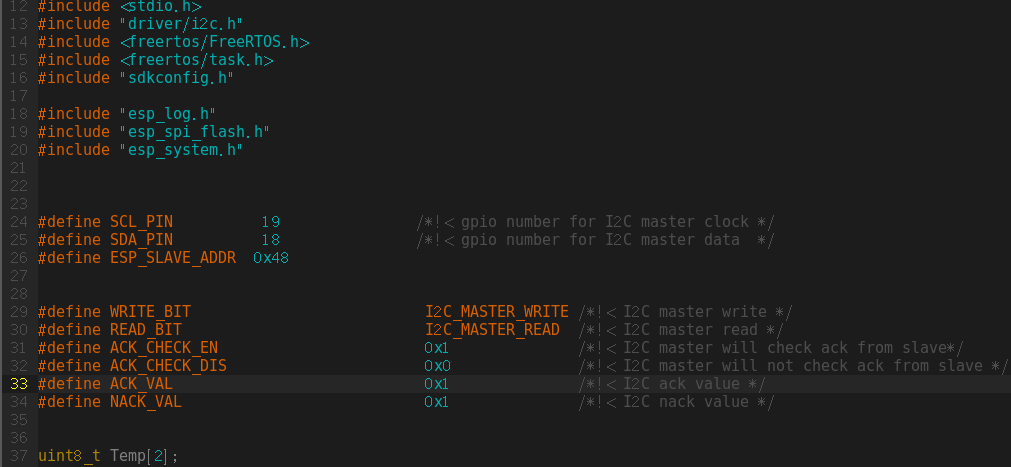
effect is as follows, the temperature is successfully read: victory: 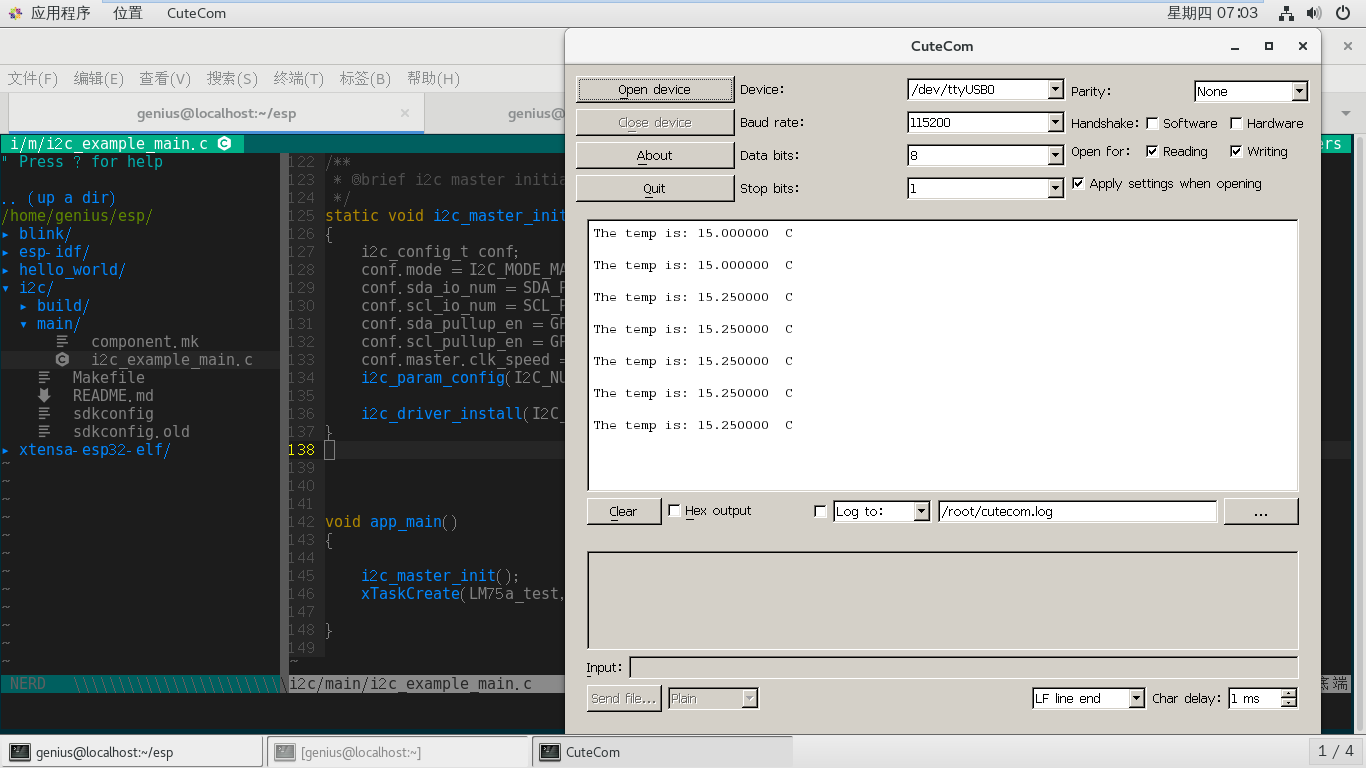
enjoy yourself~~
Attach the source code at the end
/* i2c - Example

   For other examples please check:
   https://github.com/espressif/esp-idf/tree/master/examples

   This example code is in the Public Domain (or CC0 licensed, at your option.)

   Unless required by applicable law or agreed to in writing, this
   software is distributed on an "AS IS" BASIS, WITHOUT WARRANTIES OR
   CONDITIONS OF ANY KIND, either express or implied.
*/
#include <stdio.h>
#include "driver/i2c.h"
#include <freertos / FreeRTOS.h>
#include <freertos/task.h>
#include "sdkconfig.h"

#include "esp_log.h"
#include "esp_spi_flash.h"
#include "esp_system.h"


#define SCL_PIN          19               /*!< gpio number for I2C master clock */
#define SDA_PIN          18               /*!< gpio number for I2C master data  */
#define ESP_SLAVE_ADDR  0x48


#define WRITE_BIT                          I2C_MASTER_WRITE /*!< I2C master write */
#define READ_BIT                           I2C_MASTER_READ  /*!< I2C master read */
#define ACK_CHECK_EN                       0x1              /*!< I2C master will check ack from slave*/
#define ACK_CHECK_DIS                      0x0              /*!< I2C master will not check ack from slave */
#define ACK_VAL                            0x0              /*!< I2C ack value */
#define NACK_VAL                           0x1              /*!< I2C nack value */


uint8_t Temp[2];

/**
 * @brief test code to read esp-i2c-slave
 *        We need to fill the buffer of esp slave device, then master can read them out.
 *
 * _______________________________________________________________________________________
 * | start | slave_addr + rd_bit +ack | read n-1 bytes + ack | read 1 byte + nack | stop |
 * --------|--------------------------|----------------------|--------------------|------|
 *
 */
static esp_err_t i2c_read(i2c_port_t i2c_num, uint8_t* data_rd, size_t size)
{
    if (size == 0) {
        return ESP_OK;
    }
    i2c_cmd_handle_t cmd = i2c_cmd_link_create();
    i2c_master_start(cmd);
    i2c_master_write_byte(cmd, ( ESP_SLAVE_ADDR << 1 ) | READ_BIT, ACK_CHECK_EN);
    if (size > 1) {
        i2c_master_read(cmd, data_rd, size - 1, ACK_VAL);
    }
    i2c_master_read_byte(cmd, data_rd + size - 1, NACK_VAL);
    i2c_master_stop(cmd);
    esp_err_t ret = i2c_master_cmd_begin(i2c_num, cmd, 1000 / portTICK_RATE_MS);
    i2c_cmd_link_delete(cmd);
    return ret;
}

/**
 * @brief Test code to write esp-i2c-slave
 *        Master device write data to slave(both esp32),
 *        the data will be stored in slave buffer.
 *        We can read them out from slave buffer.
 *
 * ___________________________________________________________________
 * | start | slave_addr + wr_bit + ack | write n bytes + ack  | stop |
 * --------|---------------------------|----------------------|------|
 *
 */
static esp_err_t i2c_write(i2c_port_t i2c_num, uint8_t* data_wr, size_t size)
{
    i2c_cmd_handle_t cmd = i2c_cmd_link_create();
    i2c_master_start(cmd);
    i2c_master_write_byte(cmd, ( ESP_SLAVE_ADDR << 1 ) | WRITE_BIT, ACK_CHECK_EN);
    i2c_master_write(cmd, data_wr, size, ACK_CHECK_EN);
    i2c_master_stop(cmd);
    esp_err_t ret = i2c_master_cmd_begin(i2c_num, cmd, 1000 / portTICK_RATE_MS);
    i2c_cmd_link_delete(cmd);
    return ret;
}


void LM75a_test(void *pvParameter)
{
    uint16_t Temp_Sum;
    uint8_t n,i,Tem_Reg = 0x00;
    float Temp_ALL;
    char buffer[20];

    while(1){
        i2c_write(I2C_NUM_0, &Tem_Reg, sizeof(Tem_Reg));
        i2c_read(I2C_NUM_0, (uint8_t *)Temp,sizeof(Temp));

        Temp_Sum = Temp[0];                   //count  LM75a
        Temp_Sum <<= 8;
        Temp_Sum |= Temp[1];
        Temp_Sum >>= 5;
        Temp_ALL = (float)Temp_Sum * 0.125;

        n=sprintf (buffer, "%f",Temp_ALL);
        printf("The temp is: ");
        for(i = 0; i < n; i++)
            printf("%c",buffer[i]);
        printf("  C");
        printf("\n");
        vTaskDelay(1000 / portTICK_PERIOD_MS);

    }
}


/**
 * @brief i2c master initialization
 */
static void i2c_master_init()
{
    i2c_config_t conf;
    conf.mode = I2C_MODE_MASTER;
    conf.sda_io_num = SDA_PIN;
    conf.scl_io_num = SCL_PIN;
    conf.sda_pullup_en = GPIO_PULLUP_ENABLE;
    conf.scl_pullup_en = GPIO_PULLUP_ENABLE;
    conf.master.clk_speed = 100000;
    i2c_param_config(I2C_NUM_0, &conf);

    i2c_driver_install(I2C_NUM_0, I2C_MODE_MASTER, 0, 0, 0);
}


void app_main()
{

    i2c_master_init();
    xTaskCreate(LM75a_test, "LM75a_test", 1024 * 2, NULL, 9, NULL);

}