\quad \quad Spark focuses on establishing a good ecosystem. It not only supports a variety of external file storage systems, but also provides a variety of cluster operation modes. When deployed on a single machine, it can run in local (Local) mode or pseudo-distributed mode; when deployed in a distributed cluster, you can choose Standalone mode (Spark self- With the mode), Spark on YARN mode or Spark on mesos mode. Although Spark's various operating modes are different in startup mode, operating location, and scheduling strategy, their purpose is basically the same, which is to run and manage safely and reliably in the right place according to the user's configuration and job needs. Task.
\quad \quad Spark's operating modes include Local (also known as single-node mode), Standalone (cluster mode), Spark on Yarn (running on Yarn), Mesos and K8s and other common modes. The most used are the first three.
1. Spark Local mode
\quad \quad The local mode is the simplest way to run Spark. It runs in a single-node multi-threaded (cpu) mode. It runs directly locally and uses local resources for calculations. Mainly divided into the following three situations:
-
local: All calculations are run in one thread;
-
local[K]: Specify K threads to run calculations. Usually the CPU has several Cores (number of threads), just specify K to maximize the use of CPU parallel computing capabilities;
-
local[*]: automatically set the maximum number of cores of the CPU;
1.1 Environment setup
\quad \quad Only one machine is needed. After decompressing the Spark installation package, there is no need to modify any configuration files by default. Use the default values. There is no need to start Spark's Master and Worker daemons (these two roles are only required when the cluster is in Standalone mode), and there is no need to start Hadoop services (unless you need to use HDFS).
-
Download the Spark installation package
download address

-
shell command:
解压 Spark 安装包
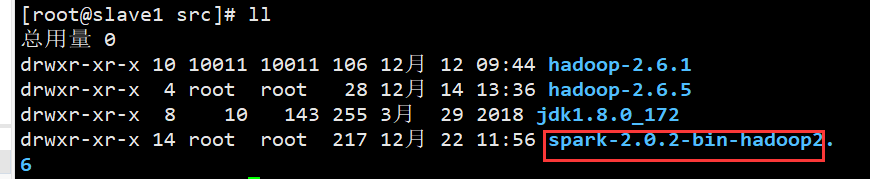
tar -zxvf spark-2.0.2-bin-hadoop2.6.tgz
- Renameable (I did not rename)
mv spark-2.0.2-bin-hadoop2.6 spark
- Decompression directory description
bin        可执行脚本
conf       配置文件
data       示例程序使用数据
examples   示例程序
jars       依赖 jar 包
python     pythonAPI
R          R 语言 API
sbin       集群管理命令
yarn       整合yarn需要的文件
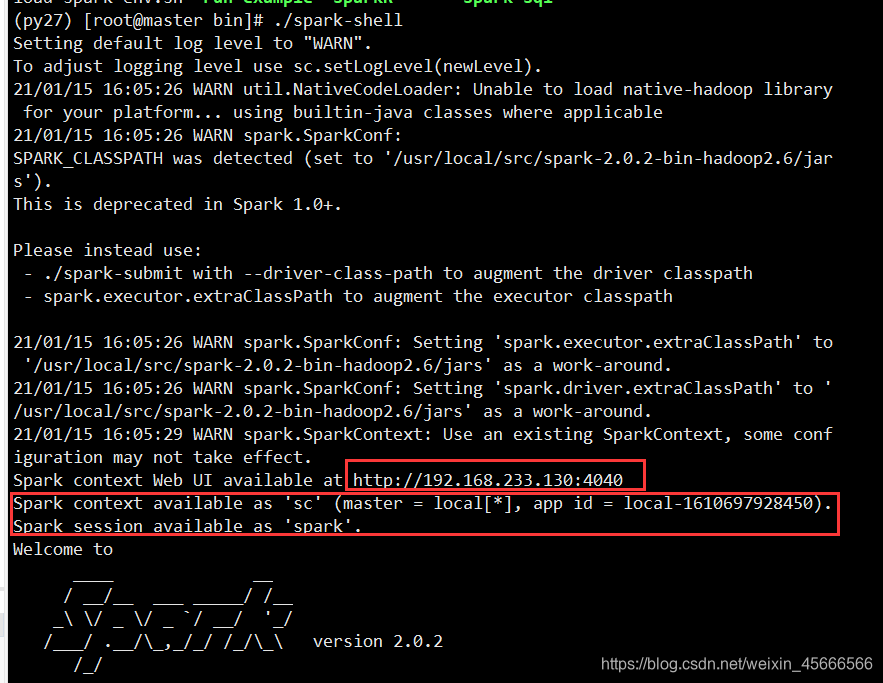
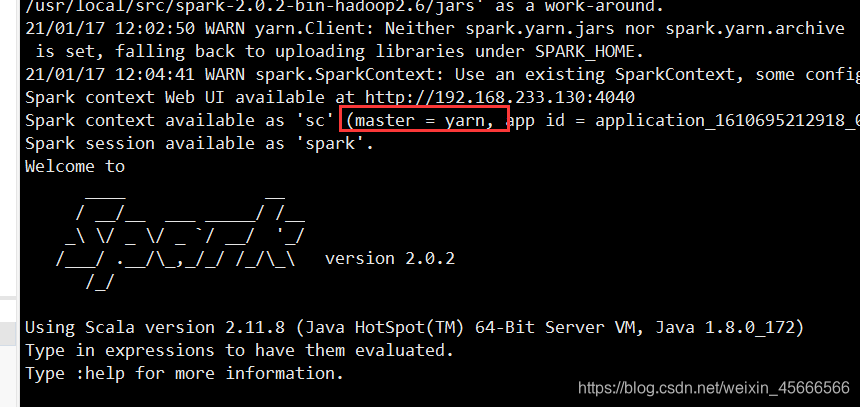
1.2 Start spark-shell
- Start spark-shell in the bin directory directly:
./spark-shell
- If you want to specify the number of processes, you can add parameters
spark-shell --master local[N]
Indicates that N threads are simulated locally to run the current task
-
Some key points have been marked with a red frame in the picture!
-
The SparkContext used in our development has been prepared for us in advance on the command line: sc
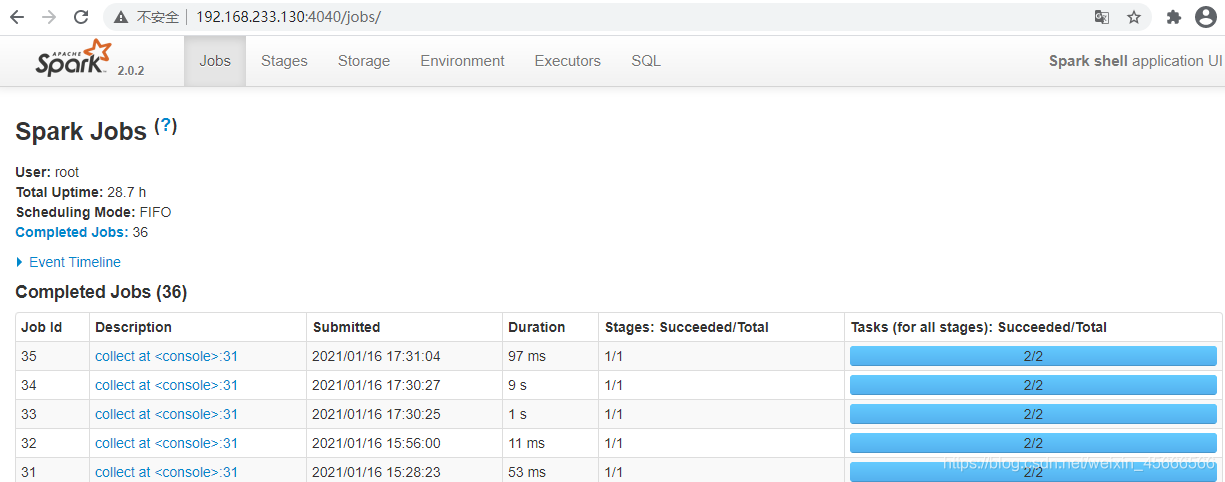
-
A web page browsed by SparkContext is given, and the process can be accessed through port 4040 !
-
scala>command line, indicating that scala code can be written directly in it, which means that we can complete the Spark program and run it directly on the command line!
-
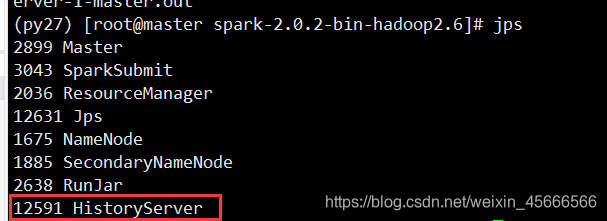
Use the jps command to see that spark-shell is a SparkSubmit process, that is, we can use this method to submit and run our Spark program (ie Job) to the local Spark
1.3 Word statistics
1. Read local files
(1) Prepare data
(py27) [root@master data]# vim words.txt
(py27) [root@master data]# cat words.txt
hello me you her
hello you her
hello her
hello
(2) Read data
- Note that you need to add before the local file path
file://, otherwise an error will be reported
scala> val textFile = sc.textFile("file:///root/data/words.txt")
textFile: org.apache.spark.rdd.RDD[String] = file:///root/data/words.txt MapPartitionsRDD[219] at textFile at <console>:26
(3) Word statistics experiment
scala> val counts = textFile.flatMap(_.split(" ")).map((_, 1)).reduceByKey(_ + _).collect
counts: Array[(String, Int)] = Array((hello,4), (me,1), (you,2), (her,3))
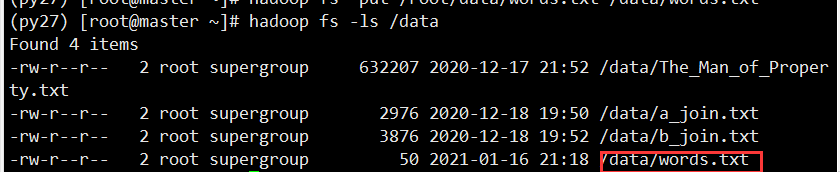
2. Read HDFS files
(1) Prepare data
- First look at all directories in hdfs
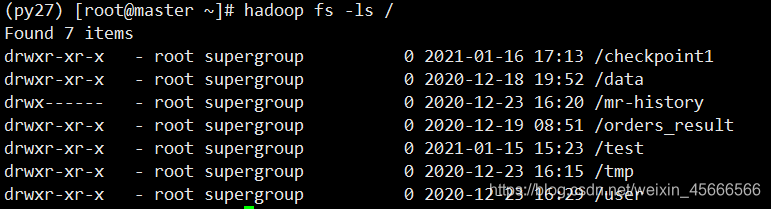
- Upload the local file words.txt to hdfs
hadoop fs -put /root/data/words.txt /data/words.txt
(2) Spark-shell read data
scala> val textFile = sc.textFile("hdfs://master:9000/data/words.txt")
textFile: org.apache.spark.rdd.RDD[String] = hdfs://master:9000/data/words.txt MapPartitionsRDD[224] at textFile at <console>:26
(3) Word statistics
scala> val counts = textFile.flatMap(_.split(" ")).map((_, 1)).reduceByKey(_ + _)
counts: org.apache.spark.rdd.RDD[(String, Int)] = ShuffledRDD[227] at reduceByKey at <console>:28
(4) Save the output result to HDFS
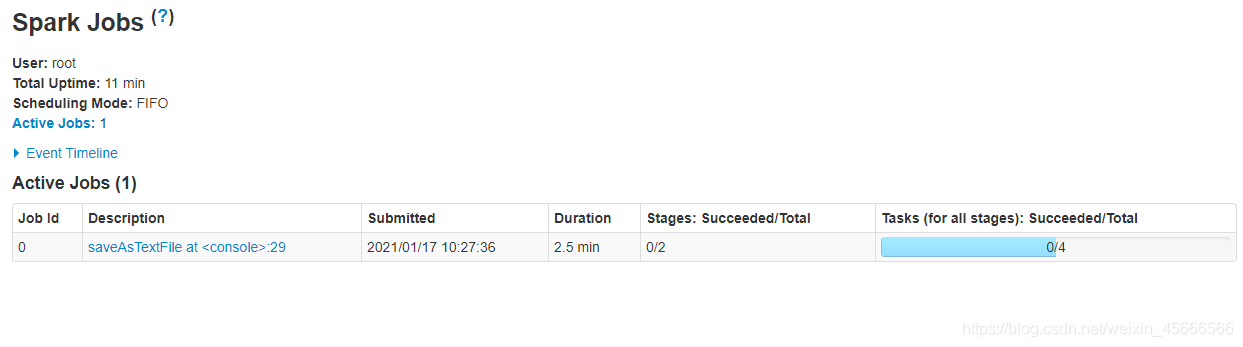
scala> counts.saveAsTextFile("hdfs://master:9000/data/output1")
After the program is executed, we enter the UI interface of HDFS to view

1.4 Application scenarios
\quad \quad Local mode is only suitable for use in the development phase. We can develop and test the code in this mode, verify that the logic of the code is ok, and then submit it to the cluster for running and testing. If you are studying or testing, you can build a local mode in order to simplify the environment.
2.Spark Standalone mode
\quad \quad Spark is a big data parallel computing framework based on in-memory computing. In practice, computing tasks must use cluster mode. Then let's learn the standalone cluster mode that comes with Spark to understand its architecture and operating mechanism.
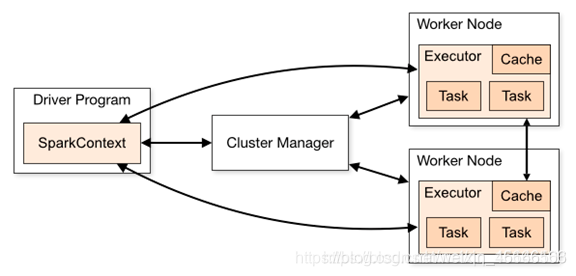
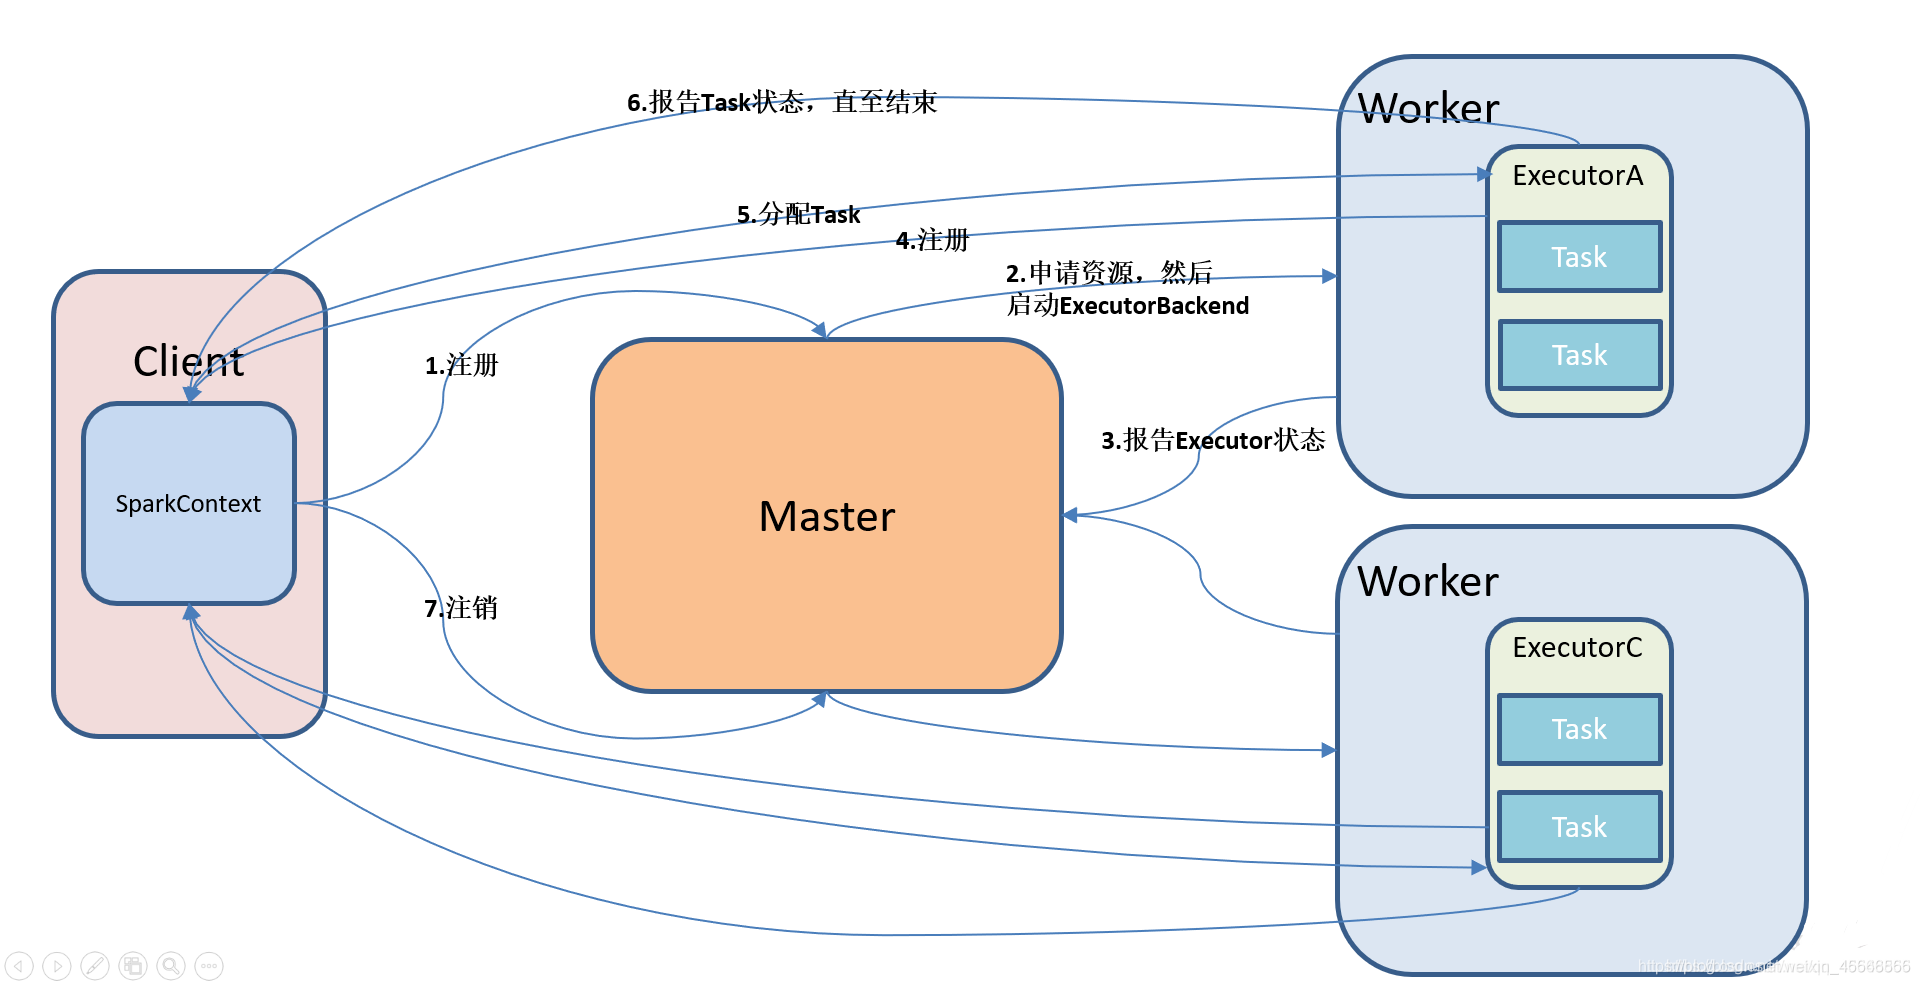
\quad \quadStandalone mode is an independent mode, with its own complete service, which can be deployed separately in a cluster without any resource management system. It only supports FIFO scheduling. In this mode, there is no concept of AM and NM, or RM. The user node directly interacts with the Master. The Driver is responsible for requesting resources from the Master, and the Driver allocates and schedules resources.
- The Standalone cluster uses the master-slave model in distributed computing
- master is the node that contains the master process in the cluster
- Slave is the worker node in the cluster containing the Executor process
2.1 Environment construction
- Yarn mode is also set up here
(1) Modify the Spark configuration file
- Enter spark/conf
(py27) [root@master spark-2.0.2-bin-hadoop2.6]# cd conf
- Execute command 1
mv spark-env.sh.template spark-env.sh
vim spark-env.sh
Add the following
#配置Scala环境变量
export SCALA_HOME=/usr/local/src/scala-2.11.8
#配置Java环境变量
export JAVA_HOME=/usr/local/src/jdk1.8.0_172
#YARN模式配置文件
export HADOOP_HOME=/usr/local/src/hadoop-2.6.1
export HADOOP_CONF_DIR=/usr/local/src/hadoop-2.6.1/etc/hadoop
#指定spark老大Master的IP
export SPARK_MASTER_IP=master
export SPARK_LOCAL_DIRS=/usr/local/src/spark-2.0.2-bin-hadoop2.6
export SPARK_DRIVER_MEMORY=1G
mv slaves.template slaves
vim slaves
(2) Distribute spark
# A Spark Worker will be started on each of the machines listed below.
slave1
slave2
Distribute the configuration file to other machines through the scp command
scp -rp spark-2.0.2-bin-hadoop2.6/ root@slave1:/usr/local/src/
scp -rp spark-2.0.2-bin-hadoop2.6/ root@slave2:/usr/local/src/
2.2 Start/Stop Spark cluster
1. Start and stop the cluster
- First start the hadoop cluster
- Start the Spark cluster on the master node: start in the sbin directory
./start-all.sh
- Stop the spark cluster on the master node
./stop-all.sh
2. Separate start and stop
- Start and stop the master on the master installation node:
  start-master.sh
  stop-master.sh
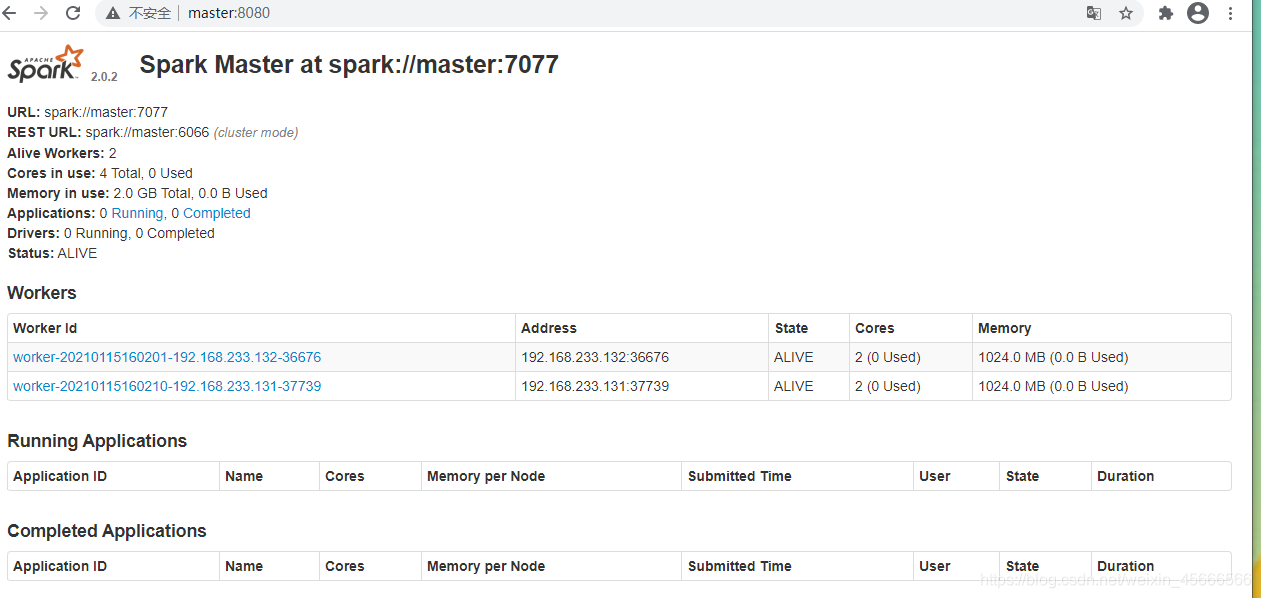
3. View the web interface
After starting the Spark cluster normally, check the Spark web interface
2.3 Environmental verification
Use Standalone mode to run the program to calculate PI
./bin/spark-submit \
--class org.apache.spark.examples.SparkPi \
--master spark://master:7077 \
--executor-memory 1G \
--total-executor-cores 6 \
--executor-cores 2 \
./examples/jars/spark-examples_2.11-2.0.2.jar 100
2.4 Configure History Server
\quad \quad Before Spark-shell exits, we can see the log of the task being executed: http://master:4040. But after exiting Spark-shell, all the executed task records are lost. Therefore, it is necessary to configure the history server of the task, so that it is convenient to check the log whenever necessary.
1. Before configuration, please stop the spark service if it is still starting!
(py27) [root@master sbin]# ./stop-all.sh
2、 配置spark-default.conf文件, 开启 Log
(py27) [root@master spark-2.0.2-bin-hadoop2.6]# mv spark-defaults.conf.template spark-defaults.conf

在spark-defaults.conf文件中, 添加如下内容
(py27) [root@master conf]# vim spark-defaults.conf
spark.eventLog.enabled=true
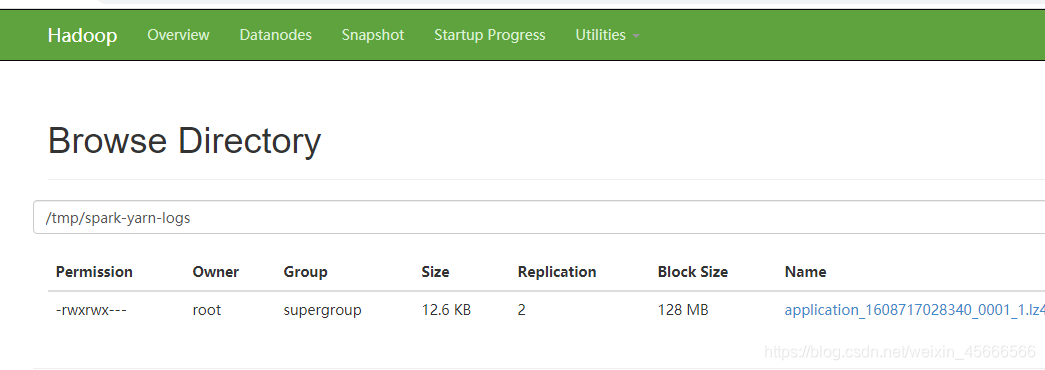
spark.eventLog.dir=hdfs://master:9000/tmp/spark-yarn-logs
spark.eventLog.compress=true
-
spark.eventLog.enabled
Whether to record Spark events for the application to raise enough for the WebUI after the completion of the application.
-
spark.eventLog.dir
After setting spark.eventLog.enabled to true, this property is the root directory where spark time is recorded. In this root directory, Spark creates a sub-directory for each application, and records the time of the application in this directory. Users can set this attribute to the HDFS directory so that History Server can read it. The storage directory
/tmp/spark-yarn-logsmust create a corresponding directory in HDFS in advance to store files specifically.
-
spark.eventLog.compress
Whether to compress and log Spark events, the premise is that spark.eventLog.enabled is true and snappy is used by default.
3、启动历史服务器
// 1. 需要先启动 HDFS
(py27) [root@master spark-2.0.2-bin-hadoop2.6]sbin/start-dfs.sh

// 2. 启动spark
(py27) [root@master spark-2.0.2-bin-hadoop2.6] sbin/start-all.sh

// 2. 然后再启动:
(py27) [root@master spark-2.0.2-bin-hadoop2.6] sbin/start-history-server.sh
Log in to the web interface
http://master:18080
2.5 Work flow chart
2.6 Start spark-shell
- Start in the bin directory
./spark-shell --master spark://master:7077
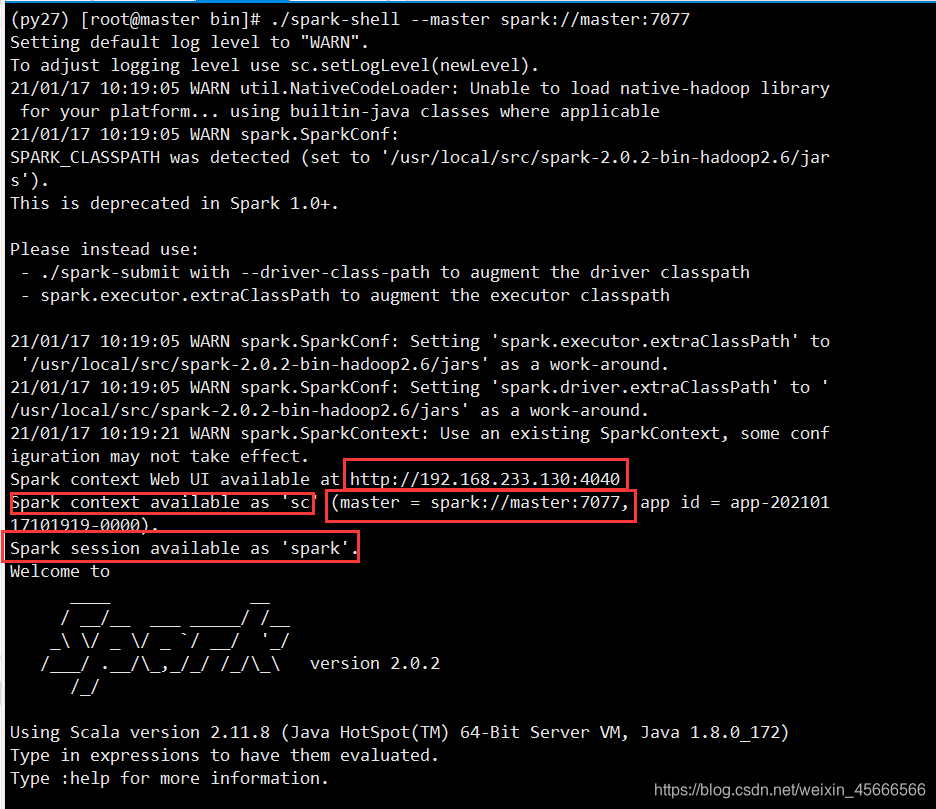
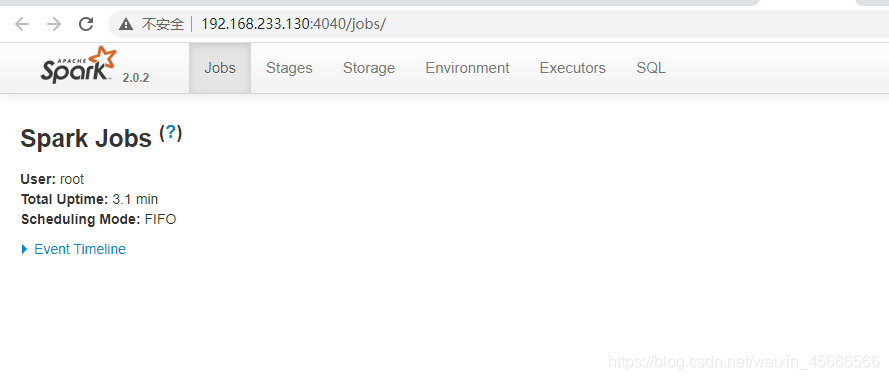
- SparkContext web UI
2.7 Word Statistics
- Read HDFS files
scala> val textFile = sc.textFile("hdfs://master:9000/data/words.txt")
textFile: org.apache.spark.rdd.RDD[String] = hdfs://master:9000/data/words.txt MapPartitionsRDD[1] at textFile at <console>:24
- Word statistics
val counts = textFile.flatMap(_.split(" ")).map((_, 1)).reduceByKey(_ + _)
- Save result
counts.saveAsTextFile("hdfs://master:9000/data/output2")

Note: In cluster mode, the program is running on the cluster. Do not read local files directly. You should read from hdfs. Because the program runs on the cluster, we don't know which node it runs on, and other nodes may not have the data file.
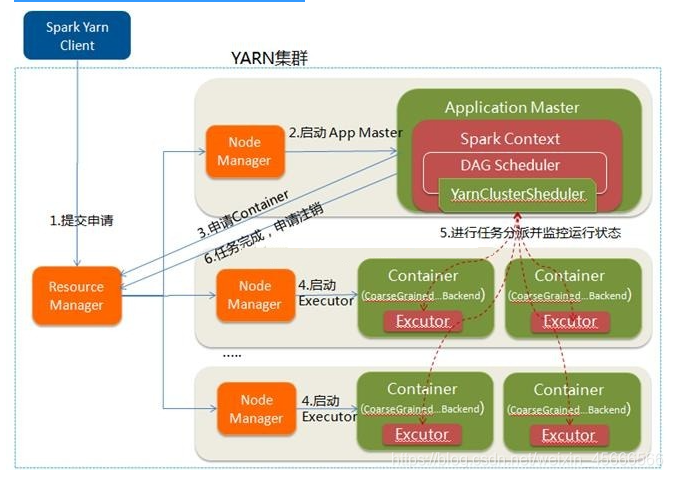
3.Spark on Yarn mode
\quad \quad The Spark client can directly connect to Yarn without the need to build a Spark cluster. Because submitting the Spark program to YARN to run is essentially sending the bytecode to the JVM on the YARN cluster to run, but there must be something to help me submit the task to the YARN, so I need a stand-alone version of Spark, which contains spark. -shell command, spark-submit command.
3.1 Environment construction
- You only need to modify the configuration here.
- The configuration file has been completed in standlone mode, so I won’t repeat it here.
3.2 Classification
The Yarn mode has two modes: client and cluster. The main difference is that the operating nodes of the Driver program are different.
- client: The Driver program runs on the client, which is suitable for interaction and debugging, and you want to see the output of the app immediately
- cluster: The Driver program runs on AM (AplicationMaster) started by RM (ResourceManager), which is suitable for production environments.
3.3 Yarn Client mode
flow chart:
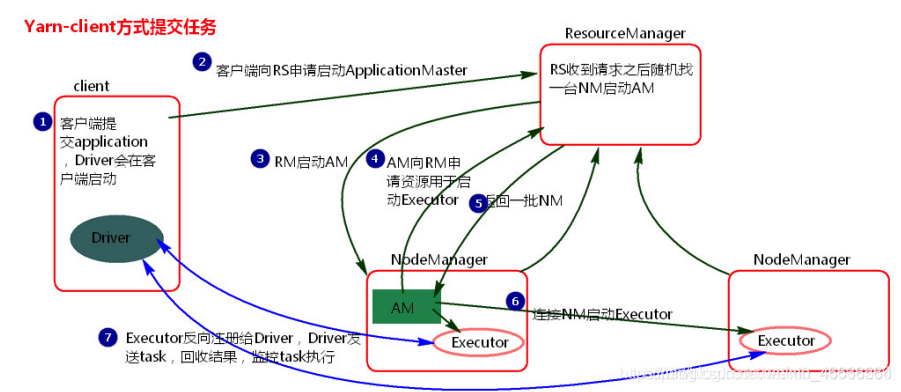
流程:

1.客户端提交一个Application,在客户端启动一个Driver进程

2.Driver进程会向ResourceManger发送请求,会启动ApplicationMaster的资源

3.ResourceManger会随机选择一台NodeManger,然后改NodeManger回到HDFS中下载jar包和配置,接着启动ApplicationMaster【ExecutorLuacher】。这里的NodeManger相当于StandAlone中的Worker节点

4.ApplicationMaster启动后,会向ResourceManager请求一批container资源,用于启动Executor.

5.ResourceManager会找到一批符合条件NodeManager返回给ApplicationMaster,用于启动Executor。

6.ApplicationMaster会向NodeManager发送请求,NodeManager到HDFS下载jar包和配置,然后启动Executor。

7.Executor启动后,会反向注册给Driver,Driver发送task到Executor,执行情况和结果返回给Driver端
3.4 Yarn Cluster Mode
flow chart:
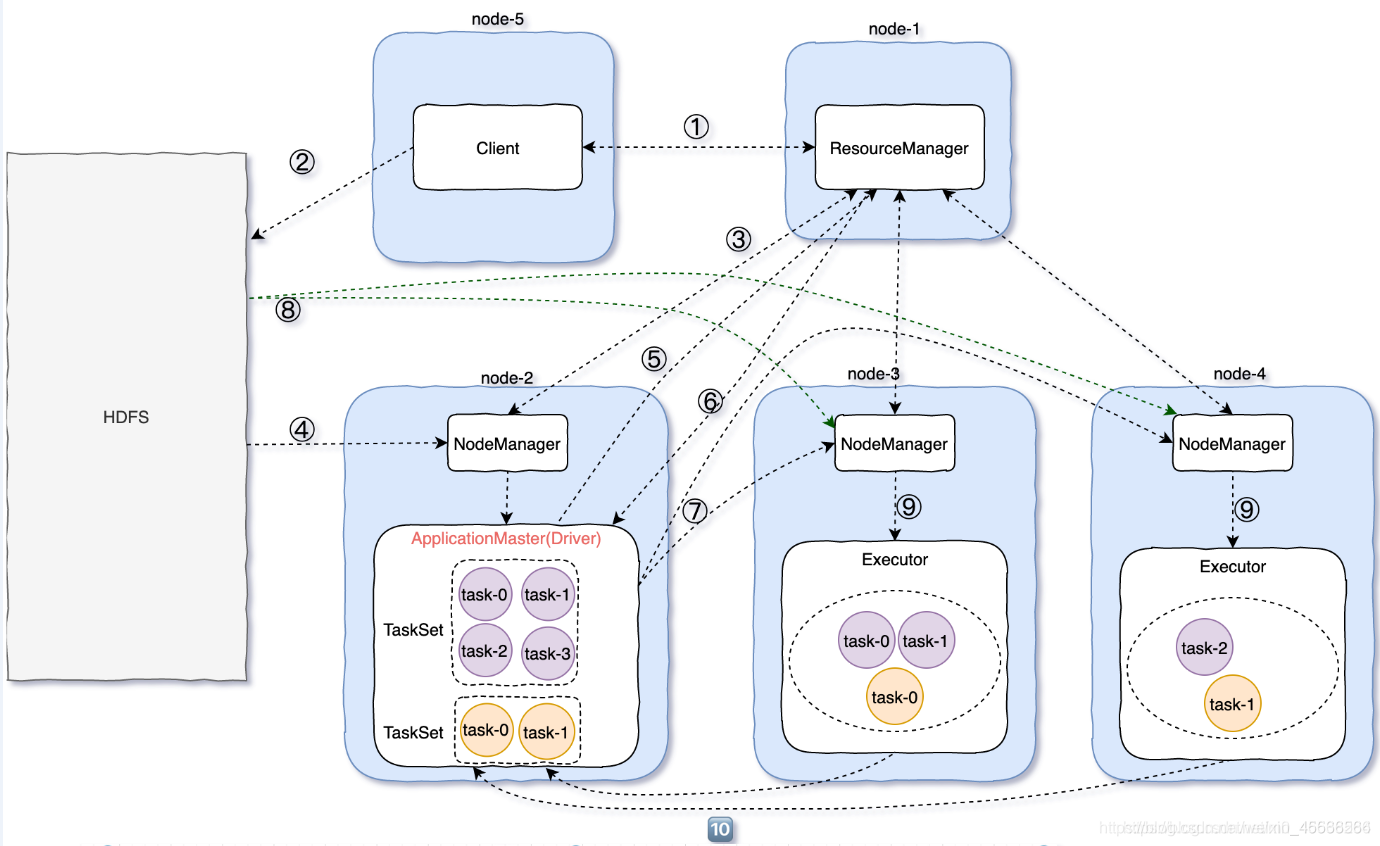
执行流程:

1.client向RM申请资源,RM会返回一个application ID

2.client上传spark jars下面的jar包以及自己写的jar包和配置

3.RM随机找一个资源充足的NodeManger

4.然后通过RPC通信让NodeManger从HDFS中下载jar包和配置,并启动ApplicationMaster

5.ApplicationMaster向RM申请资源

6.RM中的ResourceScheduler找到符合条件的NM,将NM的信息返回给ApplicationMaster

7.ApplicationMaster跟返回的NM进行通信

8.NM从HDFS中下载依赖

9.NM启动Executor

10.Executor启动之后反向向ApplicationMaster【Diver】注册
3.5 Difference between Cluster and Client Mode
1. The most essential difference between Cluster and Client mode is: Where is the Driver program running!
2. Running in the YARN cluster is the Cluster mode,
3. Running on the client is the Client mode
4. Cluster mode: use this mode in a production environment
- Driver program in YARN cluster
- The running result of the application cannot be displayed on the client
- In this mode, the Driver is running the ApplicationMaster process,
if there is a problem, yarn will restart the ApplicationMaster (Driver)
5. Client mode: test environment
- Driver runs in the SparkSubmit process on the Client
- The running result of the application will be displayed on the client
3.6 Start spark-shell
- Client mode: start in the bin directory
(py27) [root@master bin]# ./spark-shell --master yarn-client
- Cluster mode: start in the bin directory
(py27) [root@master bin]# ./spark-shell --master yarn-cluster
4. Mode comparison
| mode | Number of Spark installed machines | Process to be started | Affiliation | Application scenarios |
|---|---|---|---|---|
| Local | 1 | no | Spark | Study and test |
| Standalone | Multiple | Master及Worker | Spark | When the amount of data is not very large |
| Yarn Client | 1 | Yarn and HDFS | Hadoop | Test scenario: interaction and tuning |
| Yarn Cluster | 1 | Yarn and HDFS | Hadoop | Actual production environment |