Spark Standalone stand-alone mode environment construction
1. Experimental environment
- JDK version: jdk1.8.0_171
- Spark version: 2.1.0, download address
- Linux operating system: CentOS6.5
2. Preparation work
- For JDK installation, please refer to " Hadoop2.7.3 Environment Construction Pseudo-Distributed "
- The Spark installation package has been uploaded to the directory/tools (needs to be created in advance)
3. Installation and deployment
-
Unzip and install: Go to tools and execute the following command:
tar -zxvf spark-2.1.0-bin-hadoop2.7.tgz -C /training/注意:由于Spark的脚本命令和Hadoop有冲突,只需在.bash_profile中设置一个即可(不能同时设置) -
Modify the configuration file: spark-env.sh (it does not exist in advance and needs to be created or copied)
export JAVA_HOME=/home/hadoop/software/jdk
export SPARK_MASTER_HOST=Master
export SPARK_MASTER_PORT=7077
#history 配置历史服务
export SPARK_HISTORY_OPTS="-Dspark.history.ui.port=18080 -Dspark.history.retainedApplications=30 -Dspark.history.fs.logDirectory=/home/hadoop/software/spark/history"
注意:history目录需要事先创建 -
Modify the slaves file and change localhost to the host name: Master
-
Copy spark-defaults.conf.template to spark-defaults.conf and add the following content
spark.eventLog.enabled           true
spark.eventLog.dir               /home/hadoop/software/spark/logs
注意:logs目录需要事先创建 -
Start Spark: Go to the sbin directory under the installation directory and execute:
./start-all.sh -
Start the Spark history service: Go to the sbin directory under the installation directory and execute:
start-history-server.sh -
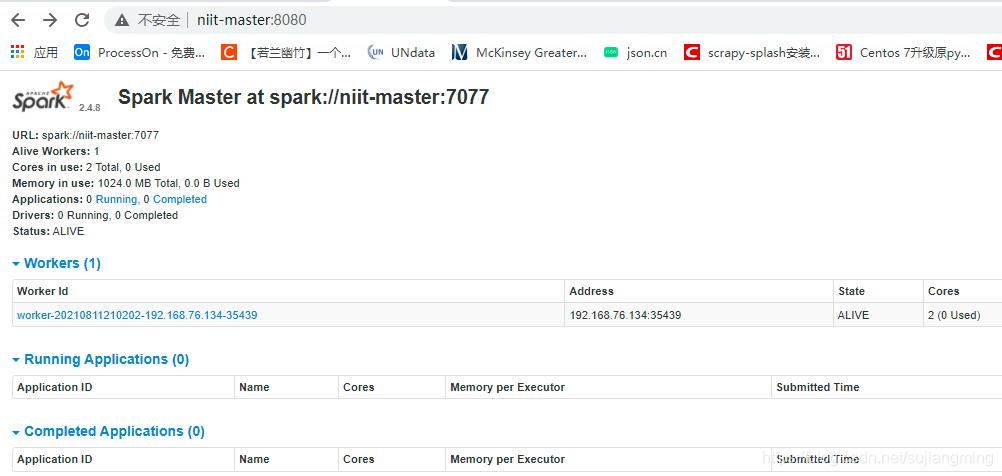
Visit SparkUI: http://niit-master:8080
-
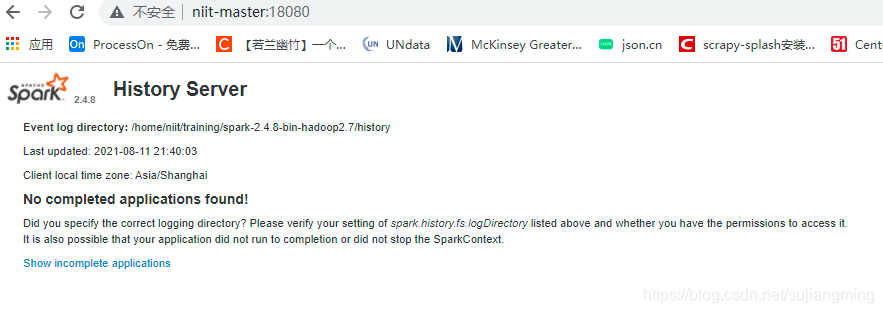
Visit Spark history service: http://niit-master:18080
Spark Standalone stand-alone mode environment construction
1. Experimental environment
- JDK version: jdk1.8.0_171
- Spark version: 2.1.0, download address
- Linux operating system: CentOS6.5
2. Preparation work
- For JDK installation, please refer to " Hadoop2.7.3 Environment Construction Pseudo-Distributed "
- The Spark installation package has been uploaded to the directory/tools (needs to be created in advance)
3. Installation and deployment
-
Unzip and install: Go to tools and execute the following command:
tar -zxvf spark-2.1.0-bin-hadoop2.7.tgz -C /training/注意:由于Spark的脚本命令和Hadoop有冲突,只需在.bash_profile中设置一个即可(不能同时设置) -
Modify the configuration file: spark-env.sh (it does not exist in advance and needs to be created or copied)
export JAVA_HOME=/home/hadoop/software/jdk
export SPARK_MASTER_HOST=Master
export SPARK_MASTER_PORT=7077
#history 配置历史服务
export SPARK_HISTORY_OPTS="-Dspark.history.ui.port=18080 -Dspark.history.retainedApplications=30 -Dspark.history.fs.logDirectory=/home/hadoop/software/spark/history"
注意:history目录需要事先创建 -
Modify the slaves file and change localhost to the host name: Master
-
Copy spark-defaults.conf.template to spark-defaults.conf and add the following content
spark.eventLog.enabled           true
spark.eventLog.dir               /home/hadoop/software/spark/logs
注意:logs目录需要事先创建 -
Start Spark: Go to the sbin directory under the installation directory and execute:
./start-all.sh -
Start the Spark history service: Go to the sbin directory under the installation directory and execute:
start-history-server.sh -
Visit SparkUI: http://niit-master:8080
-
Visit Spark history service: http://niit-master:18080