-
The classic book of Kuangchuang guest circle: "Netty Zookeeper Redis High Concurrency Practical Combat" Interview Essential + Interview Essential + Interview Essential [ Blog Garden General Entrance ]
-
Crazy Maker Circle Classic Books: "SpringCloud, Nginx High Concurrency Core Programming" Essentials for major manufacturers + Essentials for major manufacturers + Essentials for major manufacturers [ Blog Park General Entrance ]
-
Necessary for entering a big factory + salary increase: high concurrency [IM actual combat with 100 million traffic] actual combat series [SpringCloud Nginx spike] actual combat series [ blog garden general entrance ]
"SpringCloud Nginx High Concurrency Core Programming" environment setup graphic tutorials and demonstration videos:
| Component | link address |
|---|---|
| [Required] Virtual machine Linux development environment preparation | |
| Linux openresty installation | Linux openresty installation |
| [Required] Linux Redis installation (with video) | Linux Redis installation (with video) |
| [Required] Linux Zookeeper installation (with video) | Linux Zookeeper installation, with video |
| Windows Redis installation (with video) | Windows Redis installation (with video) |
| RabbitMQ offline installation (with video) | RabbitMQ offline installation (with video) |
| ElasticSearch installation, with video | ElasticSearch installation, with video |
| Nacos installation (with video) | Nacos installation (with video) |
| [Required] Eureka | Getting started with Eureka with video |
| [Required] Getting started with springcloud Config, with video | Getting started with springcloud Config with video |
| [Required] SpringCloud scaffolding packaging and startup | SpringCloud scaffolding packaging and startup |
1 Virtual machine Linux environment preparation
VMware download and installation
Most beginners use Windows. Here we only introduce the installation of VMware and Linux under Windows.
VMware has two versions, VMware Workstation Pro and VMware Workstation Player.
VMware Workstation Pro download link : https://pan.baidu.com/s/1XXhFFh0Fx0vzvcd1A543Yg , extraction code: 2o19
VMware has relatively high requirements on the computer's hardware configuration. If the configuration is low, the virtual machine is very slow and even unable to run. In theory, the higher the configuration, the better, and now mainstream computer configurations can meet the requirements of running VMware. Don't use the old antiques that you have collected for many years to run VMware, I promise you will lose patience.
Since the installation process of VMware is relatively simple, it is no different from installing ordinary software, so I will not elaborate too much. It is assumed that the reader has already downloaded and installed VMware, and then directly start using VMware to install the Linux system.
Install Linux system using VMware
Start VMware and enter its main interface, as shown in Figure 1.

Figure 2 Virtual machine setting wizard interface
Click "Next" to enter the "Install Operating System" interface. If the beginner has prepared the image file (.iso file) of the Linux system in advance, you can select the "Installer CD Image File" here and click the "Browse" button Find the iso file of the Linux system to be installed; otherwise, select "Install the operating system later", as shown in Figure 3.
- 32-bit CentOS 6.5 image download: http://archive.kernel.org/centos-vault/6.5/isos/i386/CentOS-6.5-i386-bin-DVD1.iso
- 64-bit CentOS 6.5 image download: http://archive.kernel.org/centos-vault/6.5/isos/x86_64/CentOS-6.5-x86_64-bin-DVD1.iso
Click "Next", enter "Select guest operating system", select "Linux", and select the corresponding Linux version to be installed in the "Version" drop-down list box, here select "CentOS 6", as shown in Figure 4 .

Figure 5 Name the virtual machine
Click the "Next" button to enter the "Specify Disk Capacity" interface. The default virtual hard disk size is 20GB (the virtual hard disk will be stored in the virtual machine system installation directory as a file). The space of the virtual hard disk can be adjusted as needed, but there is no need to worry about the space occupied, because the actual space occupied is still based on the installed system size rather than the hard disk size divided here.
For example, if you set the hard disk capacity to 20GB, but only 4GB is used to install Linux, it will actually only occupy 4GB of space in your Windows partition, and the occupied space will increase as the space used by the virtual machine system increases.
This "specify disk capacity" interface can keep the default settings, as shown in Figure 6.

Figure 6 Specify the disk capacity interface
Next, enter the "Ready to create a virtual machine" interface, confirm the virtual machine settings, and click the "Finish" button if you don't need to change it to start creating the virtual machine, as shown in Figure 7.

Figure 12 VMware starts the Linux system
Readers who choose "Install the operating system later" in Figure 3 must first download a certain Linux image file, and select "Use ISO image" in "Edit virtual machine settings -> CD/DVD (IDE)" File", manually add the iso file, and then click "OK" to manually start the Linux system. As shown in Figure 13.
After the above steps, we successfully installed the Linux system with VMware virtual machine.
2. Mount the expansion hard disk
1 Introduction
The local vmware always prompts that nospace space is insufficient, and it is generally necessary to mount an extended hard disk
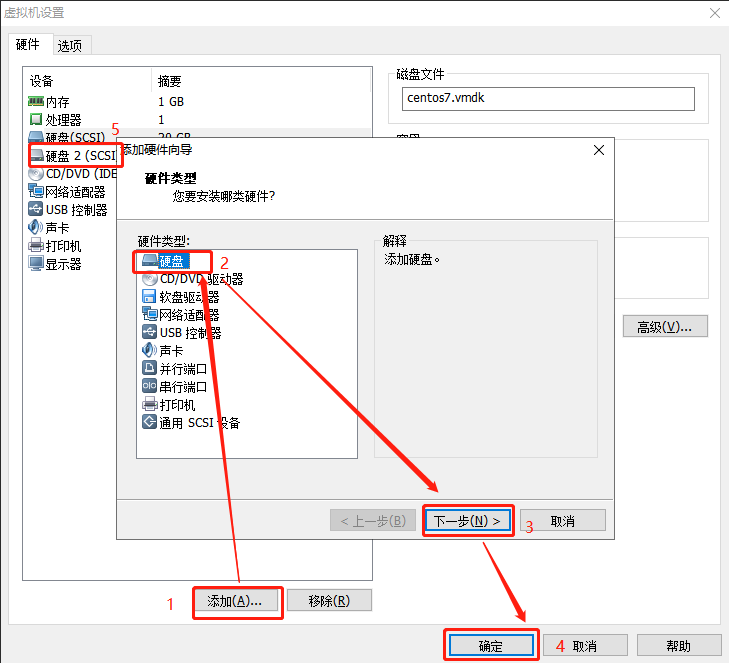
2. Add a new hard drive
Click "Virtual Machine" -> "Settings"
3. View disk information
[root@localhost ~]# fdisk -l

Disk /dev/sdb: 21.5 GB, 21474836480 bytes, 41943040 sectors
Units = sectors of 1 * 512 = 512 bytes
Sector size (logical/physical): 512 bytes / 512 bytes
I/O size (minimum/optimal): 512 bytes / 512 bytes
Disk label type: dos
Disk identifier: 0x364f5e2e

   Device Boot      Start         End      Blocks   Id  System
/dev/sdb1            2048    41943039    20970496   83  Linux

Disk /dev/sda: 21.5 GB, 21474836480 bytes, 41943040 sectors
Units = sectors of 1 * 512 = 512 bytes
Sector size (logical/physical): 512 bytes / 512 bytes
I/O size (minimum/optimal): 512 bytes / 512 bytes
Disk label type: dos
Disk identifier: 0x000cbf1e

   Device Boot      Start         End      Blocks   Id  System
/dev/sda1   *        2048      616447      307200   83  Linux
/dev/sda2          616448     4810751     2097152   82  Linux swap / Solaris
/dev/sda3         4810752    41943039    18566144   83  Linux
You can see that there are 2 disks, the /dev/sda disk has 3 partitions, and the /dev/sdb disk is my new one this time, 1 partition
4. Disk partition
fdisk /dev/sdb

After partitioning, you can use fdisk -l to check that there is a sdb1 partition under the /dev/sdb disk
5. Format the partition
# 格式化分区
mkfs.ext4 /dev/sdb1
# 将分区挂载到根目录
mount -t ext4 /dev/sdb1 /work
After mounting
[root@localhost ~]# df -ll
Filesystem     1K-blocks     Used Available Use% Mounted on
/dev/sda3       18555904  7347232  11208672  40% /
devtmpfs         1925244        0   1925244   0% /dev
tmpfs            1934520        0   1934520   0% /dev/shm
tmpfs            1934520    58484   1876036   4% /run
tmpfs            1934520        0   1934520   0% /sys/fs/cgroup
/dev/sda1         303788   109596    194192  37% /boot
/dev/sdb1       20510288 11187164   8258216  58% /work
tmpfs             386908        0    386908   0% /run/user/0
6. Set up auto mount at boot
vi /etc/rc.d/rc.local
#mount  disk 2  挂载第二块硬盘
/bin/mount /dev/sdb1 /work
3 CentOS7 install VMware Tools
VMware strongly recommends that you install the VMware Tools package immediately after completing the operating system installation in each virtual machine. It is very important to install VMware Tools in the guest operating system.
VMware Tools is an enhancement tool that comes with VMware virtual machines, which is equivalent to the enhancements in VirtualBox (Sun VirtualBox Guest Additions). It is a driver provided by VMware to enhance the performance of virtual graphics cards and hard disks, and to synchronize the clocks of the virtual machine and the host. .
Only when VMware Tools is installed in the VMware virtual machine can the file sharing between the host and the virtual machine be realized. At the same time, it can support the free drag and drop function. The mouse can also be moved freely between the virtual machine and the host (no need to press ctrl+ alt), and the virtual machine screen can also be full screen.
1 Install dependent packages
[root@localhost ~]# yum -y install perl gcc gcc-c++ make cmake kernel kernel-headers kernel-devel net-tools
2 Load vmware tools to CentOS7 CD-ROM
点击菜单 `虚拟机` ——> `安装VMware Tools(T)...`
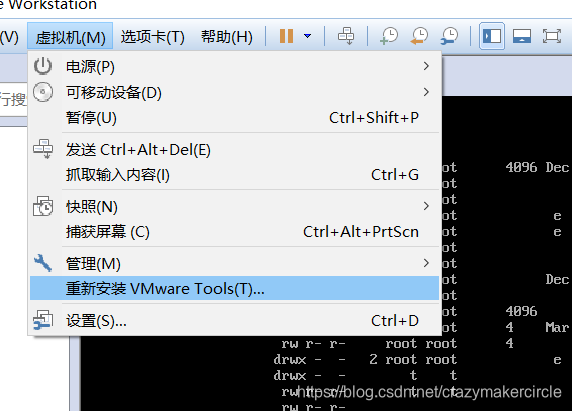
Click to load vmware tools to CentOS7 CD-ROM
3 Mount the CD-ROM to the specified directory
通常情况下都是将设备目录 /dev/crrom 挂载到 /mnt/cdrom 目录,
-
Create if the cdrom directory does not exist in the /mnt directory
/mnt/cdromThen create
[root@localhost ~]# mkdir -p /mnt/cdrom -
Mount directory
[root@localhost ~]# mount -t auto /dev/cdrom /mnt/cdrom
mount: /dev/sr0 is write-protected, mounting read-only
If the mount directory is wrong, you can enter umout /dev/cdrom to uninstall and mount.
ps: Introduction to the mount command
Command format: mount [-t vfstype] [-o options] device dir
1.-t vfstype Specifies the type of file system, usually it is not necessary to specify. mount will automatically select the correct type. Common types are:
CD or CD mirroring: iso9660
DOS fat16 file system: msdos
Windows 9x fat32 file system: vfat
Windows NT ntfs file system: ntfs
Mount Windows file network sharing: smbfs
UNIX (LINUX) file network sharing: nfs
2.-o options are mainly used to describe how to attach devices or files. Commonly used parameters are:
loop: used to mount a file as a hard disk partition to the system
ro: mount the device in read-only mode
rw: mount the device in read-write mode
iocharset: specify the character set
used to access the file system 3.device Mount the device.
4. The mount point of the dir device on the system.
The complete mount command is
mount -t iso9660 -o ro /dev/cdrom /mnt/cdrom
4 Copy the installation package to the user's home directory
[root@localhost ~]# cp /mnt/cdrom/VMwareTools-10.0.5-3228253.tar.gz ~
5 Unmount
[root@localhost ~]# umount /dev/cdrom
6 Unzip the VMwareTools installation package
[root@localhost ~]# tar -zxvf VMwareTools-10.0.5-3228253.tar.gz
Enter the command tar -zxf VMwareTools-10.0.5-3228253.tar.gz to decompress the just copied VMwareTools-10.0.5-3228253.tar.gz, decompress it to the current directory by default, and then there will be one more named similar In the "vmware-tools-distrib" folder, here is the same as the decompression result in windows.
7 InstallationVMware Tools
Enter the command cdvmware-linux-tools to enter the decompressed directory
[root@localhost ~]# cd vmware-tools-distrib/
Run
vmware-install.plthe file
[root@localhost vmware-tools-distrib]# ./vmware-install.pl
In the process of running the installation, it will ask you to respond step by step if there are questions. During this process, you only need to see [yes], [no], [yes/no] after the question, enter yes, and then press Enter , If it’s another problem, just press Enter regardless of what is in []
Enter all the way
[root@XD-ORACLE vmware-tools-distribu]# cd vmware-tools-distrib/
[root@XD-ORACLE vmware-tools-distrib]# ls
bin  doc  etc  FILES  INSTALL  installer  lib  vmware-install.pl
[root@XD-ORACLE vmware-tools-distrib]# ./vmware-install.pl
A previous installation of VMware Tools has been detected.

The previous installation was made by the tar installer (version 4).

Keeping the tar4 installer database format.

You have a version of VMware Tools installed.  Continuing this install will
first uninstall the currently installed version.  Do you wish to continue?
(yes/no) [yes] yes

Uninstalling the tar installation of VMware Tools.

Stopping services for VMware Tools

Stopping VMware Tools services in the virtual machine:
   Guest operating system daemon:                          [  OK  ]
   VMware User Agent (vmware-user):                        [  OK  ]
   Blocking file system:                                   [  OK  ]
   Unmounting HGFS shares:                                 [  OK  ]
   Guest filesystem driver:                                [  OK  ]
   VM communication interface socket family:               [  OK  ]
   VM communication interface:                             [  OK  ]

Stopping Thinprint services in the virtual machine:
   Stopping Virtual Printing daemon:                                   done

/sbin/restorecon:  Warning no default label for /tmp/vmware-block-restore0/tmp_file
File /etc/pulse/default.pa is backed up to /etc/pulse/default.pa.old.0.

The removal of VMware Tools 9.6.1 build-1378637 for Linux completed
successfully.

Installing VMware Tools.

In which directory do you want to install the binary files?
[/usr/bin]

What is the directory that contains the init directories (rc0.d/ to rc6.d/)?
[/etc/rc.d]

What is the directory that contains the init scripts?
[/etc/rc.d/init.d]

In which directory do you want to install the daemon files?
[/usr/sbin]

In which directory do you want to install the library files?
[/usr/lib/vmware-tools]

The path "/usr/lib/vmware-tools" does not exist currently. This program is
going to create it, including needed parent directories. Is this what you want?
[yes]


yes
In which directory do you want to install the documentation files?
[/usr/share/doc/vmware-tools]
The path "/usr/share/doc/vmware-tools" does not exist currently. This program
is going to create it, including needed parent directories. Is this what you
want? [yes]
The installation of VMware Tools 9.6.1 build-1378637 for Linux completed
successfully. You can decide to remove this software from your system at any
time by invoking the following command: "/usr/bin/vmware-uninstall-tools.pl".

Before running VMware Tools for the first time, you need to configure it by
invoking the following command: "/usr/bin/vmware-config-tools.pl". Do you want
this program to invoke the command for you now? [yes] yes

Initializing...

/usr/bin/xrandr: Failed to get size of gamma for output default

Making sure services for VMware Tools are stopped.

Stopping Thinprint services in the virtual machine:
   Stopping Virtual Printing daemon:                                   done
Stopping VMware Tools services in the virtual machine:
   Guest operating system daemon:                          [  OK  ]
   VMware User Agent (vmware-user):                        [  OK  ]
   Blocking file system:                                   [  OK  ]
   Unmounting HGFS shares:                                 [  OK  ]
   Guest filesystem driver:                                [  OK  ]
   VM communication interface socket family:               [  OK  ]
   VM communication interface:                             [  OK  ]


Found a compatible pre-built module for vmci.  Installing it...


Found a compatible pre-built module for vsock.  Installing it...


The module vmxnet3 has already been installed on this system by another
installer or package and will not be modified by this installer.

Use the flag --clobber-kernel-modules=vmxnet3 to override.

The module pvscsi has already been installed on this system by another
installer or package and will not be modified by this installer.

Use the flag --clobber-kernel-modules=pvscsi to override.

The module vmmemctl has already been installed on this system by another
installer or package and will not be modified by this installer.

Use the flag --clobber-kernel-modules=vmmemctl to override.

The VMware Host-Guest Filesystem allows for shared folders between the host OS
and the guest OS in a Fusion or Workstation virtual environment.  Do you wish
to enable this feature? [yes] yes

Found a compatible pre-built module for vmhgfs.  Installing it...


Found a compatible pre-built module for vmxnet.  Installing it...


The vmblock enables dragging or copying files between host and guest in a
Fusion or Workstation virtual environment.  Do you wish to enable this feature?
[yes] yes

VMware automatic kernel modules enables automatic building and installation of
VMware kernel modules at boot that are not already present. This feature can be

enabled/disabled by re-running vmware-config-tools.pl.

Would you like to enable VMware automatic kernel modules?
[no] no

Thinprint provides driver-free printing. Do you wish to enable this feature?
[yes] yes


Disabling timer-based audio scheduling in pulseaudio.


Detected X server version 1.13.0


Distribution provided drivers for Xorg X server are used.

Skipping X configuration because X drivers are not included.

Creating a new initrd boot image for the kernel.
   Starting Virtual Printing daemon:                                   done
   Checking acpi hot plug                                  [  OK  ]
Starting VMware Tools services in the virtual machine:
   Switching to guest configuration:                       [  OK  ]
   VM communication interface:                             [  OK  ]
   VM communication interface socket family:               [  OK  ]
   Guest filesystem driver:                                [  OK  ]
   Mounting HGFS shares:                                   [  OK  ]
   Blocking file system:                                   [  OK  ]
   VMware User Agent:                                      [  OK  ]
   Guest operating system daemon:                          [  OK  ]
The configuration of VMware Tools 9.6.1 build-1378637 for Linux for this
running kernel completed successfully.

You must restart your X session before any mouse or graphics changes take
effect.

You can now run VMware Tools by invoking "/usr/bin/vmware-toolbox-cmd" from the
command line.

To enable advanced X features (e.g., guest resolution fit, drag and drop, and
file and text copy/paste), you will need to do one (or more) of the following:
1. Manually start /usr/bin/vmware-user
2. Log out and log back into your desktop session; and,
3. Restart your X session.

Enjoy,

--the VMware team

Found VMware Tools CDROM mounted at /media/VMware Tools. Ejecting device
/dev/sr0 ...
/sbin/restorecon:  Warning no default label for /tmp/vmware-block-restore0/tmp_file
[root@XD-ORACLE vmware-tools-distrib]#
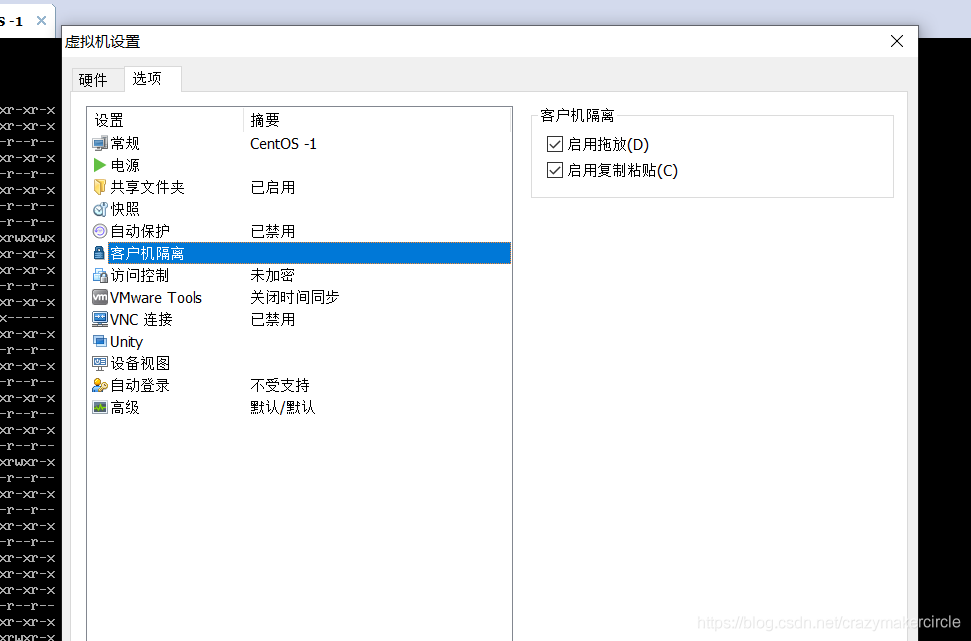
After the installation is complete, select above the virtual machine: virtual machine-settings-options-guest isolation, check "enable copy and paste", and then restart the centos system, you can copy and paste text between the virtual machine system and the host system , And files can be directly dragged between the two systems.
8 Enable shared folders

After entering the following command (ls /mnt/hgfs/) in the command window, you will see the shared folder you just set
[root@localhost ~]# ls /mnt/hgfs/
develop
[root@localhost ~]#
Complete custom boot program /etc/rc.d/rc.local
[root@localhost ~]# cat /etc/rc.d/rc.local
#!/bin/bash
# THIS FILE IS ADDED FOR COMPATIBILITY PURPOSES
#
# It is highly advisable to create own systemd services or udev rules
# to run scripts during boot instead of using this file.
#
# In contrast to previous versions due to parallel execution during boot
# this script will NOT be run after all other services.
#
# Please note that you must run 'chmod +x /etc/rc.d/rc.local' to ensure
# that this script will be executed during boot.


#start redis
/usr/local/redis/bin/redis-server  /usr/local/redis/redis.conf

#mount  disk 2  挂载第二块硬盘
/bin/mount /dev/sdb1 /work

#start nginx  以root账号 启动 nginx

/usr/bin/su  - root  -c   "/usr/local/openresty/nginx/sbin/nginx  -c /usr/local/openresty/nginx/conf/nginx.conf"

# 启动 zookeeper
/usr/bin/su  - root  -c   "/work/zookeeper/zookeeper-1/bin/zkServer.sh start"
/usr/bin/su  - root  -c   "/work/zookeeper/zookeeper-2/bin/zkServer.sh start"
sleep 10s

#start springcloud 注册中心  eureka
/usr/bin/su  - root  -c   "/work/cloud-eureka-1.0-SNAPSHOT/bin/start.sh start"
sleep 20s

#start springcloud 配置中心  config
/usr/bin/su  - root  -c   "/work/cloud-config-1.0-SNAPSHOT/bin/start.sh start"

# 启动 Nacos  ,如果要使用的话
/usr/bin/su  - root  -c   "/work/nacos/bin/startup.sh -m standalone"
The su command used above is explained as follows:
su - root -c command :
Switch to root and obtain root's environment variables and execution permissions and execute commands. It
-cis the abbreviation of command
Back to ◀ Crazy Maker Circle ▶
Crazy Maker Circle-Java high-concurrency research community, open the door to big factories for everyone