APISIX is a cloud-native, high-performance, and scalable microservice API gateway.
It is implemented based on Nginx and etcd. Compared with traditional API gateways, APISIX has dynamic routing and hot plug-in loading, which is particularly suitable for API management under the microservice system.
APISIX installation
First install dependencies
https://github.com/apache/incubator-apisix/blob/master/doc/zh-cn/install-dependencies.md
# 安装 OpenResty, etcd 和 编译工具
sudo yum install -y etcd openresty curl git gcc luarocks lua-devel

# 开启 etcd server
sudo service etcd start
Depends on the new version of OpenResty 1.15.8.3. Check whether etcd has been started normally.
ps aux | grep etcd
etcd      2769  2.2  4.2 10856200 21364 ?      Ssl  14:54   0:00 /usr/bin/etcd --name=default --data-dir=/var/lib/etcd/default.etcd --listen-client-urls=http://localhost:2379
As you can see, the listening port number is 2379. You can also look at the etcd configuration, and you can also see the port number.
/etc/etcd/etcd.conf
Next install the protagonist apisix
official installation yum installation
sudo yum install -y https://github.com/apache/incubator-apisix/releases/download/1.3/apisix-1.3-0.el7.noarch.rpm
found that the download cannot be downloaded, Download the rpm package directly and install it manually.
https://github.com/apache/incubator-apisix/releases/download/1.3/apisix-1.3-0.el7.noarch.rpm
Manually install and start apisix
rpm -ivh apisix-1.3-0.el7.noarch.rpm
准备中...                          ################################# [100%]
正在升级/安装...
   1:apisix-1.3-0                     ################################# [100%]
apisix start
Check if apisix has started successfully
ps aux | grep nginx
root      2978  0.0  0.5 178996  2616 ?        Ss   08:14   0:00 nginx: master process openresty -p /usr/local/apisix -c /usr/local/apisix/conf/nginx.conf
nobody    2979  0.6  2.4 191600 12368 ?        R    08:14   0:00 nginx: worker process
nobody    2980  0.1  0.4 173672  2120 ?        S    08:14   0:00 nginx: cache manager process
nobody    2981  0.0  0.4 173672  2120 ?        S    08:14   0:00 nginx: cache loader process
If the startup is successful, you can also go to the configuration path of apisix's Nginx conf.
APISIX is simple to use
This is the official getting started guide
https://github.com/apache/incubator-apisix/blob/master/doc/zh-cn/getting-started.md
We first configure the upstream
curl "http://127.0.0.1:9080/apisix/admin/upstreams/50" -H 'X-API-KEY: edd1c9f034335f136f87ad84b625c8f1' -X PUT -d '
> {
>     "type": "roundrobin",
>     "nodes": {
>         "127.0.0.1:7080": 1
>     }
> }'
{

    "node":{

    "value":{

    "type":"roundrobin","nodes":{

    "127.0.0.1:7080":1},"hash_on":"vars","id":"50"},"createdIndex":22,"key":"\/apisix\/upstreams\/50","modifiedIndex":22},"prevNode":{

    "value":"{\"hash_on\":\"vars\",\"id\":\"50\",\"nodes\":{\"httpbin.org:80\":1},\"type\":\"roundrobin\"}","createdIndex":19,"key":"\/apisix\/upstreams\/50","modifiedIndex":19},"action":"set"}
Then configure the router for the upstream just configured
curl "http://127.0.0.1:9080/apisix/admin/routes/5" -H 'X-API-KEY: edd1c9f034335f136f87ad84b625c8f1' -X PUT -d '
> {
>     "uri": "/get",
>     "host": "httpbin.org",
>     "upstream_id": 50
> }'
{

    "node":{

    "value":{

    "host":"httpbin.org","upstream_id":50,"uri":"\/get","priority":0},"createdIndex":25,"key":"\/apisix\/routes\/5","modifiedIndex":25},"prevNode":{

    "value":"{\"host\":\"httpbin.org\",\"plugins\":{\"proxy-rewrite\":{\"scheme\":\"https\"}},\"uri\":\"\\\/get\",\"upstream_id\":50,\"priority\":0}","createdIndex":24,"key":"\/apisix\/routes\/5","modifiedIndex":24},"action":"set"}
The current process is like this.
Terminal request httpbin.org/get->APISIX proxy-> 127.0.0.1:7080
Let's start another Nginx service so that the upstream service 127.0.0.1:7080/get can provide services normally.
vim /usr/local/openresty/nginx/conf/nginx.conf
添加7080的端口服务
    server {


        listen       7080;
        location /get {


            echo "success";
        }
    }

启动Nginx WEB服务
sudo /usr/local/openresty/nginx/sbin/nginx -c /usr/local/openresty/nginx/conf/nginx.conf

curl 'http://127.0.0.1:7080/get'
success
说明7080能够正常提供服务了
We are successful in the terminal test
curl -i -X GET "http://127.0.0.1:9080/get?foo1=bar1&foo2=bar2" -H "Host: httpbin.org"
HTTP/1.1 200 OK
Content-Type: application/octet-stream
Transfer-Encoding: chunked
Connection: keep-alive
Server: APISIX web server
Date: Sun, 28 Jun 2020 15:52:03 GMT

success
Success is printed, indicating that the entire network process is smooth.
APISIX console installation
The new version of APISIX has built-in dashboard visualization WEB console, which can intuitively see various router configurations, upstream configurations and so on.
Direct browser access can open the dashboard
http://127.0.0.1:9080/apisix/dashboard
The following error appears, maybe the etced service forgot to start
connection refused
Start the etcd service and it is normal.
service etcd start
If it is a virtual machine or a docker machine, you may need to open the admin access display
vim /usr/local/apisix/conf/config.yaml
找到 allow_admin
- 127.0.0.0/24 该为 - all
就是允许所有IP访问,生产环境可不能这样,有非常大的安全风险
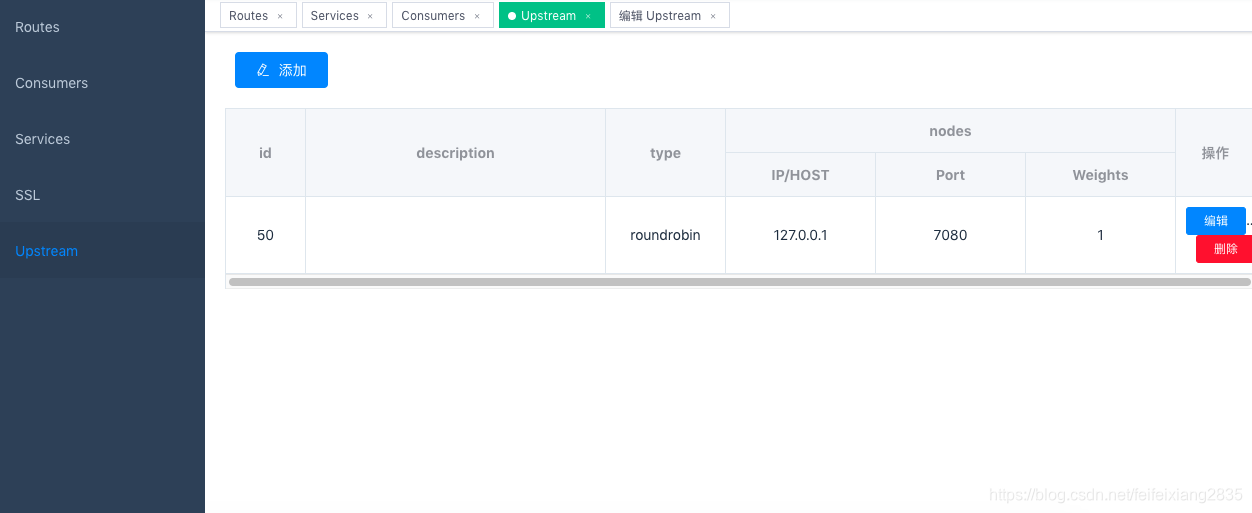
Normally visit http://127.0.0.1:9080/apisix/dashboard and you can see the routes and upstream set by curl on the Routes and Upstream on the left.
Easy to use etcd command line
etcd is a distributed and reliable key-value storage distributed system, mainly used for service discovery. The most famous k8s uses etcd to store configuration data.
The command line mainly uses etcdctl to execute etcd commands, first look at the help menu
etcdctl -h
NAME:
   etcdctl - A simple command line client for etcd.

WARNING:
   Environment variable ETCDCTL_API is not set; defaults to etcdctl v2.
   Set environment variable ETCDCTL_API=3 to use v3 API or ETCDCTL_API=2 to use v2 API.

USAGE:
   etcdctl [global options] command [command options] [arguments...]

VERSION:
   3.3.11

COMMANDS:
     backup          backup an etcd directory
     cluster-health  check the health of the etcd cluster
     mk              make a new key with a given value
     mkdir           make a new directory
     rm              remove a key or a directory
     rmdir           removes the key if it is an empty directory or a key-value pair
     get             retrieve the value of a key
     ls              retrieve a directory
     set             set the value of a key
     setdir          create a new directory or update an existing directory TTL
     update          update an existing key with a given value
     updatedir       update an existing directory
     watch           watch a key for changes
     exec-watch      watch a key for changes and exec an executable
     member          member add, remove and list subcommands
     user            user add, grant and revoke subcommands
     role            role add, grant and revoke subcommands
     auth            overall auth controls
The most commonly used commands are ls get set rm rmdir mk mkdir and so on. The names are relatively easy to understand.
etcdctl ls
/apisix

etcdctl ls /apisix
/apisix/upstreams
/apisix/node_status
/apisix/ssl
/apisix/routes
/apisix/services

etcdctl ls /apisix/upstreams
/apisix/upstreams/50

etcdctl get /apisix/upstreams/50
{"hash_on":"vars","id":"50","nodes":{"127.0.0.1:7080":1},"type":"roundrobin"}