yolov3 recognizes ground penetrating radar simulation data
Use yolov3 target detection function to detect ground penetrating radar data. Has certain research significance.
Environment preparation: ubuntu18.04, darknet platform, python3.7, CUDA10.0, GTX1050Ti
Simulation data production
The simulation data needs to install gprMax3, gprMax3 is a tool to generate gpr data, which can be downloaded from the official website . It is an open source tool and you can also visit the github repository for installation, the official installation tutorial .
Batch generate in files
Since it is just a simple experiment, there is no high requirement for simulation data, so the author used python script to generate 100 in files to realize the code as follows:
import os
import math
import random
filePrefix = 'data_'   #文件前缀
fileSuffix = '.in'    #文件后缀
for i in range(100):
    filename = filePrefix+str(i)+fileSuffix
    e1 = random.randint(1,10)	#Mate1的介电常数
    e2 = random.randint(1,10)	#Mate2的介电常数
    x = random.uniform(0.20,0.70)#目标的中心x坐标
    x = round(x,2)
    y = random.uniform(0.10,0.40)#目标的中心y坐标
    y = round(y,2)
    Twindows = (0.2*math.sqrt(e1)+0.24*math.sqrt(e2))/3e8*2
    # Twindows = round(Twindows,2)
    fl = open(filename,'w')
    fl.write('#title: '+filename+'\n')
    fl.write('#domain: 1 0.5 0.002\n')
    fl.write('#dx_dy_dz: 0.002 0.002 0.002\n')
    fl.write('时间窗可手动修改\n')
    fl.write('#time_window: '+str(Twindows)+'\n')
    fl.write('以下参数可手动修改\n\n')
    fl.write('#material: '+str(e1)+' 0 1 0 Mate1\n'
             '#material: '+str(e2)+' 0 1 0 Mate2\n\n'
             '#waveform: ricker 1 1.5e9 my_ricker\n'
             '#hertzian_dipole: z 0.05 0.49 0 my_ricker\n\n'
             '#rx: 0.055 0.49 0\n\n'
             '#src_steps: 0.01 0 0\n'
             '#rx_steps: 0.01 0 0\n\n'
             '#box: 0 0.24 0 1 0.44 0.002 Mate1\n'
             '#box: 0 0 0 1 0.24 0.002 Mate2\n'
             '#cylindrical_sector: z '+str(x)+' '+str(y)+' 0 0.002 0.02 180 180 pec\n\n'
             'geometry_view: 0 0 0 1 0.5 0.002 0.002 0.002 0.002 mytest n\n')
fl.close()
The in files generated in batches are all single-target. If you want to generate multiple targets, you can modify them appropriately. In addition, if you want to generate geometry files, you also need to modify them. I personally recommend that you need to debug several random parameters before batch generation to see if it is reasonable. How about the geometry file, because this is just a simple experiment. There are only four change parameters here. If you want to achieve more possibilities, you can set more change parameters, provided that the change range of each parameter is reasonable.
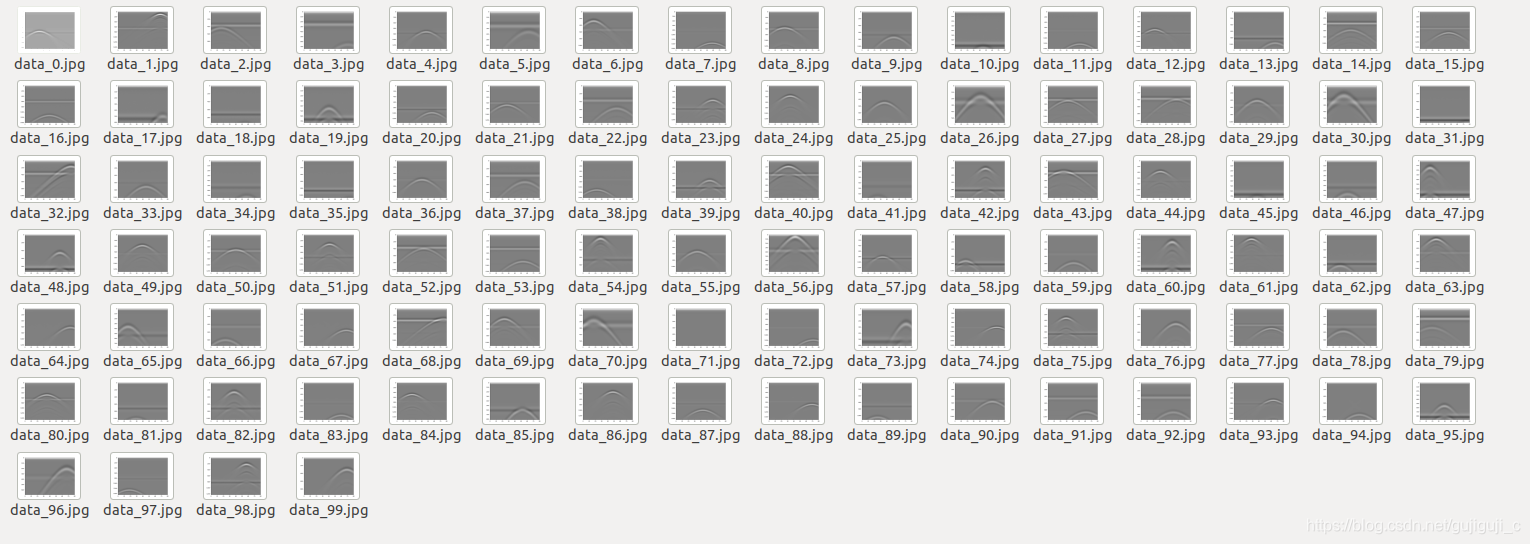
Generate out files in batches and extract out file data to generate txt files and jpg files
First of all, I would like to thank my brother for his help. Due to the author's programming skills and my lack of proficiency in gprmax applications, I have not done it for a long time. Thanks to my brother for his guidance. If you don't say anything, I just post it on my blog . Since yolov3 ultimately processes jpg images (the author’s yolo does not have opencv installed, the installation partners can ignore it), so for the code of the brother, you can add ==.pngChange to.jpg==.
There are still some small problems here, that is, the brother did not use GPU for training in the code. The author's gprMax3.0 can use GPU, so I changed the api function to
api(filename, n=num_scan, geometry_only=geo_only, gpu=[ 0]) #geometry_only: Only the geometry results are reported wrong, and finally the cpu is used to generate B-scan data
Simulation data to remove direct waves, and partly add noise
The direct wave will make the target image inconspicuous. It is best to remove the direct 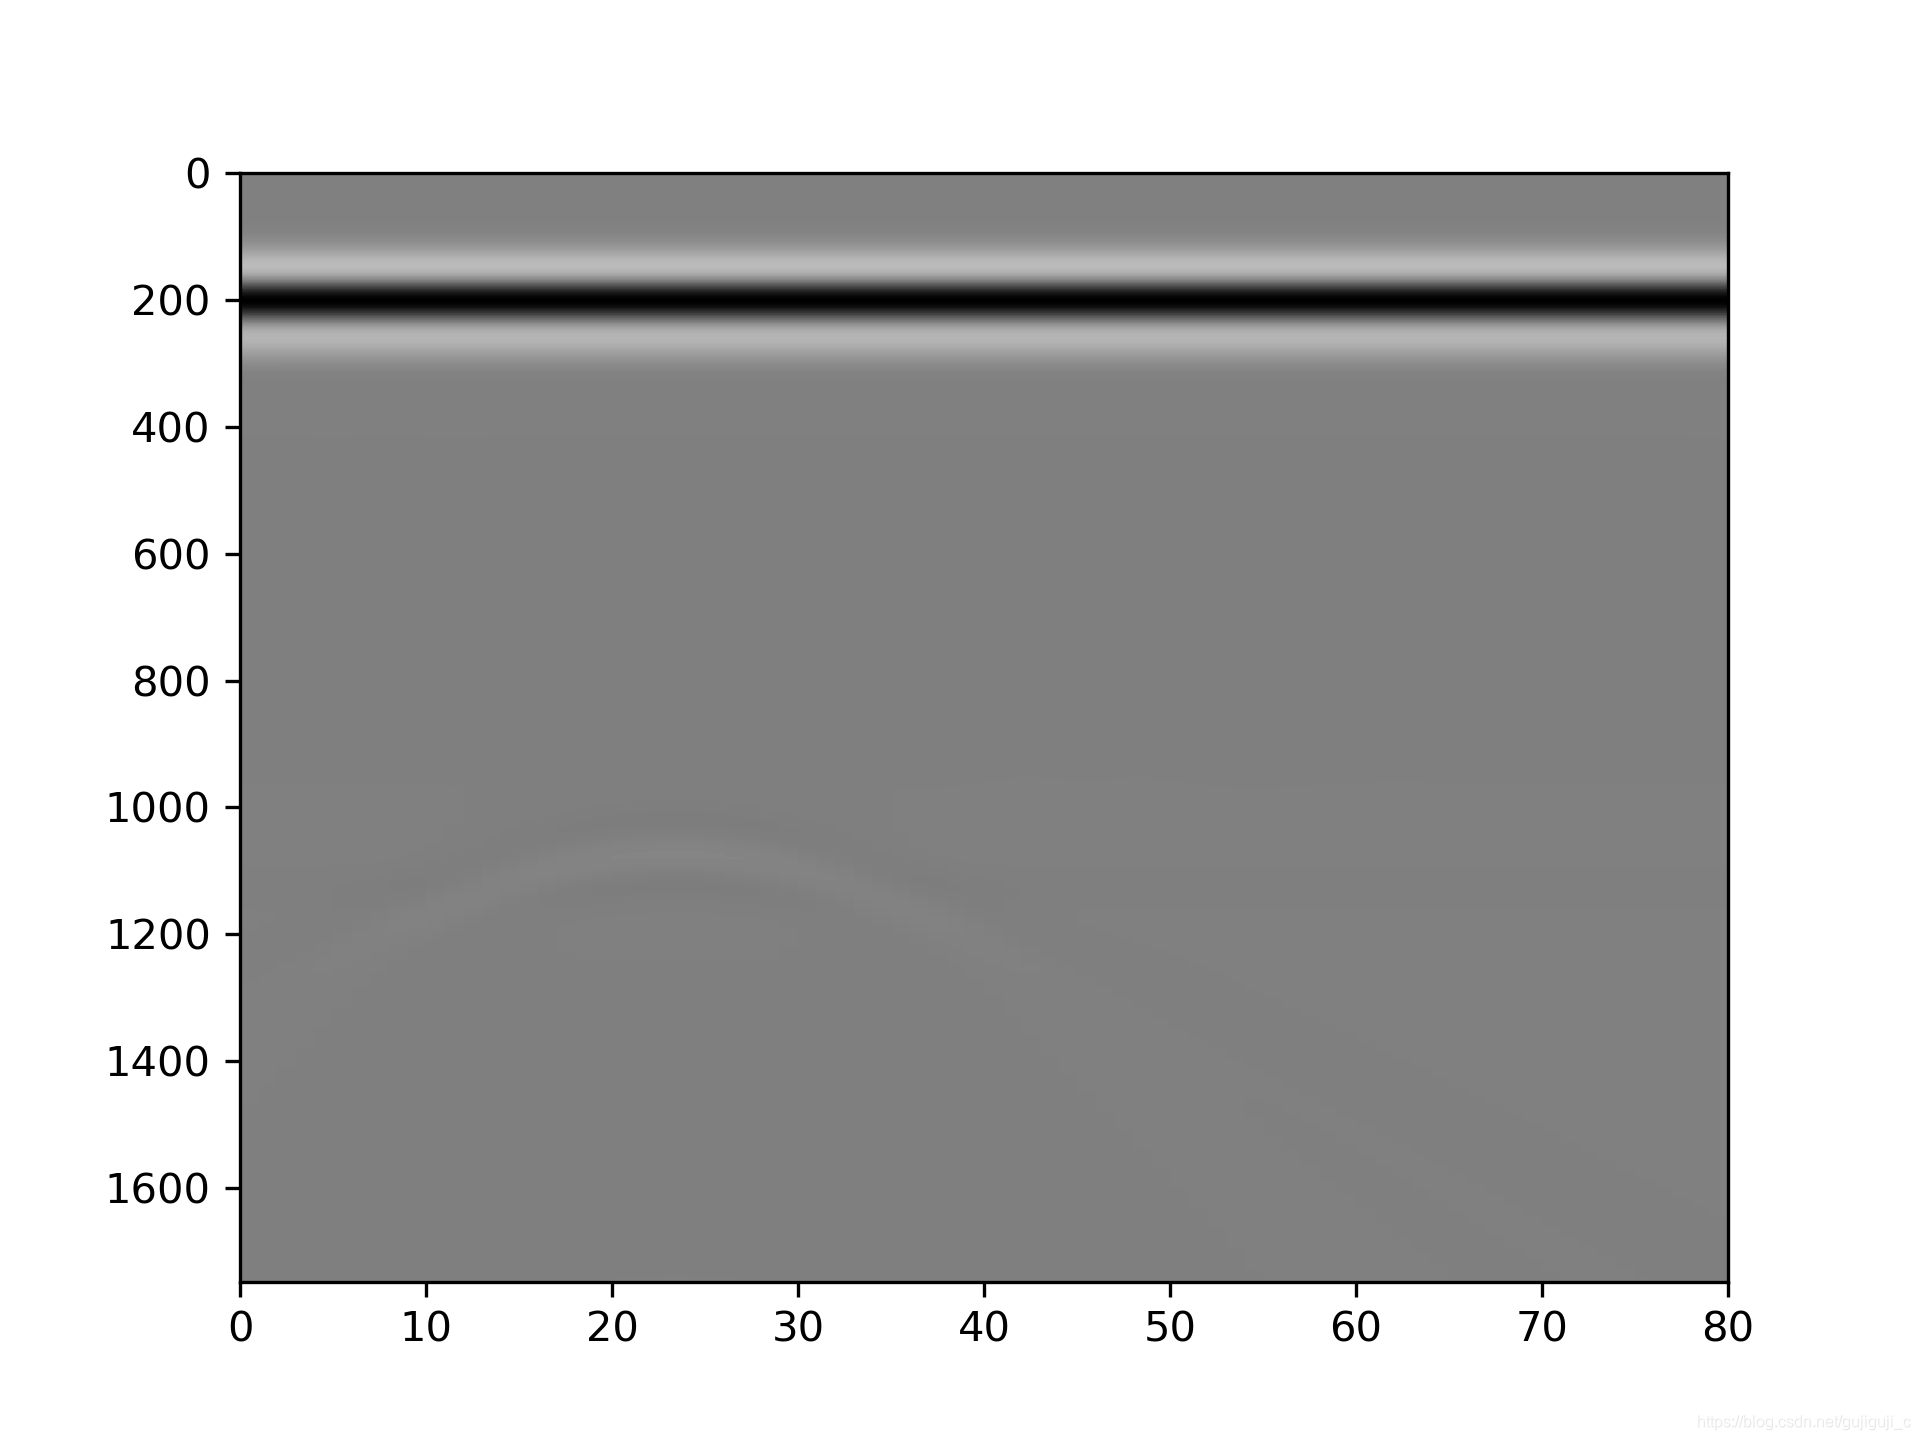
wave above without removing the direct wave as shown above. After

removing the direct wave as shown above, I used the most violent method to directly slice the data and discard the first 300 rows of data
. Add noise to the data, thank you brother again for your guidance! Here I specify the data plus noise, it is best to add noise randomly to randomize the signal-to-noise ratio, and the object of the noise is random . The implementation code is as follows:
import os
import numpy as np
import matplotlib.pyplot as plt
from PIL import Image

path = os.getcwd()

def Add_noise(x,snr):#传入的是信噪比dB
    '''snr(db) = 10log10(ps/pn)'''
    snr = 10 ** (snr / 10.0)
    xpower = np.sum(x ** 2) / np.size(x)
    npower = xpower / snr
    noise = np.random.randn(x.shape[0], x.shape[1]) * np.sqrt(npower)
    x_noise = x + noise
    return x_noise

for item in range(100):
    recordArray = np.loadtxt(path+'/out_data/data_'+str(item)+'.txt')
    recordArray = recordArray[300:]#切片去除直达波
    #部分数据加噪声
    if item>=10 and item<20:
        recordArray = Add_noise(recordArray, 30)
    elif item>=30 and item<40:
        recordArray = Add_noise(recordArray, 50)
    elif item >= 60 and item < 70:
        recordArray = Add_noise(recordArray, 70)
    # recordArray= recordArray.astype(np.float)
    # print(recordArray)
    np.savetxt('/media/rose/Rose/data/out_data/data_'+str(item)+'.txt',recordArray)
    plt.imshow(recordArray, extent=[0, recordArray.shape[1], recordArray.shape[0], 0], interpolation='nearest',
                       aspect='auto', cmap='gray',
                       vmin=-np.amax(np.abs(recordArray)), vmax=np.amax(np.abs(recordArray)))

    plt.savefig('/media/rose/Rose/data/out_image/data_' +str(item)+ '.jpg', dpi=300)  # 保存图片
At this point, the simulation data preparation is complete.
Tag data
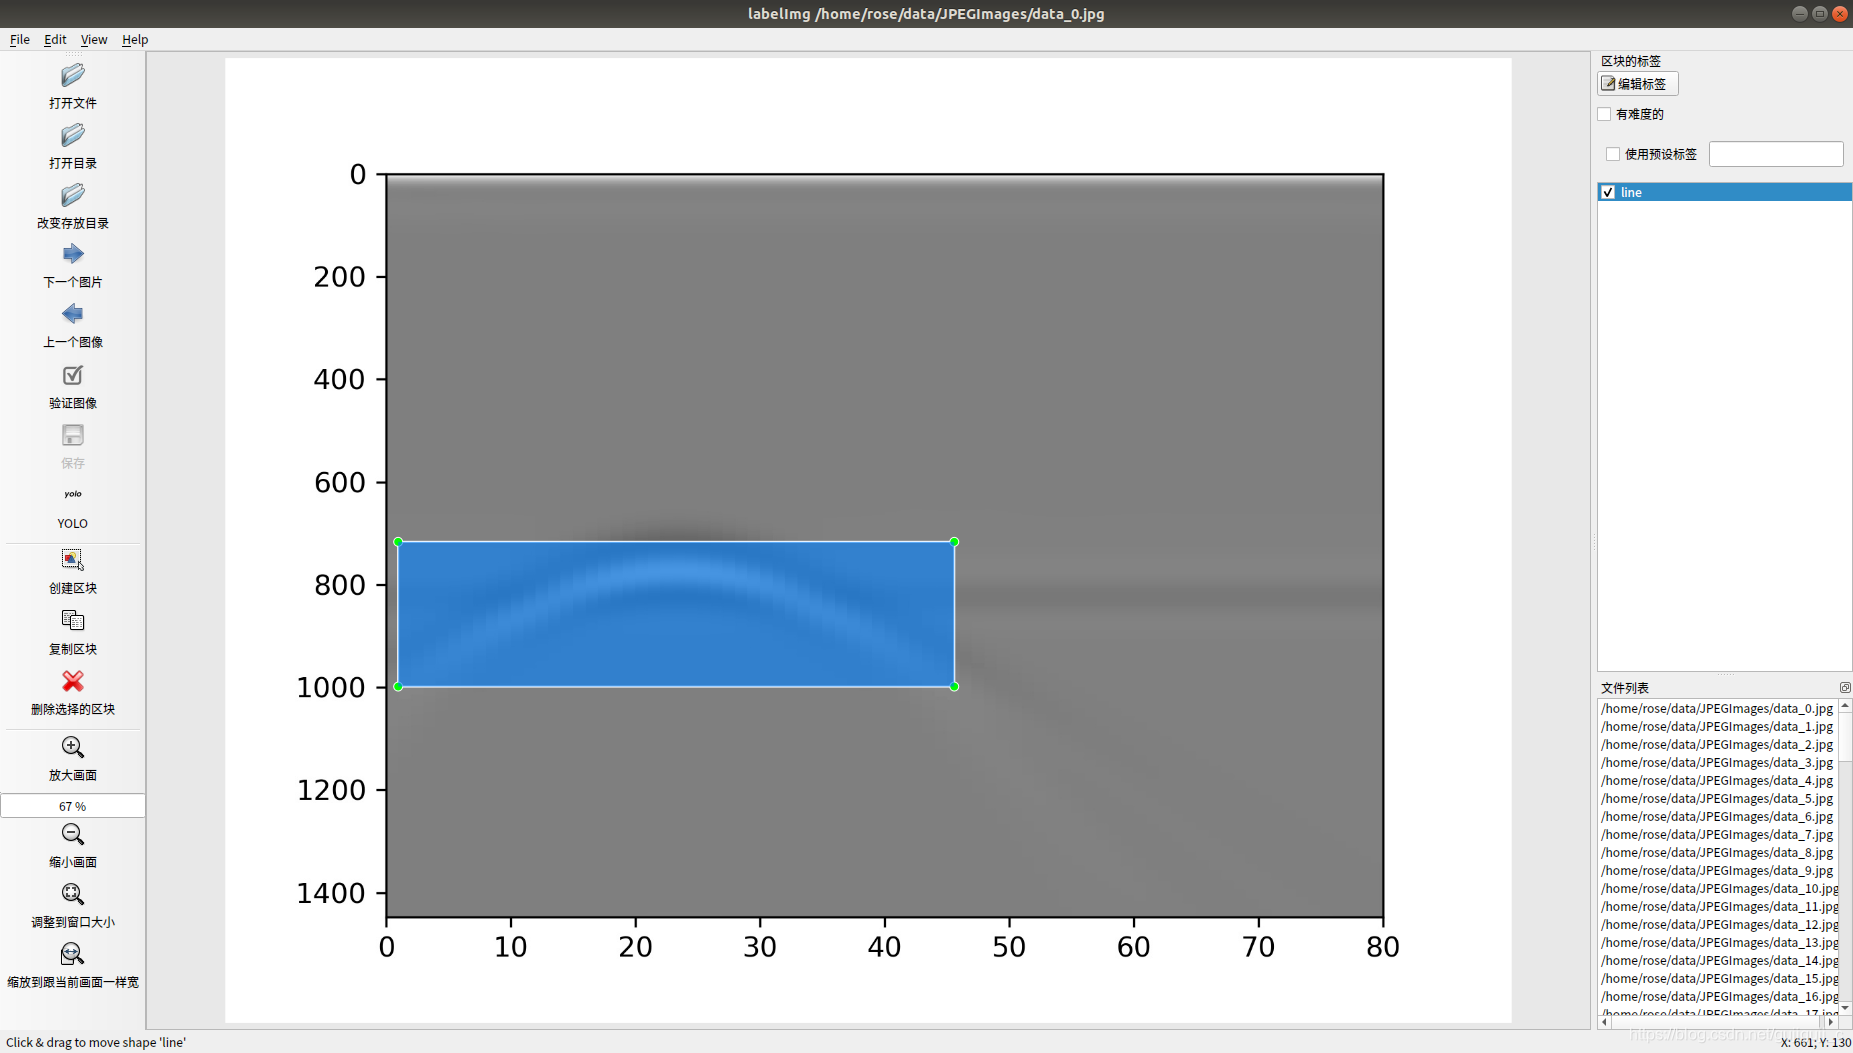
Next, make a data set that yolov3 can handle. To label the data set, you need to use the labeling tool labelImag
labelImg installation
The author’s computer system is ubuntu18.04 and directly open the terminal and input:
pip install labelImg (If the download is too slow, you can change the source and run the following command)
pip install -i https://pypi.tuna.tsinghua.edu.cn/simple labelImg
labelImag use
Terminal input:
labelImg
The use interface is as follows
yolov3 training
After making the label data, you can start training . The main reference link for training yolov3 .
Directory structure creation data set preparation
Since I have been installed darknet-yolov3, and production well yolo dataset skip a link in the two steps, the first point to the third step after the first establishment according to the corresponding requirements of the folder is as follows:
indarknet directory run command
Here I did not create the Annotations directory because I have selected the yolo tag when generating the tag data, so I don’t need to convert it to data that darknet can run.
mkdir myData
cd myData
mkdir JPEGImages  ImageSets/Main labels
Copy the picture to the JPEGImages directory
Run the code at point 1 of step 3 in the link :
import os
import random

trainval_percent = 0.1
train_percent = 0.9
xmlfilepath = 'Annotations'
txtsavepath = 'ImageSets\Main'
total_xml = os.listdir(xmlfilepath)
num = len(total_xml)
list = range(num)
tv = int(num * trainval_percent)
tr = int(tv * train_percent)
trainval = random.sample(list, tv)
train = random.sample(trainval, tr)

ftrainval = open('ImageSets/Main/trainval.txt', 'w')
ftest = open('ImageSets/Main/test.txt', 'w')
ftrain = open('ImageSets/Main/train.txt', 'w')
fval = open('ImageSets/Main/val.txt', 'w')

for i in list:
    name = total_xml[i][:-4] + '\n'
    if i in trainval:
        ftrainval.write(name)
        if i in train:
            ftest.write(name)
        else:
            fval.write(name)
    else:
        ftrain.write(name)

ftrainval.close()
ftrain.close()
fval.close()
ftest.close()
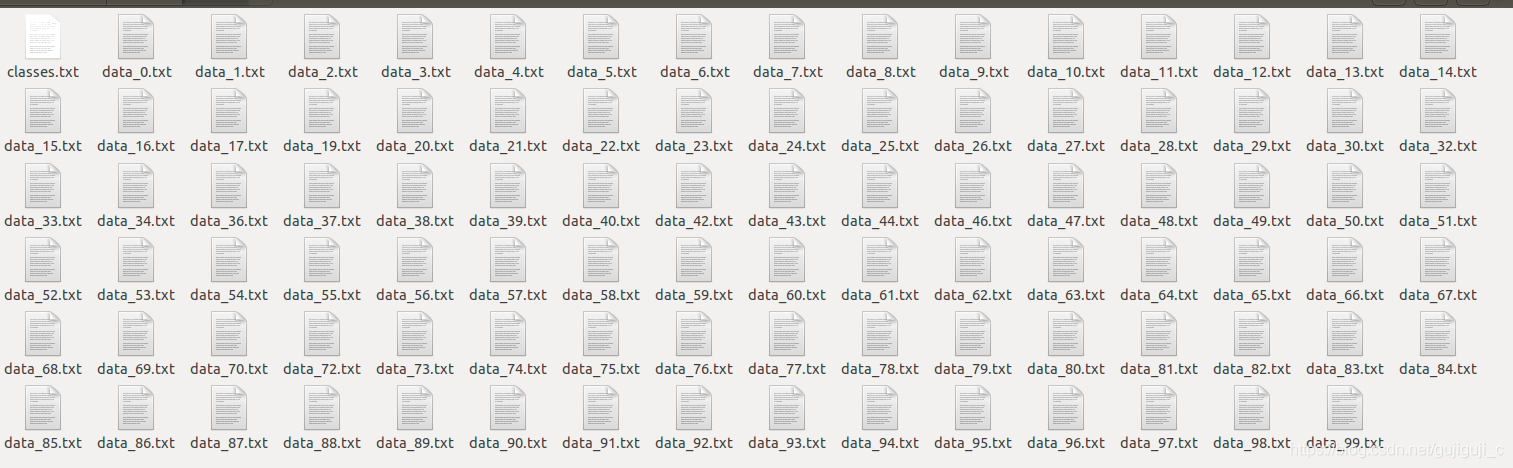
As mentioned above, we don’t need to follow what he said when we execute point 2 of the third step of the link .Copy the label file to the labels directoryAs shown below
Modify the configuration file
Enter the darknet/cfg directory and run the terminal
cp voc.data my_data.data
cp yolov3.cfg my_yolov3.cfg
Modify my_data.data
classes= 1 ##改为自己的分类个数
##下面都改为自己的路径
train  = /home/XXX/darknet/myData/myData_train.txt
names = /home/XXX/darknet/myData/myData.names #稍后需要创建这个文件
backup = /home/XXX/darknet/myData/weights
Modify my_yolov3.cfg
/yolo, a total of 3 places containing yolo will be found.
Every place must be changed 2 places, filters: 3*(5+len(classes));
among them: classes: len(classes) = 1, here take my project as an example,
filters = 18
classes = 1
can be modified: random = 0: Originally it was 1, and the video memory was changed to 0. (Whether to multi-scale output.)
Modify training batch
Annotate the test code and use the training code. Here I will modify the training as follows
batch=2
subdivisions = 2
max_batches = 5000
steps = 4000,4500
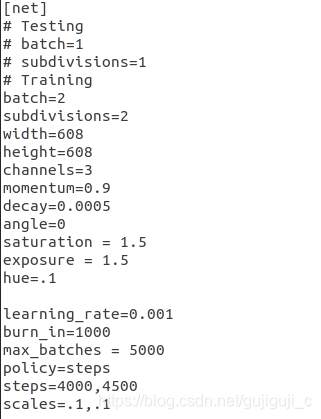
[net]
# Testing            ### 测试模式
# batch=1
# subdivisions=1
# Training           ### 训练模式,每次前向的图片数目 = batch/subdivisions
batch=2
subdivisions=2
width=416            ### 网络的输入宽、高、通道数
height=416
channels=3
momentum=0.9         ### 动量
decay=0.0005         ### 权重衰减
angle=0
saturation = 1.5     ### 饱和度
exposure = 1.5       ### 曝光度
hue=.1               ### 色调
learning_rate=0.001  ### 学习率
burn_in=1000         ### 学习率控制的参数
max_batches = 5000  ### 迭代次数
policy=steps         ### 学习率策略
steps=4000,4500    ### 学习率变动步长
Create a new myDatanames in the myData directory and enter
line (the label name I defined, there is only one category)
training
Open the terminal in the darknet directory
wget https://pjreddie.com/media/files/darknet53.conv.74

./darknet detector train cfg/my_data.data cfg/my_yolov3.cfg darknet53.conv.74
test
./darknet detect cfg/my_yolov3.cfg myData/weights/my_yolov3_final.weights data_24.jpg
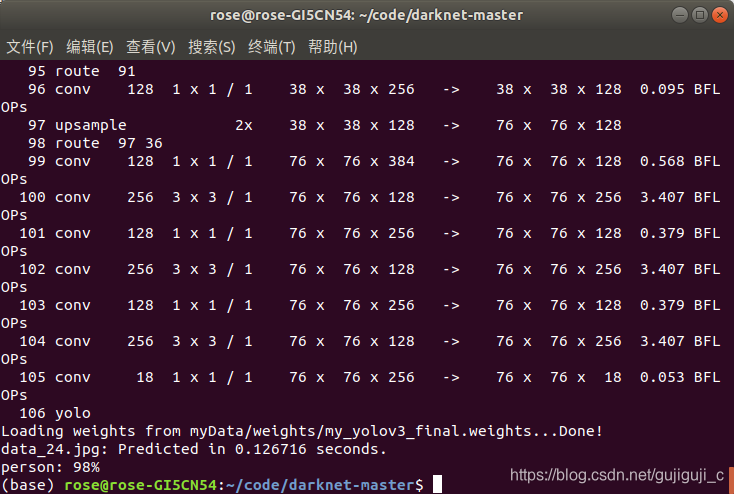
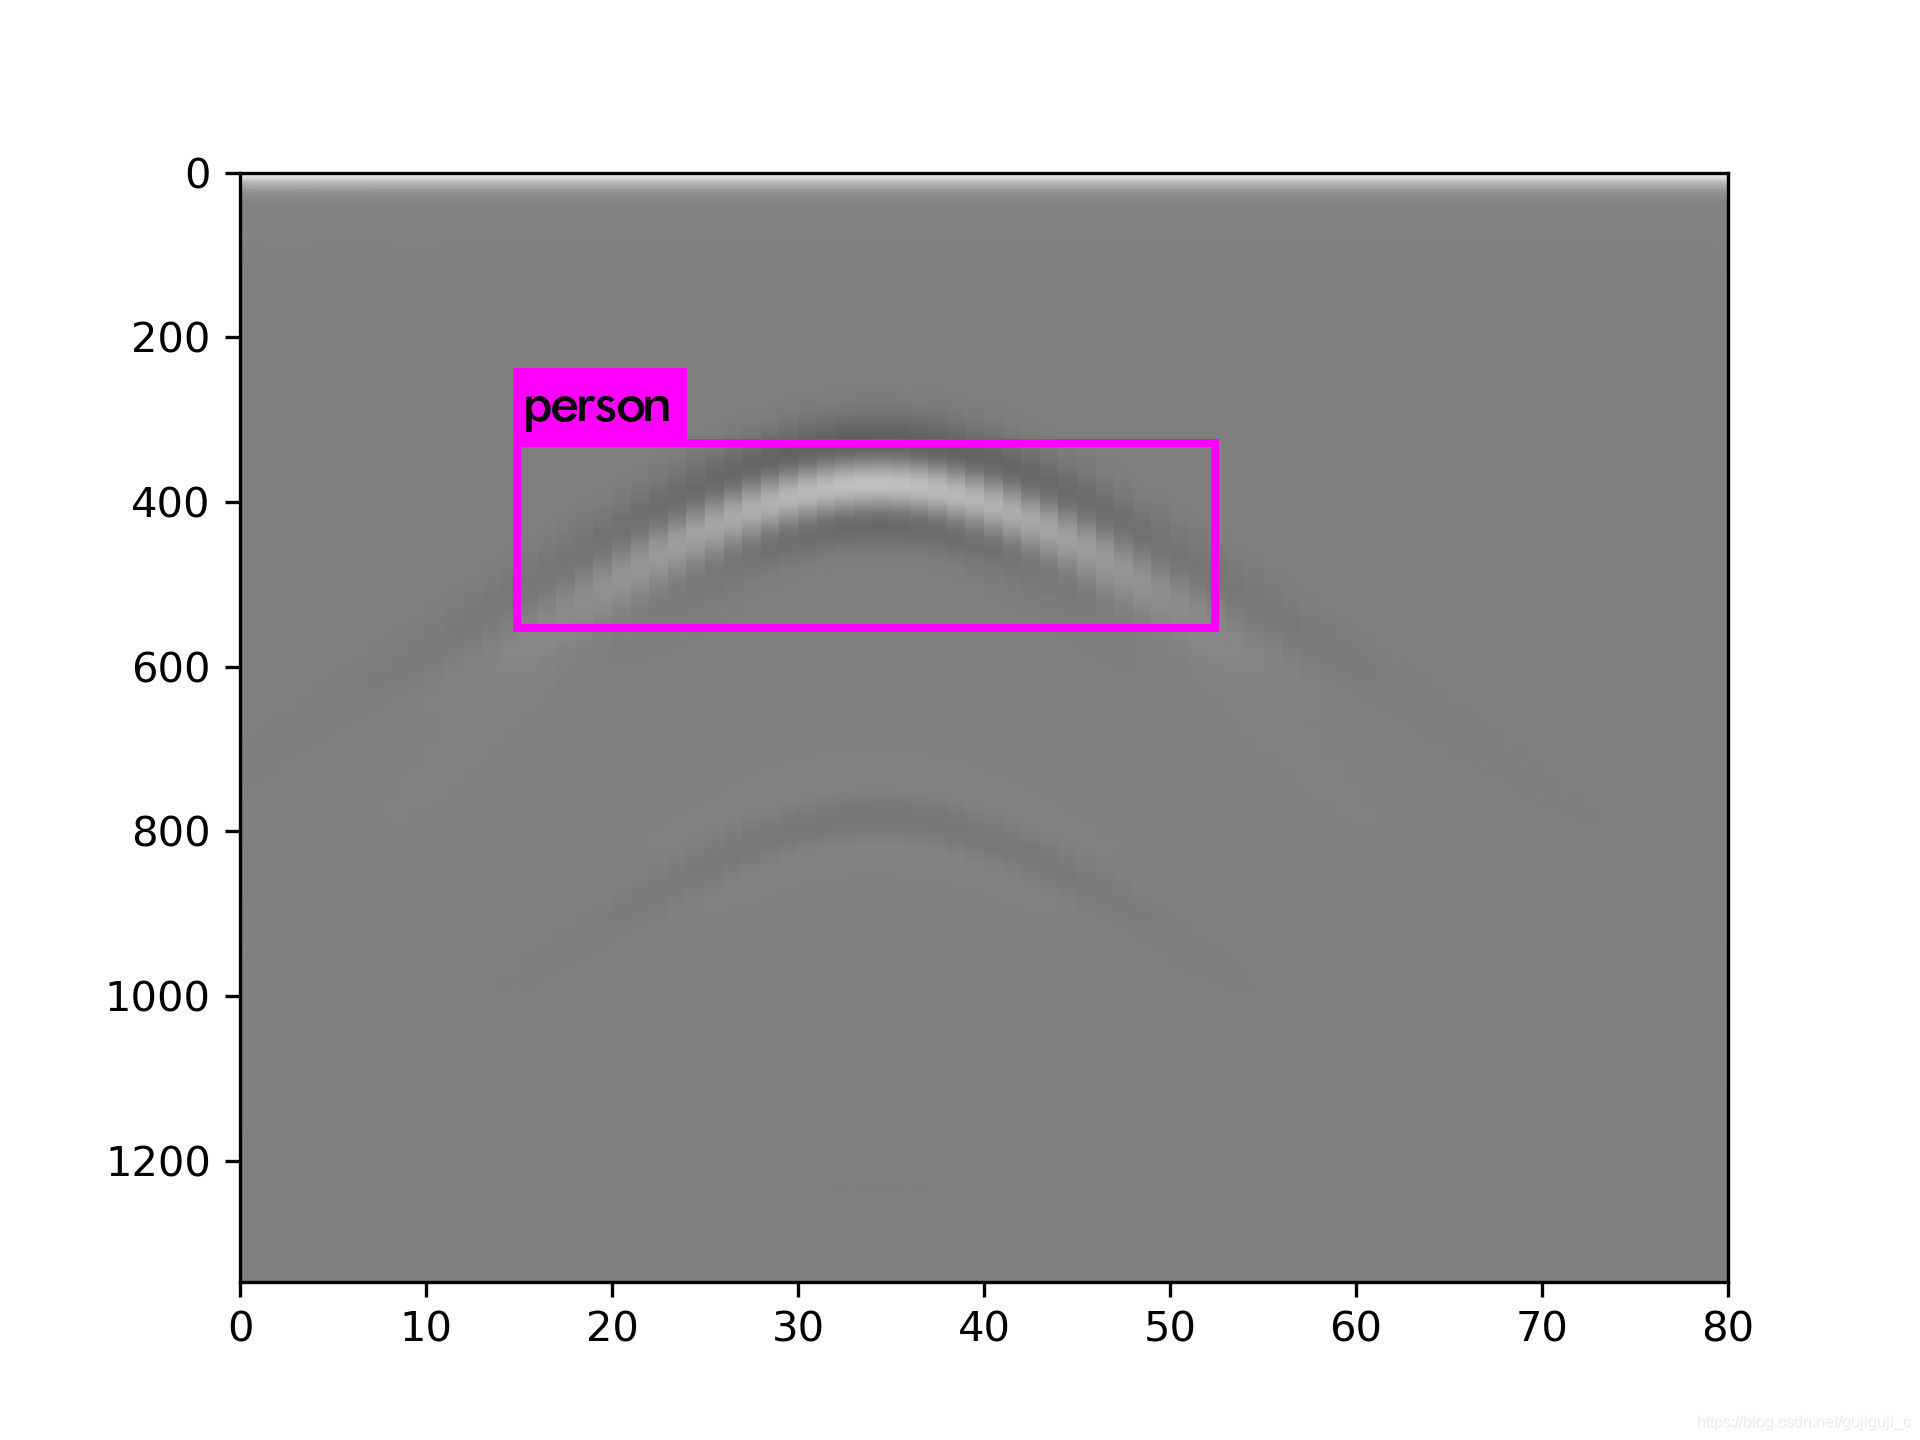
Problem: The tag name is incorrectly defined for me. The line outputs person, which has not been solved yet.