table of Contents
This section, we mainly explain how to integrate next. We need to use netty websocket docking connector, two-way communication, this step requires a server-side netty procedures for handling client connections websocket operations, such as the establishment connect, disconnect, send and receive data.
Change setting
- Modify the notification message service module tensquare_notice the micro pom file, add the following dependency dependent
<dependency>
    <groupId>org.springframework.boot</groupId>
    <artifactId>spring-boot-starter-amqp</artifactId>
</dependency>
<dependency>
    <groupId>io.netty</groupId>
    <artifactId>netty-all</artifactId>
    <version>4.1.5.Final</version>
</dependency>
- Application.yml modify the file, add the following configuration
  rabbitmq:
    host: 192.168.200.128
Such notification messaging service is introduced into the micro netty frame and having the ability to interact with and Rabbitmq
Netty achieve the integration of
Meta-analysis
Now the communication mode is as follows:
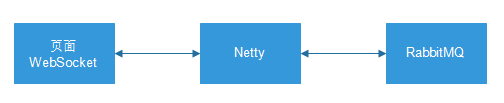
because of the use to WebSocket and Netty, integrated approach and different from the past, integration steps:
- Write NettyServer, start Netty service.
- Bean created using the configuration Netty service. Write NettyConfig.
- Write and WebSocket communication processing class MyWebSocketHandler, message processing and WebSocket of MQ.
- Creating Rabbit listener container using the configuration Bean, use the Listener. Write RabbitConfig.
- Write Rabbit listener SysNoticeListener, used to get the message MQ and processed.
FIG five class relationship is as follows:

Integrate
- Prepared ApplicationContextProvider.java, this class is the class tool, and functions to acquire examples Spring container
- Write NettyServer
public class NettyServer {
public void start(int port) {
System.out.println("准备启动Netty。。。");
ServerBootstrap serverBootstrap = new ServerBootstrap();
//用来处理新连接的
EventLoopGroup boos = new NioEventLoopGroup();
//用来处理业务逻辑的,读写。。。
EventLoopGroup worker = new NioEventLoopGroup();
serverBootstrap.group(boos, worker)
.channel(NioServerSocketChannel.class)
.childHandler(new ChannelInitializer() {
@Override
protected void initChannel(Channel ch) throws Exception {
//请求消息解码器
ch.pipeline().addLast(new HttpServerCodec());
// 将多个消息转换为单一的request或者response对象
ch.pipeline().addLast(new HttpObjectAggregator(65536));
//处理WebSocket的消息事件
ch.pipeline().addLast(new WebSocketServerProtocolHandler("/ws"));
//创建自己的webSocket处理器,就是用来编写业务逻辑的
MyWebSocketHandler myWebSocketHandler = new MyWebSocketHandler();
ch.pipeline().addLast(myWebSocketHandler);
}
}).bind(port);
}
}
- Write NettyConfig
@Configuration
public class NettyConfig {
@Bean
public NettyServer createNettyServer() {
NettyServer nettyServer = new NettyServer();
//启动Netty服务,使用新的线程启动
new Thread(){
@Override
public void run() {
nettyServer.start(1234);
}
}.start();
return nettyServer;
}
}
- Write MyWebSocketHandler
public class MyWebSocketHandler extends SimpleChannelInboundHandler<TextWebSocketFrame> {
private static ObjectMapper MAPPER = new ObjectMapper();
// 送Spring容器中获取消息监听器容器,处理订阅消息sysNotice
SimpleMessageListenerContainer sysNoticeContainer = (SimpleMessageListenerContainer) ApplicationContextProvider.getApplicationContext()
.getBean("sysNoticeContainer");
//从Spring容器中获取RabbitTemplate
RabbitTemplate rabbitTemplate = ApplicationContextProvider.getApplicationContext()
.getBean(RabbitTemplate.class);
//存放WebSocket连接Map,根据用户id存放
public static ConcurrentHashMap<String, Channel> userChannelMap = new ConcurrentHashMap();
//用户请求WebSocket服务端,执行的方法
@Override
protected void channelRead0(ChannelHandlerContext ctx, TextWebSocketFrame msg) throws Exception {
//约定用户第一次请求携带的数据:{"userId":"1"}
//获取用户请求数据并解析
String json = msg.text();
//解析json数据,获取用户id
String userId = MAPPER.readTree(json).get("userId").asText();
//第一次请求的时候,需要建立WebSocket连接
Channel channel = userChannelMap.get(userId);
if (channel == null) {
//获取WebSocket的连接
channel = ctx.channel();
//把连接放到容器中
userChannelMap.put(userId, channel);
}
//只用完成新消息的提醒即可,只需要获取消息的数量
//获取RabbitMQ的消息内容,并发送给用户
RabbitAdmin rabbitAdmin = new RabbitAdmin(rabbitTemplate);
//拼接获取队列名称
String queueName = "article_subscribe_" + userId;
//获取Rabbit的Properties容器
Properties queueProperties = rabbitAdmin.getQueueProperties(queueName);
//获取消息数量
int noticeCount = 0;
//判断Properties是否不为空
if (queueProperties != null) {
// 如果不为空,获取消息的数量
noticeCount = (int) queueProperties.get("QUEUE_MESSAGE_COUNT");
}
//封装返回的数据
HashMap countMap = new HashMap();
countMap.put("sysNoticeCount", noticeCount);
Result result = new Result(true, StatusCode.OK, "查询成功", countMap);
//把数据发送给用户
channel.writeAndFlush(new TextWebSocketFrame(MAPPER.writeValueAsString(result)));
//把消息从队列里面清空,否则MQ消息监听器会再次消费一次
if (noticeCount > 0) {
rabbitAdmin.purgeQueue(queueName, true);
}
//为用户的消息通知队列注册监听器,便于用户在线的时候,
//一旦有消息,可以主动推送给用户,不需要用户请求服务器获取数据
sysNoticeContainer.addQueueNames(queueName);
}
}
- Write RabbitConfig
@Configuration
public class RabbitConfig {
@Bean("sysNoticeContainer")
public SimpleMessageListenerContainer create(ConnectionFactory connectionFactory) {
SimpleMessageListenerContainer container =
new SimpleMessageListenerContainer(connectionFactory);
//使用Channel
container.setExposeListenerChannel(true);
//设置自己编写的监听器
container.setMessageListener(new SysNoticeListener());
return container;
}
}
- Write SysNoticeListener
public class SysNoticeListener implements ChannelAwareMessageListener {
private static ObjectMapper MAPPER = new ObjectMapper();
@Override
public void onMessage(Message message, Channel channel) throws Exception {
//获取用户id,可以通过队列名称获取
String queueName = message.getMessageProperties().getConsumerQueue();
String userId = queueName.substring(queueName.lastIndexOf("_") + 1);
io.netty.channel.Channel wsChannel = MyWebSocketHandler.userChannelMap.get(userId);
//判断用户是否在线
if (wsChannel != null) {
//如果连接不为空,表示用户在线
//封装返回数据
HashMap countMap = new HashMap();
countMap.put("sysNoticeCount", 1);
Result result = new Result(true, StatusCode.OK, "查询成功", countMap);
// 把数据通过WebSocket连接主动推送用户
wsChannel.writeAndFlush(new TextWebSocketFrame(MAPPER.writeValueAsString(result)));
}
}
}
- Start modify the startup class, adding Netty services
public static void main(String[] args) {
SpringApplication.run(NoticeApplication.class, args);
NettyServer server = ApplicationContextProvider.getApplicationContext().getBean(NettyServer.class);
try {
server.start(12345);
} catch (Exception e) {
e.printStackTrace();
}
}
Thus, the basic code has been completed, you can put forward a front page under test.
