Outline
The items in the FastDFSfile system, storage picture files.
FastDFS
Literature Reference: https://blog.csdn.net/weixin_38231448/article/details/95815069
Distributed File System (Distributed File System) refers to the physical storage resources in the system management files are not directly connected to ⼀ given on the local node, ⽽ is connected through the computer node Open networks.
Analyzing ⼀ a Distributed File System is excellent, depending on the following three factors:
. Shutter mode ① stored data
reading rate ② / data
. ③ security data
FastDFS 是⼀款开源的轻量级分布式⽂件系统The following characteristics:
- purelyYour language and CImplementation, ⽀ support Linux, FreeBSD and other unix systems.
- Similar GoogleFS / HDFS, but not through the Use of the file system, accessible only through proprietary API, provides the destination time before the C, Java and Internet ⽹ PHPAPI tailored ADVANCED pursuit of performance, High-expansion.
- FastDFS only can store files, metadata information may also store files (optional).
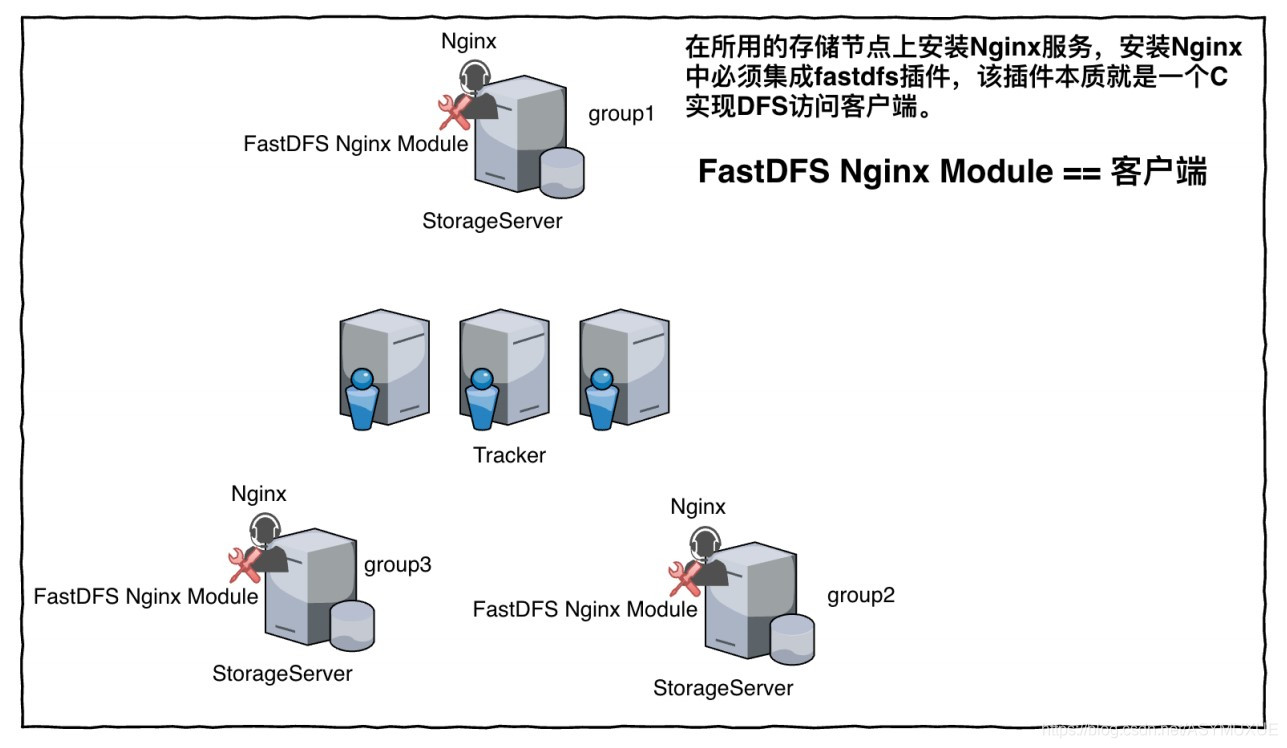
Architecture:
FastDFS whole architecture there Client, Trackerand Storageservice.
Using the Client which to submit files to FastDFS cluster.
Storage Service is responsible for storing the actual data.
Tracker service is responsible for monitoring and scheduling Storage services, played for Using the load balancer.
installation
Github link: https://github.com/happyfish100
installation package acquisition: https://pan.baidu.com/s/1k3v7j826qlYIHwO3Q84FSg acquisition code: j68s
- To 3 servers for the sample: with all xRefers to all the servers must be installed.
①. Install dependencies
[root@hbaseX ~] yum install -y gcc-c++ #下载c++依赖
[root@hbaseX ~] tar -zxf libfastcommon-1.0.39.tar.gz
[root@hbaseX ~] cd libfastcommon-1.0.39
[root@hbaseX libfastcommon-1.0.39] ./make.sh
[root@hbaseX libfastcommon-1.0.39] ./make.sh install
② installation FastDFS
[root@hbaseX ~] yum install -y perl-devel #下载依赖插件
[root@hbaseX ~] tar -zxf fastdfs-5.11.tar.gz
[root@hbaseX ~] cd fastdfs-5.11
[root@hbaseX fastdfs-5.11] ./make.sh
[root@hbaseX fastdfs-5.11] ./make.sh install
③ Configuration
创建fdfs运行所需的数据目录
[root@hbaseX ~] mkdir -p /data/fdfs/{tracker,storage/store01,storage/store02}
创建启动所需的配置文件
[root@hbaseX ~] cp /etc/fdfs/tracker.conf.sample     /etc/fdfs/tracker.conf
[root@hbaseX ~] cp /etc/fdfs/storage.conf.sample     /etc/fdfs/storage.conf
[root@hbaseX ~] cp /etc/fdfs/client.conf.sample      /etc/fdfs/client.conf
配置Tracker Server
[root@hbaseX ~] vi /etc/fdfs/tracker.conf
Modify the following configurations:
base_path=/data/fdfs/tracker
配置Storage Server
[root@hbaseX ~] vi /etc/fdfs/storage.conf
Modify the following configurations:
group_name=group[1,2,3] #这里的1,2,3,指代分别在美个服务器创建不同的组名
base_path=/data/fdfs/storage
store_path_count=2
store_path0=/data/fdfs/storage/store01
store_path1=/data/fdfs/storage/store02
tracker_server=hbase1:22122
tracker_server=hbase2:22122
tracker_server=hbase3:22122
修改client
[root@hbaseX ~] vi /etc/fdfs/client.conf
Modify the following configurations:
base_path=/tmp
tracker_server=hbase1:22122
tracker_server=hbase2:22122
tracker_server=hbase3:22122
④ start
保证所有节点都首先启动 tracker
#启动追踪器,一定所有服务器都先启动
[root@hbaseX ~] /etc/init.d/fdfs_trackerd start
Starting fdfs_trackerd (via systemctl):                    [  确定  ]

[root@hbaseX ~] /etc/init.d/fdfs_storaged start
Starting fdfs_storaged (via systemctl):                    [  确定  ]

[root@hbaseX ~] ps -aux | grep fdfs
Warning: bad syntax, perhaps a bogus '-'? See /usr/share/doc/procps-3.2.8/FAQ
root      78950  0.0  0.1 144784  2040 ?        Sl   21:06   0:00 /usr/bin/fdfs_trackerd /etc/fdfs/tracker.conf
root      79000 13.0  3.2  83520 67144 ?        Sl   21:06   0:06 /usr/bin/fdfs_storaged /etc/fdfs/storage.conf
root      79324  0.0  0.0 103320   884 pts/0    S+   21:07   0:00 grep fdfs
⑤ command to test
上传文件
[root@hbase1 ~] fdfs_upload_file /etc/fdfs/client.conf iviolet_evergarden-009.jpg
#返回的文件路径
group1/M00/00/01/wKikgV0YtQ2AfmozAAAixZ60QfI792.jpg
查看文件信息
[root@CentOSX ~]  fdfs_file_info /etc/fdfs/client.conf
#返回的信息
group1/M00/00/01/wKikgV0YtQ2AfmozAAAixZ60QfI792.jpg
source storage id: 0
source ip address: 192.168.164.129
file create timestamp: 2019-06-30 21:11:41
file size: 8901
file crc32: 2662613490 (0x9EB441F2)
下载文件
[root@hbase2 ~] fdfs_download_file /etc/fdfs/client.conf group1/M00/00/01/wKikgV0YtQ2AfmozAAAixZ60QfI792.jpg
删除文件
[root@hbase3~] fdfs_delete_file /etc/fdfs/client.conf group1/M00/00/01/wKikgV0YtQ2AfmozAAAixZ60QfI792.jpg
追加文件信息
[root@hbase2 ~] echo "hello" > 1.txt
[root@hbase2 ~] echo "word" > 2.txt
[root@hbase2 ~] fdfs_upload_appender /etc/fdfs/client.conf /root/1.txt
#返回的文件信息
group2/M00/00/00/wKikgl0qX4KEep_PAAAAAIpZx2Y751.txt
[root@hbase2 ~] fdfs_append_file /etc/fdfs/client.conf group2/M00/00/00/wKikgl0qX4KEep_PAAAAAIpZx2Y751.txt 2.txt
[root@hbase2 ~] fdfs_download_file /etc/fdfs/client.conf group2/M00/00/00/wKikgl0qX4KEep_PAAAAAIpZx2Y751.txt
[root@hbase2 ~] cat wKikgl0qX4KEep_PAAAAAIpZx2Y751.txt
hello
word
监视状态
[root@hbase2 ~] fdfs_monitor /etc/fdfs/client.conf
文件校验和
[root@hbase2 ~] fdfs_crc32 /etc/fdfs/client.conf group2/M00/00/00/wKikgl0qX4KEep_PAAAAAIpZx2Y751.txt
#返回的值
2911662598
Nginx integration FastDFS
① Installation
[root@hbaseX ~] tar -zxf fastdfs-nginx-module.tar.gz
[root@hbaseX ~] yum install -y pcre-devel
[root@hbaseX ~] yum install -y openssl-devel

[root@hbaseX ~] tar -zxf nginx-1.11.1.tar.gz
[root@hbaseX ~] cd  nginx-1.11.1/
[root@hbaseX nginx-1.11.1] ./configure --prefix=/usr/local/nginx-1.11.1/ --add-module=/root/fastdfs-nginx-module/src
[root@hbaseX nginx-1.11.1] make
[root@hbaseX nginx-1.11.1] make install
② Configuration
[root@hbaseX ~] cp fastdfs-nginx-module/src/mod_fastdfs.conf /etc/fdfs/
[root@hbaseX ~] cd fastdfs-5.11/conf/
[root@hbaseX conf] cp http.conf mime.types anti-steal.jpg /etc/fdfs/
nginx配置
root@hbaseX ~] vi /usr/local/nginx-1.11.1/conf/nginx.conf
Add the following configuration
		 #access_log  logs/host.access.log  main;

        location ~ /group[0-9]+/M00 {
            root /data/fdfs/storage/store01;
            ngx_fastdfs_module;
         }
        location ~ /group[0-9]+/M01 {
            root /data/fdfs/storage/store02;
            ngx_fastdfs_module;
         }

         location / {
            root   html;
            index  index.html index.htm;
         }

        #error_page  404              /404.html;
配置mod_fastdfs.conf
[root@hbaseX ~] vi /etc/fdfs/mod_fastdfs.conf
Add the following configuration
tracker_server=hbase1:22122
tracker_server=hbase2:22122
tracker_server=hbase3:22122

group_name=group[1,2,3] #这里的1,2,3,指代分别在美个服务器创建不同的组名
url_have_group_name = true
store_path_count=2

store_path0=/data/fdfs/storage/store01
store_path1=/data/fdfs/storage/store02
③ start
[root@hbaseX ~] cd /usr/local/nginx-1.11.1/
[root@hbaseX nginx-1.11.1] ./sbin/nginx -t
# 检查语法是否正确
ngx_http_fastdfs_set pid=116305
ngx_http_fastdfs_set pid=116305
nginx: the configuration file /usr/local/nginx-1.11.1//conf/nginx.conf syntax is ok
nginx: configuration file /usr/local/nginx-1.11.1//conf/nginx.conf test is successful
#启动
[root@hbaseX nginx-1.11.1] ./sbin/nginx
④ test access
[root@hbaseX ~] fdfs_upload_file /etc/fdfs/client.conf 2020-03-20-22-52-35_0.png
#返回的文件位置
group2/M00/00/00/CgoAmF520H6APRvGACUXSBEcDIk006.png
Browser address access:ip地址/group2/M00/00/00/CgoAmF520H6APRvGACUXSBEcDIk006.png

To download:ip地址/group2/M00/00/00/CgoAmF520H6APRvGACUXSBEcDIk006.png?filename=自定义文件名.png
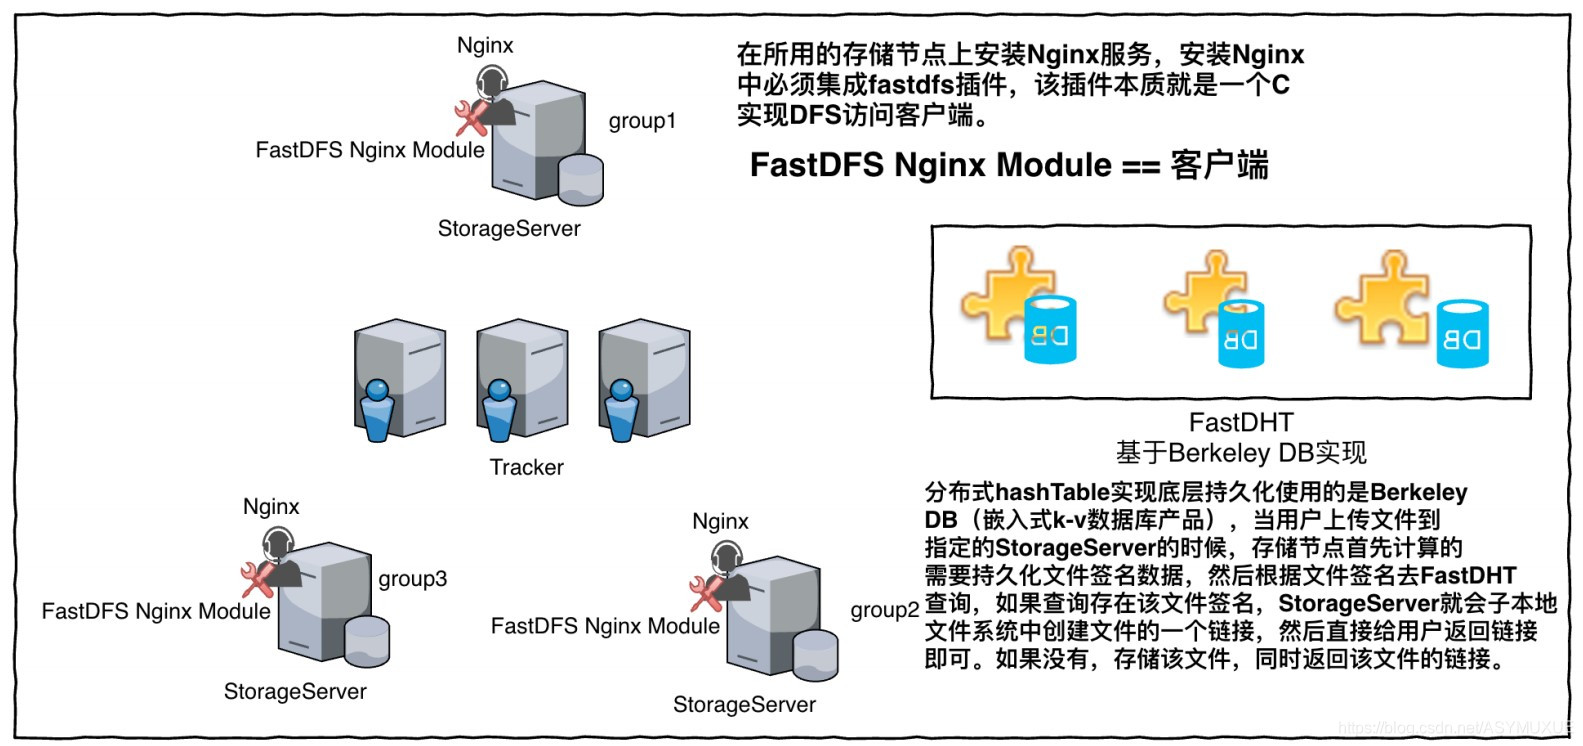
FastDHT deduplication
①安装BerkeleyDB
[root@hbaseX ~] tar -zxf db-4.7.25.tar.gz
[root@hbaseX ~] cd db-4.7.25
[root@hbaseX db-4.7.25] cd build_unix/
[root@hbaseX build_unix] ./../dist/configure
[root@hbaseX build_unix] make
[root@hbaseX build_unix] make install
② installation FastDHT
[root@hbaseX ~] tar zxf FastDHT_v2.01.tar.gz
[root@hbaseX ~] cd FastDHT
[root@hbaseX FastDHT] ./make.sh
[root@hbaseX FastDHT] ./make.sh install
③ Configuration
修改fdhtd.conf
[root@hbaseX ~] mkdir /data/fastdht
[root@hbaseX ~] vi /etc/fdht/fdhtd.conf
Modify the following configurations:
base_path=/data/fastdht
修改fdht_servers.conf
[root@hbaseX ~] vi /etc/fdht/fdht_servers.conf
Modify the following configurations:
group_count = 3
group0 = hbase1 :11411
group1 = hbase2 :11411
group2 = hbase3 :11411
修改fdht_client.conf配置文件
[root@hbaseX ~] vi /etc/fdht/fdht_client.conf
Modify the following configurations:
base_path=/tmp/
④ start
[root@hbaseX ~] fdhtd /etc/fdht/fdhtd.conf start
⑤ Test
[root@hbaseX ~] ps -axu| grep fd
Warning: bad syntax, perhaps a bogus '-'? See /usr/share/doc/procps-3.2.8/FAQ
root      29127  0.0  0.8 195200 17504 ?        Sl   00:38   0:00 fdhtd /etc/fdht/fdhtd.conf start
root      29193  0.0  0.0 103320   884 pts/0    S+   00:39   0:00 grep fd
root     128672  0.2  0.1 275856  2204 ?        Sl   00:14   0:03 /usr/bin/fdfs_trackerd /etc/fdfs/tracker.conf
root     128710  1.8  3.2  85584 67188 ?        Sl   00:14   0:27 /usr/bin/fdfs_storaged /etc/fdfs/storage.conf
命令测试
Store
[root@hbaseX ~] fdht_set /etc/fdht/fdht_client.conf test1:user001 name='zs',age=18;
Read
[root@hbaseX ~] fdht_get /etc/fdht/fdht_client.conf test1:user001 name,age
delete
[root@hbaseX ~] fdht_delete /etc/fdht/fdht_client.conf test1:user001 name;
⑥ integrated FastDHT
修改etc/fdfs/storage.conf配置文件
[root@hbaseX ~] vi /etc/fdfs/storage.conf
Modify the following configurations:
check_file_duplicate=1
keep_alive=1
#此处为C语言的头文件导入
#include /etc/fdht/fdht_servers.conf
分别启动fdhtd服务、fastfs
[root@hbaseX usr] /usr/local/bin/fdhtd /etc/fdht/fdhtd.conf restart
[root@hbaseX usr] /etc/init.d/fdfs_trackerd restart
[root@hbaseX usr] /etc/init.d/fdfs_storaged restart
Integrated SpringBoot
① dependence
		<!--FastDFS系统-->
    <dependency>
         <groupId>com.github.tobato</groupId>
         <artifactId>fastdfs-client</artifactId>
         <version>1.26.6</version>
    </dependency>
②yml file configuration
#文件系统
fdfs:
  tracker-list: pro1:22122,pro2:22122,pro3:2122
  # 配置默认缩略图
  thumb-image:
    height: 80
    width: 100
③ upload an avatar Business Integration
package com.baizhi.controller;

import com.baizhi.entities.User;
import com.baizhi.service.IUserService;
import com.github.tobato.fastdfs.domain.fdfs.StorePath;
import com.github.tobato.fastdfs.domain.upload.FastImageFile;
import com.github.tobato.fastdfs.domain.upload.ThumbImage;
import com.github.tobato.fastdfs.service.FastFileStorageClient;
import org.slf4j.Logger;
import org.slf4j.LoggerFactory;
import org.springframework.beans.factory.annotation.Autowired;
import org.springframework.web.bind.annotation.*;
import org.springframework.web.multipart.MultipartFile;

import java.io.IOException;
import java.util.HashSet;
import java.util.List;

@RestController
@RequestMapping(value = "/restUserManager")
public class RestUserController {
  //注入一个文件存储客户端
    @Autowired
    private FastFileStorageClient fastFileStorageClient;

 //用户注册---增
    @PostMapping(value = "/registerUser")
    public User registerUser(@RequestPart(value = "user")User user,
                             @RequestParam(value = "multipartFile",required = false) MultipartFile multipartFile) throws IOException{
        //定义文件名
        String photo = null;
        //如果头像图片不为空
        if (multipartFile!=null) {
            //获取文件原始名
           // String filename = multipartFile.getOriginalFilename();
            //获取文件后缀名 //FilenameUtils.getExtension(filename)
            //获取文件的类型,如果是图片,则继续进行,否则,返回。
            if(!("image".equals(multipartFile.getContentType().split("/")[0]))){
                return null;
            }else {
                //获取文件的输入流,存入文件系统
                FastImageFile fastImageFile = new FastImageFile(multipartFile.getInputStream(), multipartFile.getSize(), multipartFile.getContentType().split("/")[1], new HashSet<>(), new ThumbImage(100, 80));
                //上传文件
                StorePath storePath = fastFileStorageClient.uploadImage(fastImageFile);
                //设置真实文件路径,存入数据库
                photo = storePath.getFullPath();
            }
        }
        //储存用户信息
        user.setPhoto(photo);
        //调用接口
        try{
            //调用接口
            iUserService.saveUser(user);
        }catch (Exception e){
            fastFileStorageClient.deleteFile(photo);
        }

        return user;
    }


 //删除
    @DeleteMapping(value = "/deleteUserByIds")
    public void delteUserByIds(@RequestParam(value = "ids") Integer[] ids){
        //先查询此用户的头像文件名
        for (Integer id : ids) {
            User user = iUserService.queryUserById(id);
            fastFileStorageClient.deleteFile(user.getPhoto());
        }
        //调用接口
        iUserService.deleteByUserIds(ids);
    }
