1、概述
本篇文章内容主要从拦截器链的角度对OkHttp相关拦截器的实现进行源码分析,主要内容包括如下:

2、拦截器链分析
2.1 简介
-
拦截器是 OkHttp 提供的对 Http 请求和响应进行统一处理的强大机制,它可以实现网络监听、请求以及响应重写、请求失败重试等功能;
-
拦截器链它是一种典型的责任链模式的实现。
2.2 拦截器类关系
OkHttp默认情况下为我们实现了五类拦截器,分别为RetryAndFollowUpInterceptor(请求重定向拦截器)、BridgeInterceptor(桥接拦截器)、CacheInterceptor(缓存拦截器)、ConnectInterceptor(连接拦截器)、CallServerInterceptor。
除了这些拦截器,当然还需要一个把这些拦截器能够互相关联一起的类,它就是拦截器链即RealInterceptorChain。下面以类图的形式来看看拦截器与拦截器链之间的关系:

从类关系图中,我们可以看到每个拦截器都实现了Interceptor接口,其中有一个十分重要的方法即intercept方法,该方法的实现是每个拦截器的核心,拦截器中最新执行的也就是该方法,同时我们还可以看到RealInterceptorChain(拦截器链)中有一个List集合,用来保存各个拦截器对象,index表示索引需要执行的拦截器,拦截器链中最重要的方法即为proceed方法,它是每个拦截器能够执行的核心。
2.3 拦截器链式调用过程
下面我们用一个流程图来看看连接器的调用过程。
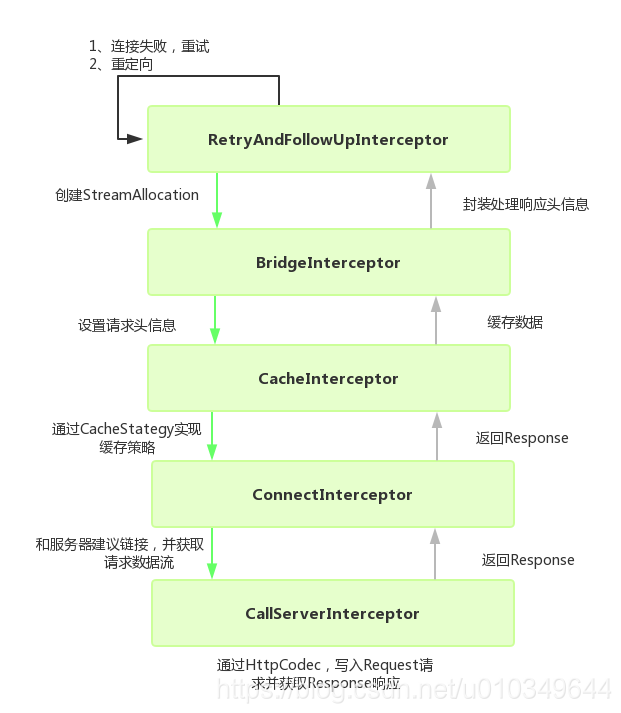
网络请求是一个相对比较复杂的过程。将一个复杂过程进行拆解,OkHttp采用责任链模式来解决这个复杂的功能, 每个拦截器都承担着不同的作用,各个拦截器相互配合最终完成网络请求。

2.4 拦截器链源码分析
通过上一篇文章,我们知道OkHttp可以发起同步或异步请求。对于同步请求,会执行RealCall中的execute方法,对于异步请求会执行AsynCall中的execute方法,两个方法具体实现大致相同,下面我们仅以同步请求方式细看RealCall中的execute方法具体实现。
- RealCall--->execute()
@Override public Response execute() throws IOException {
    synchronized (this) {
      if (executed) throw new IllegalStateException("Already Executed");
      executed = true;
    }
    captureCallStackTrace();
    eventListener.callStart(this);
    try {
      client.dispatcher().executed(this);
      // 初始化拦截器链及拦截器,并执行相关拦截器
      Response result = getResponseWithInterceptorChain();
      if (result == null) throw new IOException("Canceled");
      return result;
    } catch (IOException e) {
      eventListener.callFailed(this, e);
      throw e;
    } finally {
      client.dispatcher().finished(this);
    }
  }
该方法中内部调用了getResponseWithInterceptorChain方法,这个方法很关键,它内部初始化了拦截器链及相关拦截器,并最后执行各个拦截器返回最终的Response 对象,下面来看看getResponseWithInterceptorChain的具体实现。
- RealCall--->getResponseWithInterceptorChain()
Response getResponseWithInterceptorChain() throws IOException {
    // Build a full stack of interceptors.
    List<Interceptor> interceptors = new ArrayList<>();
    // 初始化各个拦截器
    interceptors.addAll(client.interceptors());
    interceptors.add(retryAndFollowUpInterceptor);
    interceptors.add(new BridgeInterceptor(client.cookieJar()));
    interceptors.add(new CacheInterceptor(client.internalCache()));
    interceptors.add(new ConnectInterceptor(client));
    if (!forWebSocket) {
      interceptors.addAll(client.networkInterceptors());
    }
    interceptors.add(new CallServerInterceptor(forWebSocket));
    //  初始化拦截器链
    Interceptor.Chain chain = new RealInterceptorChain(interceptors, null, null, null, 0,
        originalRequest, this, eventListener, client.connectTimeoutMillis(),
        client.readTimeoutMillis(), client.writeTimeoutMillis());

    return chain.proceed(originalRequest);
  }
代码十分简单,首先把我们自定义的拦截器加入到List列表中,接下来初始化OkHttp提供的各个拦截器加入到List列表中,然后初始化拦截器链,将拦截器列表作为入参传递给拦截器链,最后执行拦截器链的proceed方法,因此接下来重点就在于proceed方法了。
- RealInterceptorChain--->getResponseWithInterceptorChain()
@Override public Response proceed(Request request) throws IOException {
    return proceed(request, streamAllocation, httpCodec, connection);
  }
public Response proceed(Request request, StreamAllocation streamAllocation, HttpCodec httpCodec,
      RealConnection connection) throws IOException {
    ......
    // Call the next interceptor in the chain.
    RealInterceptorChain next = new RealInterceptorChain(interceptors, streamAllocation, httpCodec,
        connection, index + 1, request, call, eventListener, connectTimeout, readTimeout,
        writeTimeout);
    Interceptor interceptor = interceptors.get(index);
    Response response = interceptor.intercept(next);
   ......
    return response;
  }
省略了部分不是十分重要的代码,剩下关键性代码,我们可以看到,首先初始化下一个连接器链,然后通过index获取当前连接器链中的对应拦截器,执行拦截器中的intercept方法。在这里想必能够猜测到,intercept方法中会调用next的proceed方法,这其实就是拦截器链的递归调用过程。
总结
至此,拦截器链分析结束,拦截器链(RealInterceptorChain)保存有各个拦截器对象,当RealInterceptorChain执行自身的proceed方法后,会根据index索引取出对应的拦截器执行拦截器中intercept方法,同时将下一个拦截器链传递给当前执行的拦截器,拦截器中的intercept方法又会调用拦截器链的proceed方法,这样实现各个拦截器的递归调用过程,在进入递归的时候其实各个拦截器都会对Request进行相关准备操作,知道最后一个拦截器(CallServerInterceptor)发起网络请求,在退出递归的时候对Response进行相关封装操作。
同时,在初始化拦截器及拦截器链的时候,我们可以看到,当我们在初始化OkHttpClient的时候,可以根据自己业务的需要自定义拦截器,完成我们自身业务的需求。
3、RetryAndFollowUpInterceptor(请求重定向拦截器)源码分析
3.1 简介
RetryAndFollowUpInterceptor中文可以叫做请求重定向拦截器,它是默认情况下源码中最先执行的拦截器。它主要的作用有
- 初始化接下来的拦截器需要使用到的对象,例如StreamAllocation 对象;
- 失败重连;
- 重定向。
3.2 执行流程
在上文的分析中,已经知道每个拦截器中最核心的方法是intercept方法,对于每个拦截器的分析其实也就是分析这个方法的具体实现,下面首先以一个流程图来概要解析intercept方法的具体执行流程。

通过流程图可以看到当其他拦截器出现异常,RetryAndFollowUpInterceptor会进行异常捕获,然后判断是否需要再次进行连接,当其他拦截器都正常执行并返回Response对象,会判断Response的body,是否需要进行重定向等等,下面我们分析具体源码。
3.3 RetryAndFollowUpInterceptor源码分析
@Override public Response intercept(Chain chain) throws IOException {
    ......
    // 初始化StreamAllocation 对象,该对象在连接拦截器中具有很重要的作用
    StreamAllocation streamAllocation = new StreamAllocation(client.connectionPool(),
        createAddress(request.url()), call, eventListener, callStackTrace);
    this.streamAllocation = streamAllocation;

    int followUpCount = 0;
    Response priorResponse = null;
    while (true) {
      if (canceled) {
        streamAllocation.release();
        throw new IOException("Canceled");
      }

      Response response;
      boolean releaseConnection = true;
      try {
        // 执行下一个拦截器,即BridgeInterceptor
        response = realChain.proceed(request, streamAllocation, null, null);
        releaseConnection = false;
      } catch (RouteException e) {
        //  如果有异常,判断是否要恢复
        if (!recover(e.getLastConnectException(), streamAllocation, false, request)) {
          throw e.getFirstConnectException();
        }
        releaseConnection = false;
        continue;
      } catch (IOException e) {
        // An attempt to communicate with a server failed. The request may have been sent.
        boolean requestSendStarted = !(e instanceof ConnectionShutdownException);
        if (!recover(e, streamAllocation, requestSendStarted, request)) throw e;
        releaseConnection = false;
        continue;
      } finally {
        // We're throwing an unchecked exception. Release any resources.
        if (releaseConnection) {
          streamAllocation.streamFailed(null);
          streamAllocation.release();
        }
      }

      // Attach the prior response if it exists. Such responses never have a body.
      if (priorResponse != null) {
        response = response.newBuilder()
            .priorResponse(priorResponse.newBuilder()
                    .body(null)
                    .build())
            .build();
      }

       // 检查是否符合重定向要求
      Request followUp;
      try {
        followUp = followUpRequest(response, streamAllocation.route());
      } catch (IOException e) {
        streamAllocation.release();
        throw e;
      }

      if (followUp == null) {
        if (!forWebSocket) {
          streamAllocation.release();
        }
        return response;
      }

      closeQuietly(response.body());

     // 重定向次数不能超过最大限制 20
      if (++followUpCount > MAX_FOLLOW_UPS) {
        streamAllocation.release();
        throw new ProtocolException("Too many follow-up requests: " + followUpCount);
      }

      if (followUp.body() instanceof UnrepeatableRequestBody) {
        streamAllocation.release();
        throw new HttpRetryException("Cannot retry streamed HTTP body", response.code());
      }
      ......
      request = followUp;
      priorResponse = response;
    }
}
通过代码,我们也可以知道,首先初始化StreamAllocation对象,该对象在请求连接过程中具有很重要的作用,然后开启while(true)循环,执行下一个拦截器,如果发生异常这会捕获检查是否需要重连,反之调用followUpRequest查看响应是否需要重定向,最终返回Response给RealCall。
4、BridgeInterceptor源码分析
4.1 简介
BridgeInterceptor翻译成中文可以视为桥接拦截,主要功能是:
-
处理请求头(header),将自定义的头和协议必须的头合在一起,如果有自定义使用自定义的,没有就生成默认头;
-
封装处理响应头信息。
BridgeInterceptor源码相对比较简单,主要就是对头部信息进行处理,下面我们直接看源码。
4.2 源码分析
@Override public Response intercept(Chain chain) throws IOException {
    Request userRequest = chain.request();
    Request.Builder requestBuilder = userRequest.newBuilder();

    RequestBody body = userRequest.body();
    //  判断是否有请求体,如果有,则对header进行一些设置
    if (body != null) {
      MediaType contentType = body.contentType();
      if (contentType != null) {
        requestBuilder.header("Content-Type", contentType.toString());
      }

      long contentLength = body.contentLength();
      if (contentLength != -1) {
        requestBuilder.header("Content-Length", Long.toString(contentLength));
        requestBuilder.removeHeader("Transfer-Encoding");
      } else {
       //  Transfer-Encoding:chunked,表示响应体或者请求体的长度不固定
        requestBuilder.header("Transfer-Encoding", "chunked");
        requestBuilder.removeHeader("Content-Length");
      }
    }

    if (userRequest.header("Host") == null) {
      requestBuilder.header("Host", hostHeader(userRequest.url(), false));
    }
    //  默认使用长连接
    if (userRequest.header("Connection") == null) {
      requestBuilder.header("Connection", "Keep-Alive");
    }

    //  请求头gizp的设置
    boolean transparentGzip = false;
    if (userRequest.header("Accept-Encoding") == null && userRequest.header("Range") == null) {
      transparentGzip = true;
      requestBuilder.header("Accept-Encoding", "gzip");
    }
     // Cookie的设置
    List<Cookie> cookies = cookieJar.loadForRequest(userRequest.url());
    if (!cookies.isEmpty()) {
      requestBuilder.header("Cookie", cookieHeader(cookies));
    }

    if (userRequest.header("User-Agent") == null) {
      requestBuilder.header("User-Agent", Version.userAgent());
    }
    // 执行下一个拦截器,  以上为请求头处理
    Response networkResponse = chain.proceed(requestBuilder.build());
   // 以下是请求完成,对响应头进行处理

    HttpHeaders.receiveHeaders(cookieJar, userRequest.url(), networkResponse.headers());

    Response.Builder responseBuilder = networkResponse.newBuilder()
        .request(userRequest);
    // 前面解析完header后,判断服务器是否支持gzip压缩格式,如果支持将交给Okio处理
    if (transparentGzip
        && "gzip".equalsIgnoreCase(networkResponse.header("Content-Encoding"))
        && HttpHeaders.hasBody(networkResponse)) {
      GzipSource responseBody = new GzipSource(networkResponse.body().source());
      Headers strippedHeaders = networkResponse.headers().newBuilder()
          .removeAll("Content-Encoding")
          .removeAll("Content-Length")
          .build();
      responseBuilder.headers(strippedHeaders);
      String contentType = networkResponse.header("Content-Type");
      // 处理完成后,重新生成一个response
      responseBuilder.body(new RealResponseBody(contentType, -1L, Okio.buffer(responseBody)));
    }

    return responseBuilder.build();
}
代码相对比较简单,主要是对请求头和响应头进行相关处理,值得注意的是此处也对Cookie进行了相关处理。
- 何为Cookie?
Cookie是一种能够让服务器把少量数据储存到客户端的硬盘或内存,或是从客户端的硬盘读取数据的一种技术,Cookie的数据最终通过请求头传递给服务端。
- 如何将Cookie保存到本地,又如何将Cookie传递给服务端?
其实非常简单,我们只需要在初始化OkHttpClient的时候,调用cookieJar函数即可,如下:
mClient = new OkHttpClient.Builder()
                .cookieJar(new CookieJar() {
                    @Override
                    public void saveFromResponse(HttpUrl url, List<Cookie> cookies) {
                        // 将cookies保存到本地
                        ......
                    }

                    @Override
                    public List<Cookie> loadForRequest(HttpUrl url) {
                        // 从本地读取cookies,在发起网络请求时会作为header部分发送给服务器
                        List<Cookie> cookies = new ArrayList<>();
                        ......
                        return cookies;
                    }
                })
                .build();
5、CacheInterceptor源码分析
在分析缓存拦截器之前,可以思考一个问题。
- 为什么要有缓存?
缓存具有很多作用,例如下:
- 减少请求次数,减少服务器压力;
- 本地数据读取更快,让页面快速响应;
- 在无网络的情况下提供数据;
- ……
5.1 简介
CacheInterceptor中文可以命名为缓存拦截器,通过类名想必能判断该拦截器的作用,主要用来解决网络请求有关缓存相关的问题。大致作用如下:
- 通过执行缓存策略,确定网络请求数据是否从缓存中获取
- 对一定条件下对缓存进行增、删、改、查等操作
5.2 程序执行流程
依然按照前面拦截器的分析方式,以一个流程图来概要结束拦截器的执行流程及具体作用,使得我们能够大致了解到该拦截器的具体作用,这样在源码分析过程中也更加容易理解。

通过流程图,缓存拦截器首先获取缓存,然后执行对应的缓存策略,得到networkRequest和cacheResponse,通过一系列判断,得到最终的Response对象并返回给上一个拦截器,下面来分析具体源码。
5.3 源码分析
@Override public Response intercept(Chain chain) throws IOException {
   // 如果存在缓存,则从缓存中取出,有可能为null
    Response cacheCandidate = cache != null
        ? cache.get(chain.request())
        : null;

    long now = System.currentTimeMillis();
   // 执行缓存策略,获取缓存策略对象
    CacheStrategy strategy = new CacheStrategy.Factory(now, chain.request(), cacheCandidate).get();
    Request networkRequest = strategy.networkRequest;
    Response cacheResponse = strategy.cacheResponse;
    ......
     // 禁止使用网络(根据缓存策略),缓存又无效,直接返回
    // If we're forbidden from using the network and the cache is insufficient, fail.
    if (networkRequest == null && cacheResponse == null) {
      return new Response.Builder()
          .request(chain.request())
          .protocol(Protocol.HTTP_1_1)
          .code(504)
          .message("Unsatisfiable Request (only-if-cached)")
          .body(Util.EMPTY_RESPONSE)
          .sentRequestAtMillis(-1L)
          .receivedResponseAtMillis(System.currentTimeMillis())
          .build();
    }
     // 缓存有效,不使用网络, 则直接返回缓存的Response
    // If we don't need the network, we're done.
    if (networkRequest == null) {
      return cacheResponse.newBuilder()
          .cacheResponse(stripBody(cacheResponse))
          .build();
    }
    //  缓存无效,执行下一个拦截器(也就是有关网络连接的拦截器)
    Response networkResponse = null;
    try {
      networkResponse = chain.proceed(networkRequest);
    } finally {
      // If we're crashing on I/O or otherwise, don't leak the cache body.
      if (networkResponse == null && cacheCandidate != null) {
        closeQuietly(cacheCandidate.body());
      }
    }

   //  本地有缓存,根据条件选择使用哪个响应
    // If we have a cache response too, then we're doing a conditional get.
    if (cacheResponse != null) {
      // 网络返回的响应码为HTTP_NOT_MODIFIED(304),表示服务端数据没有改变,可以使用缓存
      if (networkResponse.code() == HTTP_NOT_MODIFIED) {
        Response response = cacheResponse.newBuilder()
            .headers(combine(cacheResponse.headers(), networkResponse.headers()))
            .sentRequestAtMillis(networkResponse.sentRequestAtMillis())
            .receivedResponseAtMillis(networkResponse.receivedResponseAtMillis())
            .cacheResponse(stripBody(cacheResponse))
            .networkResponse(stripBody(networkResponse))
            .build();
        networkResponse.body().close();

        // Update the cache after combining headers but before stripping the
        // Content-Encoding header (as performed by initContentStream()).
        cache.trackConditionalCacheHit();
        cache.update(cacheResponse, response);
        return response;
      } else {
        closeQuietly(cacheResponse.body());
      }
    }
    //  使用网络响应
    Response response = networkResponse.newBuilder()
        .cacheResponse(stripBody(cacheResponse))
        .networkResponse(stripBody(networkResponse))
        .build();

    if (cache != null) {
      if (HttpHeaders.hasBody(response) && CacheStrategy.isCacheable(response, networkRequest)) {
         //  缓存到本地
        // Offer this request to the cache.
        CacheRequest cacheRequest = cache.put(response);
        return cacheWritingResponse(cacheRequest, response);
      }

      if (HttpMethod.invalidatesCache(networkRequest.method())) {
        try {
          cache.remove(networkRequest);
        } catch (IOException ignored) {
          // The cache cannot be written.
        }
      }
    }

    return response;
}
通过代码分析可以知道缓存拦截器首先获取缓存,通过缓存策略来判断是否直接将缓存的Response返回给上一个拦截器,缓存无效则执行下一个拦截器,然后根据下一个拦截器返回的Response判断是否需要将Response进行缓存,同时将Response返回给上一个拦截器。
这里仅仅分析了缓存拦截器主要的操作流程,并没有对缓存策略及具体的缓存细节做详细分析,阅读者可以进行更深入的分析,下一节将简单分析缓存的get和put方法,具体分析OkHttp是如何进行缓存及获取缓存数据的。
6、OkHttp 缓存
6.1 简介
OkHttp缓存主要为http请求返回的Response(响应)进行本地缓存,主要使用到的是Cache类,该类是对DiskLruCache的封装,真正对于数据的缓存还是在于DiskLruCache。
下面我们具体看看对应的类图

从类图中可以看到,Cache类中通过get方法获取缓存,入参为Request对象,添加缓存直接通过put方法完成,在Cache类中有一个内部类Entry,它会将一个Response转化为一个Entry实例,该Entry会和DisLruCache中的Editor相关联,在DisLruCache中,正在对缓存进行操作的类为其内部类Editor。下面我们先来分析put方法。
6.2 Cache--->put(Response response)方法
@Nullable CacheRequest put(Response response) {
    String requestMethod = response.request().method();
    //   判断请求如果是"POST"、"PATCH"、"PUT"、"DELETE"、"MOVE"中的任何一个
    //   则调用DiskLruCache.remove(urlToKey(request)),  将这个请求从缓存中移除出去。
    if (HttpMethod.invalidatesCache(response.request().method())) {
      try {
        remove(response.request());
      } catch (IOException ignored) {
        // The cache cannot be written.
      }
      return null;
    }
    //  判断请求如果不是Get则不进行缓存,直接返回null。
    if (!requestMethod.equals("GET")) {
      // Don't cache non-GET responses. We're technically allowed to cache
      // HEAD requests and some POST requests, but the complexity of doing
      // so is high and the benefit is low.
      return null;
    }
    //  判断请求中的http数据包中headers是否有符号"*"的通配符,有则不缓存直接返回null
    if (HttpHeaders.hasVaryAll(response)) {
      return null;
    }
    //  通过Response对象构建一个Entry对象
    Entry entry = new Entry(response);
    DiskLruCache.Editor editor = null;
    try {
       //  此处的cache为DiskLruCache对象, 通过key(response.request().url())产生key来获取对应的editor对象
      editor = cache.edit(key(response.request().url()));
      if (editor == null) {
        return null;
      }
      // 通过editor来写入数据
      // 方法内部是通过Okio.buffer(editor.newSink(ENTRY_METADATA));获取到一个BufferedSink对象,随后将Entry中存储的Http报头数据写入到sink流中。
      entry.writeTo(editor);
      return new CacheRequestImpl(editor);
    } catch (IOException e) {
      abortQuietly(editor);
      return null;
    }
}
源码中可以看到通过response.request().url()来产生一个key,然后从DiskLruCache中获取对应的Editor 对象,然后进行数据的写入。
6.3 Cache--->put(Response response)方法
@Nullable Response get(Request request) {
     // 通过url转化为具体的key,这个put的时候产生key一致
    String key = key(request.url());
    //   根据key来获取缓存中的一个snapshot(快照)
    DiskLruCache.Snapshot snapshot;
    Entry entry;
    try {
      snapshot = cache.get(key);
      if (snapshot == null) {
        return null;
      }
    } catch (IOException e) {
      // Give up because the cache cannot be read.
      return null;
    }

    try {
      // 通过snapshot 中的source构造Entry实例
      entry = new Entry(snapshot.getSource(ENTRY_METADATA));
    } catch (IOException e) {
      Util.closeQuietly(snapshot);
      return null;
    }
    // 构造具体的Response 对象
    Response response = entry.response(snapshot);
   //  对request和Response进行匹配检查,成功则返回该Response。
    if (!entry.matches(request, response)) {
      Util.closeQuietly(response.body());
      return null;
    }

    return response;
}
代码整体流程比较简单,首先通过url产生对应的key,通过key从DiskLruCache中获取DiskLruCache.Snapshot对象,进一步产生Entry对象、Response 对象,最后对request和response进行匹配检查,返回最终的response。
至此对Cache类中的get和put方法进行了简要的分析,基于篇幅并没有分析到DiskLruCache类以及相关的读写详情,阅读者可以进行更深入的分析。
7、总结
- OkHttp的核心在于拦截器链式的调用(基于一种责任链模式);
- 各个拦截器在网络请求过程中起着分工合作的作用;
- 通过拦截器链式调用,我们也可以创建自己的拦截器在链式调用过程中执行;
- OkHttp缓存使用的是DiskLruCache;
OkHttp源码十分复杂,本篇文章仅仅对部分拦截器执行流程进行简要分析,没有深入到具体每一个函数的实现细节,例如BridgeInterceptor拦截器中对头部header的设置,具体头部都有哪些类型,每个类型具体代表什么意思,实现文件断点续传等等这些都是需要对请求头做一定的设置;在CacheInterceptor拦截器中,缓存策略也是很重要的一部分,那么具体缓存策略是怎样的;DiskLruCache缓存的具体实现等等;这些在OkHttp中都具有重要的作用。
本篇文章主要在OkHttp请求过程中起着整体脉络的作用,对源码的整体实现进行一个概述,方便开发过程中遇到问题能够快速定位,同时借鉴它的实现思想能够对我们日常开发中具有一定的指导作用。
