大家好,我是烤鸭:
给大家分享一个简单的用Android Studio快速搭建app
工具:
Android Studio 64位 专业版
插件:
Datepicker Timepicker okhttp
实现需求:
界面上选择时间,发get/post请求到后台,获取选择的时间。
1.修改AndroidManifest.xml文件
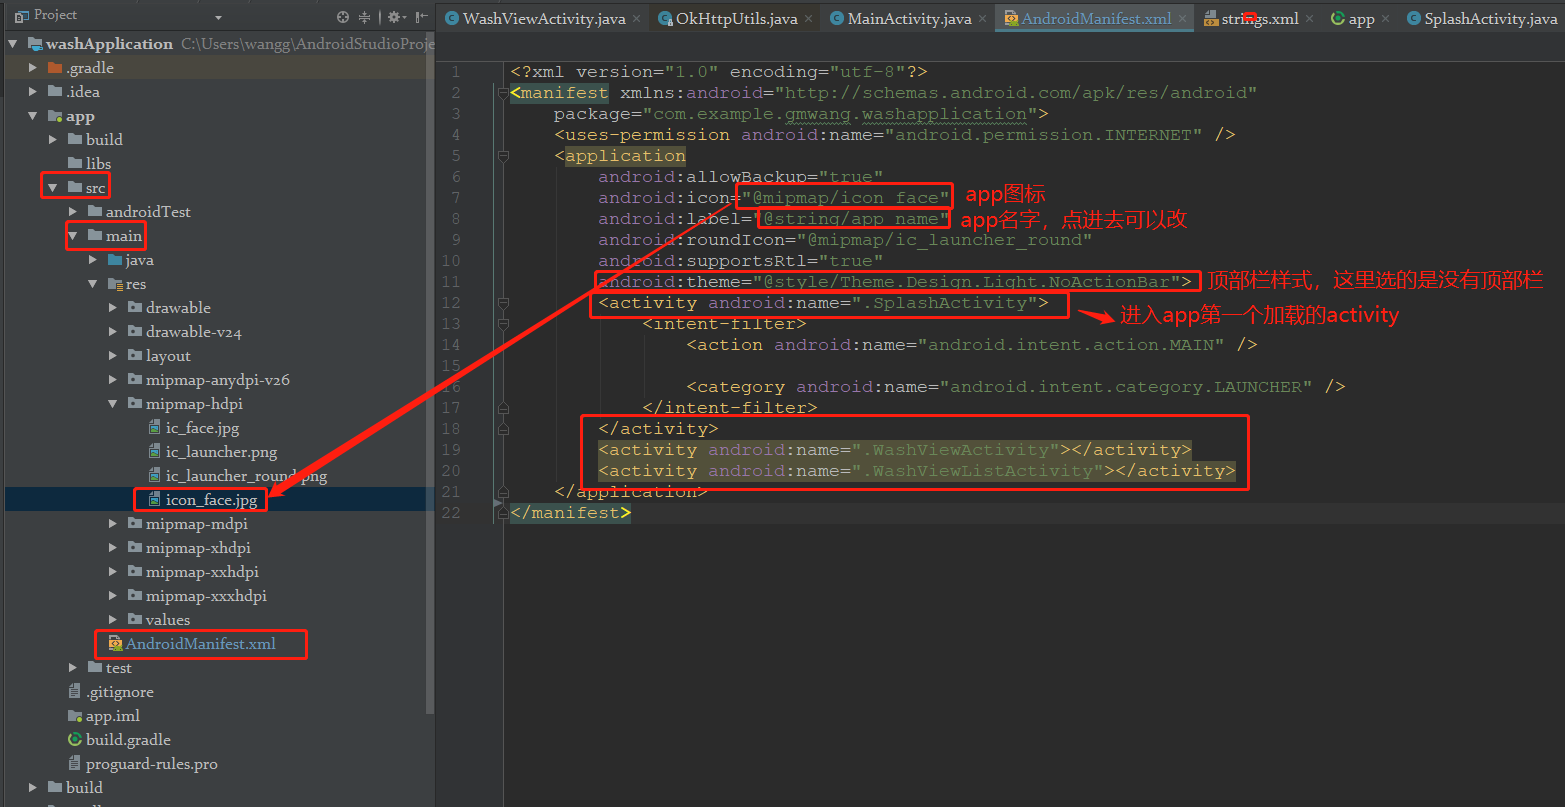
其中可以修改app样式,app图标,进入app的最先执行哪个activity,
最重要的!!!
创建的activity一定要在这里注册。
项目名/app/build.gradle中添加依赖,这里贴一下我用到的。
apply plugin: 'com.android.application'

android {
    compileSdkVersion 26
    defaultConfig {
        applicationId "com.example.gmwang.washapplication"
        minSdkVersion 15
        targetSdkVersion 26
        versionCode 1
        versionName "1.0"
        testInstrumentationRunner "android.support.test.runner.AndroidJUnitRunner"
    }
    buildTypes {
        release {
            minifyEnabled false
            proguardFiles getDefaultProguardFile('proguard-android.txt'), 'proguard-rules.pro'
        }
    }
}

dependencies {
    implementation fileTree(dir: 'libs', include: ['*.jar'])
    implementation 'com.android.support:appcompat-v7:26.1.0'
    implementation 'com.android.support.constraint:constraint-layout:1.0.2'
    testImplementation 'junit:junit:4.12'
    androidTestImplementation 'com.android.support.test:runner:1.0.1'
    androidTestImplementation 'com.android.support.test.espresso:espresso-core:3.0.1'
    compile 'pl.droidsonroids.gif:android-gif-drawable:1.2.7'
    compile 'com.squareup.okhttp3:okhttp:3.3.0'
    compile 'com.android.support:design:+'
    compile 'com.zhy:okhttputils:2.6.1'
    compile 'com.alibaba:fastjson:1.2.7'
}
2.创建Splash页面
可以看到上面我设置的最先跳转的activity是SplashActivity,这是一个过渡页面,一般app都是有一个页面或者是广告,等几秒再进入app的首页。
创建SplashActivity
package com.example.gmwang.washapplication;

import android.app.Activity;
import android.content.Intent;
import android.os.Bundle;
import android.os.Handler;
import android.os.Message;
import android.support.annotation.Nullable;

import java.util.Timer;
import java.util.TimerTask;

/**
 * Created by gmwang on 2017/11/15.
 */

public class SplashActivity extends Activity {
    Timer timer;
    Message message;
    private Handler handler = new Handler() {
        public void handleMessage(Message msg) {
            switch (msg.what) {
                case 1:
                    if (timer != null) {
                        timer.cancel();
                        timer = null;
                    }
                    Intent i = new Intent(SplashActivity.this,WashViewActivity.class);
                    startActivity(i);
                    break;
                default:
                    break;
            }
        }
    };

    @Override
    protected void onCreate(@Nullable Bundle savedInstanceState) {
        super.onCreate(savedInstanceState);
        setContentView(R.layout.activity_spalsh);
        timer = new Timer();
        timer.scheduleAtFixedRate(new TimerTask() {
            @Override
            public void run() {
                message = new Message();
                message.what = 1;
                handler.sendMessage(message);
            }
        }, 3000, 3000);
    }
}
先说这一行:
setContentView(R.layout.activity_spalsh);
需要创建activity_spalsh的layout,就是页面。
这里就是画了一个简单的页面,里边放了一张图。
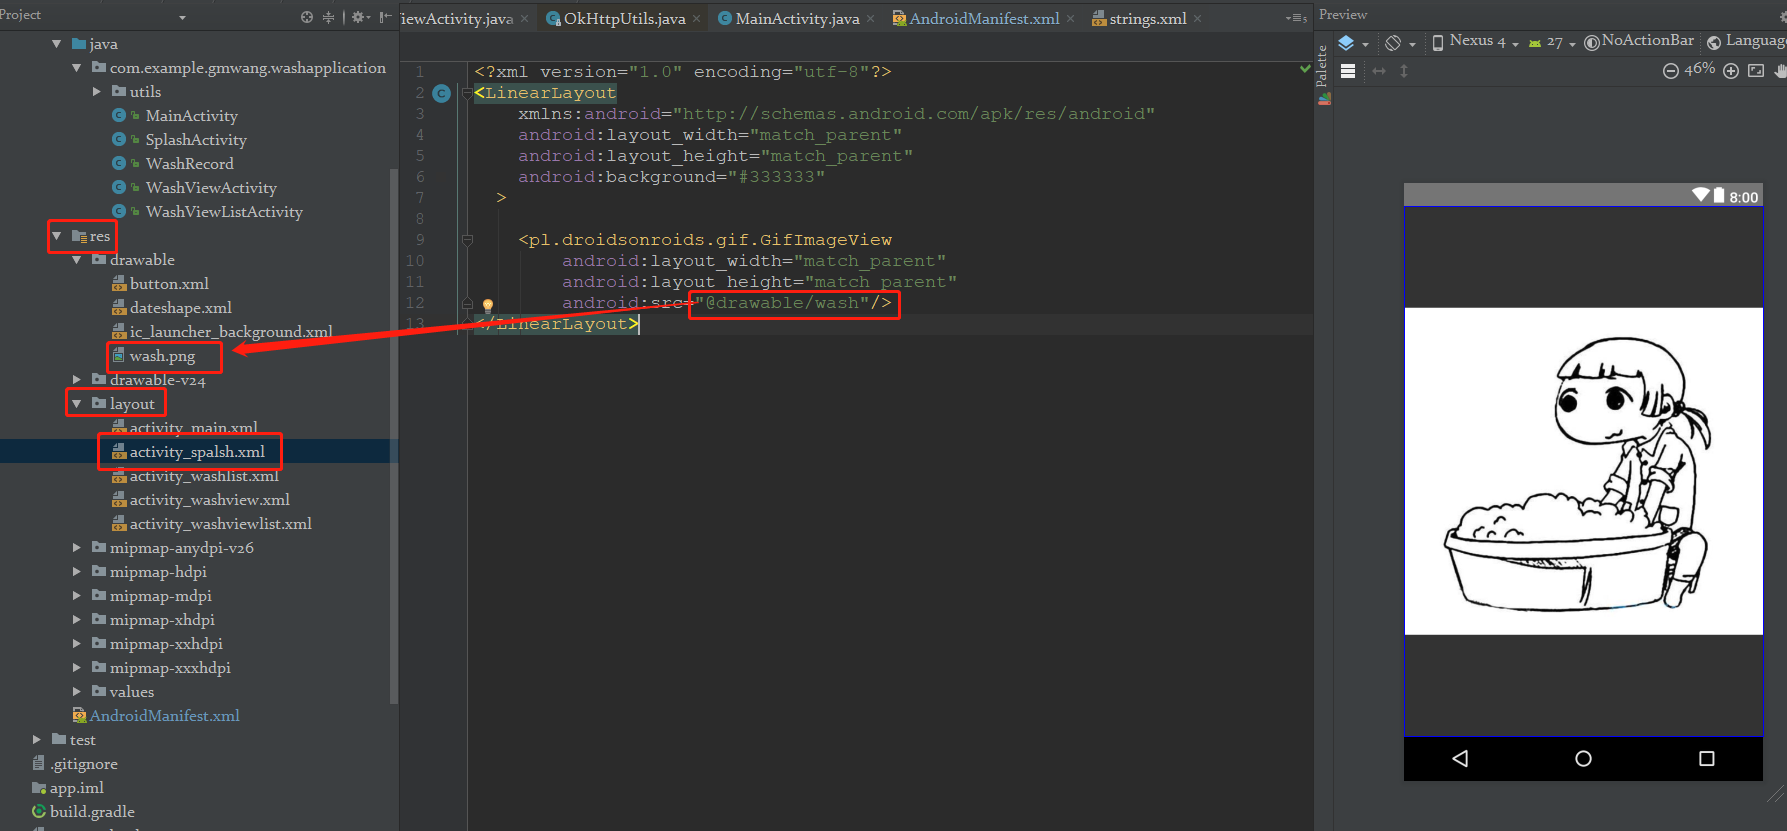
代码如下:
<?xml version="1.0" encoding="utf-8"?>
<LinearLayout
    xmlns:android="http://schemas.android.com/apk/res/android"
    android:layout_width="match_parent"
    android:layout_height="match_parent"
    android:background="#333333"
  >

    <pl.droidsonroids.gif.GifImageView
        android:layout_width="match_parent"
        android:layout_height="match_parent"
        android:src="@drawable/wash"/>
</LinearLayout>
再说这一行:
Intent i = new Intent(SplashActivity.this,WashViewActivity.class);
就是从这个页面3秒之后,跳转到哪个acticity。
3.创建WashViewActivity页面
这个页面就稍微复杂点,需要有picker插件和okhttp。
先把代码贴出来:
package com.example.gmwang.washapplication;

import android.app.Activity;
import android.app.DatePickerDialog;
import android.app.TimePickerDialog;
import android.content.Intent;
import android.os.Bundle;
import android.support.constraint.ConstraintLayout;
import android.text.TextUtils;
import android.util.Log;
import android.view.View;
import android.widget.Button;
import android.widget.DatePicker;
import android.widget.TextView;
import android.widget.TimePicker;
import android.widget.Toast;

import com.alibaba.fastjson.JSONObject;
import com.example.gmwang.washapplication.utils.Constants;
import com.zhy.http.okhttp.OkHttpUtils;
import com.zhy.http.okhttp.callback.StringCallback;

import java.util.Calendar;

import okhttp3.Call;

/**
 * Created by gmwang on 2017/11/24.
 */

public class WashViewActivity extends Activity {
    private TextView tvShowDialog;
    private TextView timeDialog;
    private Calendar cal;
    private int year, month, day;
    private int hour, minute;
    private String dateString = "0000";
    private String timeString = "0000";
    @Override
    protected void onCreate(Bundle savedInstanceState) {
        super.onCreate(savedInstanceState);
        setContentView(R.layout.activity_washview);
        Button recordButton = findViewById(R.id.recordId);
        Button recordListButton = findViewById(R.id.recordList);
        tvShowDialog = (TextView) findViewById(R.id.tvShowDialog);
        timeDialog = (TextView) findViewById(R.id.timeDialog);
        //获取当前日期
        getDate();
        tvShowDialog.setOnClickListener(new View.OnClickListener() {
            @Override
            public void onClick(View view) {
                switch (view.getId()) {
                    case R.id.tvShowDialog:
                        DatePickerDialog.OnDateSetListener listener = new DatePickerDialog.OnDateSetListener() {
                            @Override
                            public void onDateSet(DatePicker arg0, int year, int month, int day) {
                                dateString = year + "-" + (++month) + "-" + day;
                                tvShowDialog.setText(dateString);      //将选择的日期显示到TextView中,因为之前获取month直接使用,所以不需要+1,这个地方需要显示,所以+1
                            }
                        };
                        DatePickerDialog dialog = new DatePickerDialog(WashViewActivity.this, 0, listener, year, month, day);//后边三个参数为显示dialog时默认的日期,月份从0开始,0-11对应1-12个月
                        dialog.show();
                        break;
                    default:
                        break;
                }
            }
        });
        timeDialog.setOnClickListener(new View.OnClickListener() {
            @Override
            public void onClick(View view) {
                switch (view.getId()) {
                    case R.id.timeDialog:
                        TimePickerDialog.OnTimeSetListener listener = new TimePickerDialog.OnTimeSetListener() {
                            @Override
                            public void onTimeSet(TimePicker timePicker, int hour, int minute) {
                                timeString = hour + ":"+minute;
                                timeDialog.setText(timeString);
                            }
                        };
                        TimePickerDialog dialog = new TimePickerDialog(WashViewActivity.this, 0, listener, hour, minute,true);
                        dialog.show();
                        break;
                    default:
                        break;
                }
            }
        });
        recordButton.setOnClickListener(new View.OnClickListener() {
            @Override
            public void onClick(View view) {
                Log.e("recordButton",dateString);
                if(TextUtils.isEmpty(tvShowDialog.getText())){
                    Toast.makeText(getApplicationContext(), "请先选择日期!!!!!!", Toast.LENGTH_LONG).show();
                    return ;
                }
                if(TextUtils.isEmpty(timeDialog.getText())){
                    Toast.makeText(getApplicationContext(), "请先选择时间!!!!!!", Toast.LENGTH_LONG).show();
                    return ;
                }
                String url = Constants.url+"addRecord";
                StringBuffer sb = new StringBuffer();
                OkHttpUtils.get().url(url).addParams("cuuid","66666").addParams("washDate", dateString).addParams("washTime",timeString).build().execute(new StringCallback() {
                    @Override
                    public void onError(Call call, Exception e, int id) {
                        Log.e("onError:", e.toString());
                    }


                    @Override
                    public void onResponse(String response, int id) {
                        Log.e("onResponse:", response);
                        JSONObject responseJson = (JSONObject) JSONObject.parse(response);
                        String code = responseJson.getString("code");
                        String message = responseJson.getString("message");
                        //保存成功
                        if("100".equals(responseJson.get("code"))){
                            Toast.makeText(getApplicationContext(), code+","+responseJson.get("message"), Toast.LENGTH_LONG).show();
                        }else{
                            Toast.makeText(getApplicationContext(), code+","+responseJson.get("message"), Toast.LENGTH_LONG).show();
                        }
                    }
                });
            }
        });
    }

    //获取当前日期
    private void getDate() {
        cal = Calendar.getInstance();
        year = cal.get(Calendar.YEAR);       //获取年月日时分秒
        Log.i("wxy", "year" + year);
        month = cal.get(Calendar.MONTH);   //获取到的月份是从0开始计数
        day = cal.get(Calendar.DAY_OF_MONTH);
        hour = cal.get(Calendar.HOUR_OF_DAY);
        minute = cal.get(Calendar.MINUTE);
    }
}
代码有点多,我们一行一行看:
setContentView(R.layout.activity_washview);
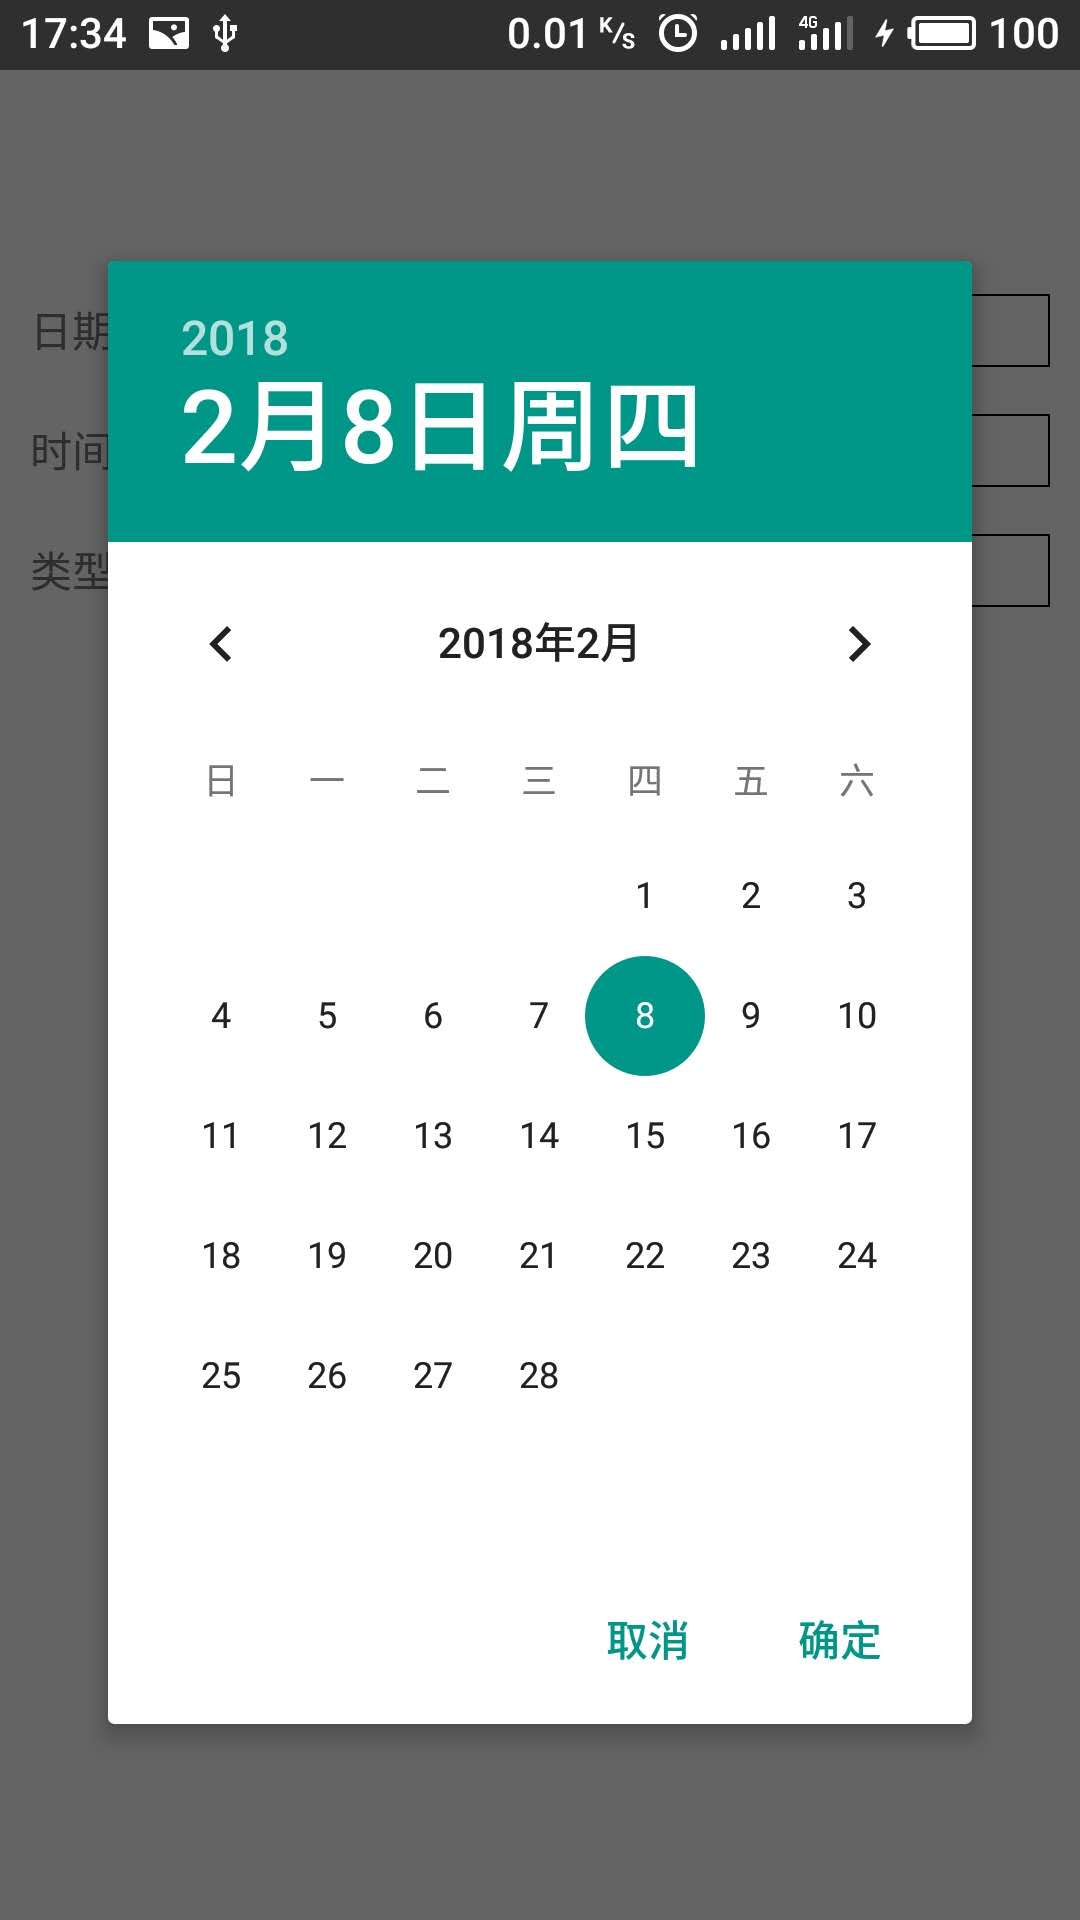
跟上面一样,去画个页面activity_washview去,页面上有时间选择插件。
效果:
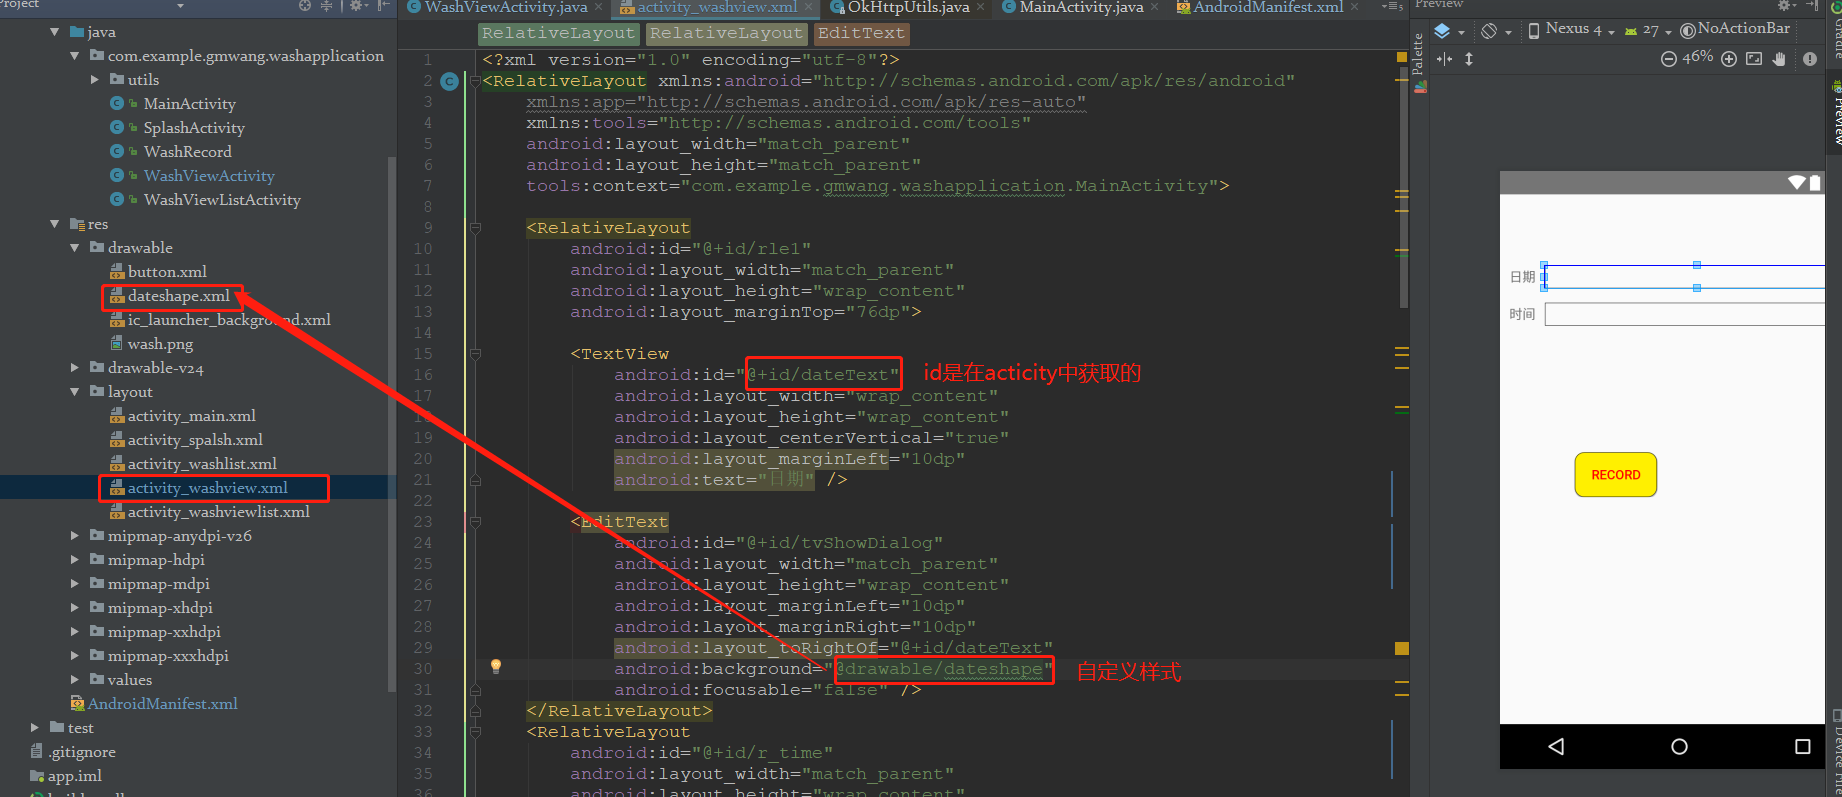
3.1 activity_washview代码:
<?xml version="1.0" encoding="utf-8"?>
<RelativeLayout xmlns:android="http://schemas.android.com/apk/res/android"
    xmlns:app="http://schemas.android.com/apk/res-auto"
    xmlns:tools="http://schemas.android.com/tools"
    android:layout_width="match_parent"
    android:layout_height="match_parent"
    tools:context="com.example.gmwang.washapplication.MainActivity">

    <RelativeLayout
        android:id="@+id/rle1"
        android:layout_width="match_parent"
        android:layout_height="wrap_content"
        android:layout_marginTop="76dp">

        <TextView
            android:id="@+id/dateText"
            android:layout_width="wrap_content"
            android:layout_height="wrap_content"
            android:layout_centerVertical="true"
            android:layout_marginLeft="10dp"
            android:text="日期" />

        <EditText
            android:id="@+id/tvShowDialog"
            android:layout_width="match_parent"
            android:layout_height="wrap_content"
            android:layout_marginLeft="10dp"
            android:layout_marginRight="10dp"
            android:layout_toRightOf="@+id/dateText"
            android:background="@drawable/dateshape"
            android:focusable="false" />
    </RelativeLayout>
    <RelativeLayout
        android:id="@+id/r_time"
        android:layout_width="match_parent"
        android:layout_height="wrap_content"
        android:layout_marginTop="116dp">

        <TextView
            android:id="@+id/timeText"
            android:layout_width="wrap_content"
            android:layout_height="wrap_content"
            android:layout_centerVertical="true"
            android:layout_marginLeft="10dp"
            android:text="时间" />

        <EditText
            android:id="@+id/timeDialog"
            android:layout_width="match_parent"
            android:layout_height="wrap_content"
            android:layout_marginLeft="10dp"
            android:layout_marginRight="10dp"
            android:layout_toRightOf="@+id/timeText"
            android:background="@drawable/dateshape"
            android:focusable="false"/>
    </RelativeLayout>
    <RelativeLayout
        android:id="@+id/rle2"
        android:layout_width="match_parent"
        android:layout_height="wrap_content"
        android:layout_marginTop="156dp">
    </RelativeLayout>

    <RelativeLayout
        android:layout_width="match_parent"
        android:layout_height="wrap_content"
        android:layout_alignParentLeft="true"
        android:layout_alignParentStart="true"
        android:layout_alignTop="@+id/rle1">
        >

        <Button
            android:id="@+id/recordId"
            android:layout_width="wrap_content"
            android:layout_height="wrap_content"
            android:layout_marginLeft="80dp"
            android:layout_marginTop="200dp"
            android:text="record"
            android:textColor="#f00"
            android:background="@drawable/button"/>
    </RelativeLayout>
</RelativeLayout>
3.2 贴一下自定义样式,就是个边框,dateshape.xml
<?xml version="1.0" encoding="utf-8"?>
<shape xmlns:android="http://schemas.android.com/apk/res/android">
    <stroke android:color="#000000"
        android:width="0.5dp"
        ></stroke>
</shape>
3.3 关于textview和button
定义的textview和button都是根据id来找的。
比如:
private TextView tvShowDialog;
tvShowDialog = (TextView) findViewById(R.id.tvShowDialog);
这样就找到这个textView,就可以给他赋值或者其他操作了。button也是一样。
3.4 时间选择插件
DatePicker插件:
tvShowDialog.setOnClickListener 是选择后获取年/月/日/的
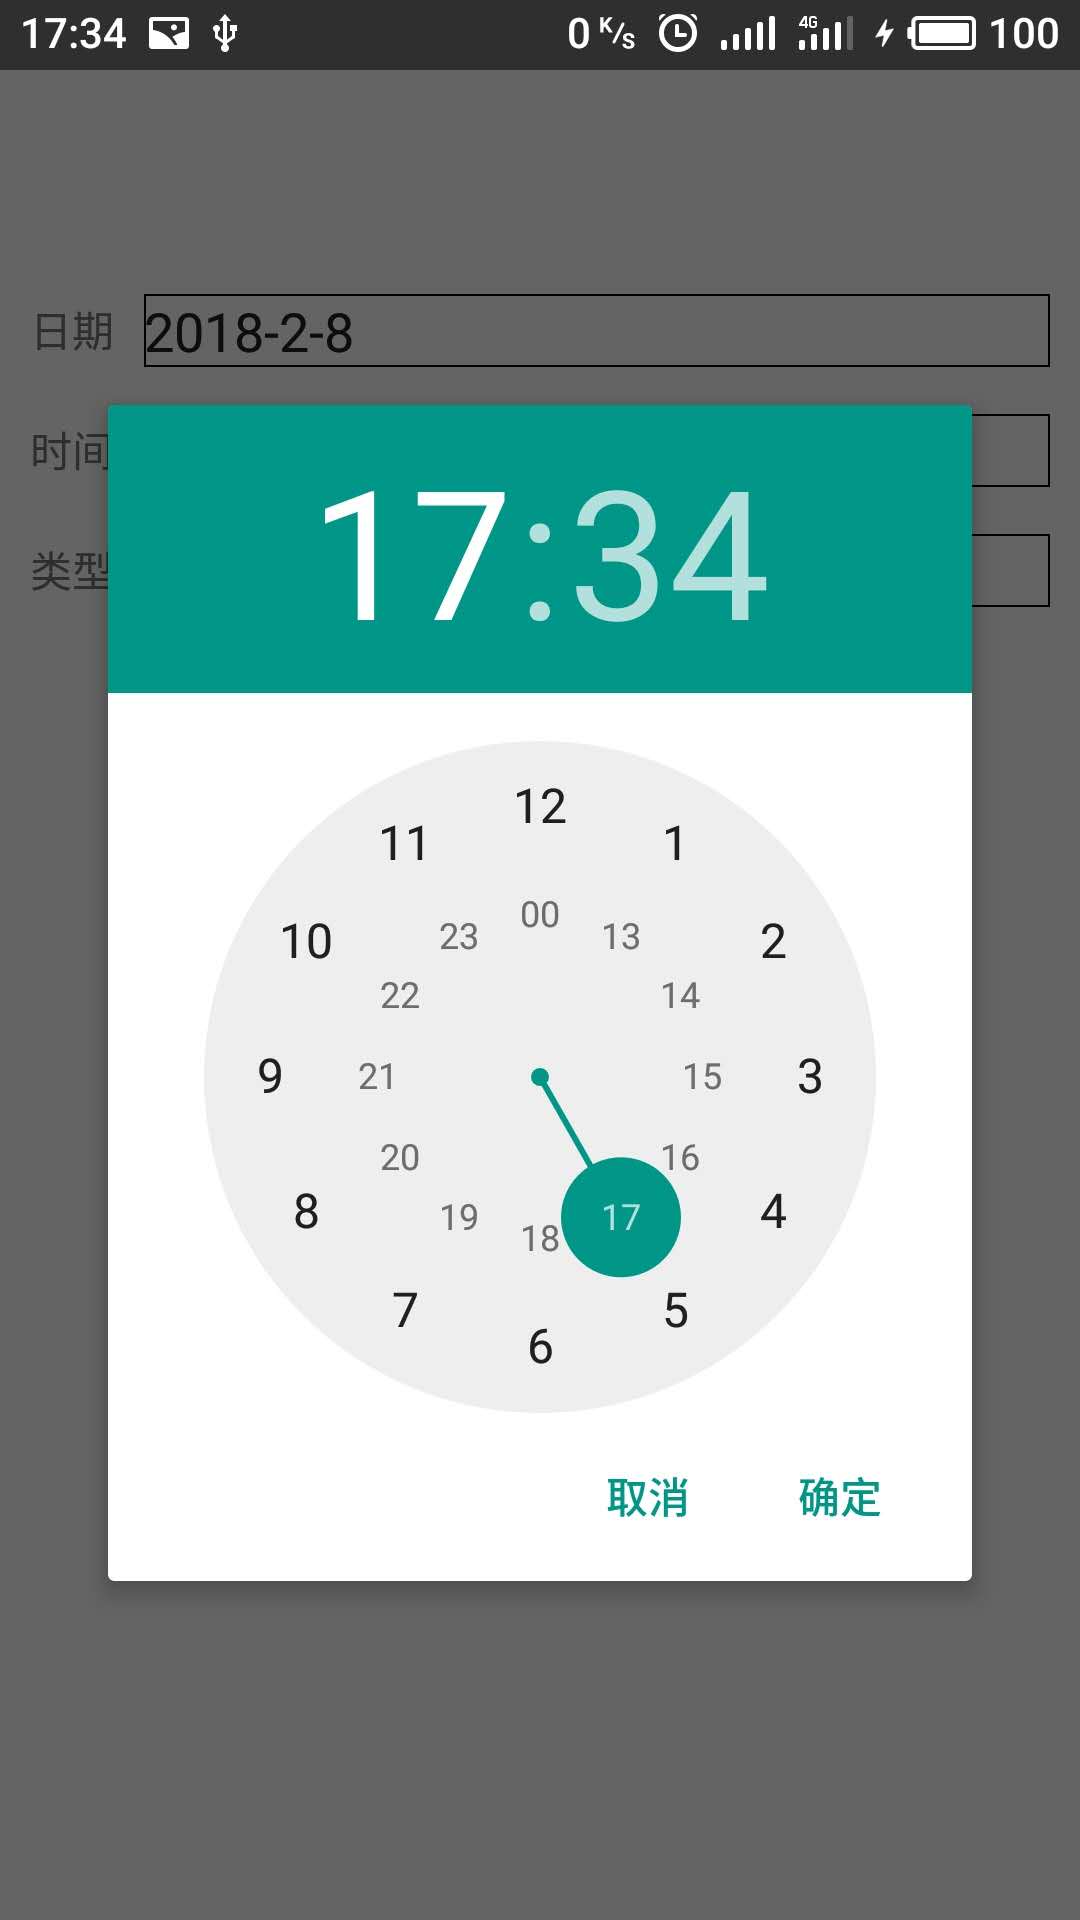
TimeDatePicker插件:
timeDialog.setOnClickListener 是选择后获取时/分/的
3.5 http请求
后面的按钮点击方法
recordButton.setOnClickListener,发送http请求,利用okhttp组件
可以看到这里的OkHttpUtils,贴一下代码
package com.zhy.http.okhttp;

import com.zhy.http.okhttp.builder.GetBuilder;
import com.zhy.http.okhttp.builder.HeadBuilder;
import com.zhy.http.okhttp.builder.OtherRequestBuilder;
import com.zhy.http.okhttp.builder.PostFileBuilder;
import com.zhy.http.okhttp.builder.PostFormBuilder;
import com.zhy.http.okhttp.builder.PostStringBuilder;
import com.zhy.http.okhttp.callback.Callback;
import com.zhy.http.okhttp.request.RequestCall;
import com.zhy.http.okhttp.utils.Platform;

import java.io.IOException;
import java.util.concurrent.Executor;

import okhttp3.Call;
import okhttp3.OkHttpClient;
import okhttp3.Response;

/**
 * Created by zhy on 15/8/17.
 */
public class OkHttpUtils
{
    public static final long DEFAULT_MILLISECONDS = 10_000L;
    private volatile static OkHttpUtils mInstance;
    private OkHttpClient mOkHttpClient;
    private Platform mPlatform;

    public OkHttpUtils(OkHttpClient okHttpClient)
    {
        if (okHttpClient == null)
        {
            mOkHttpClient = new OkHttpClient();
        } else
        {
            mOkHttpClient = okHttpClient;
        }

        mPlatform = Platform.get();
    }


    public static OkHttpUtils initClient(OkHttpClient okHttpClient)
    {
        if (mInstance == null)
        {
            synchronized (OkHttpUtils.class)
            {
                if (mInstance == null)
                {
                    mInstance = new OkHttpUtils(okHttpClient);
                }
            }
        }
        return mInstance;
    }

    public static OkHttpUtils getInstance()
    {
        return initClient(null);
    }


    public Executor getDelivery()
    {
        return mPlatform.defaultCallbackExecutor();
    }

    public OkHttpClient getOkHttpClient()
    {
        return mOkHttpClient;
    }

    public static GetBuilder get()
    {
        return new GetBuilder();
    }

    public static PostStringBuilder postString()
    {
        return new PostStringBuilder();
    }

    public static PostFileBuilder postFile()
    {
        return new PostFileBuilder();
    }

    public static PostFormBuilder post()
    {
        return new PostFormBuilder();
    }

    public static OtherRequestBuilder put()
    {
        return new OtherRequestBuilder(METHOD.PUT);
    }

    public static HeadBuilder head()
    {
        return new HeadBuilder();
    }

    public static OtherRequestBuilder delete()
    {
        return new OtherRequestBuilder(METHOD.DELETE);
    }

    public static OtherRequestBuilder patch()
    {
        return new OtherRequestBuilder(METHOD.PATCH);
    }

    public void execute(final RequestCall requestCall, Callback callback)
    {
        if (callback == null)
            callback = Callback.CALLBACK_DEFAULT;
        final Callback finalCallback = callback;
        final int id = requestCall.getOkHttpRequest().getId();

        requestCall.getCall().enqueue(new okhttp3.Callback()
        {
            @Override
            public void onFailure(Call call, final IOException e)
            {
                sendFailResultCallback(call, e, finalCallback, id);
            }

            @Override
            public void onResponse(final Call call, final Response response)
            {
                if (call.isCanceled())
                {
                    sendFailResultCallback(call, new IOException("Canceled!"), finalCallback, id);
                    return;
                }

                if (!finalCallback.validateReponse(response, id))
                {
                    sendFailResultCallback(call, new IOException("request failed , reponse's code is : " + response.code()), finalCallback, id);
                    return;
                }

                try
                {
                    Object o = finalCallback.parseNetworkResponse(response, id);
                    sendSuccessResultCallback(o, finalCallback, id);
                } catch (Exception e)
                {
                    sendFailResultCallback(call, e, finalCallback, id);

                }

            }
        });
    }


    public void sendFailResultCallback(final Call call, final Exception e, final Callback callback, final int id)
    {
        if (callback == null) return;

        mPlatform.execute(new Runnable()
        {
            @Override
            public void run()
            {
                callback.onError(call, e, id);
                callback.onAfter(id);
            }
        });
    }

    public void sendSuccessResultCallback(final Object object, final Callback callback, final int id)
    {
        if (callback == null) return;
        mPlatform.execute(new Runnable()
        {
            @Override
            public void run()
            {
                callback.onResponse(object, id);
                callback.onAfter(id);
            }
        });
    }

    public void cancelTag(Object tag)
    {
        for (Call call : mOkHttpClient.dispatcher().queuedCalls())
        {
            if (tag.equals(call.request().tag()))
            {
                call.cancel();
            }
        }
        for (Call call : mOkHttpClient.dispatcher().runningCalls())
        {
            if (tag.equals(call.request().tag()))
            {
                call.cancel();
            }
        }
    }

    public static class METHOD
    {
        public static final String HEAD = "HEAD";
        public static final String DELETE = "DELETE";
        public static final String PUT = "PUT";
        public static final String PATCH = "PATCH";
    }
}
要是没有添加依赖的,去build.gradle添加依赖,没有包的就ALT+ENTER引包。
再说一下这段请求代码,搞过后台的基本都能看懂。
OkHttpUtils.get().url(url).addParams("cuuid","66666").addParams("washDate", dateString).addParams("washTime",timeString).build().execute(new StringCallback() {
                    @Override
                    public void onError(Call call, Exception e, int id) {
                        Log.e("onError:", e.toString());
                    }


                    @Override
                    public void onResponse(String response, int id) {
                        Log.e("onResponse:", response);
                        JSONObject responseJson = (JSONObject) JSONObject.parse(response);
                        String code = responseJson.getString("code");
                        String message = responseJson.getString("message");
                        //保存成功
                        if("100".equals(responseJson.get("code"))){
                            Toast.makeText(getApplicationContext(), code+","+responseJson.get("message"), Toast.LENGTH_LONG).show();
                        }else{
                            Toast.makeText(getApplicationContext(), code+","+responseJson.get("message"), Toast.LENGTH_LONG).show();
                        }
                    }
                });
发了一个get请求,参数是cuuid,washDate,washTime,这两个时间就是上面从插件
选的。onResponse方法,需要返回标准的json格式,我这里定义的是
{"code":"100","message":"success"},后台需要的接口,这里不写了。
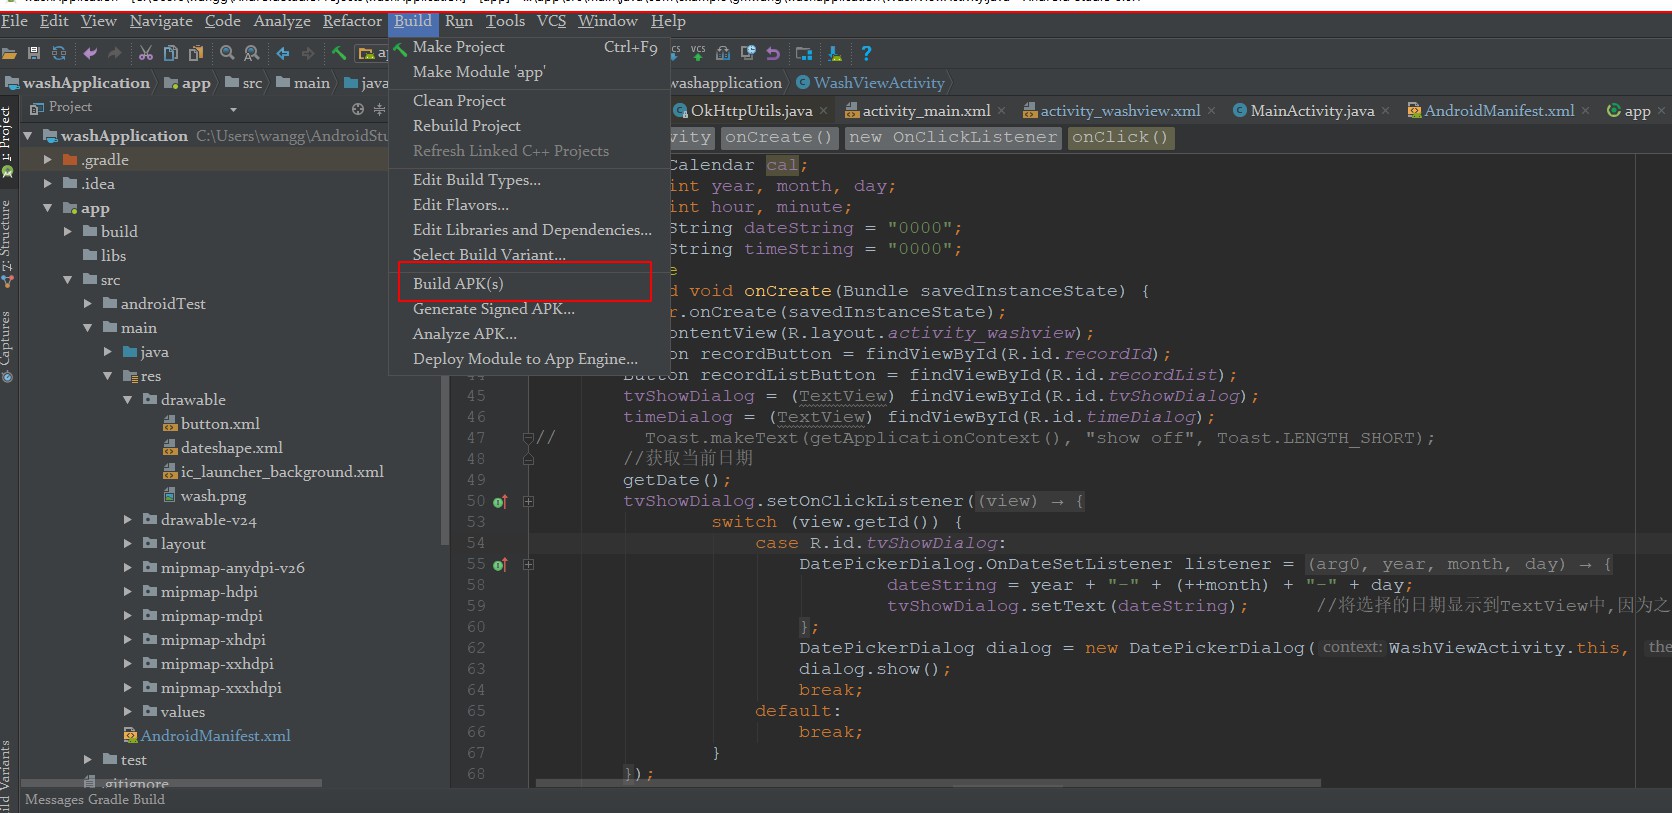
4.最后一步,打包
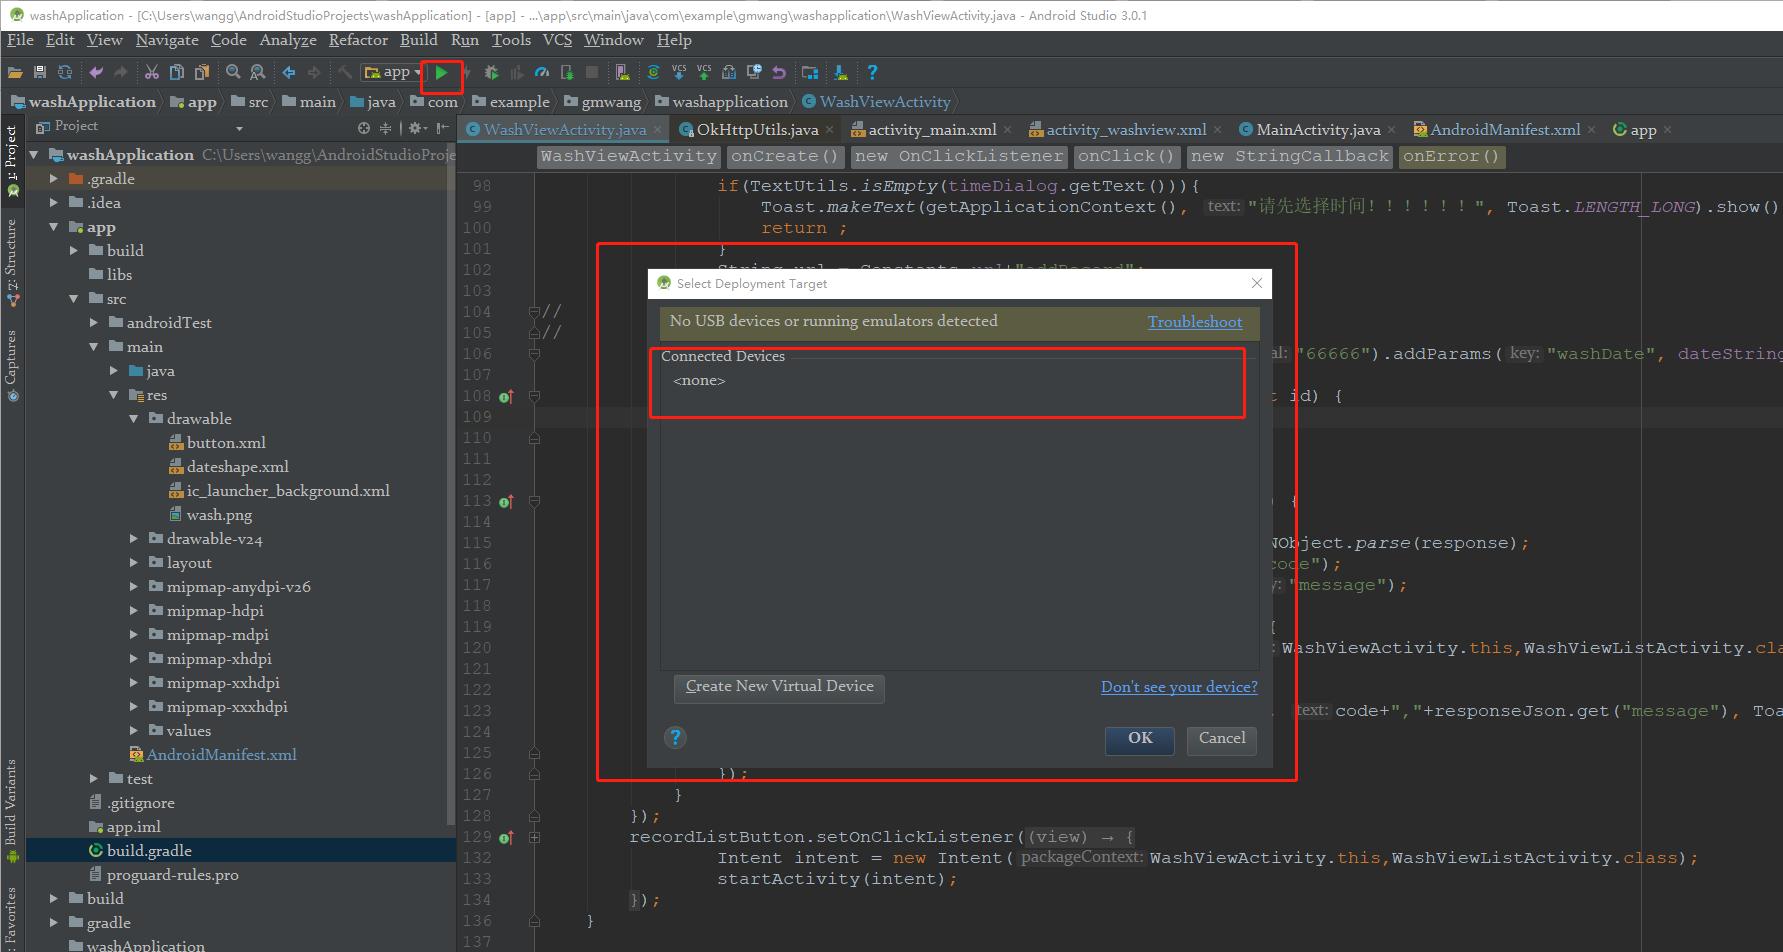
我这里没有连手机,如果你连手机,打开开发者模式,显示有你的手机,点击ok就好了。
打成apk文件。
第一次打的话,让你写密码什么的,一定要记住。。。
打好了就可以把apk分享给好友下载了。
贴一张我的app的图。