本节内容:集合、深浅copy、文件操作、函数初识
1.小知识点补充
2.编码二
3.集合
4.深浅copy
5.文件操作
6.函数的初识
1、小知识点补充
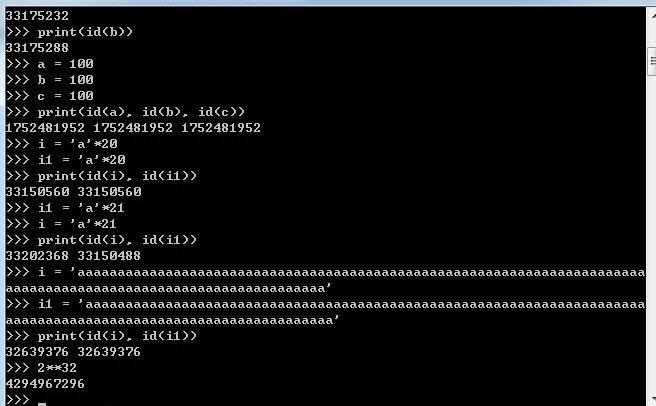
1.1 小数据池====str、int
小数据池存在的意义就是节省内存
节省内存,位多个变量开辟一个共享空间(str和int)
int:-5--256

int======>他们公用一个内存
字符串的内存换位的条件
1、不能含有特殊字符
2、单个元素*int不能超过21
2、编码二
2.1 二进制和程序的对照关系
ascii:数字、字母、特殊字符
字节:8位表示一个字节
字符: 你看到的最小单位
abc: a就是一个字符
中国: "中"就是一个字符
a:0000 1011

1、 不同编码之间的二进制对应关系互不通用,不能互相识别(对应的密码本不一样)
2、对于文件的存储和传输不能使用unicode(太占内存)
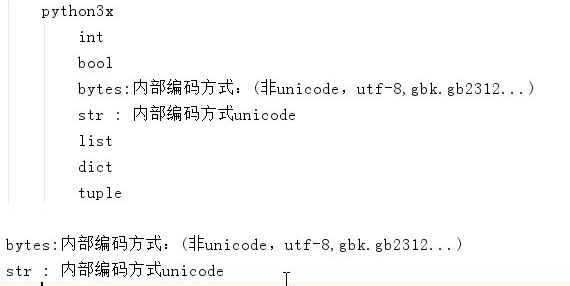
2.2 数据类型
=======python 3版本 str bool int dist tuple list ======
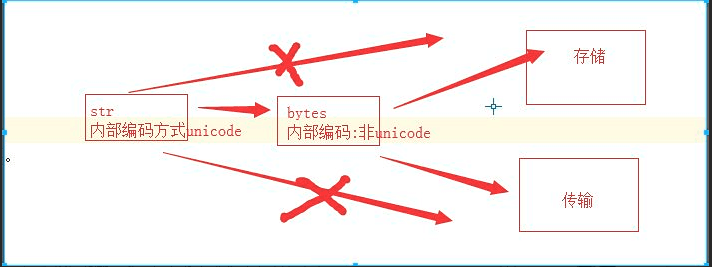
字符串的存储过程(unicode=====>非unicode====>存储/传输)
bytes:内部编码方式:(非unicode,utf-8,gbk.gb2312...)
str : 内部编码方式unicode
        字母:
            str:表现形式:s1 = 'alex'
                内部编码:unicode

            bytes:表现形式:s2 = b'alex'
                内部编码:非unicode

        中文:
            str:表现形式:s1 = '中国'
                内部编码:unicode

            bytes:表现形式:b1 = b'\xe4\xb8\xad\xe5\x9b\xbd'
                内部编码:非unicode
bytes 虽然具有str 类型所有的功能特性,但是bytes 处理中文展示的时候,是我们看不懂的,
所以这也是str还存在的意义下面是str和bytes 类型转化:
1.encode编码


s1 = 'alex'
b1 = s1.encode('utf-8')
print(b1)
===》输出
b'alex'
b2 = s1.encode('gbk')
print(b2)
===》输出
b'alex'
2.decode 解码(你用什么方式编码的那么就是相应的方式解码)
s1 = 'alex'
# str ---> bytes encode 编码
b1 = s1.encode('utf-8')
print(b1)
#bytes---> str  decode 解码
s2 = b1.decode('utf-8')
print(s2)
===》输出
b'alex'
alex

s1 = 'alex'
b2 = s1.encode('gbk')
s3 = b2.decode('gbk')
print(b2)
print(s3)
===>输出
b'alex'
alex
【注意】utf-8和gbk 的英文部分引用的是ascall 码,在做英文的转化的时候可以混用(强烈不推荐),
但是在设计英文意外的数据类型的时候就会报错了具体展示如下:
s1 = 'alex'
b1 = s1.encode('utf-8')
s2 = b1.decode('gbk')
print(s2)
===》输出
alex

s4 = '中国'
b4 = s4.encode('utf-8')
print(b4)
===》输出
b'\xe4\xb8\xad\xe5\x9b\xbd'

s5 = b4.decode('gbk')
print(s5)
===》输出
直接报错
考题:如何将代码中的utf-8=====>转化成gbk的代码格式
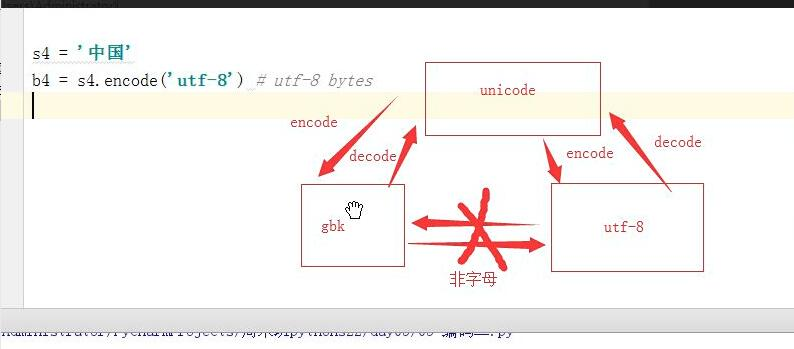
s4 = '中国'
b4 = s4.encode('utf-8') # utf-8 bytes
print(b4)
b6 = b4.decode('utf-8').encode('gbk')
print(b6)
===》输出
b'\xe4\xb8\xad\xe5\x9b\xbd'
b'\xd6\xd0\xb9\xfa'
3.集合
集合是无序的,不重复的数据集合,它里面的元素是可哈希的(不可变类型),但是集合本身是不可哈希(所以集合做不了字典的键)的。
以下是集合最重要的两点:
1、去重,把一个列表变成集合,就自动去重了。
2、关系测试,测试两组数据之前的交集、差集、并集等关系。
set1 = {'alex', 'wusir', 'taibai', 'alex'}
set2 = {'alex', 'wusir', 'taibai', 'alex',[1, 2, 3]}
print(set1)
print(set2)
===》输出
{'alex', 'taibai', 'wusir'}#去重
===》输出
set2报错
3.1 列表的去重:set
l1 = [1, 1, 2, 2, 3, 4, 4, 5]
print(list(set(l1)))
=====>输出
[1, 2, 3, 4, 5]
3.2 集合的增
set1 = {'alex', 'wusir', 'ritian', 'egon', 'barry'}
set1.add('文周')
print(set1)
===》输出
{'ritian', 'alex', 'egon', 'barry', 'wusir', '文周'}

set1.update('abc')
print(set1)
===》输出
{'b', 'egon', 'ritian', 'c', 'barry', 'wusir', 'a', 'alex'}
3.3 集合的删
set1 = {'alex', 'wusir', 'ritian', 'egon', 'barry'}
set1.pop()  #随机删除
print(set1)
===》输出
{'barry', 'ritian', 'egon', 'alex'}
set1.remove('alex')  # 按照元素删除
set1.remove('alex1')  # 按照元素删除,没有会报错
print(set1)
===》输出
{'wusir', 'egon', 'barry', 'ritian'}
set1.clear()  #清空
print(set1)  # set()
===》输出
set()
del set1  #删除列表
print(set1)
=====》输出
报错
3.4 集合的查
set1 = {'alex', 'wusir', 'ritian', 'egon', 'barry'}
for i in set1:
    print(i)
====》输出
ritian
wusir
barry
egon
alex
3.5 集合的其他操作
3.5.1 交集(& 或者 intersection)
set1 = {1, 2, 3, 4, 5}
set2 = {4, 5, 6, 7, 8}
print(set1 & set2)
print(set1.intersection(set2))
====>输出
{4, 5}
{4, 5}
3.5.2 并集(|或者union)
set1 = {1, 2, 3, 4, 5}
set2 = {4, 5, 6, 7, 8}
print(set1 | set2)
print(set1.union(set2))
====>输出
{1, 2, 3, 4, 5, 6, 7, 8}
{1, 2, 3, 4, 5, 6, 7, 8}
3.5.3 差集(-或者difference)
set1 = {1, 2, 3, 4, 5}
set2 = {4, 5, 6, 7, 8}
print(set1 - set2)
print(set1.difference(set2))
print(set2 - set1)
====》输出
{1, 2, 3}
{1, 2, 3}
{8, 6, 7}
3.5.4 反交集(^ 或者 symmetric_difference)
set1 = {1,2,3,4,5}
set2 = {4,5,6,7,8}
print(set1 ^ set2)   ===》# {1, 2, 3, 6, 7, 8}
print(set1.symmetric_difference(set2))===》# {1, 2, 3, 6, 7, 8}
3.5.5 子集与超集
set1 = {1,2,3}
set2 = {1,2,3,4,5,6}
print(set1 < set2)
print(set1.issubset(set2))  # 这两个相同,都是说明set1是set2子集。
====》输出
True
True
print(set2 > set1)
print(set2.issuperset(set1))  # 这两个相同,都是说明set2是set1超集。
====》输出
True
True
3.5.6 frozenset不可变集合,让集合变成不可变类型。
set1 = {1, 2, 3}
print(frozenset(set1))
====》输出
frozenset({1, 2, 3})
4.深浅copy
4.1 赋值运算补充,赋值运算中公用一个内存空间
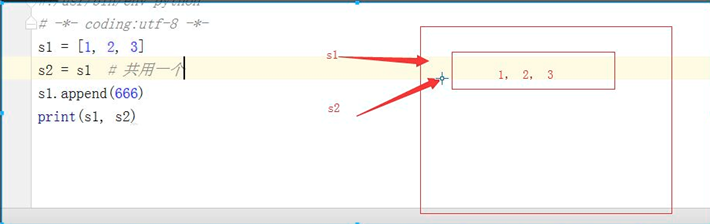
s1 = [1, 2, 3]
s2 = s1  # 共用一个
s1.append(666)
print(s1, s2)
====>输出
[1, 2, 3, 666] [1, 2, 3, 666]
4.2 浅拷贝copy。
s1 = [1, 2, 3]
s2 = s1.copy()
s1.append(666)
print(s1, s2)
====》输出
[1, 2, 3, 666]
[1, 2, 3]
s1 = [1, 2, 3,[11,22]]
s2 = s1.copy()
s1[-1].append(666)
print(s1, s2)  #[1, 2, 3, [11, 22, 666]] [1, 2, 3, [11, 22, 666]]
print(id(s1), id(s2)) #38526216 38526920
print(id(s1[-1]), id(s2[-1])) #38526856 38526856
# 浅copy 第一层各自独立,从第二层开始,共用一个内存地址。
对于浅copy来说,第一层创建的是新的内存地址,而从第二层开始,指向的都是同一个内存地址,所以,对于第二层以及更深的层数来说,保持一致性。
4.3 深拷贝deepcopy。
import copy
s1 = [1, 2, 3,[11,22]]
s2 = copy.deepcopy(s1)
s1.append(666)
print(s1, s2)
====》输出
[1, 2, 3, [11, 22], 666]
[1, 2, 3, [11, 22]]
s1 = [1, 2, 3,[11,22]]
s2 = copy.deepcopy(s1)
s1[-1].append(666)
print(s1, s2)
====》输出
[1, 2, 3, [11, 22, 666]]
[1, 2, 3, [11, 22]]
对于深copy来说,两个是完全独立的,改变任意一个的任何元素(无论多少层),另一个绝对不改变。
4.4 切片 浅copy
s1 = [1, 2, 3, [11, 22]]
s2 = s1[:]
# s1.append(666)
s1[-1].append(666)
print(s1, s2)
====>输出
[1, 2, 3, [11, 22, 666]]
[1, 2, 3, [11, 22, 666]]
5.文件操作
计算机系统分为:计算机硬件,操作系统,应用程序三部分。
我们用python或其他语言编写的应用程序若想要把数据永久保存下来,必须要保存于硬盘中,这就涉及
到应用程序要操作硬件,众所周知,应用程序是无法直接操作硬件的,这就用到了操作系统。操作系统
把复杂的硬件操作封装成简单的接口给用户/应用程序使用,其中文件就是操作系统提供给应用程序来操
作硬盘虚拟概念,用户或应用程序通过操作文件,可以将自己的数据永久保存下来。
有了文件的概念,我们无需再去考虑操作硬盘的细节,只需要关注操作文件的流程:
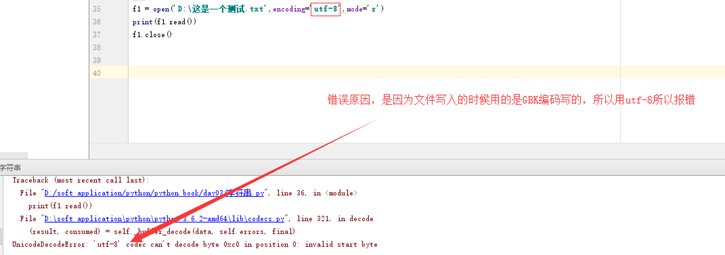
f1 = open(r'd:/a.txt', encoding='gbk', mode='r')
print(f1.read())
f1.close()

f1 = open('log1', encoding='gbk', mode='r')
print(f1.read())
f1.close()

"""
f1 文件句柄,f,file,file_hander,f_h....
open()调用的内置函数,内置函数调用的系统内部的open,
一切对文件进行的操作都是基于文件句柄f1.
执行流程:
    1,打开文件,产生文件句柄。
    f=open('a.txt','r',encoding='utf-8') #默认打开模式就为r
    2,对文件句柄进行操作。
    data=f.read()
    3,关闭文件句柄。
     f.close()
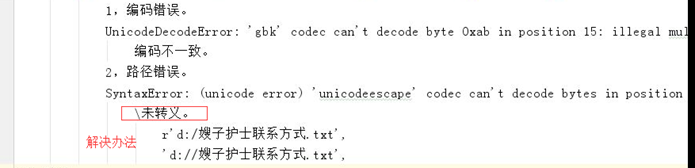
5.1 常见报错
5.2 读 r
5.2.1 read() 全部读出来
f1 = open('log1', encoding='utf-8')
content = f1.read()
print(content)
f1.close()
5.2.2 read(n) 读一部分
f1 = open('log1', encoding='utf-8')
content = f1.read(3)
print(content)
f1.close()
5.2.3 rb模式
r 模式 read(n) n 按照字符读取。
rb 模式 read(n) n 按照字节读取。
f1 = open('log1', mode='rb')
print(f1.read(3).decode('utf-8'))
f1.close()
5.2.4 readline() 按行读取
f1 = open('log1', encoding='utf-8')
print(f1.readline())
print(f1.readline())
print(f1.readline())
f1.close()
5.2.5 readlines()多行读取
f1 = open('log1', encoding='utf-8')
print(f1.readlines())
f1.close()
5.2.6 for 循环
f1 = open('log1', encoding='utf-8')
for line in f1:
    print(line)
f1.close()
5.2.7 r+ 读写 先读后写
f1 = open('log1', encoding='utf-8', mode='r+')
# print(f1.read())
# f1.write('666')
f1.write('a')
print(f1.read())
f1.close()
5.3 写 w
w 没有文件,新建文件写入内容
有原文件,先清空内容,在写入新内容。
f1 = open('log2', encoding='utf-8', mode='w')
f1.write('桃白白fdksagdfsa')
f1.close()
#图片的读取及写入
f1 = open('1.jpg', mode='rb')
content = f1.read()
f2 = open('2.jpg', mode='wb')
f2.write(content)
f1.close()
f2.close()
5.3.1 w+先写后读
f1 = open('log2', encoding='utf-8', mode='w+')
f1.write('两款发动机了')
f1.seek(0)
print(f1.read())
f1.close()
5.4 追加 a
a没有文件,新建文件写入内容
f1 = open('log3', encoding='utf-8', mode='a')
# f1.write('alex 666')
f1.write('\nalex 666')
f1.close()
5.4.1 a+
f1 = open('log3', encoding='utf-8', mode='a')
# f1.write('alex 666')
f1.write('\nalex 666')
f1.close()
#在后面追加
5.5 其他操作方法
readable 是否可读
writable 是否可写
f1.seek(12)  # 任意调整
f1.seek(0,2) #光标调整到最后
f1.seek(0) #光标调整到开头
f1.tell() # 告诉光标的位置
f1.truncate(3)  # 按照字节对原文件进行截取 必须在a 或 a+ 模式
======================
f1 = open('log3', encoding='utf-8', mode='a+')
# f1.write('python22期')
# print(f1.read())
print(f1.readable())
print(f1.writable())
f1.close()
======================
f1 = open('log2', encoding='utf-8')
f1.read()
print(f1.tell())
print(f1.seek(0))
print(f1.seek(0,2))
f1.seek(12)  # 任意调整
f1.seek(0,2) #光标调整到最后
f1.seek(0) #光标调整到开头
print(f1.tell()) # 告诉光标的位置
f1.close()
=======================
f1 = open('log3', encoding='utf-8', mode='a+')
f1.truncate(3)  # 按照字节对原文件进行截取 必须在a 或 a+ 模式
f1.close()
5.6 不用主动关闭文件句柄
with open('log1', encoding='utf-8') as f1,\
    open('log2', encoding='utf-8', mode='w') as f2:
    content = f1.read()
    f2.write(content)

with open('log1', encoding='utf-8') as f1:
    print(f1.read())
    f1.close()
    pass
    with open('log1', encoding='utf-8',mode='w') as f2:
        f2.write('666')
5.7 文件的改
# 1,以读模式打开原文件。
# 2,以写的模式打开一个新文件。
#3,将原文件读出按照要求修改将修改后的内容写入新文件。
import os
with open('file', encoding='utf-8') as f1,\
    open('file.bak', encoding='utf-8', mode='w') as f2:
    old_content = f1.read()
    new_content = old_content.replace('alex', 'SB')
    f2.write(new_content)

os.remove('file')
os.rename('file.bak', 'file')
#4,删除原文件。
# 5,将新文件重命名原文件。
5.8 升级版本
import os
with open('file', encoding='utf-8') as f1,\
    open('file.bak', encoding='utf-8', mode='w') as f2:
    for line in f1:
        new_line = line.replace('SB','alex')
        f2.write(new_line)

os.remove('file')
os.rename('file.bak', 'file')
with open('log1', encoding='utf-8', mode='w') as f1:
    f1.write('111')
    f1.write('666')
    f1.write('333')
    f1.write('222')
6.函数的初识
6.1 什么是函数
先思考一个问题:
现在有这么个情况:python中的len方法不让用了,你怎么办?
来测试一下‘hello word’ 的长度:
s = 'hello world'
count = 0
for i in s:
    count += 1
print(count)
===========
l1 = [1, 2, 3, 4, 5, 6]
count = 0
for i in l1:
    count += 1
print(count)
===========
函数是组织好的,可重复使用的,用来实现单一,或相关联功能的代码段。
函数能提高应用的模块性,和代码的重复利用率。你已经知道Python提供了许多内建函数,比如
print(),len()等。但你也可以自己创建函数,这被叫做用户自定义函数。
6.2 函数的定义与调用
s = 'lkfjsjulkjdgjdsf'
def my_len():
    count = 0
    for i in s:
        count += 1
    print(count)
'''
def 关键字 函数名():
    函数体
    函数执行:函数名()
函数:以功能为导向。
'''
my_len()
关于def
定义:def 关键词开头,空格之后接函数名称和圆括号(),最后还有一个":"。

   def 是固定的,不能变,他就是定义函数的关键字。

   空格 为了将def关键字和函数名分开,必须空(四声),当然你可以空2格、3格或者你想空多少都行,但正常人还是空1格。

   函数名:函数名只能包含字符串、下划线和数字且不能以数字开头。虽然函数名可以随便起,但我们给函数起名字还是要尽量简短,并能表达函数功能

   括号:是必须加的,先别问为啥要有括号,总之加上括号就对了!

注释:每一个函数都应该对功能和参数进行相应的说明,应该写在函数下面第一行。以增强代码的可读性。

调用:就是 函数名() 要记得加上括号。
6.3 return
1,终止函数。
2,给函数的执行者返回值。
6.3.1 没有返回值
不写return的情况下,会默认返回一个None:我们写的第一个函数,就没有写return,这就是没有返回值的一种情况。
#函数定义
def mylen():
    """计算s1的长度"""
    s1 = "hello world"
    length = 0
    for i in s1:
        length = length+1
    print(length)

#函数调用
str_len = mylen()
#因为没有返回值,此时的str_len为None
print('str_len : %s'%str_len)
只写return,后面不写其他内容,也会返回None。
def ret_demo():
    print(111)
    return
    print(222)

ret = ret_demo()
print(ret)
6.3.2 返回一个值
#函数定义
def mylen():
    """计算s1的长度"""
    s1 = "hello world"
    length = 0
    for i in s1:
        length = length+1
    return length

#函数调用
str_len = mylen()
print('str_len : %s'%str_len)
6.3.3 返回多个值
def ret_demo1():
    '''返回多个值'''
    return 1,2,3,4


def ret_demo2():
    '''返回多个任意类型的值'''
    return 1,['a','b'],3,4

ret1 = ret_demo1()
print(ret1)
ret2 = ret_demo2()
print(ret2)

返回多个值
返回的多个值会被组织成元组被返回,也可以用多个值来接收。
def ret_demo2():
    return 1,['a','b'],3,4

#返回多个值,用一个变量接收
ret2 = ret_demo2()
print(ret2)

#返回多个值,用多个变量接收
a,b,c,d = ret_demo2()
print(a,b,c,d)

#用多个值接收返回值:返回几个值,就用几个变量接收
a,b,c,d = ret_demo2()
print(a,b,c,d)
6.4 函数的参数
#函数定义
def mylen(s1):
    """计算s1的长度"""
    length = 0
    for i in s1:
        length = length+1
    return length

#函数调用
str_len = mylen("hello world")
print('str_len : %s'%str_len)
实参与形参
参数还有分别:
我们调用函数时传递的这个“hello world”被称为实际参数,因为这个是实际的要交给函数的内容,简称实参。
定义函数时的s1,只是一个变量的名字,被称为形式参数,因为在定义函数的时候它只是一个形式,表示这里有一个参数,简称形参。
6.4.1 实参角度
#位置参数  按照顺序一一对应
def func1(a, b, c):
    print(a, b, c)
func1(1, 2, 'alex')
def max(a, b): return a if a > b else b
ret = 1 if 2 > 1 else 6
print(ret)
print(max(10, 2))
#关键字传参  一一对应。
def func2(a, b):
    print(a, b)
func2(b=2, a=3)
#混合参数。(位置参数,关键字参数) 关键字参数必须在位置参数后面。
def func3(a, b, c, d):
    print(a, b, c, d)
func3(1,2,d=3,c=5)
6.4.2 形参角度
#位置参数。按顺序一一对应。
def func1(a, b, c):
    print(a, b, c)
func1(1, 2, 'alex')

#默认参数。 默认参数在位置参数的后面。
def func1():
    print(a, b, c)
func1(1, 2, 'alex')
def login(name,sex='男'):
    with open('register', encoding='utf-8', mode='a') as f1:
        f1.write('{},{}\n'.format(name,sex))

while True:
    name = input('请输入姓名:').strip()
    if '1' in name:
        login(name)
    else:
        sex = input('请输入性别:').strip()
        login(name,sex)

#动态参数。 *args, **kwargs 万能参数。
 args:所有的位置参数,放在一个元组中。
 kwargs:所有的关键字参数,放在一个字典中。

def func3(*args, **kwargs):  #函数的定义的时候 * 代表聚合。
    print(args)
    print(kwargs)
# func3(1, 2, 3, 'alex', c=6, name='wusir', age='21')
# func3(*[1, 2, 3],*(22, 33))  #函数的执行的时候 * 代表打散。
func3(**{'name':"alex"},**{'age':23})  #函数的执行的时候 * 代表打散。
func3(1, 2, 3, 22, 33)  #函数的执行的时候 * 代表打散。

#形参的顺序  位置参数 *args, 默认参数,**kwargs
def func5(a,b,*args,sex='男',**kwargs):
    print(a,b,)
    print(args)
    print(sex)
    print(kwargs)