1.5与QuerySet和管理器协同操作
这个小节作为练习熟悉操作即可。
创建对象
打开cmd进入本项目虚拟环境(可参考),然后进入项目文件中(需要cd到本项目文件目录下),运行python manage.py shell
from django.contrib.auth.models import User
from blog.models import Post
user = User.objects.get(username='admin')
post = Post(title='Another post', slug='another-post',body='Post body',author=user)
post.save()
查看数据库就有一条数据了。
也可使用下面创建数据:
Post.objects.create(title='One more post', slug='one-more-post',body='Post body',author=user)
修改数据:
post.title = 'New title'
>>> post.save()
获取数据:两个下划线,或者用点。all()全部,filter()过滤,exclude()不包含某些,order_by()排序
Post.objects.all()
Post.objects.filter(publish__year=2020, author__username='admin')
Post.objects.filter(publish__year=2020).filter(author__username='admin')
Post.objects.filter(publish__year=2020).exclude(title__startwith='why')
Post objects.order_by('title')
删除对象
post = Post.objects.get(id=1)
post.delete()
QuerySet一般不会直接运行,会在调用时,或者运算时调用。
创建模型管理器,(这个东西也是第一次见)。
在models.py中加入代码
class PublishedManager(models.Manager):  # 创建模型管理器
    def get_queryset(self):
        return super(PublishedManager, self).get_queryset().filter(status='published')


class Post(models.Model):
	...
	objects = models.Manager()
    published = PublishedManager()
1.6构建列表和详细视图
创建视图显示帖子列表,编辑blog下的view.py文件:
from django.shortcuts import render, get_object_or_404

# Create your views here.
from mysite.blog.models import Post


def post_list(request):  # 获取帖子列表
    posts = Post.published.all()
    return render(request, 'blog/post/list.html', {'posts': posts})


def post_detail(request, year, month, day, post):  # 获取独立的帖子
    post = get_object_or_404(Post, slug=post,
                             status='published',
                             publish__year=year,
                             publish__month=month,
                             publish__day=day)
    return render(request, 'blog/post/detail.html', {"post": post})
向视图添加URL路径,在blog下的urls.py中添加下面代码:
from django.urls import path

from .blog import views

urlpatterns = [
    path('', views.post_list, name='post_list'),
    path('<int:year>/<int:month>/<int:day>/<slug:post>/',views.post_detail,name='post_detail'),
]
然后在主项目的urls.py中加入:
from django.contrib import admin
from django.urls import path, include

urlpatterns = [
    path('admin/', admin.site.urls),
    #path('blog/', include('blog.urls',namespace='blog')),# 书里这是个坑。
    path('blog/', include(('blog.urls', 'blog'), namespace='blog')),
]
模型的标准url这个概念我以前没接触过,看起来还不错。
django中,向返回对象的标准URL模型中添加get_absolute_url()方法。使用reverse()方法,,可通过对应的名称和所传递的可选参数构建url.
在models.py文件并添加下列内容:
from django.urls import reverse
class Post(models.Model):
	...
   def get_absolute_url(self):
       return reverse('blog:post_detail',
                      args=[self.publish.year,
                            self.publish.month,
                            self.publish.day,
                            self.slug])
1.7创建视图模板
先在主项目下新建文件夹template文件夹,setting.py中设置路径
TEMPLATES = [
    {
        'BACKEND': 'django.template.backends.django.DjangoTemplates',
        'DIRS': [os.path.join(BASE_DIR,'templates')],
        'APP_DIRS': True,
        'OPTIONS': {
            'context_processors': [
                'django.template.context_processors.debug',
                'django.template.context_processors.request',
                'django.contrib.auth.context_processors.auth',
                'django.contrib.messages.context_processors.messages',
            ],
        },
    },
]
在templates下创建blog,blog下创建base.html和post,post里创建list.html,detail.html。
编辑base.html
<!DOCTYPE html>
{% load static %}
<html lang="en">
<head>
<meta charset="UTF-8">
<title>{% block title %}{% endblock %}</title>
<link rel="stylesheet" href="{% static "css/blog.css" %}>
</head>
<body>
<div id="content">
{% block content %}
{% endblock %}
</div>
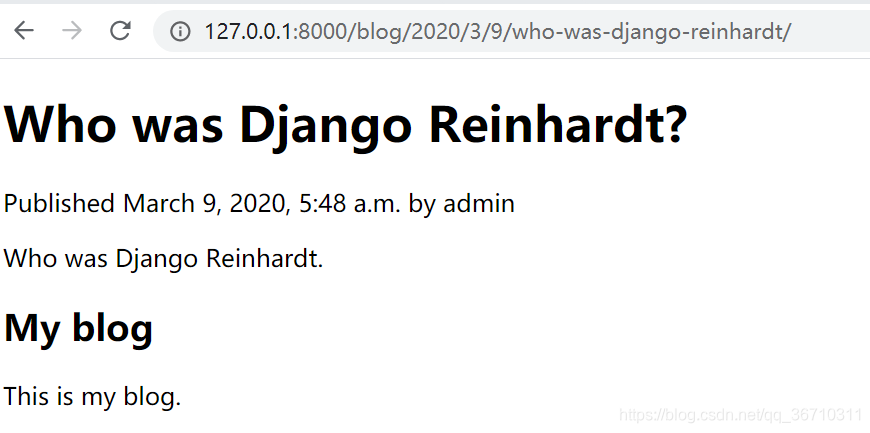
<div id="sidebar">
<h2>My blog</h2>
<p>This is my blog.</p>
</div>
</body>
</html>
编写post/list.html
{% extends "blog/base.html" %}
{% block title %}{% endblock %}
{% block content %}
<h1>My blog</h1>
{% for post in posts %}
<h2>
    <a href="{{ post.get_absolute_url }}">
        {{ post.title }}
    </a>
</h2>
<p>
    Published {{ post.publish }} by {{ post.author }}
</p>
{{ post.body|truncatewords:30|linebreaks }}
{% endfor%}
{% endblock %}
编写post/detail.html:
{% extends "blog/base.html" %}
{% block title %}{{ post.title }} {% endblock %}
{% block content %}
<h1>{{ post.title }}</h1>
<p class="date">
    Published {{ post.publish }} by {{ post.author }}
</p>
{{ post.body|linebreaks }}
{% endblock %}
需要自己在admin或者数据库中插入几条测试数据。

1.8添加分页机制
在blog/view.py中加入分页机制,改成如下
from django.core.paginator import Paginator, PageNotAnInteger, EmptyPage

def post_list(request):  # 获取帖子列表
    object_list = Post.published.all()
    paginator = Paginator(object_list, 3)  # 每页显示三个
    page = request.GET.get("page")
    try:
        posts = paginator.page(page)
    except PageNotAnInteger:  # 不是整数,返回第一个页面
        posts = paginator.page(1)
    except EmptyPage:
        posts = paginator.page(paginator.num_pages)
    return render(request, 'blog/post/list.html', {'page':page, 'posts': posts})
1.9使用基于类的视图
视图基类
在blog/views.py中把post_list函数替换成类:
from django.views.generic import ListView
class PostListView(ListView):
    queryset = Post.published.all()
    context_object_name = "posts"
    paginate_by = 3
    template_name = 'blog/post/list.html'
修改blog/urls.py文件:
path('', views.PostListView.as_view(), name='post_list'),
第一章节完成。继续努力。
