Android studio apk签名 必须明白的概念 流程 获取证书指纹 apk默认名称修改
- (一)一些必须明白的基本概念:
- 一、Keys, certificates, and keystores 即密钥、证书和密钥库
- 二、Sign your debug build 签署调试版本
- 三、Generate an upload key and keystore 生成上传密钥和密钥库
- 四、Sign your app with your key 用密钥签名您的应用
- 五、Configure the build process to automatically sign your app 配置构建过程以自动签署您的应用
- 六、Sign each product flavor differently 每种产品的口味不同
- 七、Keep your key secure 保持私钥安全
- (二)keytool 部分命令的使用
- (三)apk默认名称修改
(一)一些必须明白的基本概念:
此处翻译Android官网 Android Studio 部分下面的 Publish your app 的 部分文档,这里删减了一些与上传应用到 Google Play 的部分 ,也就没介绍 Android App Bundles 、上传秘钥和上传秘钥库等概念,感兴趣的同学 可去 官网 自己学习。
一、Keys, certificates, and keystores 即密钥、证书和密钥库
A public key certificate (.der or .pem files), also known as a digital
certificate or an identity certificate, contains the public key of a
public/private key pair, as well as some other metadata identifying the
owner (for example, name and location) who holds the corresponding
private key.
公钥证书(.der或.pem文件),也称为数字证书或身份证书,包含公钥/私钥对的公钥,以及标识持有相应私钥的所有者(例如,名称和位置)的某些其他元数据。
When signing your app, the signing tool attaches the certificate to your
app. The certificate associates the APK or app bundle to you and your
corresponding private key. This helps Android ensure that any future
updates to your app are authentic and come from the original author. The
key used to create this certificate is called the app signing key.
在为应用程序签名时,签名工具会将证书附加到应用程序。证书将APK或应用程序捆绑包与您和相应的私钥相关联。这有助于Android确保您的应用程序的任何未来更新都是真实的,并且来自原始作者。用于创建此证书的密钥称为应用程序签名密钥。
The certificate can be shared with anyone. It does not contain your
private key.
证书可以与任何人共享。它不包含您的私钥。
Every app must use the same certificate throughout its lifespan in order
for users to be able to install new versions as updates to the app.
每个应用程序在其整个生命周期中都必须使用相同的证书,以便用户能够安装新版本作为应用程序的更新。
A certificate fingerprint is a short and unique representation of a
certificate that is often requested by API providers alongside the
package name to register an app to use their service.
证书指纹是一种简短且唯一的证书表示形式,通常由API提供者在包名旁边请求该证书以注册应用程序以使用其服务。
证书指纹 分为 MD5、SHA-1 和 SHA-256指纹。
常见的API提供者,比如:微信开放平台 需要提供MD5证书指纹 和 包名,百度地图开放平台 需要提供SHA-1 证书指纹 和 包名,下面会介绍如何获取证书指纹。
The following are the different types of keys and keystores you should
understand:
以下是你应该了解的不同类型的密钥和密钥库:
App signing key: The key that is used to sign APKs that are installed on
a user's device. As part of Android’s secure update model, the signing
key never changes during the lifetime of your app. The app signing key
is private and must be kept secret. You can, however, share the
certificate that is generated using your app signing key.
应用程序签名密钥:用于对安装在用户设备上的apk进行签名的密钥。作为Android安全更新模型的一部分,签名密钥在应用程序的生命周期内不会更改。应用程序签名密钥是私有的,必须保密。但是,你可以共享使用应用程序签名密钥生成的证书。
Java keystore (.jks or .keystore): A binary file that serves as a
repository of certificates and private keys.
Java密钥库(.jks或.keystore):用作证书和私钥存储库的二进制文件。
二、Sign your debug build 签署调试版本
When running or debugging your project from the IDE, Android Studio
automatically signs your app with a debug certificate generated by the
Android SDK tools. The first time you run or debug your project in
Android Studio, the IDE automatically creates the debug keystore and
certificate in $HOME/.android/debug.keystore, and sets the keystore and key passwords.
当从IDE运行或 调试项目时,Android Studio会使用 Android SDK工具生成的调试证书 自动 为应用程序签名。第一次在Android Studio中运行或调试项目时,IDE会 自动 在$HOME/.Android/debug.keystore中创建调试密钥库和证书,并设置密钥库和密钥密码。
Because the debug certificate is created by the build tools and is
insecure by design, most app stores (including the Google Play Store) do
not accept apps signed with a debug certificate for publishing.
由于调试证书是由生成工具创建的,并且设计上不安全,因此大多数应用程序商店(包括Google Play商店)不接受使用调试证书签名的应用程序进行发布。
Android Studio automatically stores your debug signing information in a
signing configuration so you do not have to enter it every time you
debug. A signing configuration is an object consisting of all of the
necessary information to sign your app, including the keystore location,
keystore password, key name, and key password. You cannot directly edit
the debug signing configuration, but you can configure how you sign your
release build.
Android Studio自动将您的调试签名信息存储在签名配置中,因此您不必在每次调试时都输入它。签名配置是一个对象,包含用于对应用程序进行签名的所有必要信息,包括密钥库位置,密钥库密码,密钥名称和密钥密码。你 不能直接编辑 调试签名 配置,但是可以配置对 发布版本 进行签名的方式。
Expiry of the debug certificate 调试证书到期
The self-signed certificate used to sign your app for debugging has an
expiration date of 30 years from its creation date. When the certificate
expires, you get a build error.
用于为应用程序签名以进行调试的自签名证书的有效期为自创建之日起30年。证书过期时,将出现生成错误。
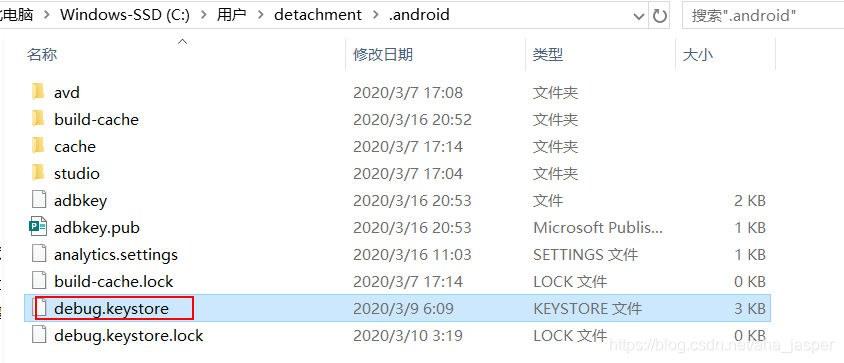
To fix this problem, simply delete the debug.keystore file stored in one
of the following locations:
 - ~/.android/ on OS X and Linux
 - C:\Documents and Settings\user\.android\ on Windows XP
 - C:\Users\user\.android\ on Windows Vista and Windows 7, 8, and 10

The next time you build and run a debug version of your app, Android
Studio regenerates a new keystore and debug key.
要解决此问题,只需删除debug.keystore以下位置之一中存储的文件:
- ~/.android/ 在OS X和Linux上
- C:\Documents and Settings\user.android\ 在Windows XP上
- C:\Users\user.android\ 在Windows Vista和Windows 7、8和10上
下次你构建和运行应用程序的调试版本时,Android Studio会重新生成新的密钥库和调试密钥。
三、Generate an upload key and keystore 生成上传密钥和密钥库
If you don't already have an upload key, which is useful when opting in
to App signing by Google Play, you can generate one using Android Studio
as follows:
如果您还没有上传密钥(在选择通过Google Play进行应用签名时非常有用),则可以使用Android Studio生成一个密钥,如下所示:
- In the menu bar, click Build > Build > Generate Signed Bundle/APK.
在菜单栏中,单击 Build > Build > Generate Signed Bundle/APK。 - In the Generate Signed Bundle or APK dialog, select Android App Bundle or APK and click Next.
在 “Generate Signed Bundle or APK” 对话框中,选择“ Android App Bundle ”或“ APK”,然后单击“ 下一步”。 - Below the field for Key store path, click Create new.
在“ Key store path ”字段下方,单击“ Create new”。 - On the New Key Store window, provide the following information for your keystore and key, as shown in figure 2.
在“ New Key Store”窗口上,为您的密钥库和密钥提供以下信息,如图2所示。
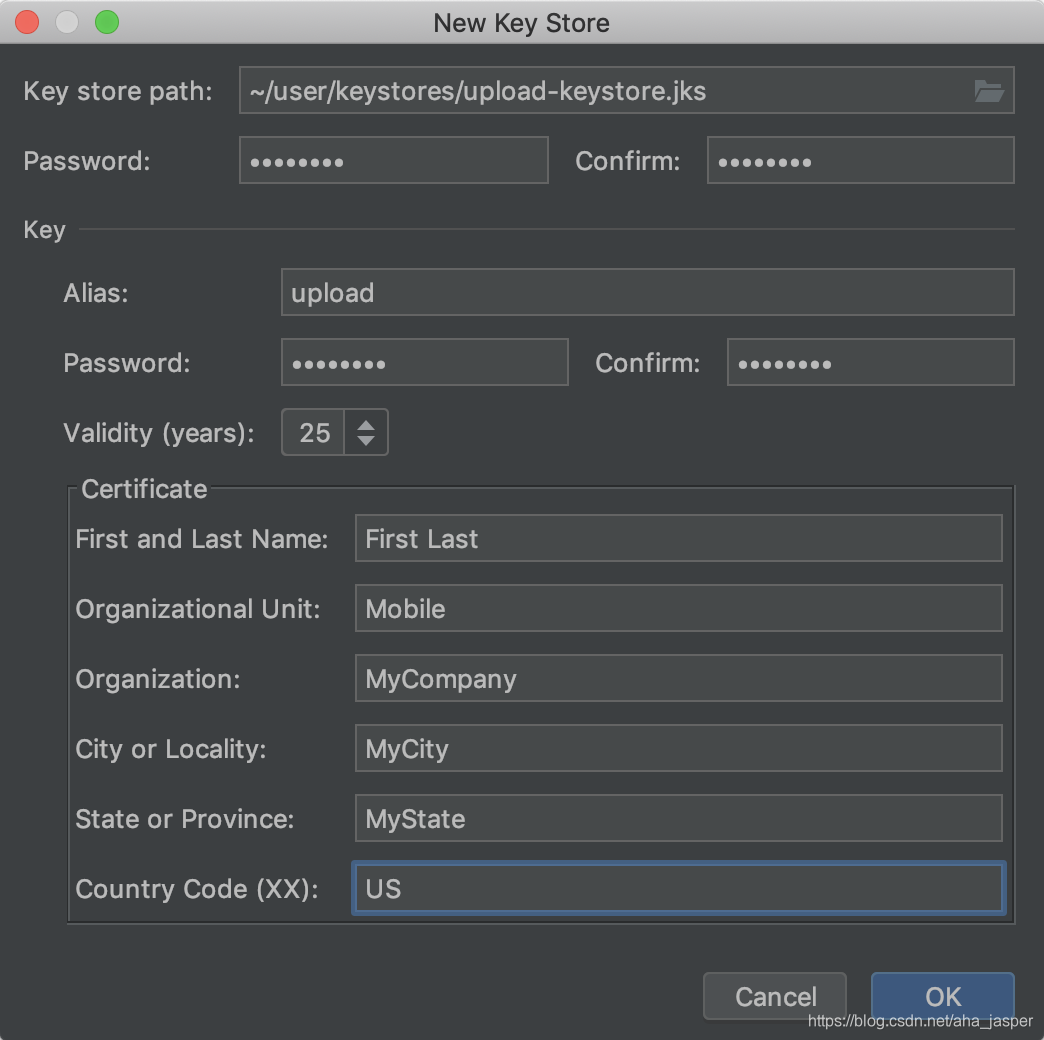
Figure 2. Create a new upload key and keystore in Android Studio.
图2.在Android Studio中创建一个新的上传密钥和密钥库。 - Keystore 密钥库
Key store path: Select the location where your keystore should be created.
密钥库路径:选择应在其中创建密钥库的位置。
Password: Create and confirm a secure password for your keystore.
密码:创建并确认密钥库的安全密码。 - Key 键
Alias: Enter an identifying name for your key.
别名:输入密钥的标识名。
Password: Create and confirm a secure password for your key. This should be different from the password you chose for your keystore.
密码:创建并确认密钥的安全密码。这应该与您为密钥库选择的密码不同。
Validity (years): Set the length of time in years that your key will be valid. Your key should be valid for at least 25 years, so you can sign app updates with the same key through the lifespan of your app.
有效期(年):设置密钥有效的时间长度(以年为单位)。您的密钥的有效期至少应为25年,因此您可以在应用的生命周期内使用相同的密钥对应用更新进行签名。
Certificate: Enter some information about yourself for your certificate. This information is not displayed in your app, but is included in your certificate as part of the APK.
证书:输入有关您自己的一些信息以获取证书。此信息不会显示在您的应用中,而是作为APK的一部分包含在您的证书中。 - Once you complete the form, click OK.
填写完表格后,点击OK。
四、Sign your app with your key 用密钥签名您的应用
If you already have an upload key, use it to sign your app.
如果您已经有一个上传密钥,请使用它来对您的应用进行签名。
To sign your app using Android Studio, follow these steps:
要使用Android Studio签名应用,请按照以下步骤操作:
-
If you don’t currently have the Generate Signed Bundle or APK dialog open, click Build > Generate Signed Bundle/APK.
如果您当前尚未打开“ Generate Signed Bundle or APK”对话框,请单击 Build > Generate Signed Bundle/APK。 -
In the Generate Signed Bundle or APK dialog, select either Android App Bundle or APK and click Next.
在“ Generate Signed Bundle or APK”对话框中,选择“ Android App Bundle”或“ APK”,然后单击“ 下一步”。 -
Select a module from the drop down.
从下拉列表中选择一个模块。 -
Specify the path to your keystore, the alias for your key, and enter the passwords for both. If you haven’t yet prepared your upload keystore and key, first Generate an upload key and keystore and then return to complete this step.
指定密钥库的路径,密钥的别名,然后输入两者的密码。如果尚未准备上载密钥库和密钥,请首先生成一个上载密钥和密钥库,然后返回以完成此步骤。
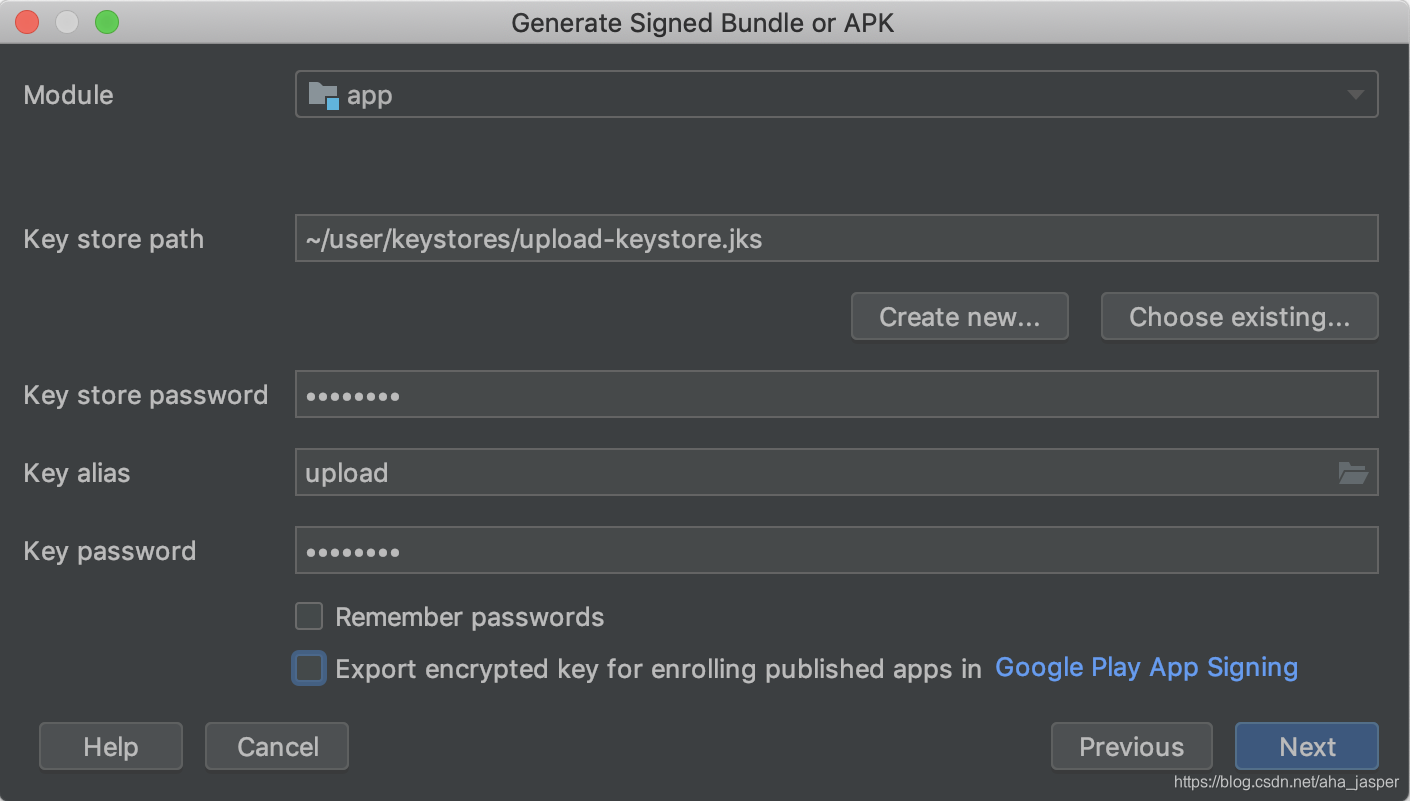
Figure 3. Sign your app with your upload key.
图3。使用上传密钥对您的应用进行签名。 -
Click Next. 单击下一步。
-
In the next window (shown in figure 4), select a destination folder for your signed app, select the build type, choose the product flavor(s) if applicable.
在下一个窗口(如图4所示)中,为已签名的应用选择目标文件夹,选择构建类型,然后选择产品口味(如果适用)。 -
Click Finish. 点击完成。
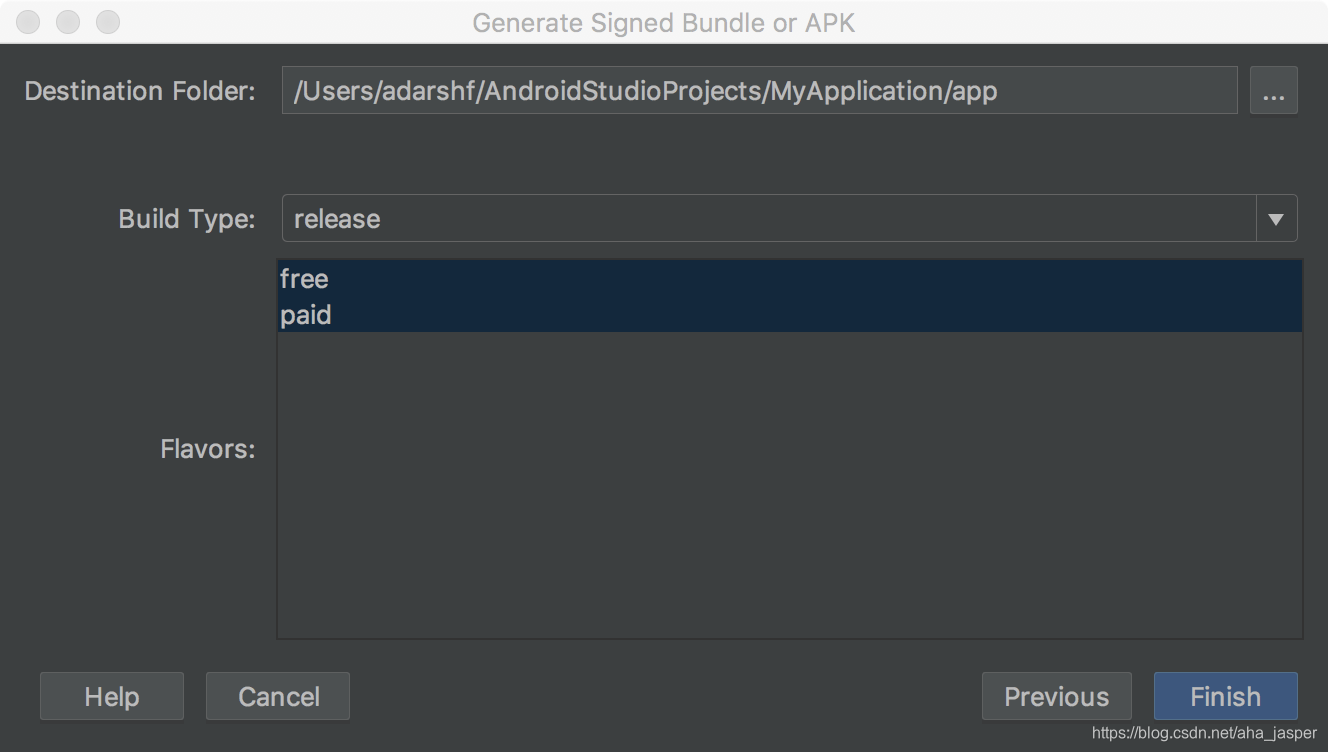
Figure 4. Generate a signed version of your app for the selected product flavors.
图4 为所选产品口味生成应用程序的签名版本。
Note: If your project uses product flavors, you can select multiple
product flavors while holding down the Control key on Windows/Linux, or
the Command key on Mac OSX. Android Studio will generate a separate APK
or app bundle for each product flavor you select.
注意:如果项目使用产品样式,则可以在按住Windows / Linux上的Control键或Mac OSX上的 Command键的同时选择多个产品样式。Android Studio会为您选择的每种口味生成单独的APK或应用包。
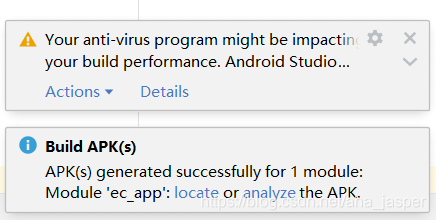
After Android Studio finishes building your signed app, you can either
locate or analyze your app by clicking on the appropriate option in the
pop-up notification.
Android Studio完成构建已签名应用程序后,您可以 通过单击弹出通知中的相应选项来查找或分析您的应用程序。
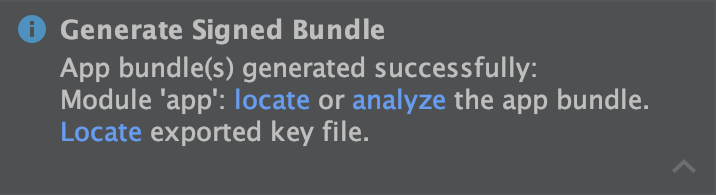
Figure 5. Click the link in the popup to analyze or locate your app bundle, or locate your exported signing key.
图5.单击弹出窗口中的链接以分析或找到您的应用程序包,或找到导出的签名密钥。
五、Configure the build process to automatically sign your app 配置构建过程以自动签署您的应用
Configure the build process to automatically sign your app
In Android Studio, you can configure your project to sign the release
version of your app automatically during the build process by creating a
signing configuration and assigning it to your release build type. A
signing configuration consists of a keystore location, keystore
password, key alias, and key password. To create a signing configuration
and assign it to your release build type using Android Studio, complete
the following steps:
在Android Studio中,您可以通过创建签名配置并将其分配给发布的构建类型,将项目配置为在构建过程中自动对应用的发布版本进行签名。签名配置由密钥库位置,密钥库密码,密钥别名和密钥密码组成。要创建签名配置并使用Android Studio将其分配给您的发布构建类型,请完成以下步骤:
-
In the Project window, right click on your app and click Open Module
Settings.
“ 项目”窗口中,右键单击您的应用,然后单击“ 打开模块设置”。 -
On the Project Structure window, under Modules in the left panel,
click the module you would like to sign.
在项目结构窗口下,在模块左边的面板中,单击您想签署模块。 -
Click the Signing tab, then click Add .
点击“Signing ”标签,然后点击添加 +。 -
Select your keystore file, enter a name for this signing configuration (as you may create more than one), and enter the required information.
选择密钥库文件,输入此签名配置的名称(您可能会创建多个),然后输入所需的信息。

Figure 7. The window for creating a new signing configuration.
上图是用于创建新签名配置的窗口。 -
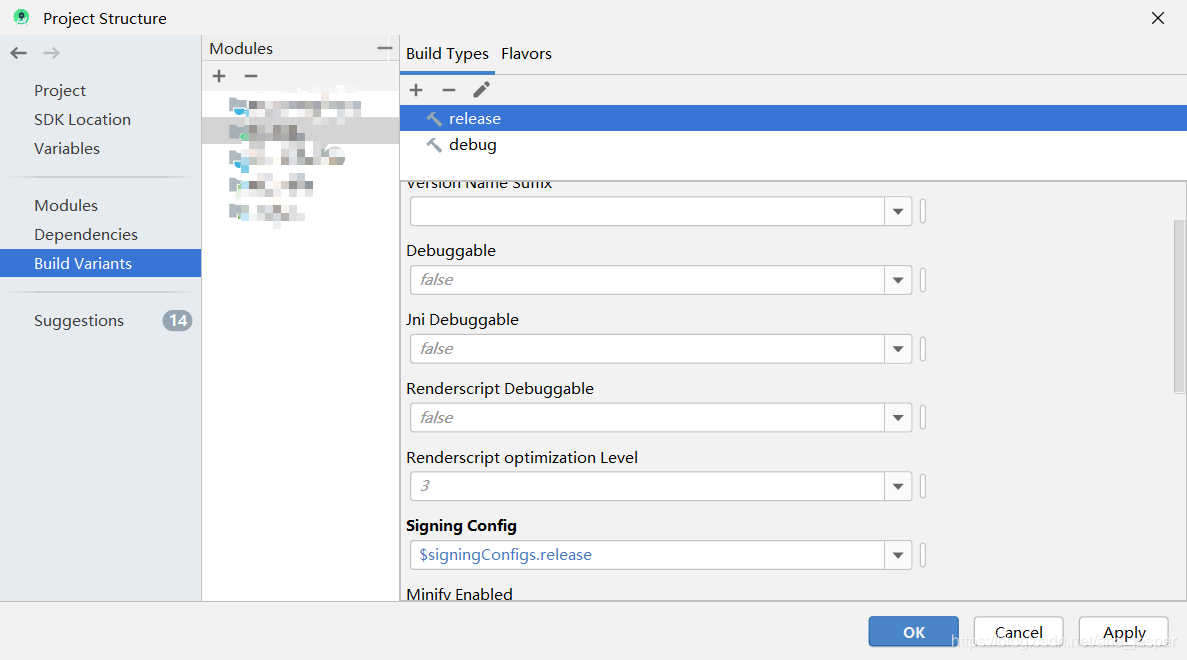
Click the Build Types tab.单击“Build Types”选项卡。
-
Click the release build. 单击“release”。
-
Under Signing Config, select the signing configuration you just created.
在“ Signing Config”下,选择您刚刚创建的签名配置。
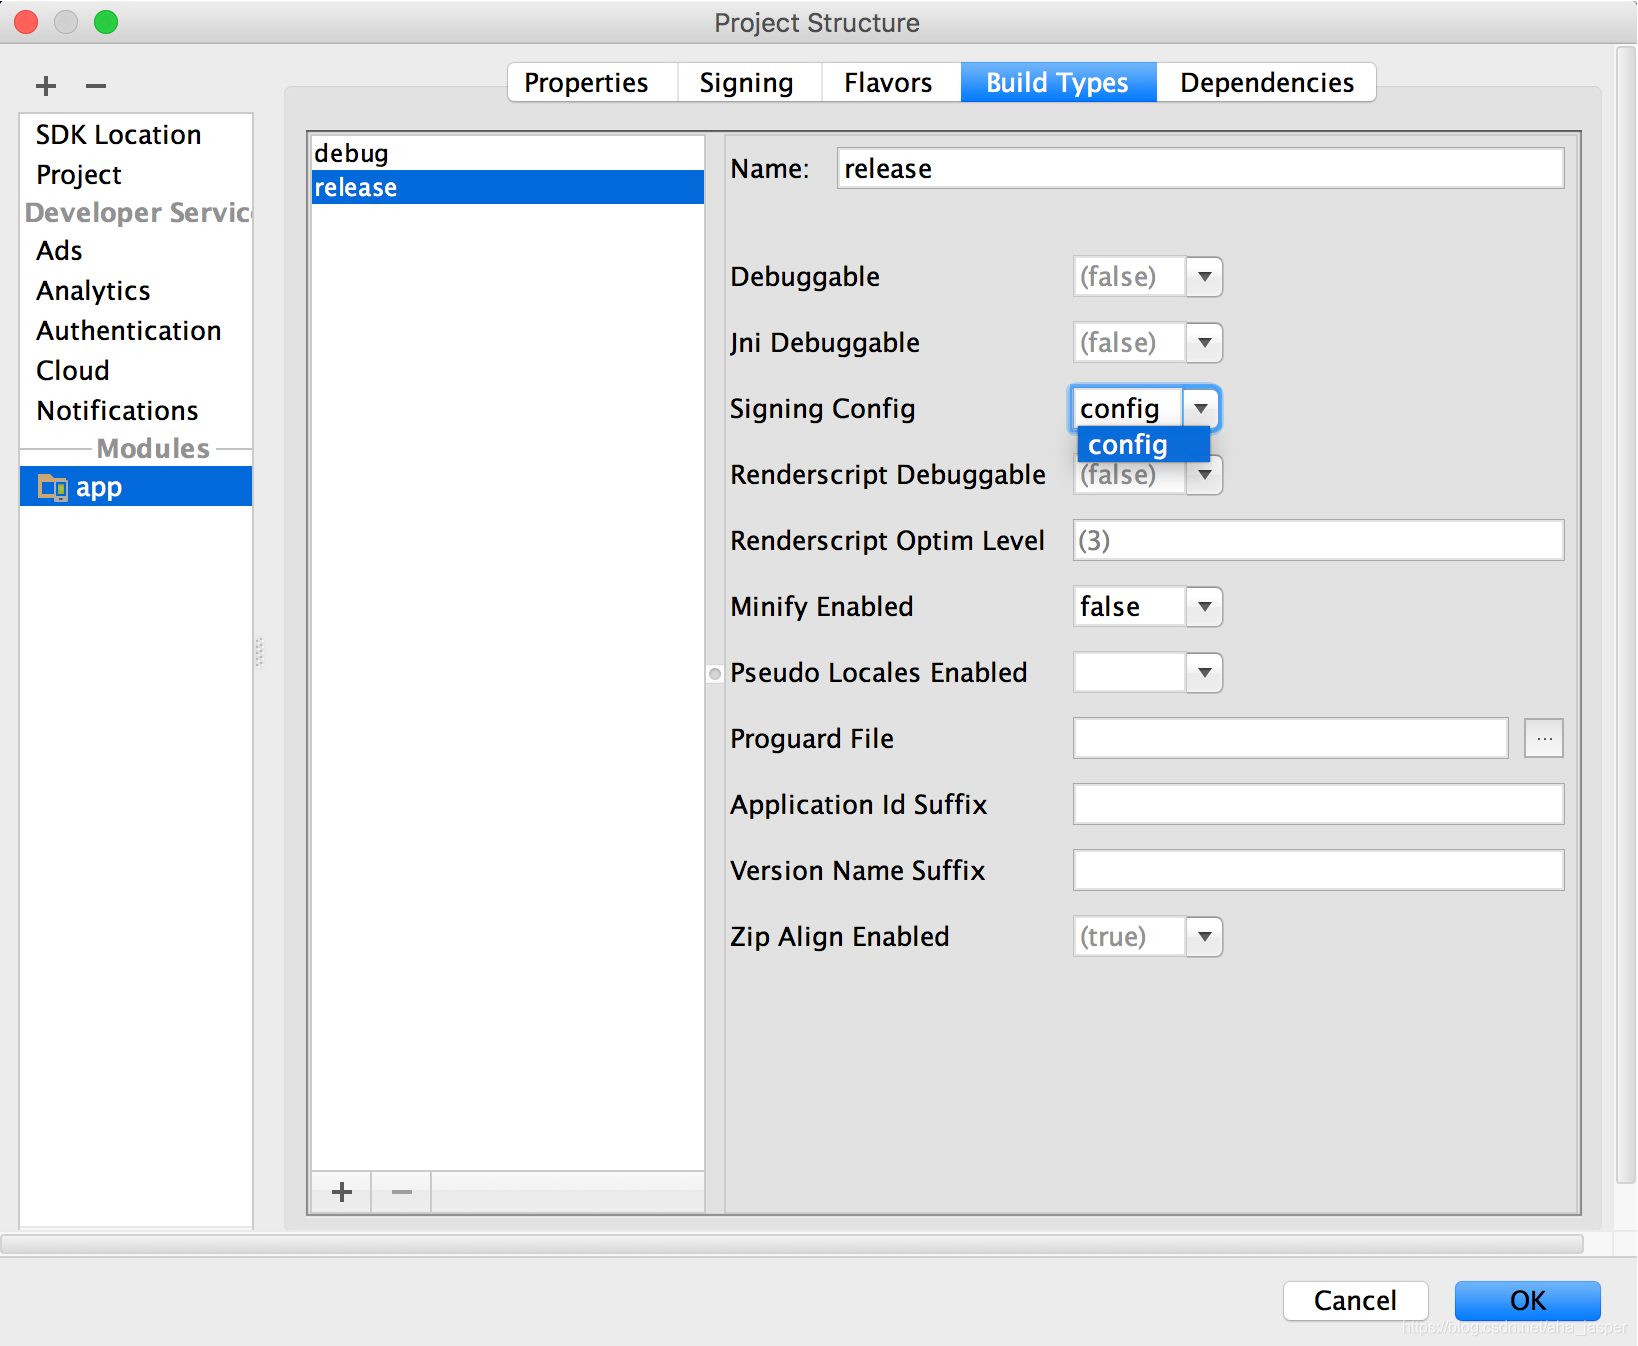
Figure 8. Select a signing configuration in Android Studio.
上图是在Android Studio中选择一个签名配置。 -
Click OK.
单击确定。
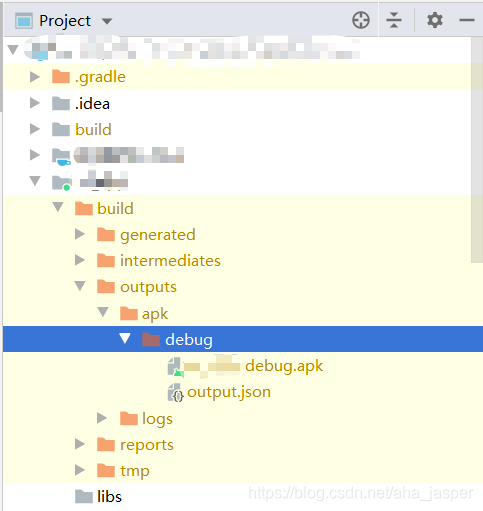
Now every time you build your release build type by selecting an option
under Build > Build Bundle(s) / APK(s) in Android Studio, the IDE will
sign your app automatically, using the signing configuration you
specified. You can find your signed APK or app bundle in the
build/outputs/ directory inside the project directory for the module you
are building.
现在,每次在Android Studio中的“ Build”>“Build Bundle(s) / APK(s)”下选择一个选项来构建发行版本时 ,IDE都会使用您指定的签名配置自动对您的应用程序进行签名。您可以在build/outputs/要构建的模块的项目目录内的目录中找到已签名的APK或应用包 。
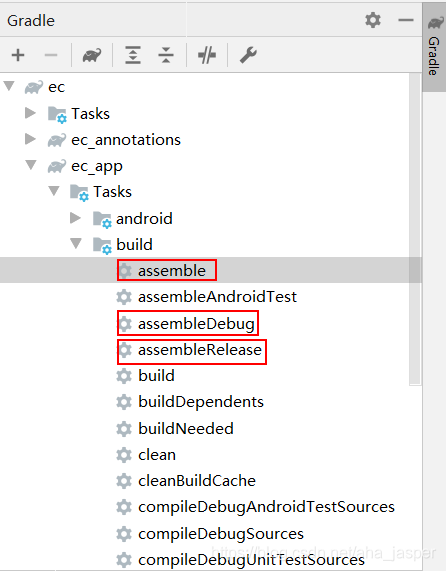
上面这种方式构建的是调试版本的apk。也可以通过gradle task执行打包,可以自己执行 gradle命令,如 Gradle assemble,也可以找到该module下的task点击执行,如下图:
When you create a signing configuration, your signing information is
included in plain text in your Gradle build files. If you are working in
a team or sharing your code publicly, you should keep your signing
information secure by removing it from the build files and storing it
separately.
创建签名配置时,签名信息以纯文本格式包含在Gradle构建文件中。如果您在团队中工作或公开共享代码,则应通过从构建文件中删除签名信息并将其单独存储来确保签名信息的安全。
六、Sign each product flavor differently 每种产品的口味不同
If your app uses product flavors and you would like to sign each flavor
differently, you can create additional signing configurations and assign
them by flavor:
如果您的应用使用产品口味,并且希望对每种口味进行不同的签名,则可以创建其他签名配置并按口味进行分配:
- In the Project window, right click on your app and click Open Module
Settings.
在“ 项目”窗口中,右键单击您的应用module,然后单击“ 打开模块设置”。 - On the Project Structure window, under Modules in the left panel, click the module you would like to sign.
在“Project Structure ”窗口下,在module左边的面板中,单击您想签署module。 - Click the Signing tab, then click Add .
点击“Signing”标签,然后点击添加+ 。 - Select your keystore file, enter a name for this signing configuration (as you may create more than one), and enter the required information.
选择密钥库文件,输入此签名配置的名称(您可能会创建多个),然后输入所需的信息。
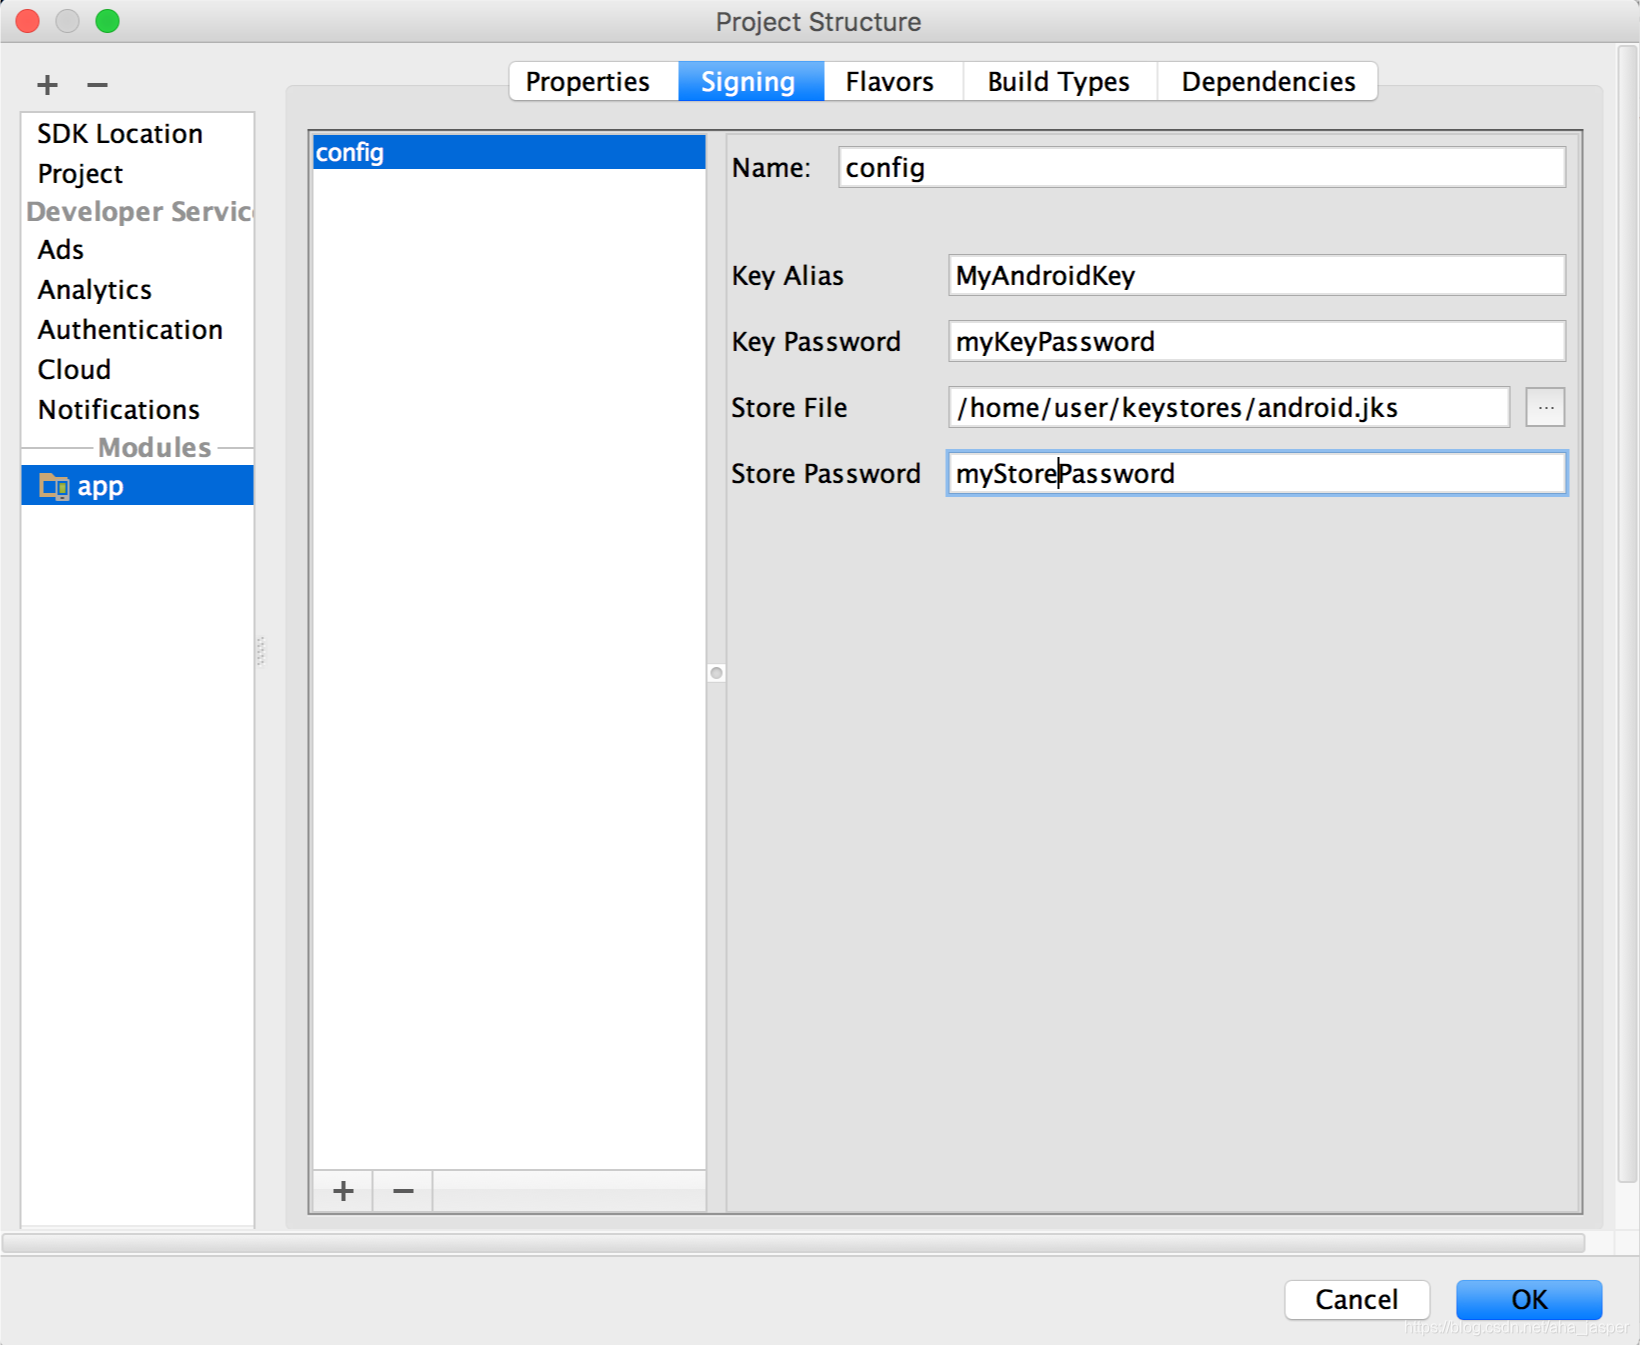
Figure 10. The window for creating a new signing configuration.
图10。用于创建新签名配置的窗口。 - Repeat steps 3 and 4 as necessary until you have created all your signing configurations.
根据需要重复步骤3和4,直到创建了所有签名配置。 - Click the Flavors tab.
单击“Flavors”选项卡。 - Click the flavor you would like to configure, then select the appropriate signing configuration from the Signing Config dropdown menu.
单击您想要配置的样式,然后从“ Signing Config”下拉菜单中选择适当的签名配置。
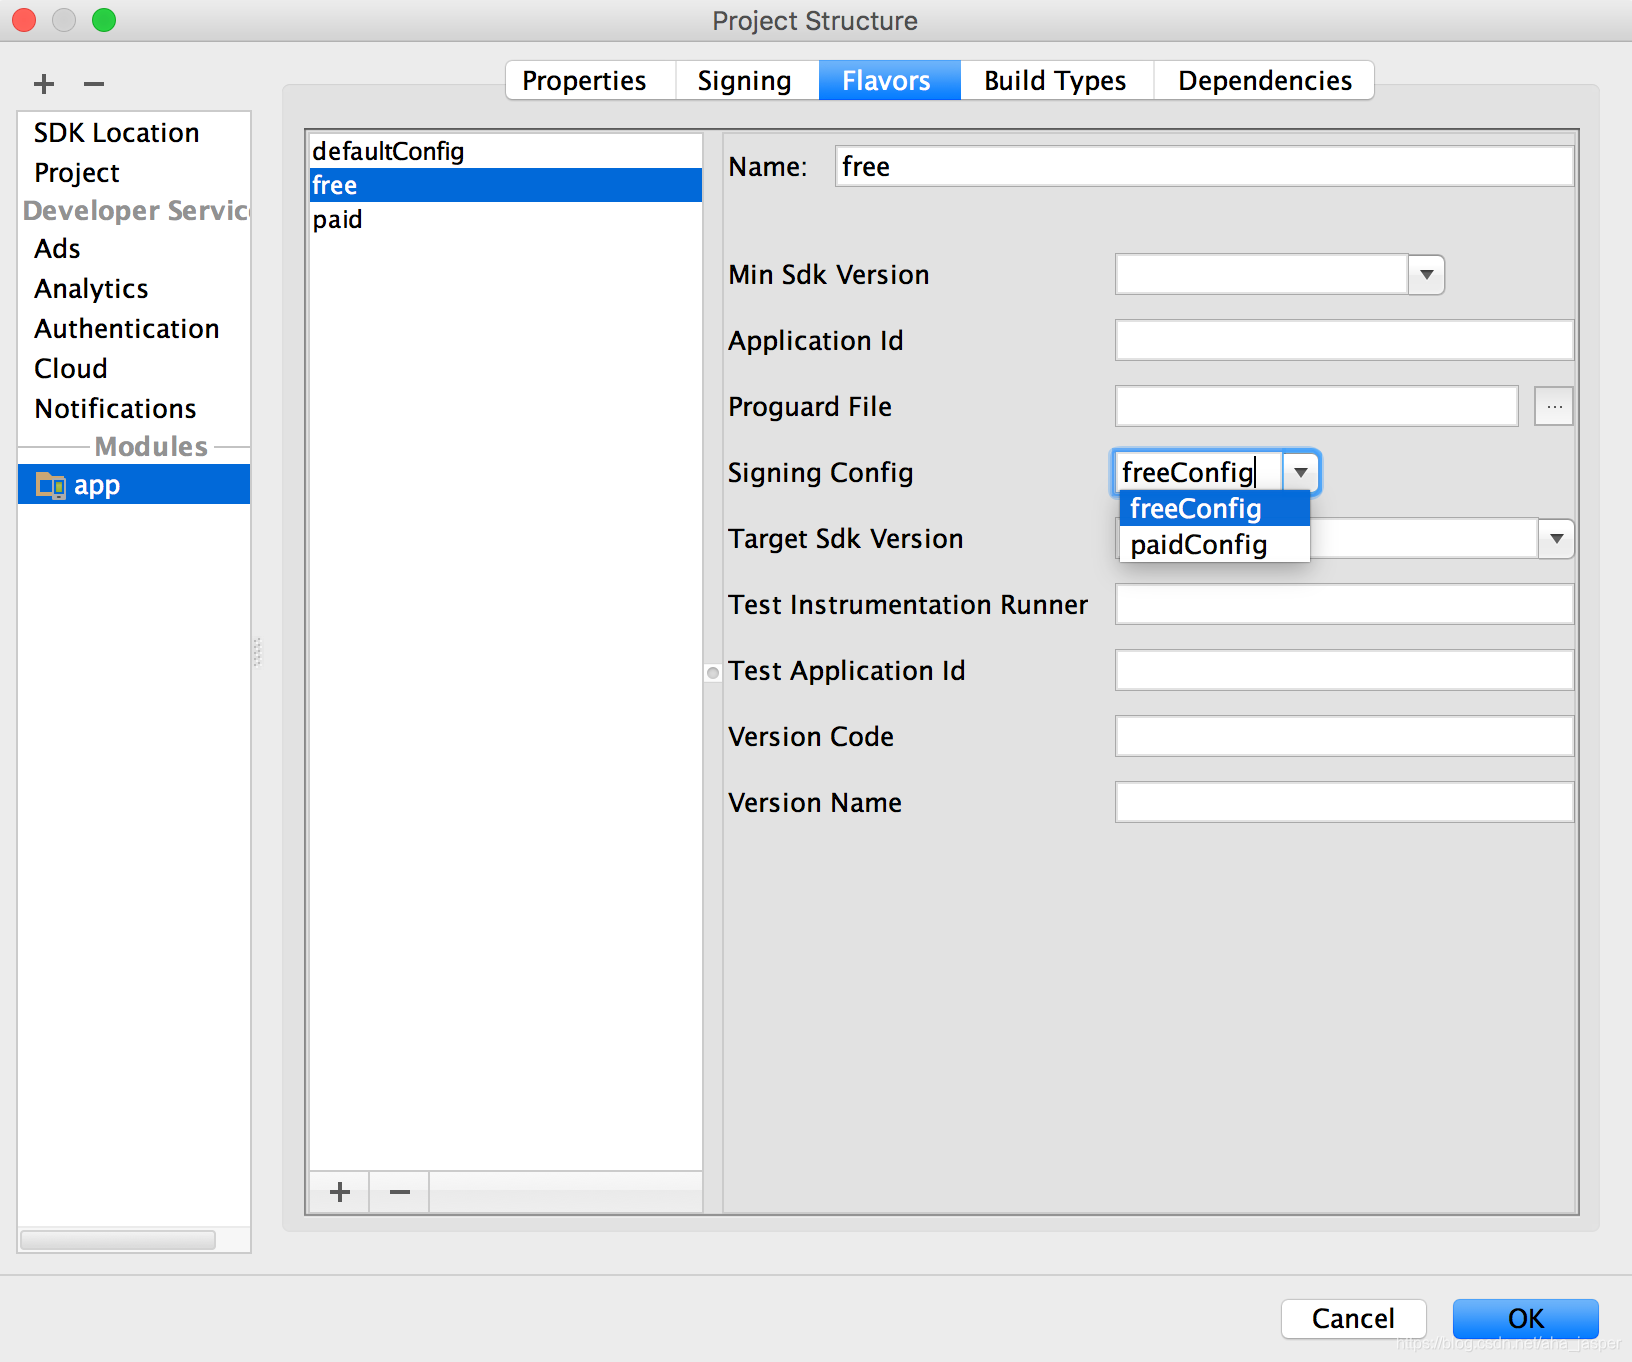
Figure 11. Configure signing settings by product flavor.
图11。根据产品口味配置签名设置。 - Repeat to configure any additional product flavors.
重复配置其他产品口味。 - Click OK. 单击确定。
You can also specify your signing settings in Gradle configuration files.
您还可以在Gradle配置文件中指定签名设置。
七、Keep your key secure 保持私钥安全
If you choose to manage and secure your app signing key and keystore
yourself, securing your app signing key is of critical importance, both
to you and to the user. If you allow someone to use your key, or if you
leave your keystore and passwords in an unsecured location such that a
third-party could find and use them, your authoring identity and the
trust of the user are compromised.
如果您选择管理和保护应用程序签名密钥并自己存储密钥,那么保护应用程序签名密钥对您和用户都至关重要。如果您允许某人使用您的密钥,或者将您的密钥库和密码保留在不安全的位置,以致第三方可以找到并使用它们,那么您的创作身份和用户的信任就会受到损害。
If a third party should manage to take your key without your knowledge
or permission, that person could sign and distribute apps that
maliciously replace your authentic apps or corrupt them. Such a person
could also sign and distribute apps under your identity that attack
other apps or the system itself, or corrupt or steal user data.
如果第三方在您不知情或未经许可的情况下设法取得您的密钥,则该人可能会签署并分发恶意替换您真实应用程序或对其进行破坏的应用程序。这样的人还可以在您的身份下签名和分发攻击其他应用程序或系统本身的应用程序,或者破坏或窃取用户数据。
Your private key is required for signing all future versions of your
app. If you lose or misplace your key, you will not be able to publish
updates to your existing app. You cannot regenerate a previously
generated key.
要对应用程序的所有将来版本进行签名,必须使用私钥。如果您丢失或放错了密钥,将无法将更新发布到现有应用程序。您无法重新生成先前生成的密钥。
Your reputation as a developer entity depends on your securing your app
signing key properly, at all times, until the key is expired. Here are
some tips for keeping your key secure:

- Select strong passwords for the keystore and key.
- Do not give or lend anyone your private key, and do not let
unauthorized persons know your keystore and key passwords.
- Keep the keystore file containing your private key in a safe, secure
place.

In general, if you follow common-sense precautions when generating,
using, and storing your key, it will remain secure.
您作为开发者实体的声誉取决于您在任何时候都始终正确保护您的应用签名密钥,直到密钥过期为止。以下是一些确保密钥安全的提示:
- 为密钥库和密钥选择强密码。
- 请勿将您的私钥提供给或借给任何人,也不要让未经授权的人员知道您的密钥库和密钥密码。
- 将包含您的私钥的密钥库文件保存在安全的地方。
通常,如果在生成,使用和存储密钥时遵循常识性的预防措施,则它将保持安全。
Remove signing information from your build files 从构建文件中删除签名信息
When you create a signing configuration, Android Studio adds your
signing information in plain text to the module's build.gradle files. If
you are working with a team or open-sourcing your code, you should move
this sensitive information out of the build files so it is not easily
accessible to others. To do this, you should create a separate
properties file to store secure information and refer to that file in
your build files as follows:
创建签名配置时,Android Studio将纯文本格式的签名信息添加到模块build.gradle 文件中。如果您正在与团队合作或将代码开源,则应将此敏感信息移出构建文件,以免他人轻易访问。为此,您应该创建一个单独的属性文件来存储安全信息,并在构建文件中引用该文件,如下所示:
-
Create a signing configuration, and assign it to one or more build types. These instructions assume you have configured a single signing configuration for your release build type, as described in Configure the build process to automatically sign your app, above.
创建一个签名配置,并将其分配给一个或多个构建类型。这些说明假定您已为发布构建类型配置了单个签名配置,如上面的第五部分内容 配置构建过程以自动签署您的应用中所述。 -
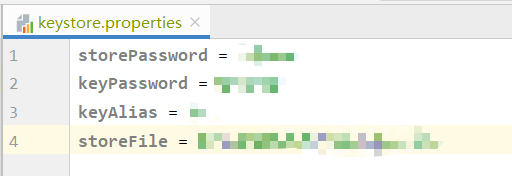
Create a file named keystore.properties in the root directory of your project. This file should contain your signing information, as follows:
在项目的根目录中创建一个名为keystore.properties的文件。该文件应包含您的签名信息,如下所示:
storePassword=myStorePassword
keyPassword=mykeyPassword
keyAlias=myKeyAlias
storeFile=myStoreFileLocation
如下图所示:
-
In your module's build.gradle file, add code to load your keystore.properties file before the android {} block.
在模块的build.gradle文件中,在android {} 块之前添加代码以加载keystore.properties文件。
...
// Create a variable called keystorePropertiesFile, and initialize it to
// yourkeystore.properties file, in the rootProject folder.
// 在rootProject文件夹中创建一个名为keystorePropertiesFile的变量,并将其
// 初始化为 keystore.properties文件。
def keystorePropertiesFile = rootProject.file("keystore.properties")`
// Initialize a new Properties() object called keystoreProperties.
// 初始化一个名为keystoreProperties的新Properties()对象。
def keystoreProperties = new Properties()`
// Load your keystore.properties file into the keystoreProperties object.
// 将keystore.properties文件加载到keystoreProperties对象中。
keystoreProperties.load(new FileInputStream(keystorePropertiesFile))`

android {
    ...
}
Note: You could choose to store your keystore.properties file in another
location (for example, in the module folder rather than the root folder
for the project, or on your build server if you are using a continuous
integration tool). In that case, you should modify the code above to
correctly initialize keystorePropertiesFile using your actual
keystore.properties file's location.
注意:您可以选择将keystore.properties文件存储 在其他位置(例如,存储在项目的模块文件夹而不是根文件夹中,或者如果使用持续集成工具,则存储在构建服务器上)。在这种情况下,您应该修改上面的代码以keystorePropertiesFile使用实际 keystore.properties文件的位置正确初始化 。
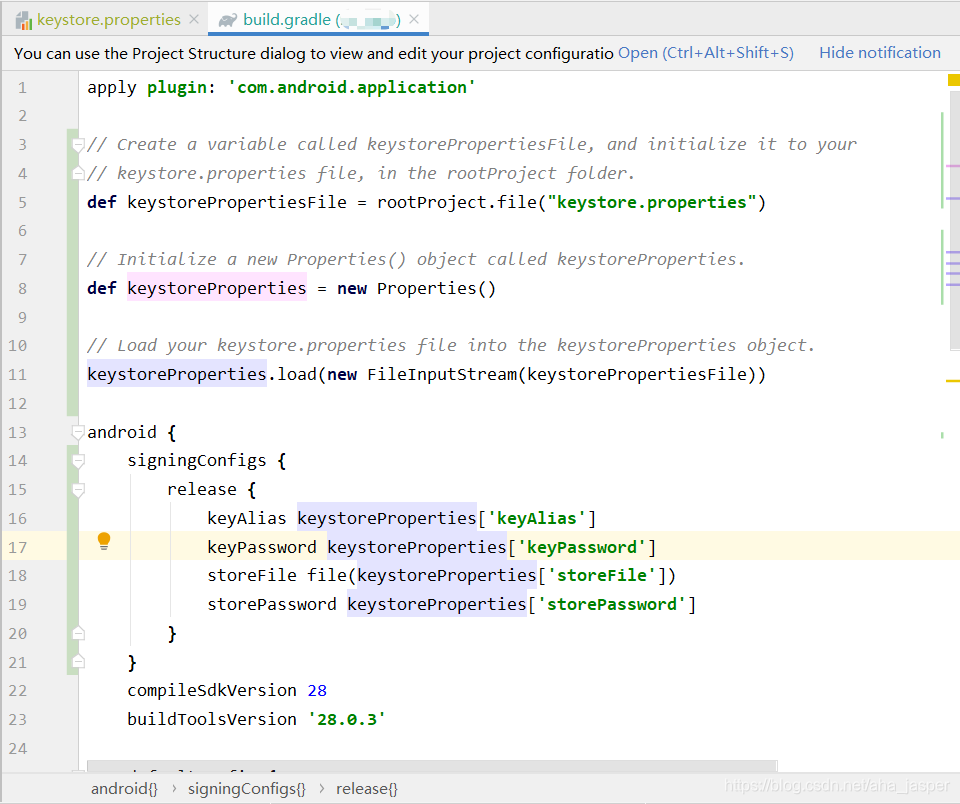
You can refer to properties stored in keystoreProperties using the syntax keystoreProperties['propertyName']. Modify the signingConfigs block of your module's build.gradle file to reference the signing information stored in keystoreProperties using this syntax.
您可以使用语法keystoreProperties['propertyName']引用存储在keystoreProperties其中的属性。修改模块build.gradle文件的signingConfigs块,以使用此语法引用存储在keystoreProperties中的签名信息。
android {
    signingConfigs {
        config {
            keyAlias keystoreProperties['keyAlias']
            keyPassword keystoreProperties['keyPassword']
            storeFile file(keystoreProperties['storeFile'])
            storePassword keystoreProperties['storePassword']
        }
    }
    ...
  }
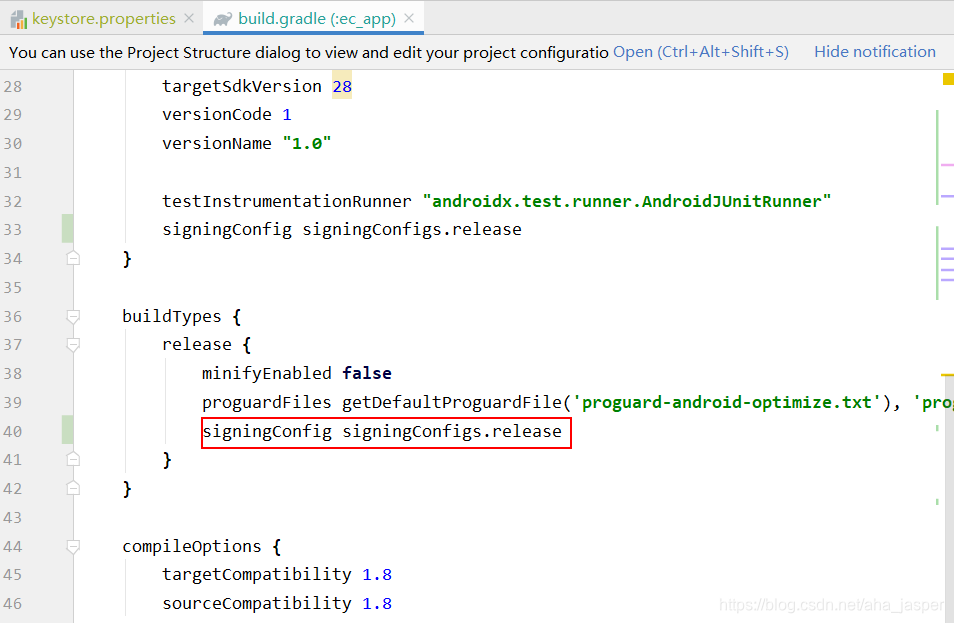
步骤3、4如下图所示:
5. Open the Build Variants tool window and ensure that the release build type is selected.
打开“ Build Variants”工具窗口,并确保选择了发布构建类型。
如下图:
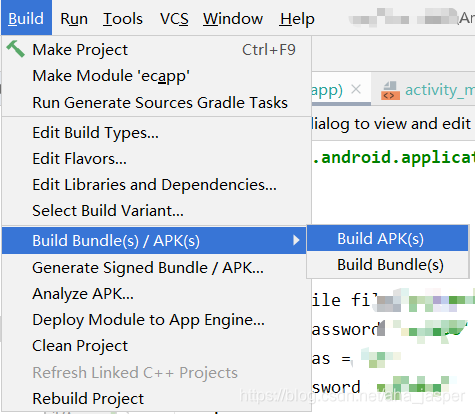
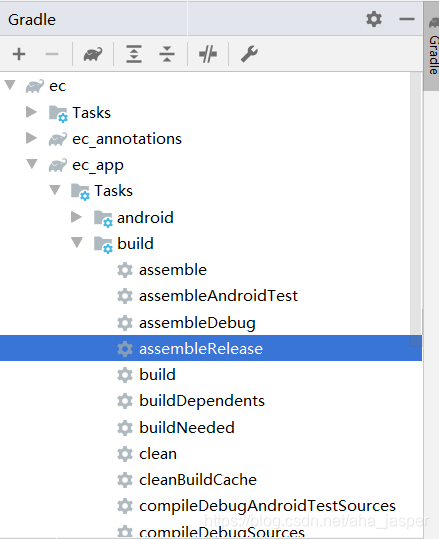
6. Select an option under Build > Build Bundle(s) / APK(s) to build either an APK or app bundle of your release build. You should see the build output in the build/outputs/ directory for your module.
在 Build > Build Bundle(s) / APK(s) 下选择一个选项,以构建发行版本的APK或应用捆绑包。您应该在build/outputs/模块目录中看到构建输出 。
点击assembleRelease Gradle Task,如下图所示
Because your build files no longer contain sensitive information, you
can now include them in source control or upload them to a shared
codebase. Be sure to keep the keystore.properties file secure. This may
include removing it from your source control system.
由于生成文件不再包含敏感信息,因此现在可以将其包含在源代码管理中或上载到共享代码库中。确保keystore.properties文件安全。这可能包括从源代码管理系统中删除它。
(二)keytool 部分命令的使用
一、查看证书指纹
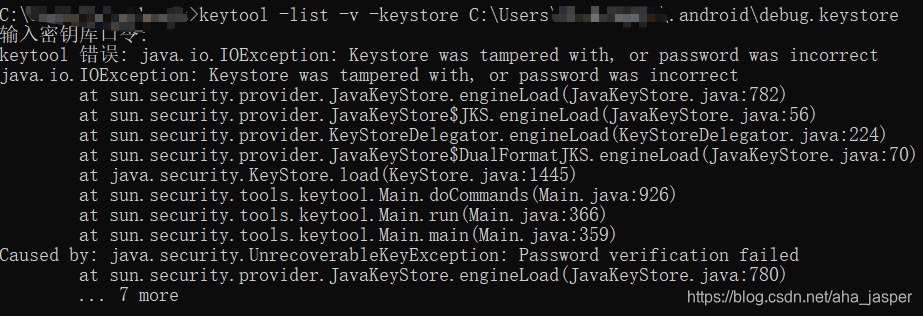
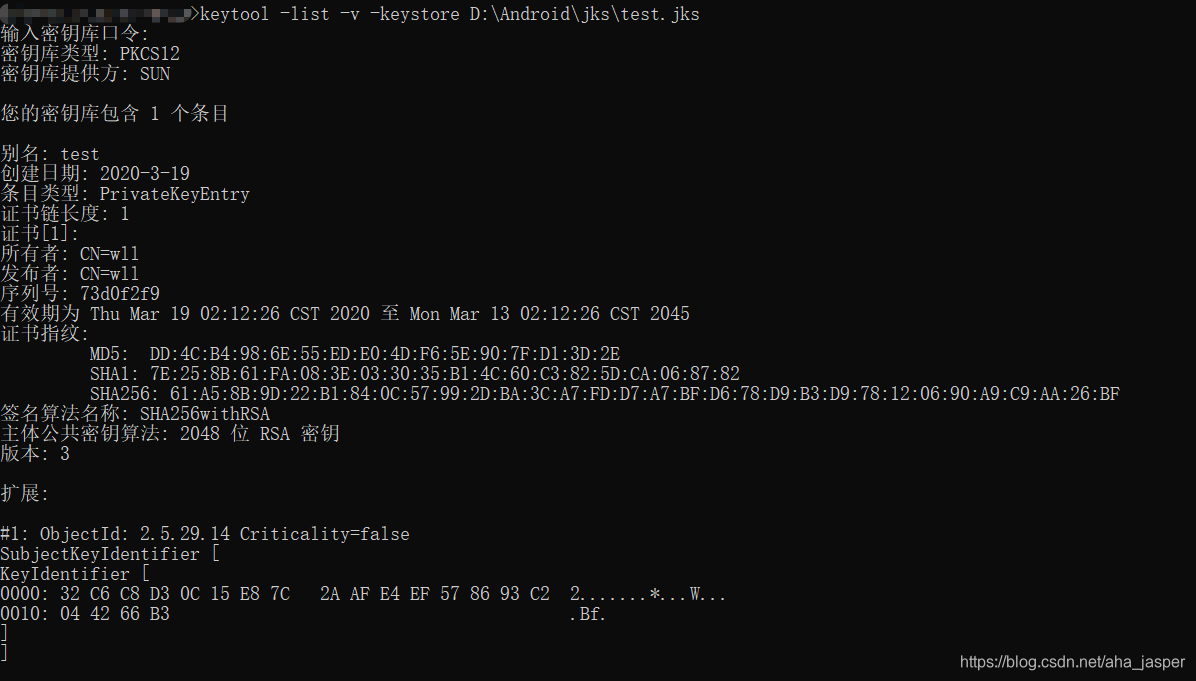
在命令窗口中输入命令:keytool -list -v -keystore .keystore或者.jks文件路径
首先我们需要知道,默认debug.keystore的信息如下:
Keystore name: “debug.keystore”
Keystore password: “android”
Key alias: “androiddebugkey”
Key password: “android”
如果秘钥库口令输入错误,如下:
获取debug.keystore的证书指纹如下:

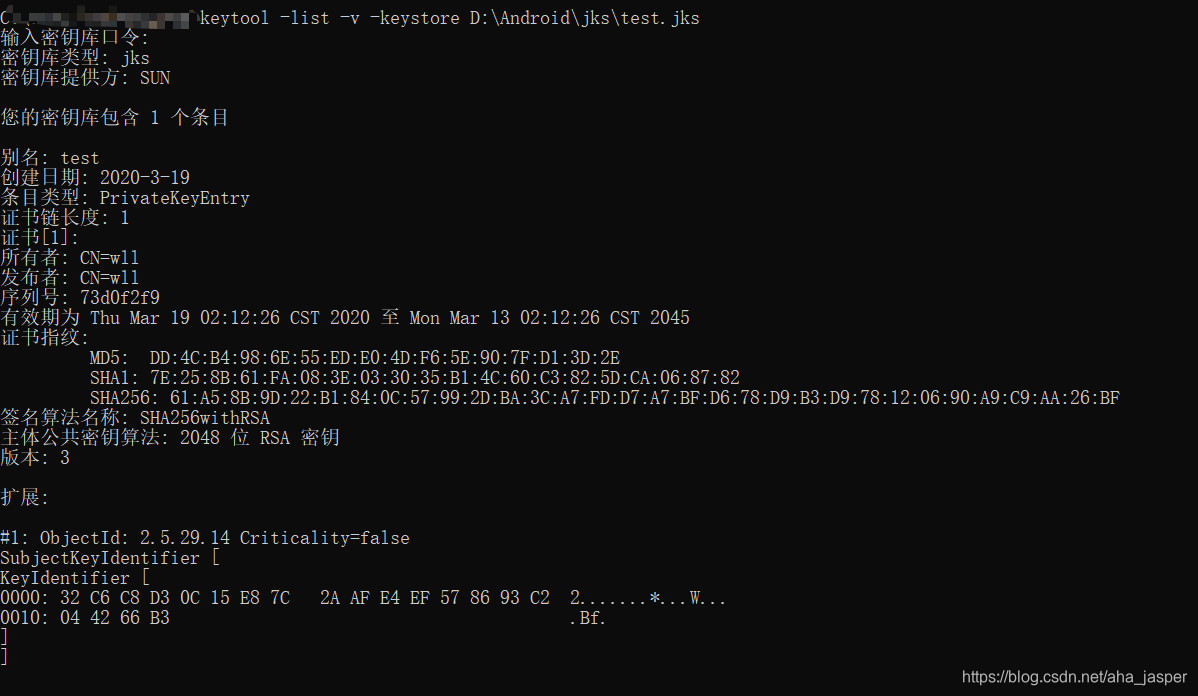
获取.jks文件的证书指纹如下:
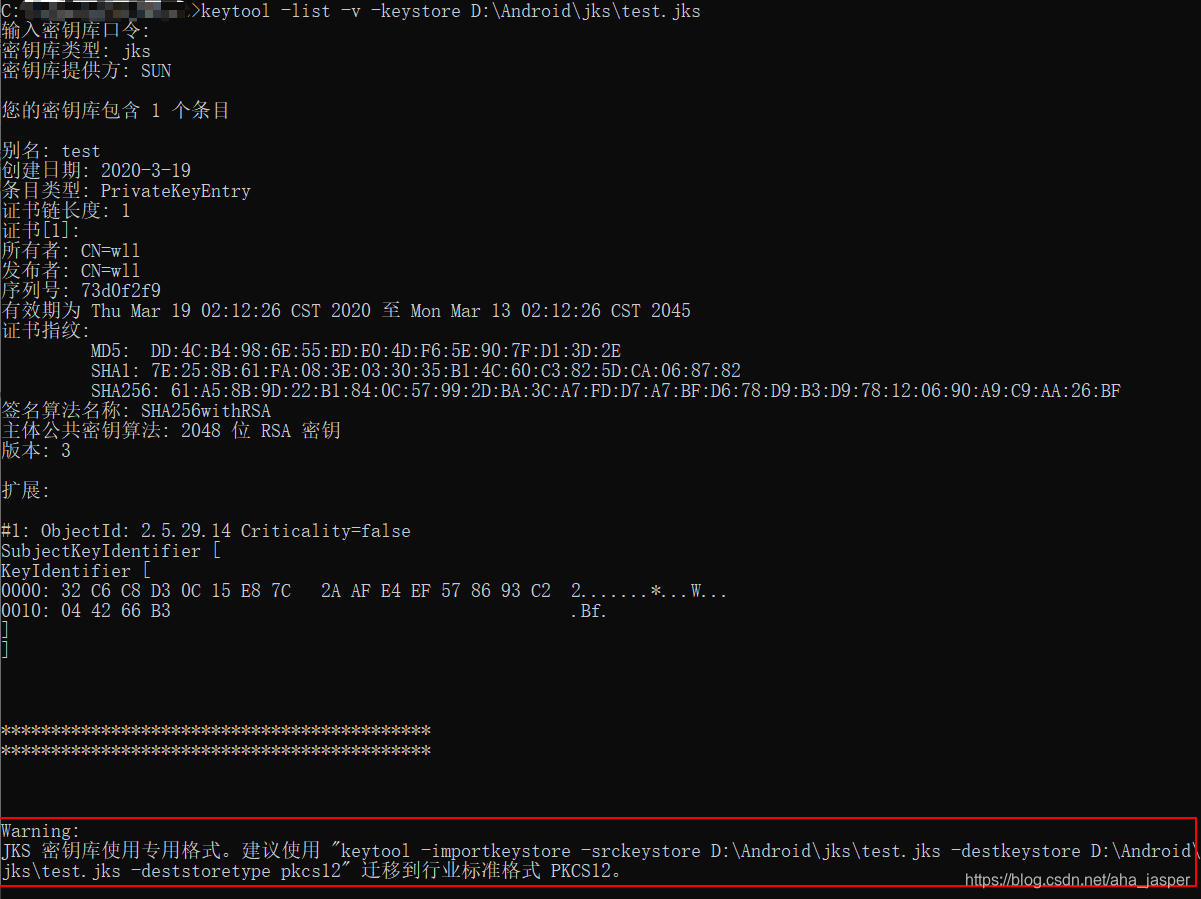
二、Android Studio 创建私钥,提示 JKS 密钥库使用专用格式。建议使用 “keytool -importkeystore -srckeystore D:\Android\jks\test.jks -destkeystore D:\Android\jks\test.jks -deststoretype pkcs12” 迁移到行业标准格式 PKCS12。

解决办法:
复制它的提示信息,粘贴到windows的cmd命令框里执行一遍即可。
keytool -importkeystore -srckeystore D:\Android\jks\test.jks -destkeystore D:\Android\jks\test.jks -deststoretype pkcs12
当我们查看上面创建的.jks的证书指纹的时候最下面也会提示该信息,如下图红框部分:
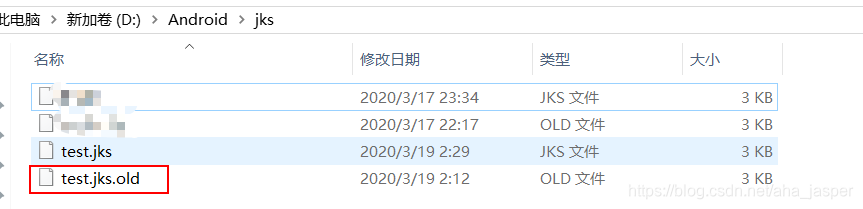
执行完提示命令之后,如下图

如上图所示,对原来的.jks文件进行了备份
再次查看上面创建的.jks的证书指纹时,就没有 迁移到行业标准格式 PKCS12 的相关提示了。
三、使用keytool命令创建本地数字证书
keytool -genkey -alias android-alias -keypass 123456 -keyalg RSA -keysize 2048 -validity 36500 -keystore D:\android\key-store.keystore -storepass 123456
- alias 别名,此处后面的内容根据实际需要自定义,此处为android-alias
- keypass 别名密码,后面密码根据实际情况自定义,此处设置123456
- keystore 秘钥库,后面填写自己的秘钥库在电脑中的路径,此处为 D:\android\key-store.keystore
- storepass 秘钥库密码,后面密码根据实际情况自定义,此处设置123456
注意:以上四项信息Android Studio 打包的时候需要填写的
其他的含义:
- genkey 生成文件
- keyalg 指定密钥加密算法,这里指定为RSA算法
- validity 有效期,至少是25年,这里指定为36500天即100年
- keysize 指定密钥长度,默认1024位,这里指定为2048位
还可以指定sigalg
- sigalg 指定数字签名算法,可以指定为SHA1withRSA算法。
KeyTool工具支持RSA和DSA共2中算法,且DSA算法为默认算法。
使用这个指令相当于 (一)必须明白的概念中 三、Generate an upload key and keystore 生成上传密钥和密钥库 里面Android Studio 创建秘钥和秘钥库。
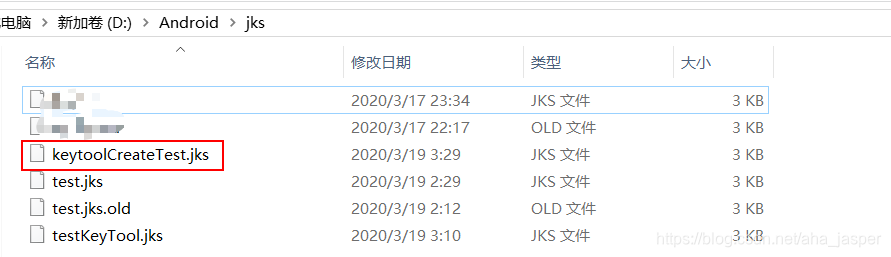
如下图,使用该命令创建一个keytoolCreateTest.jks文件:
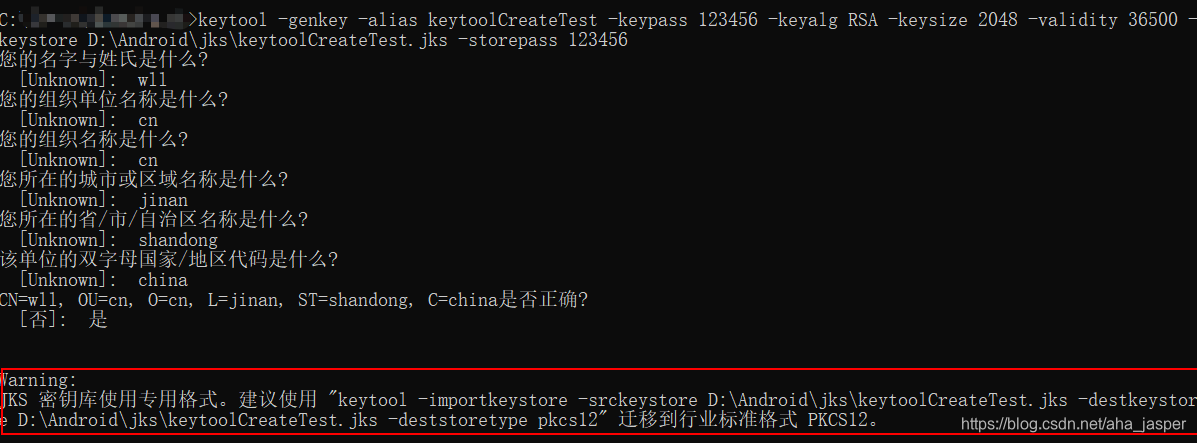
上面命令行红框部分有出现了 迁移到行业标准格式 PKCS12 提示,解决办法跟上面一样。
四、keytool常用命令
可以自己搜索,或者参考以下博客:
Keytool命令详解 by JIU_9527
KeyTool命令详解 by 我是连长
(三)apk默认名称修改
Android Studio 2.3:
android.applicationVariants.all { variant ->
    variant.outputs.each { output ->
        def file = output.outputFile
        def filename = "*****.apk"
        output.outputFile = new File(file.parent, filename)
    }
}
注意:
- android.applicationVariants.all 是固定写法,换成android.applicationVariants.each——是不会其效果的。
- variant.outputs.each换成variant.outputs.all——是不能”Sync Now”(或Sync Project with Gradle File)成功(variant对象名可以改) 。
- variant这个相当于是ApplicationVariants的一个对象,可以随意定义对象名字,例如上面改成“hehe”
同理:output是属于BaseVariantOutput的对象,对象名也可以随意定义。
Android Studio 3.0+ :
android.applicationVariants.all { variant ->
    variant.outputs.all {
        outputFileName = "*****.apk"
    }
}
注意:
- android.applicationVariants.all 同上。
- variant.outputs.all换成variant.outputs.each是不能”Sync Now”(或Sync Project with Gradle File)成功(variant对象名可以改)
我的build.gradle文件如下:
apply plugin: 'com.android.application'
// Create a variable called keystorePropertiesFile, and initialize it to your
// keystore.properties file, in the rootProject folder.
def keystorePropertiesFile = rootProject.file("keystore.properties")
// Initialize a new Properties() object called keystoreProperties.
def keystoreProperties = new Properties()
// Load your keystore.properties file into the keystoreProperties object.
keystoreProperties.load(new FileInputStream(keystorePropertiesFile))
static def releaseTime() {
return new Date().format("yyyy-MM-dd", TimeZone.getTimeZone("UTC"))
}
android {
android.applicationVariants.all { variant ->
variant.outputs.all { output ->
def outputFile = output.outputFile
if (outputFile != null && outputFile.name.endsWith('.apk')) {
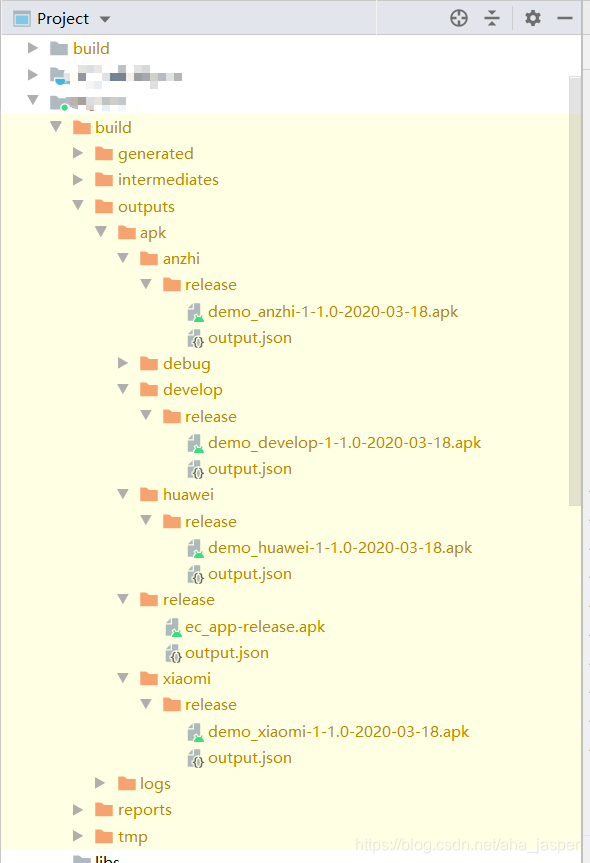
outputFileName = "demo_${variant.productFlavors[0].name}" +
"-${defaultConfig.versionCode}-${defaultConfig.versionName}-${releaseTime()}.apk"
}
}
}
signingConfigs {
release {
keyAlias keystoreProperties['keyAlias']
keyPassword keystoreProperties['keyPassword']
storeFile file(keystoreProperties['storeFile'])
storePassword keystoreProperties['storePassword']
}
}
productFlavors{
develop{}
xiaomi{}
huawei{}
anzhi{}
}
buildTypes {
release {
minifyEnabled false
proguardFiles getDefaultProguardFile('proguard-android-optimize.txt'), 'proguard-rules.pro'
signingConfig signingConfigs.release
}
}
compileSdkVersion 28
buildToolsVersion '28.0.3'
defaultConfig {
applicationId "com.wll.ec"
minSdkVersion 16
targetSdkVersion 28
versionCode 1
versionName "1.0"
testInstrumentationRunner "androidx.test.runner.AndroidJUnitRunner"
signingConfig signingConfigs.release
flavorDimensions "hehe"
}
compileOptions {
targetCompatibility 1.8
sourceCompatibility 1.8
}
}
dependencies {
implementation fileTree(dir: 'libs', include: ['*.jar'])
annotationProcessor project(':ec_compiler')
api project(':ec_fast')
implementation 'com.facebook.stetho:stetho-js-rhino:1.4.2'
implementation 'com.facebook.stetho:stetho-okhttp3:1.4.2'
}
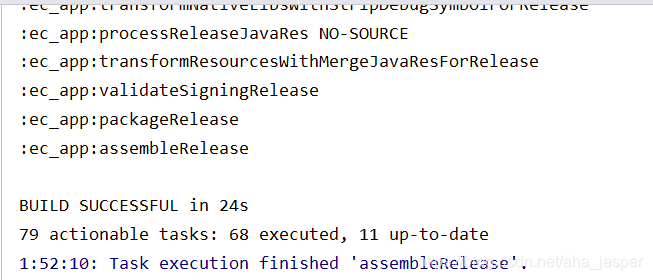
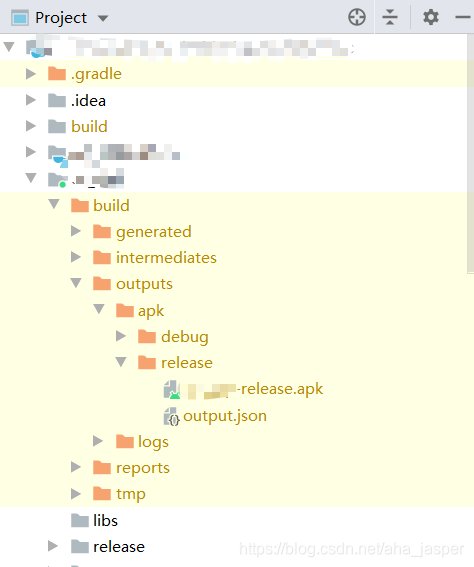
运行 gradle assembleRelease 后,如下:
增加日期/时间:
new Date().format("yyyyMMddHHmmss" , TimeZone.getTimeZone("GMT+08"))
new Date().format("yyyyMMddHHmmss" , TimeZone.getTimeZone("Asia/Shanghai"))
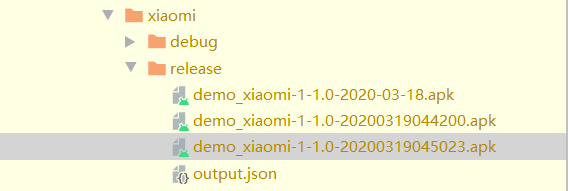
releaseTime 改为下面后,xiaomi apk名如下:
static def releaseTime() {
//    return new Date().format("yyyy-MM-dd", TimeZone.getTimeZone("UTC"))
    new Date().format("yyyyMMddHHmmss" , TimeZone.getTimeZone("GMT+08"))
}
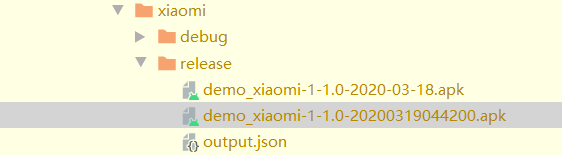
UTC 和 GMT 的区别自己百度:我用 TimeZone.getTimeZone("UTC") 获取的时间不太对。
我使用new Date().format("yyyyMMddHHmmss" , TimeZone.getTimeZone("Asia/Shanghai")) 跟new Date().format("yyyyMMddHHmmss" , TimeZone.getTimeZone("GMT+08")) 是一样的。如下图所示: