文章目录
一、Apache连接保持
Apache连接保持相关参数
KeepAlive
- 是否打开连接保持,OFF关闭, ON打开
KeepAlive Time
- 一次性连接多次请求之间的最大间隔时间,两次请求超时该事件断开连接
MaxKeepAlive
- 一次连接能够传输的最大请求数量
二、Apache访问控制
作用
-
控制对网站资源的访问
-
为特定的网站目录添加访问授权
常用访问控制方式
- 客户机地址限制
- 用户授权限制
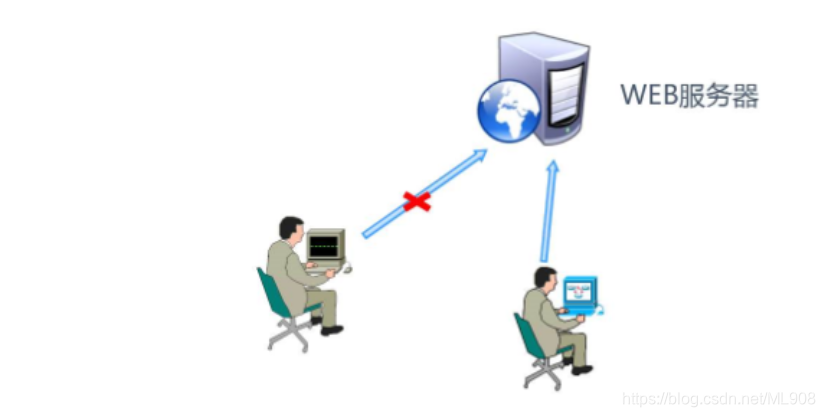
基于客户端地址的访问控制
-
使用Require配置项实现访问控制,按先后顺序限制
-
可用于< Location >、 < Diretory >、 < Files >、 < Limit >配置段中
-
Require配置项的常见语法:
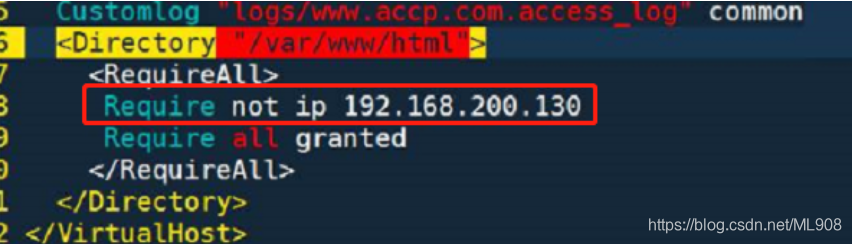
not为仅拒绝访问,使用not禁止访问时要将其置于< RequireAll > < /RequireAll >容器中并在容器中指定相应的限制策略
Require all granted
Require all denied
Require local
Require [not] host <主机名或域名列表>
Require [not] ip <IP地址或网段列表>
not为仅拒绝访问,使用not禁止访问时要将其置于< RequireAll > < /RequireAll >容器中并在容器中指定相应的限制策略,如下图
用户授权限制
httpd服务器支持使用摘要认证和基本认证两种方式。使用摘要认证需要在编译httpd之前添加“ --enable-auth-digest”选项,但并不是所有浏览器都支持摘要认证。而基本认证是httpd服务的基本功能,不需要预先配置特别的选项
基于用户的访问控制包含认证和授权两个过程。认证是指识别用户的过程,授权是指允许特定用户访问特定目录区域的过程。
现在我们以基本认证方式,添加用户授权限制
创建用户认证数据库
语法:htpasswd -c 文件路径 用户名
[root@localhost ~]# htpasswd -c /etc/httpd/conf/pwd stu      //指定新建文件路径创建用户
New password:                                //根据提示设置密码
Re-type new password:
Adding password for user stu
[root@localhost ~]# htpasswd  /etc/httpd/conf/pwd stu02      //第二次创建不需要-c  新建文件
New password:
Re-type new password:
Adding password for user stu02
[root@localhost ~]# cd /etc/httpd/conf
[root@localhost conf]# ls
extra  httpd.conf  magic  pwd
[root@localhost conf]# cat pwd                   //查看确认用户数据文件
stu:$apr1$dsDFIwsC$MHG9Ofi8itWxhQ0cjh91m1
stu02:$apr1$J/v5AgIo$Jv/Riis4kMwdcVJsvBKY0.
添加用户授权配置
相关配置项:
- AuthName:
- AuthType:
- AuthUserFile:
- require valid-user:
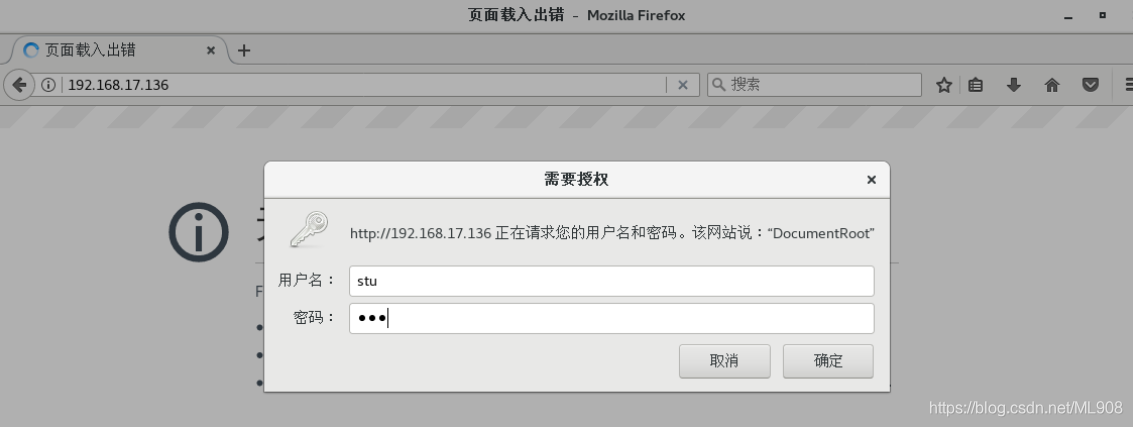
#更改httpd主配置文件 只有通过身份身份验证的用户才可以访问
[root@localhost ~]# vim /etc/httpd/conf/httpd.conf
…………省略
<Directory "/var/www/html">
        AuthName "DocumentRoot"
        AuthType Basic
        AuthUserFile "/etc/httpd/conf/pwd"
        require valid-user
</Directory>
…………省略
[root@localhost ~]# systemctl restart httpd      //重启服务
验证用户访问授权
三、日志分割
随着网站的访问量越来越大,默认情况下Apache服务器产生的单个日志文件也会越来越大,如果不对日志进行分割,那么日志文件占用磁盘空间很大的话势必会将整个日志文件删除,这样就会丢失很多重要的信息,因此分割日志意义重大
日志分割工具
- Apache自带rotatelogs分割工具实现
- 第三方工具cronolog分割
rotatelogs分割工具(Apache自带)
配置网站的日志文件转交给rotatelogs分割处理
配置格式为: ( “|” 代表命令的绝对路径)
ErrorLog "| rotatelogs命令的绝对路径 -l 日志文件路径/网站名-error_%Y%m%d.log 86400"

CustomLog "| rotatelogs命令路径 -l 日志文件路径/网站名-access_ %Y%m%d.log 86400" combined
#首先先安装Apache,并启动服务(日志需要在服务启动以后才会生成)
[root@localhost ~]# yum install httpd -y
[root@localhost ~]# cd /etc/httpd/
[root@localhost httpd]# ls
conf  conf.d  conf.modules.d  logs  modules  run
[root@localhost httpd]# cd logs
[root@localhost logs]# ls
[root@localhost logs]# systemctl start httpd
[root@localhost logs]# systemctl stop firewalld.service
[root@localhost logs]# setenforce 0
[root@localhost logs]# ls
access_log  error_log
#rotatelogs为Apache自带,查看工具所在路径
[root@localhost logs]# which rotatelogs
/usr/sbin/rotatelogs
#修改httpd主配置文件,配置网站的日志文件转交给rotatelogs分割处理
[root@localhost logs]# vim /etc/httpd/conf/httpd.conf
ErrorLog "| /usr/sbin/rotatelogs -l logs/error_%Y%m%d.log 86400"
CustomLog "| /usr/sbin/rotatelogs -l logs/access_%Y%m%d.log 86400" combined
#重启服务,访问网站后查看日志目录
[root@localhost logs]# systemctl restart httpd
[root@localhost logs]# ls
access_log  error_20191216.log  error_log
#将日期更改为延后的一天,并查看日志目录
[root@localhost logs]# date -s 2019-12-17
2019年 12月 17日 星期二 00:00:00 CST
[root@localhost logs]# ls
access_log  error_20191216.log  error_log
[root@localhost logs]# systemctl restart httpd
[root@localhost logs]# ls                                //产生了新的日志
access_log  error_20191216.log  error_20191217.log  error_log
cronolog第三方日志分割工具
#首先先安装Apache,并启动服务(日志需要在服务启动以后才会生成)
[root@localhost ~]# yum install httpd -y
[root@localhost ~]# cd /etc/httpd/
[root@localhost httpd]# ls
conf  conf.d  conf.modules.d  logs  modules  run
[root@localhost httpd]# cd logs
[root@localhost logs]# ls
[root@localhost logs]# systemctl start httpd
[root@localhost logs]# systemctl stop firewalld.service
[root@localhost logs]# setenforce 0
[root@localhost logs]# ls
access_log  error_log
#挂载并解压缩
[root@localhost ~]# mkdir /abc
[root@localhost ~]# mount.cifs //192.168.17.1/share /abc
Password for root@//192.168.17.1/share:
[root@localhost ~]# cd /abc
[root@localhost abc]# ls
apr-1.6.2.tar.gz       cronolog-1.6.2-14.el7.x86_64.rpm  httpd-2.4.29.tar.bz2  LAMP.txt
apr-util-1.6.0.tar.gz  Discuz_X2.5_SC_UTF8.zip           httpd-2.4.2.tar.gz    mysql-5.6.26.tar.gz
awstats-7.6.tar.gz     extundelete-0.2.4.tar.bz2         john-1.8.0.tar.gz     php-5.6.11.tar.bz2
[root@localhost abc]# rpm -ivh cronolog-1.6.2-14.el7.x86_64.rpm
#cronolog为第三方工具,安装后查看工具所在路径
[root@localhost abc]# which cronolog
/usr/sbin/cronolog
#修改httpd主配置文件,配置网站的日志文件转交给cronolog分割处理
[root@localhost ~]# vim /etc/httpd/conf/httpd.conf
ErrorLog "| /usr/sbin/cronolog logs/error_%Y%m%d.log"
CustomLog "| /usr/sbin/cronolog logs/access_%Y%m%d.log" combined
#重启服务,访问网站后查看日志目录
[root@localhost logs]# systemctl restart httpd
[root@localhost logs]# ls
access_20191216.log  access_log  error_20191216.log  error_log
#将日期更改为延后的一天,并查看日志目录
[root@localhost logs]# date -s 2019-12-17
2019年 12月 17日 星期二 00:00:00 CST
[root@localhost logs]# ls
access_log  error_20191216.log  error_log
[root@localhost logs]# systemctl restart httpd
[root@localhost logs]# ls                                //产生了新的日志
access_20191216.log  access_log  error_20191216.log  error_20191217.log  error_log
