1.全文检索

1.1数据的分类
结构化数据:
mysql:表 字段类型和大小都是固定
非结构化数据:
全文检索:
1.2普通检索和全文检索的比较
| 普通检索(mysql)(增删改) | 全文检索(查) | |
|---|---|---|
| 数据类型 | 结构化数据 | 结构化数据和非结构化数据 |
| 过程 | 先创建索引,然后根据id查询 | 先创建倒排索引,然后根据倒排索引查询 |
| 查询速度 | 有时快,有时慢 | 一定快 |
| 结果范围 | 普通 | 广 |
| 事务 | 支持 | 不支持事务 |
1.3.全文检索应用场景
(1) 站内搜索
例如:微博 智联招聘 boss直聘
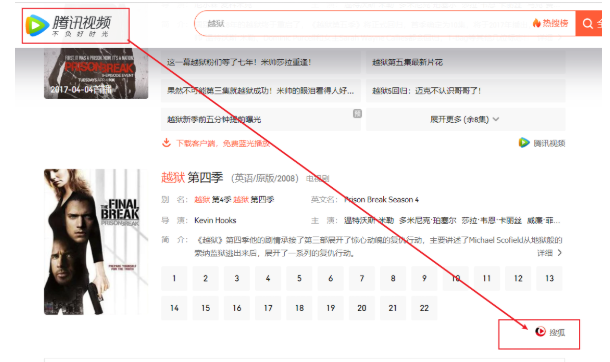
(2) 垂直搜索
比如说腾讯视频能搜到搜狐视频
(3) 搜索引擎
百度 谷歌

2.lucene(了解)
lucene:所有流行的实现全文检索的框架的底层都是lucene,实现全文检索的一套jar包库(类库) 官网:https://lucene.apache.org/
solr:封装lucene这套jar包库的框架,数据库
elastic search:封装lucene这套jar包库的框架,更强,比solr更专业,更简单
2.1.实现全文检索
(1) 创建一个空的项目:
起名:full-text-searching

(2) 创建新模块,lucene

(3) 添加pom依赖:
<?xml version="1.0" encoding="UTF-8"?>
<project xmlns="http://maven.apache.org/POM/4.0.0"
         xmlns:xsi="http://www.w3.org/2001/XMLSchema-instance"
         xsi:schemaLocation="http://maven.apache.org/POM/4.0.0 http://maven.apache.org/xsd/maven-4.0.0.xsd">
    <modelVersion>4.0.0</modelVersion>

    <groupId>com.shenyian.demo</groupId>
    <artifactId>lucene</artifactId>
    <version>1.0-SNAPSHOT</version>
    <!-- 版本锁定-->
    <parent>
        <groupId>org.springframework.boot</groupId>
        <artifactId>spring-boot-starter-parent</artifactId>
        <version>2.1.7.RELEASE</version>
        <relativePath/> <!-- lookup parent from repository -->
    </parent>
    <dependencies>
        <dependency>
            <groupId>org.springframework.boot</groupId>
            <artifactId>spring-boot-starter</artifactId>
        </dependency>
        <!-- lucene 依赖-->
        <dependency>
            <groupId>org.apache.lucene</groupId>
            <artifactId>lucene-core</artifactId>
            <version>4.10.3</version>
        </dependency>
        <dependency>
            <groupId>org.apache.lucene</groupId>
            <artifactId>lucene-analyzers-common</artifactId>
            <version>4.10.3</version>
        </dependency>
        <!-- mybatis plus 的起步依赖-->
        <dependency>
            <groupId>com.baomidou</groupId>
            <artifactId>mybatis-plus-boot-starter</artifactId>
            <version>2.3</version>
        </dependency>
        <!-- mysql 依赖-->
        <dependency>
            <groupId>mysql</groupId>
            <artifactId>mysql-connector-java</artifactId>
        </dependency>
        <!-- lombok -->
        <dependency>
            <groupId>org.projectlombok</groupId>
            <artifactId>lombok</artifactId>
        </dependency>
        <!-- 单元测试的起步依赖-->
        <dependency>
            <groupId>org.springframework.boot</groupId>
            <artifactId>spring-boot-starter-test</artifactId>
        </dependency>
        <!-- ik分词器 -->
        <dependency>
            <groupId>com.janeluo</groupId>
            <artifactId>ikanalyzer</artifactId>
            <version>2012_u6</version>
        </dependency>

    </dependencies>

</project>
sql脚本:(在代码文件夹中)
(4) 编辑配置文件application.yml
spring:
  datasource:
    driver-class-name: com.mysql.jdbc.Driver
    url: jdbc:mysql://192.168.176.109:3306/elastic_search?useUnicode=true&characterEncoding=UTF8&useSSL=false&allowMultiQueries=true&serverTimezone=Asia/Shanghai
    username: root
    password: ****
(5) 创建启动类,添加MapperScan注解
package com.shenyian;

import org.mybatis.spring.annotation.MapperScan;
import org.springframework.boot.SpringApplication;
import org.springframework.boot.autoconfigure.SpringBootApplication;

@SpringBootApplication
@MapperScan("com.shenyian.mapper")
public class LuceneApplication {

    public static void main(String[] args) {
        SpringApplication.run(LuceneApplication.class, args);
    }
}
(6) 创建JobInfo 实体类
package com.shenyian.domain;

import com.baomidou.mybatisplus.annotations.TableId;
import com.baomidou.mybatisplus.annotations.TableName;
import lombok.Data;

@Data
@TableName("job_info")
public class JobInfo {
    @TableId
    private Long id;
    //公司名称
    private String companyName;
    //职位名称
    private String jobName;
    //薪资范围,最小
    private Integer salaryMin;
    //招聘信息详情页
    private String url;
}
(7) 创建mapper
package com.shenyian.mapper;

import com.baomidou.mybatisplus.mapper.BaseMapper;
import com.shenyian.domain.JobInfo;

public interface JobInfoMapper extends BaseMapper<JobInfo> {
}
(8) 单元测试类:
创建索引库,添加文档:
  @Test
    public void test() throws Exception {

        List<JobInfo> jobInfos = jobInfoMapper.selectList(null);

        //Directory d, IndexWriterConfig conf
        Directory directory = FSDirectory.open(new File("H:\\lucene\\index"));//指定索引库保存的地址
        //Version matchVersion, Analyzer analyzer
        Analyzer analyzer = new IKAnalyzer();//中文分词器
        //Analyzer analyzer = new StandardAnalyzer();//标准分词器 对于英文识别,不识别中文
        //Analyzer analyzer = new CJKAnalyzer();//中日韩分词器 分词的不准
        IndexWriterConfig indexWriterConfig = new IndexWriterConfig(Version.LATEST, analyzer);
        IndexWriter indexWriter = new IndexWriter(directory, indexWriterConfig); //用来创建索引库的工具
        for (JobInfo jobInfo : jobInfos) {
            Document document = new Document();
            document.add(new TextField("companyName", jobInfo.getCompanyName(), Field.Store.YES));
            document.add(new TextField("jobName", jobInfo.getJobName(), Field.Store.YES));
            document.add(new DoubleField("salaryMin", jobInfo.getSalaryMin(), Field.Store.YES));
            document.add(new StringField("url", jobInfo.getUrl(), Field.Store.YES));
            indexWriter.addDocument(document);//添加document 文档
        }
        indexWriter.close();//io关闭

    }
通过luke工具查看索引库:

选择代码中index所在文件夹:


点击ok:
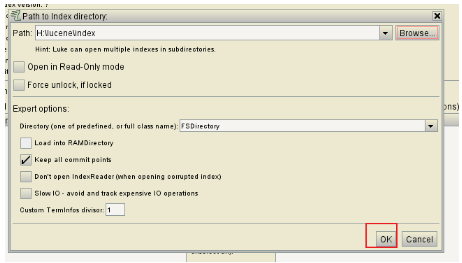
索引库:
(9) 实现检索
@Test
public void search() throws Exception {
IndexReader indexReader = DirectoryReader.open(FSDirectory.open(new File("H:\\lucene\\index")));//用来读取索引库的信息
IndexSearcher indexSearcher = new IndexSearcher(indexReader);//是用来检索
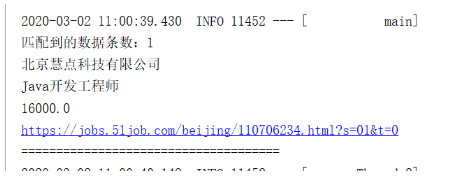
TopDocs topDocs = indexSearcher.search(new TermQuery(new Term("jobName", "java")), 10);//通过term查询,最多显示10条
int totalHits = topDocs.totalHits;
System.out.println("匹配到的数据条数:" + totalHits);
ScoreDoc[] scoreDocs = topDocs.scoreDocs;//通过倒排索引查询到的id数组
for (ScoreDoc scoreDoc : scoreDocs) {
int doc = scoreDoc.doc;//文档的id
Document document = indexSearcher.doc(doc);//通过id查询到文档
System.out.println(document.get("companyName"));
System.out.println(document.get("jobName"));
System.out.println(document.get("salayMin"));
System.out.println(document.get("url"));
System.out.println("=====================================");
}
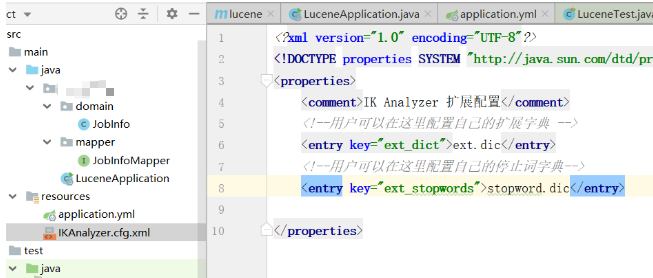
}2.2.IK分词器的扩展词和停用词
在resources下创建文件: IKAnalyzer.cfg.xml
然后再在resources下创建文件ext.dic 和 stopword.dic
<?xml version="1.0" encoding="UTF-8"?>
<!DOCTYPE properties SYSTEM "http://java.sun.com/dtd/properties.dtd">
<properties>
    <comment>IK Analyzer 扩展配置</comment>
    <!--用户可以在这里配置自己的扩展字典 -->
    <entry key="ext_dict">ext.dic</entry>
    <!--用户可以在这里配置自己的停止词字典-->
    <entry key="ext_stopwords">stopword.dic</entry>

</properties>
(1) 添加扩展词和停用词的配置文件
(2) 添加扩展词

(3) 再次创建索引库,可以先清除之前的索引库
(4) 配置之后,需要重新加载文档(加载之前要删除旧的):

(5) 那么扩展词就能查到,停止词查不到了
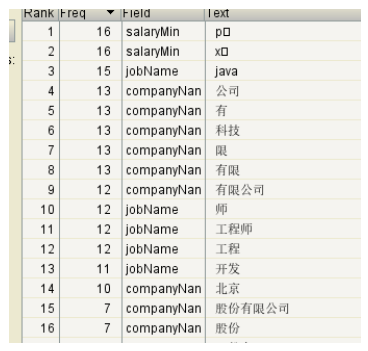
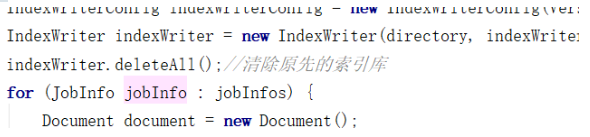
2.3.竞价排名(关键代码如下)
默认的排序是根据匹配度:如果匹配度一样,那么根据id
竞价排名的优先级高于匹配度 ,通过field的属性来设置:textField.setBoost(10000); //打分
     @Test
    public void test() throws Exception {

        List<JobInfo> jobInfos = jobInfoMapper.selectList(null);

        //Directory d, IndexWriterConfig conf
        Directory directory = FSDirectory.open(new File("H:\\lucene\\index"));//指定索引库保存的地址
        //Version matchVersion, Analyzer analyzer
        Analyzer analyzer = new IKAnalyzer();//中文分词器
        //Analyzer analyzer = new StandardAnalyzer();//标准分词器 对于英文识别,不识别中文
        //Analyzer analyzer = new CJKAnalyzer();//中日韩分词器 分词的不准
        IndexWriterConfig indexWriterConfig = new IndexWriterConfig(Version.LATEST, analyzer);
        IndexWriter indexWriter = new IndexWriter(directory, indexWriterConfig); //用来创建索引库的工具
        indexWriter.deleteAll();//清除原先的索引库
        for (JobInfo jobInfo : jobInfos) {
            Document document = new Document();
            document.add(new TextField("companyName", jobInfo.getCompanyName(), Field.Store.YES));
            document.add(new TextField("jobName", jobInfo.getJobName(), Field.Store.YES));
            document.add(new DoubleField("salaryMin", jobInfo.getSalaryMin(), Field.Store.YES));
            document.add(new StringField("url", jobInfo.getUrl(), Field.Store.YES));
            indexWriter.addDocument(document);//添加document 文档
        }
        //单独添加一个给钱的公司
        Document document = new Document();
        TextField textField = new TextField("companyName", "给钱的随便写的给了排名第一的有限公司", Field.Store.YES);
        textField.setBoost(10000); //打分
        document.add(textField);
        document.add(new TextField("jobName", "java", Field.Store.YES));
        document.add(new DoubleField("salaryMin", 30000, Field.Store.YES));
        document.add(new StringField("url", "www.suibian.com", Field.Store.YES));
        indexWriter.addDocument(document);
        indexWriter.close();//io关闭

    }
3.Elastic Search
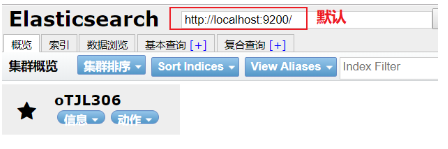
es有两个端口:9200(通过浏览器http协议可以访问)9300(集群的es 互相访问,tcp协议访问)
安装:node.js》6.2.4 版本es 》6.2.4版本 kibana可视化工具》谷歌浏览器es插件
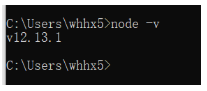
1,安装node:
(1) 一路next即可,智能安装
(2) 检查,在cmd命令窗口中输入:果出现版本,说明安装成功
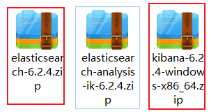
2, 安装es和kibana:
(1) es和kibana的压缩包,解压缩
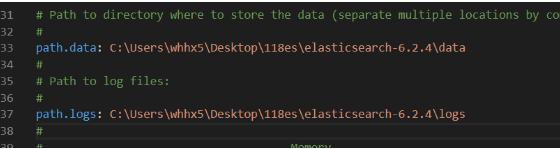
(2) 在es的解压缩之后的软件中找到config目录,然后修改如下配置:

1)elasticsearch.yml: 数据保存地址和日志保存地址
2)jvm.options:配置启动占用的内存

(3) 在es的plugins文件夹中添加ik分词器插件,如果已经有,那么就直接第四步:

(4) 启动es:

(5) 启动了两个端口9200是可以通过浏览器访问,9300是为了集群内部使用

(6) 验证:如果浏览器显示如下信息,那么代表es已经安装成功

(6) 如果启动es的时候报错,查看报错信息:

(7) 在kibana的安装软件中找到bin目录,启动kibana:

(8) 如果控制台打印如下:

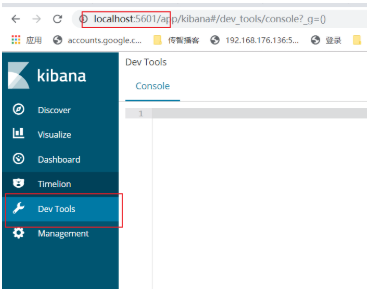
(9) 在浏览器中打 开kibana页面,点击Dev Tools:http://localhost:5601
(9) 谷歌浏览器插件安装:
1)谷歌安装插件地址: google ---》更多工具----》扩展程序

2)
解压此文件;
3) 如果没有这个加载已压缩的扩展程序,那么点击开发者模式

4) 添加扩展程序

5) 查看谷歌浏览器

6) 点击之后:
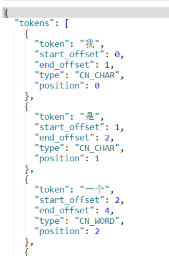
3.1.验证ik分词器是否生效
GET /_analyze
{
  "text": "我是一个好学生",
  "analyzer": "ik_smart"
}
或者
GET /_analyze
{
  "text": "我是一个好学生",
  "analyzer": "ik_max_word" 推荐的
} 
kibana 支持restful风格:
PUT 一般为创建索引库、类型
POST 一般为添加和修改文档
GET 代表获得数据
Delete 一般为删除
3.2.操作索引库
创建索引库:PUT /shenyian

查询索引库:GET /shenyian

删除索引库:DELETE /shenyian
3.3.在索引库中创建类型(type)(不推荐)
PUT /shenyian
PUT /shenyian/_mapping/goods  //创建索引库中的类型
{
  "properties": { //固定写法
     "goodsName":{// 类型中的字段
       "type": "text", //字段的field类型
       "index": true, //是否会检索
       "store": true, //是否在文档中保存
       "analyzer": "ik_max_word" //用哪个分词器
     }
  }
}
3.4.同时创建索引库和类型(type)(推荐)
PUT /shenyian
{
  "mappings": {
    "goods":{
      "properties": {
         "goodsName":{
          "type": "text",
          "index": true,
          "store": true,
          "analyzer": "ik_max_word"
        },
        "price":{
          "type": "double", //double的field类型
          "index": true,
          "store": true
        },
        "image":{
          "type": "keyword", //和lucene的stringField一样,保存字符串,但是不分词
          "index": true,
          "store": true
        }
      }
    }
  }
}
模板的创建(了解)
PUT /shenyian2
{
  "mappings": {
    "goods":{
      "properties": {
        "goodsName":{
          "type": "text",
          "index": true,
          "store": true,
          "analyzer": "ik_max_word"
        }
    },
    "dynamic_templates":[
        {
          "myStringTemplate":{ //自定义的模板名称
            "match_mapping_type": "string", //匹配到的字段类型
            "mapping":{
               "type": "text",//如果匹配的是字符串,那么自动textfiled类型
               "analyzer": "ik_max_word" //默认的ik_max_word分词器
            }
          }
        }
    ]
  }
 }
}
3.5.文档的操作
添加文档:
POST /shenyian/goods
{
  "goodsName": "小米9手机",
  "price": 2999,
  "image": "www.xiaomi9.com/9.jpg"
}
或
POST /shenyian/goods/1 如果自己给id,那么es会用我们给的id
{
  "goodsName": "小米9手机",
  "price": 2999,
  "image": "www.xiaomi9.com/9.jpg"
}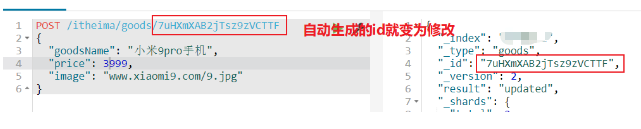
通过id修改文档:
POST /shenyian/goods/7uHXmXAB2jTsz9zVCTTF //通过自动生成的id进行修改
{
  "goodsName": "小米9pro手机",
  "price": 3999,
  "image": "www.xiaomi9.com/9.jpg"
}
通过id查询:
GET /shenyian/goods/7uHXmXAB2jTsz9zVCTTF通过id删除:
DELETE /shenyian/goods/7uHXmXAB2jTsz9zVCTTF3.7.各种查询(重点)
数据准备:
PUT /shenyian
{
  "mappings": {
    "goods":{
      "properties": {
        "goodsName":{
          "type": "text",
          "index": true,
          "store": true,
          "analyzer": "ik_max_word"
        },
        "price":{
          "type": "double",
          "index": true,
          "store": true
        },
        "image":{
          "type": "keyword",
          "store": true
        }
      }
    }
  }
}
POST /shenyian/goods/1
{
"goodsName": "小米9 手机",
"price": 2999,
"image":"www.xiaomi.9.jpg"
}
POST /shenyian/goods/2
{
"goodsName": "华为 p30 手机",
"price": 2999,
"image":"www.huawei.p30.jpg"
}
POST /shenyian/goods/3
{
"goodsName": "华为 p30 plus",
"price": 3999,
"image":"www.huawei.p30plus.jpg"
}
POST /shenyian/goods/4
{
"goodsName": "苹果 iphone 11 手机",
"price": 5999,
"image":"www.iphone.11.jpg"
}
POST /shenyian/goods/5
{
"goodsName": "苹果 iphone xs",
"price": 6999,
"image":"www.iphone.xs.jpg"
}
POST /shenyian/goods/6
{
"goodsName": "一加7 手机",
"price": 3999,
"image":"www.yijia.7.jpg"
}(1)查询所有
POST /shenyian/goods/_search 如果不通过id来查询,那么需要添加_search固定语法
{
  "query": { 也是固定语法
    "match_all": {}
  }
}
(2)term 查询
(根据倒排索引中的term来查询)
POST /shenyian/goods/_search
{
  "query": {
    "term": {
      "goodsName": "手机"
    }
  }
}
(3) match 查询
(将查询数据分词,然后每个词都term查询,将结果合集)
POST /shenyian/goods/_search
{
  "query": {
    "match": {
      "goodsName": "手机 小米"
    }
  }
}
(4)范围查询
根据某个字段的区间范围
POST /shenyian/goods/_search
{
  "query": {
    "range": {
      "price": { //通过price这个字段
        "gte": 2000,  gte:greate than equals
        "lte": 4000   lte:less than equals
      }
    }
  }
}
(5)模糊查询
(容错查询,可以允许打错字,最多2个)
POST /shenyian/goods/_search
{
  "query": {
    "fuzzy": { 容错查询关键字
      "goodsName": {
        "value": "iphoww",
        "fuzziness": 2 容错率,最多是2
      }
    }
  }
}
(6)布尔查询
(组合查询,组合上面提到的查询)
POST /shenyian/goods/_search
{
  "query": {

    "bool": {
      "must": [    //下面的match查询的结构和range查询的结果的交集
        {
          "match": {
            "goodsName": "手机 小米"
          }
        },

        {
          "range": {
            "price": {
              "gte": 2000,
              "lte": 4000
            }
          }
        }
      ]
    }
  }
}
POST /shenyian/goods/_search
{
"query": {
"bool": {
"should": [ //下面的match查询的结构和range查询的结果的并集
{
"match": {
"goodsName": "手机 小米"
}
},
{
"range": {
"price": {
"gte": 2000,
"lte": 4000
}
}
}
]
}
}
}POST /shenyian/goods/_search
{
"query": {
"bool": { must中查询出来的结果然后排除must_not中的结果
"must": [
{
"match": {
"goodsName": "手机 小米"
}
},
{
"range": {
"price": {
"gte": 2000,
"lte": 4000
}
}
}
],
"must_not": [
{
"term": {
"goodsName": "华为"
}
}
]
}
}
}关键字有:
must:组合term,match,range, fuzzy 等等查询结果的交集 match&& range
must_not:根据must或者should的查询结果,然后剔除must_not查询的结果
should:组合term,match,range等等查询结果的并集 match||range
一般来说:must和must_not一起用,或者should和must_not一起用
filter(这个filter的术语是过滤,作用和must一样......所以就认为等于must)
3.8.过滤
显示字段的过滤,如果不想显示那些字段,可以过滤....
includes:
POST /shenyian/goods/_search
{
  "query": {
    "match": {
      "goodsName": "华为"
    }
  },
  "_source": {
    "includes": ["goodsName","price"]
  }
}
excludes:
POST /shenyian/goods/_search
{
  "query": {
    "match": {
      "goodsName": "华为"
    }
  },
  "_source": {
    "excludes": ["image"] 不想显示的字段
  }
}
3.8.排序,分页
POST /shenyian/goods/_search
{
  "query": {
    "match": {
      "goodsName": "手机"
    }
  },
  "sort": [   排序
    {
      "price": {
        "order": "desc"
      }
    }
  ],
  "from": 0,  分页
  "size": 2
}
3.9.高亮(被搜索的关键字变色)
POST /shenyian/goods/_search
{
  "query": {
    "match": {
      "goodsName": "手机"
    }
  },
  "highlight": {
    "fields": {
      "goodsName": {}  //需要高亮的字段和上面的查询字段要一致
    },
    "pre_tags": "<font color=red>",  //前置html标签
    "post_tags": "</font>"          //闭合html标签
  }
}3.10.聚合(分组)
聚合的字段field类型必须是:keyword
| elastic search | mysql | |
|---|---|---|
| 聚合(分组) | 桶(bucket) | group by |
| avg,max,min,count(*) 分组之后的计算 | 度量 | 聚合函数 |
mysql聚合:

准备数据:
PUT /car
{
  "mappings": {
    "orders": {
      "properties": {
        "color": {
          "type": "keyword"
        },
        "make": {
          "type": "keyword"
        }
      }
    }
  }
}
POST /car/orders/_bulk
{ "index": {}}
{ "price" : 10000, "color" : "红", "make" : "本田", "sold" : "2014-10-28" }
{ "index": {}}
{ "price" : 20000, "color" : "红", "make" : "本田", "sold" : "2014-11-05" }
{ "index": {}}
{ "price" : 30000, "color" : "绿", "make" : "福特", "sold" : "2014-05-18" }
{ "index": {}}
{ "price" : 15000, "color" : "蓝", "make" : "丰田", "sold" : "2014-07-02" }
{ "index": {}}
{ "price" : 12000, "color" : "绿", "make" : "丰田", "sold" : "2014-08-19" }
{ "index": {}}
{ "price" : 20000, "color" : "红", "make" : "本田", "sold" : "2014-11-05" }
{ "index": {}}
{ "price" : 80000, "color" : "红", "make" : "宝马", "sold" : "2014-01-01" }
{ "index": {}}
{ "price" : 25000, "color" : "蓝", "make" : "福特", "sold" : "2014-02-12" }GET /car/orders/_search
{
"from": 0,
"size": 0, //为了不显示查询结果,不影响聚合
"aggs": {
"my_aggs_color": {//聚合起名
"terms": {//固定写法
"field": "color", //用什么字段来进行分组
"size": 10 //最多显示多少组
},
"aggs": {
"my_avg": {//给聚合函数起个名字
"avg": { //根据什么聚合函数来计算:avg max min
"field": "price" //什么字段来进行计算
}
}
}
}
}
}
(本文致谢王浩,我特别敬佩的大神,浩哥。)