Recently, Spring boot and docker are particularly hot. Today, we will use dockerfile-maven-plugin to introduce how to build a spring boot project that can run independently on docker. In order to get closer to the actual battle, we will expand the demonstration of the example with Alibaba Cloud container image service.
- step 1 Create a standard Spring boot project
Generate a spring boot project based on the official spring boot template (url see https://start.spring.io), as follows.
lwk@qwfys:~/Public/project/com/qwfys/dockfile-sample$ tree
.
├── mvnw
├── mvnw.cmd
├── pom.xml
├── README.md
└── src
    ├── main
    │   ├── java
    │   │   └── com
    │   │       └── qwfys
    │   │           └── sample
    │   │               └── docker
    │   │                   └── file
    │   │                       ├── DockfileSampleApplication.java
    │   │                       └── UserController.java
    │   └── resources
    │       ├── application.properties
    │       ├── static
    │       └── templates
    └── test
        └── java
            └── com
                └── qwfys
                    └── sample
                        └── docker
                            └── file
                                └── DockfileSampleApplicationTests.java

18 directories, 9 files
lwk@qwfys:~/Public/project/com/qwfys/dockfile-sample$
The project directory structure is shown above.
The content of the project object model file pom.xml is as follows.
<?xml version="1.0" encoding="UTF-8"?>
<project xmlns="http://maven.apache.org/POM/4.0.0" xmlns:xsi="http://www.w3.org/2001/XMLSchema-instance"
         xsi:schemaLocation="http://maven.apache.org/POM/4.0.0 https://maven.apache.org/xsd/maven-4.0.0.xsd">
    <modelVersion>4.0.0</modelVersion>

    <parent>
        <groupId>org.springframework.boot</groupId>
        <artifactId>spring-boot-starter-parent</artifactId>
        <version>2.2.2.RELEASE</version>
        <relativePath/>
    </parent>

    <groupId>com.qwfys.sample</groupId>
    <artifactId>dockerfile-sample</artifactId>
    <version>0.0.1-SNAPSHOT</version>

    <name>dockerfile-sample</name>
    <description>dockerfile project for Spring Boot</description>

    <properties>
        <java.version>1.8</java.version>
    </properties>

    <dependencies>
        <dependency>
            <groupId>org.springframework.boot</groupId>
            <artifactId>spring-boot-starter-web</artifactId>
        </dependency>

        <dependency>
            <groupId>org.springframework.boot</groupId>
            <artifactId>spring-boot-devtools</artifactId>
            <scope>runtime</scope>
            <optional>true</optional>
        </dependency>
        <dependency>
            <groupId>org.projectlombok</groupId>
            <artifactId>lombok</artifactId>
            <optional>true</optional>
        </dependency>
        <dependency>
            <groupId>org.springframework.boot</groupId>
            <artifactId>spring-boot-starter-test</artifactId>
            <scope>test</scope>
            <exclusions>
                <exclusion>
                    <groupId>org.junit.vintage</groupId>
                    <artifactId>junit-vintage-engine</artifactId>
                </exclusion>
            </exclusions>
        </dependency>
    </dependencies>

    <build>
        <finalName>${project.name}</finalName>
        <plugins>
            <plugin>
                <groupId>org.springframework.boot</groupId>
                <artifactId>spring-boot-maven-plugin</artifactId>
            </plugin>
        </plugins>
    </build>
</project>
The content of the file named DockfileSampleApplication.java is as follows.
package com.qwfys.sample.docker.file;

import org.springframework.boot.SpringApplication;
import org.springframework.boot.autoconfigure.SpringBootApplication;

@SpringBootApplication
public class DockfileSampleApplication {

    public static void main(String[] args) {
        SpringApplication.run(DockfileSampleApplication.class, args);
    }

}
The file UserController.java is as follows.
package com.qwfys.sample.docker.file;

import org.springframework.web.bind.annotation.GetMapping;
import org.springframework.web.bind.annotation.RestController;

@RestController
public class UserController {

    @GetMapping("/")
    public String home() {
        return "Docker says \"China loves you!\"";
    }
}
The file DockfileSampleApplicationTests.java is as follows.
package com.qwfys.sample.docker.file;

import org.junit.jupiter.api.Test;
import org.springframework.boot.test.context.SpringBootTest;

@SpringBootTest
class DockfileSampleApplicationTests {

    @Test
    void contextLoads() {
    }

}
- step 2 Configure Alibaba Cloud Container Image Service
Create a fixed password for Alibaba Cloud Container Image Service

Fill in the password. After the password is set, you will use these passwords next.

Namespaces are used to logically divide different docker images into different groups. First, we start creating a namespace called qwfys.

After the namespace is created, we create a warehouse for each docker image for a specific purpose. The warehouse can be private or public, depending on the actual use.
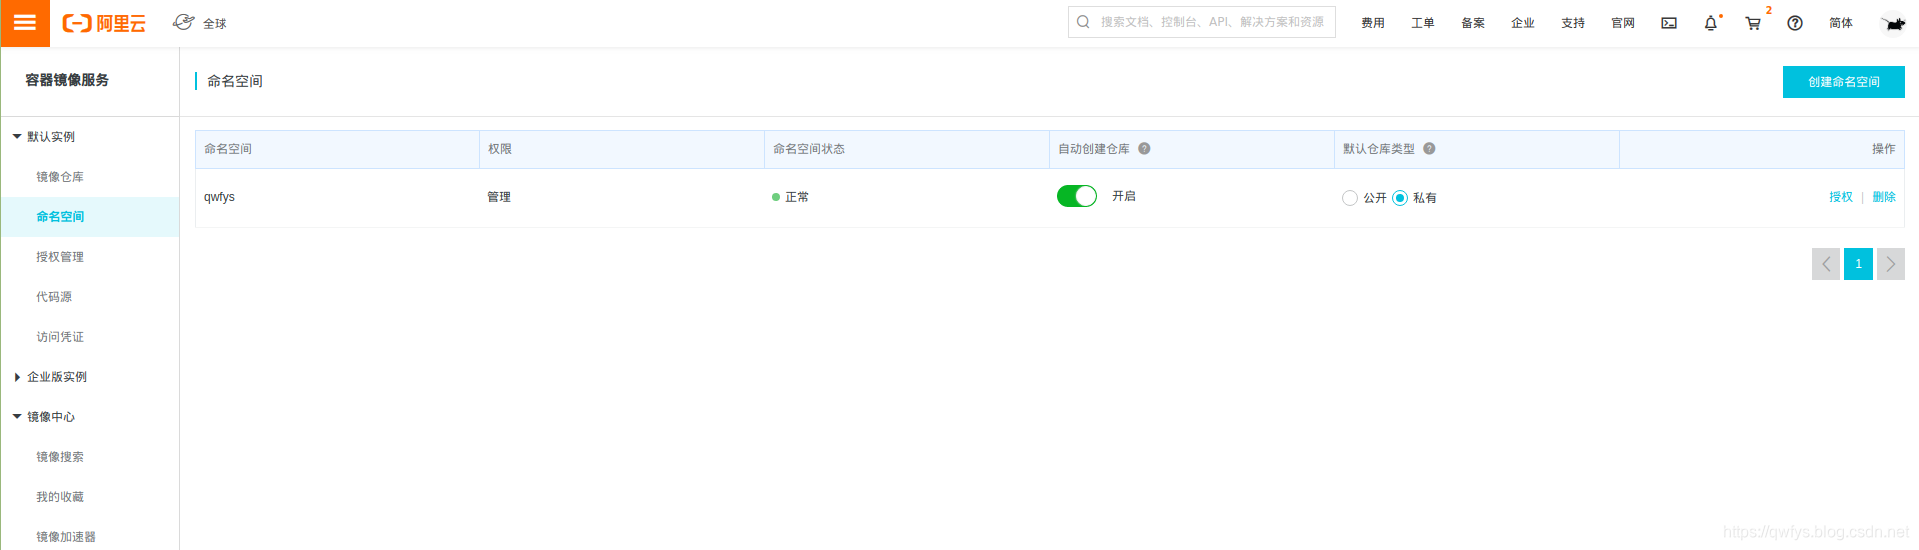
Next, we create a private docker image named dockfile-sample to help us complete the next example demonstration

Code warehouse type, we choose local warehouse.
Local warehouse created successfully.

Entering the newly created docker image warehouse, we see that it is empty. In the picture below, we can clearly see the relevant examples of how to use Alibaba Cloud docker image to mirror the warehouse.

- step 3 Integrated dockerfile-maven-plugin
First, we create a file named Dockerfile in the location of the same directory as pom.xml in the project, as follows.
FROM java:8
VOLUME /tmp
ARG JAR_FILE
ADD ${JAR_FILE} app.jar
RUN bash -c 'touch /app.jar'
EXPOSE 8080
ENTRYPOINT ["java", "-Djava.security.egd=file:/dev/./urandom","-jar", "/app.jar"]
Second, we edit the file pom.xml, find the tag named properties, and append the following to it.
    <properties>
        <java.version>1.8</java.version>
        <docker.image.prefix>registry.cn-hangzhou.aliyuncs.com/qwfys</docker.image.prefix>
        <docker.tag.version>1.0.0.release</docker.tag.version>
    </properties>
Third, we found the tag named plugins in the file pom.xml and appended the following content to it.
<plugin>
    <groupId>com.spotify</groupId>
    <artifactId>dockerfile-maven-plugin</artifactId>
    <version>1.4.13</version>
    <configuration>
        <repository>${docker.image.prefix}/${project.build.finalName}</repository>
        <tag>${docker.tag.version}</tag>
        <buildArgs>
            <JAR_FILE>target/${project.build.finalName}.jar</JAR_FILE>
        </buildArgs>
        <useMavenSettingsForAuth>true</useMavenSettingsForAuth>
    </configuration>
</plugin>
Fourth, we found the tag named build in the file pom.xml, and traced the following content behind it.
<repositories>
    <repository>
        <id>aliyun-docker</id>
        <url>registry.cn-hangzhou.aliyuncs.com</url>
    </repository>
</repositories>
Finally, let’s take a look at the contents of the complete pom.xml.
<?xml version="1.0" encoding="UTF-8"?>
<project xmlns="http://maven.apache.org/POM/4.0.0" xmlns:xsi="http://www.w3.org/2001/XMLSchema-instance"
         xsi:schemaLocation="http://maven.apache.org/POM/4.0.0 https://maven.apache.org/xsd/maven-4.0.0.xsd">
    <modelVersion>4.0.0</modelVersion>

    <parent>
        <groupId>org.springframework.boot</groupId>
        <artifactId>spring-boot-starter-parent</artifactId>
        <version>2.2.2.RELEASE</version>
        <relativePath/>
    </parent>

    <groupId>com.qwfys.sample</groupId>
    <artifactId>dockerfile-sample</artifactId>
    <version>0.0.1-SNAPSHOT</version>

    <name>dockerfile-sample</name>
    <description>dockerfile project for Spring Boot</description>

    <properties>
        <java.version>1.8</java.version>
        <docker.image.prefix>registry.cn-hangzhou.aliyuncs.com/qwfys</docker.image.prefix>
        <docker.tag.version>1.0.0.release</docker.tag.version>
    </properties>

    <dependencies>
        <dependency>
            <groupId>org.springframework.boot</groupId>
            <artifactId>spring-boot-starter-web</artifactId>
        </dependency>

        <dependency>
            <groupId>org.springframework.boot</groupId>
            <artifactId>spring-boot-devtools</artifactId>
            <scope>runtime</scope>
            <optional>true</optional>
        </dependency>
        <dependency>
            <groupId>org.projectlombok</groupId>
            <artifactId>lombok</artifactId>
            <optional>true</optional>
        </dependency>
        <dependency>
            <groupId>org.springframework.boot</groupId>
            <artifactId>spring-boot-starter-test</artifactId>
            <scope>test</scope>
            <exclusions>
                <exclusion>
                    <groupId>org.junit.vintage</groupId>
                    <artifactId>junit-vintage-engine</artifactId>
                </exclusion>
            </exclusions>
        </dependency>
    </dependencies>

    <build>
        <finalName>${project.name}</finalName>
        <plugins>
            <plugin>
                <groupId>org.springframework.boot</groupId>
                <artifactId>spring-boot-maven-plugin</artifactId>
            </plugin>
            <plugin>
                <groupId>com.spotify</groupId>
                <artifactId>dockerfile-maven-plugin</artifactId>
                <version>1.4.13</version>
                <configuration>
                    <repository>${docker.image.prefix}/${project.build.finalName}</repository>
                    <tag>${docker.tag.version}</tag>
                    <buildArgs>
                        <JAR_FILE>target/${project.build.finalName}.jar</JAR_FILE>
                    </buildArgs>
                    <useMavenSettingsForAuth>true</useMavenSettingsForAuth>
                </configuration>
            </plugin>
        </plugins>
    </build>

    <repositories>
        <repository>
            <id>aliyun-docker</id>
            <url>registry.cn-hangzhou.aliyuncs.com</url>
        </repository>
    </repositories>

</project>
I have to say that we also need to find the maven configuration file setttngs.xml and edit it. This file is usually located in the .m2 directory of the user directory, that is, ~ / .m2 / settins.xml.
        <server>
            <id>aliyun-docker</id>
            <username>[email protected]</username>
            <password>*******</password>
            <configuration>
                <email>[email protected]</email>
            </configuration>
        </server>
Congratulations, everything is in place, let’s start the last crazy, oh ye.
- step 4 Build a docker image and push it to the private repository of the aliyun container image service image.
mvn clean install dockerfile:build dockerfile:push

- step 5 Run from the image checked out in the Alibaba Cloud docker private image repository
lwk@qwfys:~$ ssh [email protected]
Last login: Wed Jan  1 21:30:23 2020 from 192.168.3.223
[root@xtwj84 ~]# docker login [email protected] registry.cn-hangzhou.aliyuncs.com
Password:
WARNING! Your password will be stored unencrypted in /root/.docker/config.json.
Configure a credential helper to remove this warning. See
https://docs.docker.com/engine/reference/commandline/login/#credentials-store

Login Succeeded
[root@xtwj84 ~]# docker run -d --name dockerfile-sample -p 17829:8080 registry.cn-hangzhou.aliyuncs.com/qwfys/dockerfile-sample:1.0.0.release
Unable to find image 'registry.cn-hangzhou.aliyuncs.com/qwfys/dockerfile-sample:1.0.0.release' locally
1.0.0.release: Pulling from qwfys/dockerfile-sample
7448db3b31eb: Pull complete
c36604fa7939: Pull complete
29e8ef0e3340: Pull complete
a0c934d2565d: Pull complete
a360a17c9cab: Pull complete
cfcc996af805: Pull complete
2cf014724202: Pull complete
4bc402a00dfe: Pull complete
769f94f99cb0: Pull complete
2ead78f8f5b4: Pull complete
Digest: sha256:4a876dfa89f42a0f9a666235d8534055734d71bd39c48d75dc1af92171bfaf53
Status: Downloaded newer image for registry.cn-hangzhou.aliyuncs.com/qwfys/dockerfile-sample:1.0.0.release
0b30f5149dc4c8f12a2146e3c259ff1d2fc360dba32fc13bf7781ac69b9b6e43
[root@xtwj84 ~]# docker ps -a
CONTAINER ID        IMAGE                                                                     COMMAND                  CREATED             STATUS              PORTS                     NAMES
0b30f5149dc4        registry.cn-hangzhou.aliyuncs.com/qwfys/dockerfile-sample:1.0.0.release   "java -Djava.securit…"   8 seconds ago       Up 6 seconds        0.0.0.0:17829->8080/tcp   dockerfile-sample
[root@xtwj84 ~]#
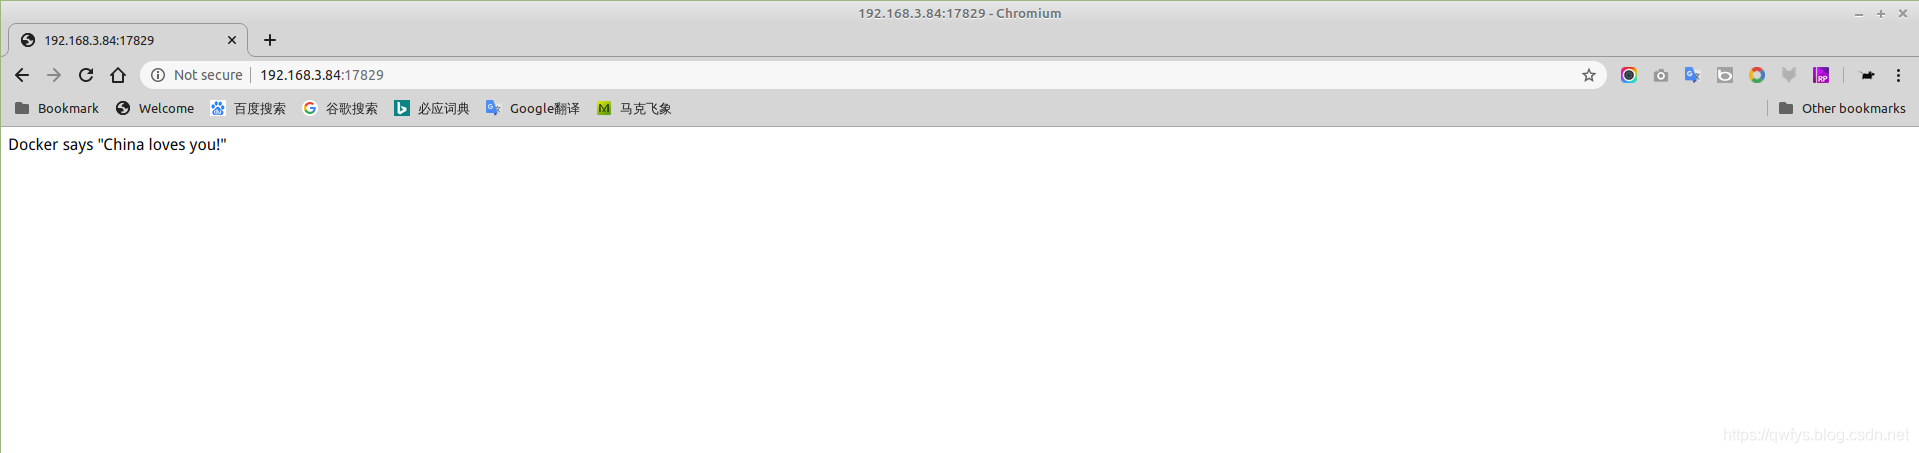
Open your browser and enter http://192.168.3.84:17829/, you will see the Docker says "China loves you!" string displayed on the page, indicating that the project has started normally.
- Reference
