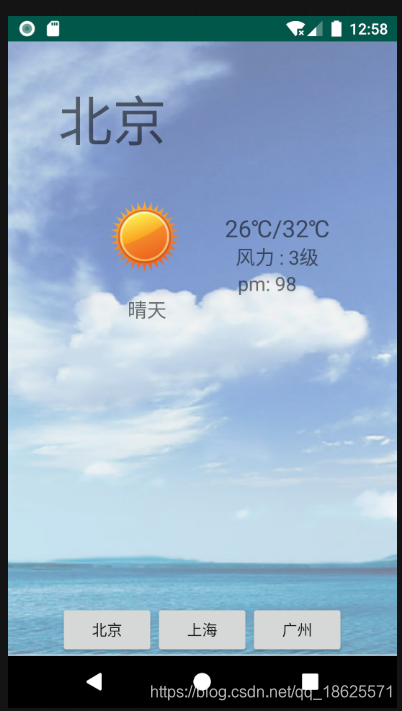
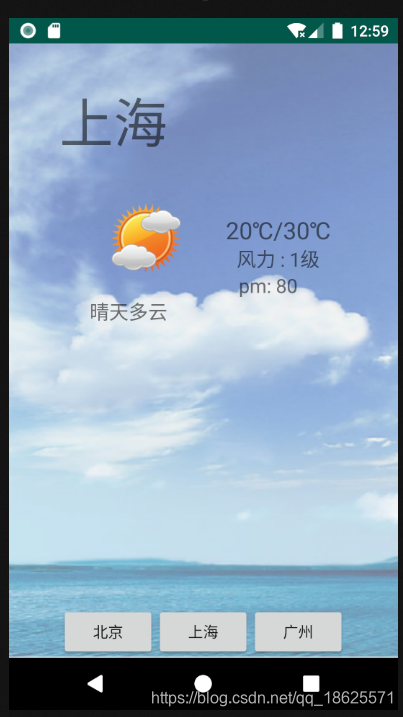
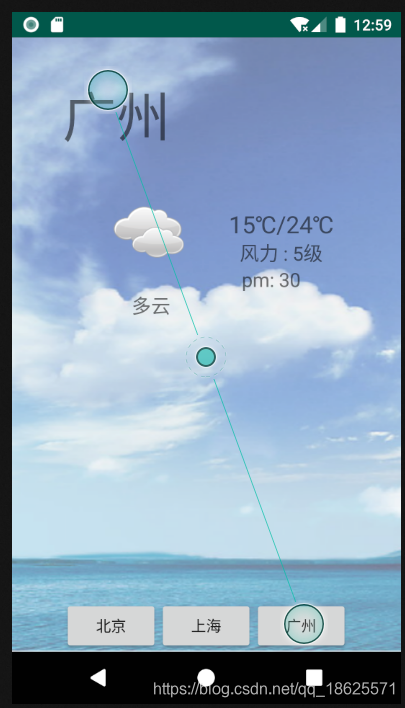
背景:解析天气预报的xml文件,在模拟器显示
解析前准备
layout目录下weather.xml
<?xml version="1.0" encoding="utf-8"?>
<RelativeLayout xmlns:android="http://schemas.android.com/apk/res/android"
    xmlns:tools="http://schemas.android.com/tools"
    android:layout_width="match_parent"
    android:layout_height="match_parent"
    android:background="@drawable/beijing2"
    tools:context=".MainActivity">

    <TextView
        android:id="@+id/tv_city"
        android:layout_width="wrap_content"
        android:layout_height="wrap_content"
        android:layout_alignEnd="@+id/tv_weather"
        android:layout_alignRight="@+id/tv_weather"
        android:layout_alignParentTop="true"
        android:layout_marginTop="39dp"
        android:text="上海"
        android:textSize="50sp" />

    <ImageView
        android:id="@+id/iv_icon"
        android:layout_width="70dp"
        android:layout_height="70dp"
        android:layout_below="@+id/tv_city"
        android:layout_alignStart="@+id/ll_btn"
        android:layout_alignLeft="@+id/ll_btn"
        android:layout_marginStart="44dp"
        android:layout_marginLeft="44dp"
        android:layout_marginTop="42dp"
        android:paddingBottom="5dp"
        android:src="@mipmap/ic_launcher" />

    <TextView
        android:id="@+id/tv_weather"
        android:layout_width="wrap_content"
        android:layout_height="wrap_content"
        android:layout_below="@+id/iv_icon"
        android:layout_alignRight="@+id/iv_icon"
        android:layout_marginTop="18dp"
        android:layout_marginRight="15dp"
        android:gravity="center"
        android:text="多云"
        android:textSize="18sp" />

    <LinearLayout
        android:layout_width="wrap_content"
        android:layout_height="wrap_content"
        android:layout_alignTop="@+id/iv_icon"
        android:layout_marginStart="39dp"
        android:layout_marginLeft="39dp"
        android:layout_toEndOf="@+id/iv_icon"
        android:layout_toRightOf="@+id/iv_icon"
        android:gravity="center"
        android:orientation="vertical">

        <TextView
            android:id="@+id/tv_temp"
            android:layout_width="wrap_content"
            android:layout_height="wrap_content"
            android:layout_marginTop="10dp"
            android:gravity="center_vertical"
            android:text="-7℃"
            android:textSize="22sp" />

        <TextView
            android:id="@+id/tv_wind"
            android:layout_width="wrap_content"
            android:layout_height="wrap_content"
            android:text="风力:3级"
            android:textSize="18sp" />

        <TextView
            android:id="@+id/tv_pm"
            android:layout_width="73dp"
            android:layout_height="wrap_content"
            android:text="pm"
            android:textSize="18sp" />
    </LinearLayout>

    <LinearLayout
        android:id="@+id/ll_btn"
        android:layout_width="wrap_content"
        android:layout_height="wrap_content"
        android:layout_alignParentBottom="true"
        android:layout_centerHorizontal="true"
        android:orientation="horizontal">

        <Button
            android:id="@+id/btn_bj"
            android:layout_width="wrap_content"
            android:layout_height="wrap_content"
            android:text="北京" />

        <Button
            android:id="@+id/btn_sh"
            android:layout_width="wrap_content"
            android:layout_height="wrap_content"
            android:text="上海" />

        <Button
            android:id="@+id/btn_gz"
            android:layout_width="wrap_content"
            android:layout_height="wrap_content"
            android:text="广州" />
    </LinearLayout>
</RelativeLayout>
需要解析的文件:raw目录下的weather1.xml
<?xml version ="1.0" encoding ="utf-8"?>
<infos>
    <city id="sh">
        <temp>20℃/30℃</temp>
        <weather>晴天多云</weather>
        <name>上海</name>
        <pm>80</pm>
        <wind>1级</wind>
    </city>
    <city id="bj">
        <temp>26℃/32℃</temp>
        <weather>晴天</weather>
        <name>北京</name>
        <pm>98</pm>
        <wind>3级</wind>
    </city>
    <city id="gz">
        <temp>15℃/24℃</temp>
        <weather>多云</weather>
        <name>广州</name>
        <pm>30</pm>
        <wind>5级</wind>
    </city>
</infos>
WeatherBean.java
package com.example.ch4;

public class WeatherBean {
    private String id;
    private String temp;
    private String weather;
    private String name;
    private String pm;
    private String wind;

    public String getId() {
        return id;
    }

    public void setId(String id) {
        this.id = id;
    }

    public String getTemp() {
        return temp;
    }

    public void setTemp(String temp) {
        this.temp = temp;
    }

    public String getWeather() {
        return weather;
    }

    public void setWeather(String weather) {
        this.weather = weather;
    }

    public String getName() {
        return name;
    }

    public void setName(String name) {
        this.name = name;
    }

    public String getPm() {
        return pm;
    }

    public void setPm(String pm) {
        this.pm = pm;
    }

    public String getWind() {
        return wind;
    }

    public void setWind(String wind) {
        this.wind = wind;
    }
}
MainActivity.java将weather1.xml解析到的信息映射到布局weather.xml中
//解析天气
public class MainActivity extends AppCompatActivity implements View.OnClickListener {
    private TextView tvCity;
    private TextView tvWeather;
    private TextView tvTemp;
    private TextView tvWind;
    private TextView tvPm;
    private ImageView ivIcon;
    private Map<String, String> map;
    private List<Map<String, String>> list;
    private String temp, weather, name, pm, wind;

    @Override
    protected void onCreate(Bundle savedInstanceState) {
        super.onCreate(savedInstanceState);
        setContentView(R.layout.weather);
        // 初始化文本控件
        initView();
        try {
            // 读取 weather1.xml 文件
            InputStream is = this.getResources().openRawResource(R.raw.weather1);
            // 把每个城市的天气信息集合存到 weatherInfos 中
//            List<WeatherInfo> weatherInfos = PULLUnit.getInfosFromXML(is);
//            List<WeatherInfo> weatherInfos = SAXContentHandler.parse(is);
            List<WeatherBean> weatherInfos = DOMUnit.parseXmlByDom(is);
            // 循环读取 weatherInfos 中的每一条数据
            list = new ArrayList<Map<String, String>>();
            for (WeatherBean info : weatherInfos) {
                map = new HashMap<String, String>();
                map.put("temp", info.getTemp());
                map.put("weather", info.getWeather());
                map.put("name", info.getName());
                map.put("pm", info.getPm());
                map.put("wind", info.getWind());
                list.add(map);
            }
        } catch (Exception e) {
            e.printStackTrace();
            Toast.makeText(this, "解析信息失败", Toast.LENGTH_SHORT).show();
        }
        // 自定义 getMap() 方法,显示天气信息到文本控件中,默认显示北京的天气
        getMap(1, R.drawable.wanzi);
    }

    private void initView() {
        tvCity = (TextView) findViewById(R.id.tv_city);
        tvWeather = (TextView) findViewById(R.id.tv_weather);
        tvTemp = (TextView) findViewById(R.id.tv_temp);
        tvWind = (TextView) findViewById(R.id.tv_wind);
        tvPm = (TextView) findViewById(R.id.tv_pm);
        ivIcon = (ImageView) findViewById(R.id.iv_icon);
        findViewById(R.id.btn_sh).setOnClickListener(this);
        findViewById(R.id.btn_bj).setOnClickListener(this);
        findViewById(R.id.btn_gz).setOnClickListener(this);
    }

    @Override
    public void onClick(View v) {
        // 按钮的点击事件
        switch (v.getId()) {
            case R.id.btn_sh:
                getMap(0, R.drawable.wanzi);
                break;
            case R.id.btn_bj:
                getMap(1, R.drawable.wanzi);
                break;
            case R.id.btn_gz:
                getMap(2, R.drawable.wanzi);
                break;
        }
    }

    // 将城市天气信息分条展示到界面上
    private void getMap(int number, int iconNumber) {
        Map<String, String> cityMap = list.get(number);
        temp = cityMap.get("temp");
        weather = cityMap.get("weather");
        name = cityMap.get("name");
        pm = cityMap.get("pm");
        wind = cityMap.get("wind");
        tvCity.setText(name);
        tvWeather.setText(weather);
        tvTemp.setText("" + temp);
        tvWind.setText("风力 : " + wind);
        tvPm.setText("pm: " + pm);
        ivIcon.setImageResource(iconNumber);
    }
}
PULL解析
PULL解析器的运行方式和SAX类似,都是基于事件的模式。不同的是,在PULL解析过程中,需要自己获取产生的事件然后做相应的操作,而不像SAX那样由处理器触发一种事件的方法,执行我们的代码。PULL解析器小巧轻便,解析速度快,简单易用,非常适合在Android移动设备中使用,Android系统内部在解析各种XML时也是用PULL解析器。
一个一个标签(tag)的去解析,至上而下解析到文件的末尾,因为xml文件里面的格式相似度高,可以用到while循环,没有解析到文件的末尾之前一直解析。
循环中要加上循环终止的条件的变化语句:type = parser.next()
解析完所有变量之后把常量置为null,节省内存,方便垃圾清理器回收对象。
步骤:
1.实例化解析器:XmlPullParser parser = Xml.newPullParser();
2.初始化解析器:parser.setInput(is, “utf-8”);
3.获取当前事件的类型通过循环解析标签
public class PULLUnit {
    // 解析 xml 文件返回天气信息的集合
    public static List<WeatherBean> getInfosFromXML(InputStream is) throws Exception {
        // 得到 pull 解析器
        XmlPullParser parser = Xml.newPullParser();
        // 初始化解析器 , 第一个参数代表包含 xml 的数据
        parser.setInput(is, "utf-8");
        List<WeatherBean> weatherInfos = null;
        WeatherBean weatherInfo = null;
        // 得到当前事件的类型
        int type = parser.getEventType();
        // END_DOCUMENT 文档结束标签
        while (type != XmlPullParser.END_DOCUMENT) {
            switch (type) {
                // 一个节点的开始标签
                case XmlPullParser.START_TAG:
                    // 解析到全局开始的标签 infos 根节点
                    if ("infos".equals(parser.getName())) {
                        weatherInfos = new ArrayList<WeatherBean>();
                    } else if ("city".equals(parser.getName())) {
                        weatherInfo = new WeatherBean();
                        String idStr = parser.getAttributeValue(0);
                        weatherInfo.setId(idStr);
                    } else if ("temp".equals(parser.getName())) {
                        //parset.nextText() 得到该 tag 节点中的内容
                        String temp = parser.nextText();
                        weatherInfo.setTemp(temp);
                    } else if ("weather".equals(parser.getName())) {
                        String weather = parser.nextText();
                        weatherInfo.setWeather(weather);
                    } else if ("name".equals(parser.getName())) {
                        String name = parser.nextText();
                        weatherInfo.setName(name);
                    } else if ("pm".equals(parser.getName())) {
                        String pm = parser.nextText();
                        weatherInfo.setPm(pm);
                    } else if ("wind".equals(parser.getName())) {
                        String wind = parser.nextText();
                        weatherInfo.setWind(wind);
                    }
                    break;
                // 一个节点结束的标签
                case XmlPullParser.END_TAG:
                    // 一个城市的信息处理完毕, city 的结束标签
                    if ("city".equals(parser.getName())) {
                        weatherInfos.add(weatherInfo);//把城市信息加到信息集合里面
                        weatherInfo = null;//清空数据,便于回收变量
                    }
                    break;
            }
            type = parser.next();
        }
        return weatherInfos;
    }
}
SAX解析
SAX(Simple API for XML)解析器是一种基于事件的解析器,它的核心是事件处理模式,主要是围绕着事件源以及事件处理器来工作的。当事件源产生事件后,调用事件处理器相应的处理方法,一个事件就可以得到处理。在事件源调用事件处理器中特定方法的时候,还要传递给事件处理器相应事件的状态信息,这样事件处理器才能够根据提供的事件信息来决定自己的行为。
简单地说就是对文档进行顺序扫描,当扫描到文档(document)开始与结束、元素(element)开始与结束、文档(document)结束等地方时通知事件处理函数,由事件处理函数做相应动作,然后继续同样的扫描,直至文档结束。
SAX解析器的优点是解析速度快,占用内存少。非常适合在Android移动设备中使用。
步骤:
1.自定义类去继承Android提供的ContextHandler接口的实现类DefaultHandler。
2.实例化一个SAXParserFactory对象:
SAXParserFactory factory = SAXParserFactory.newInstance();
3.通过factory对象获得一个SAXParser对象,该对象就称做SAX 解析器:
SAXParser saxParser = factory.newSAXParser();
4.saxParser对象调用parse方法解析XML文件:
saxParser.parse(File file,DefaultHandler dh);
5.ContextHandler接口常用方法解析
- startDocument() :读取文档开头时调用,可在此方法中进行预处理操作,比如:初始化bean类,或者容器
- startElement() : 开始标签时触发(此处获取属性值)
- characters() : 处理文件中读取到内容,即标签间内容
- endElment() : 结束标签时触(此处获取标签的文本值)
- endDocument() : 读取文档结束时调用,在此方法中进行结尾工作
public class SAXContentHandler extends DefaultHandler {

    private List<WeatherBean> WeatherList = new ArrayList<>();//解析集合
    private WeatherBean WeatherBean;//记录当前messageBean
    private String curTagName; //通过此变量,记录当前标签的名称

    /**
     * 提供给外部调用的方法
     *
     * @param inputStream 输入流
     * @return 解析的实体类集合
     */
    public static List<WeatherBean> parse(InputStream inputStream) {
        try {
            //创建SAXParserFactory解析工厂类
            SAXParserFactory factory = SAXParserFactory.newInstance();
            SAXContentHandler saxUtil = new SAXContentHandler();
            //实例化一个SAXParser解析类
            SAXParser saxParser = factory.newSAXParser();
            //开始解析文档
            //参数2:利用我们定义的handler进行解析输入的文档
            saxParser.parse(inputStream, saxUtil);
            return saxUtil.getUserBeanList();
        } catch (ParserConfigurationException e) {
            e.printStackTrace();
        } catch (SAXException e) {
            e.printStackTrace();
        } catch (IOException e) {
            e.printStackTrace();
        }

        return null;
    }

    private SAXContentHandler() {

    }

    private List<WeatherBean> getUserBeanList() {
        return WeatherList;
    }

    //开始解析文档,做初始化工作
    @Override
    public void startDocument() throws SAXException {
        super.startDocument();
        WeatherList = new ArrayList<>();
//        Log.e("messageInfo", "解析开始");
    }

    @Override
    public void startElement(String uri, String localName, String qName, Attributes attributes) throws SAXException {
        super.startElement(uri, localName, qName, attributes);
        if (qName.trim().equals("city")) {
            WeatherBean = new WeatherBean();
            WeatherBean.setName(qName.trim());
            //根据属性名拿到值
            String id = String.valueOf(attributes.getValue("id"));
            WeatherBean.setId(id);
        }
    }

    //获取元素值
    //解析字符
    @Override
    public void characters(char[] ch, int start, int length) throws SAXException {
        super.characters(ch, start, length);
        //根据char数组生产一个字符串
        curTagName = new String(ch, start, length);
    }

    //遍历结束标签
    @Override
    public void endElement(String uri, String localName, String qName) throws SAXException {
        super.endElement(uri, localName, qName);
        //解析子标签
        if (qName.trim().equals("city")) {
            //当一个用户被解析完,加入到集合中
            WeatherList.add(WeatherBean);
            WeatherBean = null;
        } else if (qName.trim().equals("id"))
            WeatherBean.setId(curTagName);
        else if (qName.trim().equals("temp"))
            WeatherBean.setTemp(curTagName);
        else if (qName.trim().equals("weather"))
            WeatherBean.setWeather(curTagName);
        else if (qName.trim().equals("name"))
            WeatherBean.setName(curTagName);
        else if (qName.trim().equals("pm"))
            WeatherBean.setPm(curTagName);
        else if (qName.trim().equals("wind"))
            WeatherBean.setWind(curTagName);
    }

    //文档结束
    @Override
    public void endDocument() throws SAXException {
        super.endDocument();
//        Log.e("messageInfo", "解析结束");
    }
}
DOM解析
DOM是基于树形结构的的节点或信息片段的集合,允许开发人员使用DOM API遍历XML树、检索所需数据。分析该结构通常需要加载整个文档和构造树形结构,然后才可以检索和更新节点信息。
由于DOM在内存中以树形结构存放,因此检索和更新效率会更高。但是对于特别大的文档,解析和加载整个文档将会很耗资源。
步骤:
1.建立DocumentBuilderFactor,用于获得DocumentBuilder对象:
DocumentBuilderFactory factory = DocumentBuilderFactory.newInstance();
2.建立DocumentBuidler:
DocumentBuilder builder = factory.newDocumentBuilder();
3.建立Document对象,获取树的入口:
Document doc = builder.parse(“xml文件的相对路径或者绝对路径”);
4.建立NodeList:
NodeList n1 = doc.getElementByTagName(“读取节点”);
5.进行xml信息获取
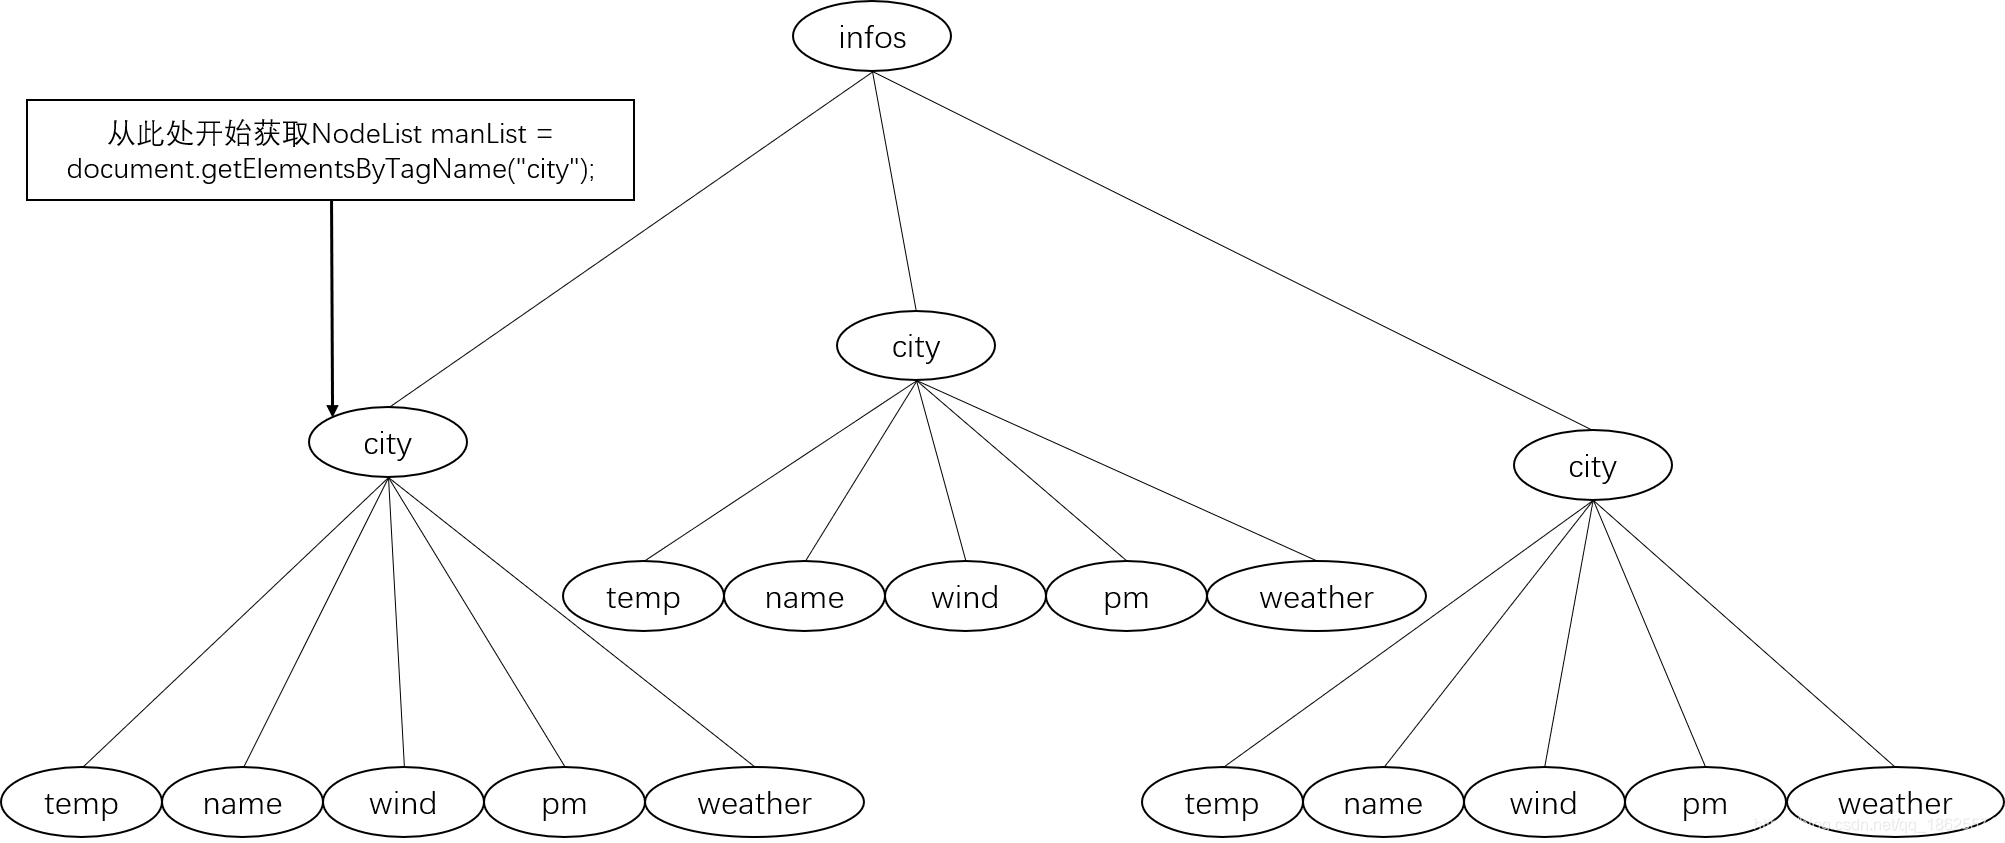
此时的List包含三个city节点
public class DOMUnit {

    /**
     * 根据dom解析XML文档
     *
     * @return 返回解析后的集合,可能为空
     * @paraminputStream需要解析的输入流
     */

    public static List<WeatherBean> parseXmlByDom(InputStream input) {
        List<WeatherBean> itList = new ArrayList<>();
        try {
            //一系列的初始化
            DocumentBuilderFactory factory = DocumentBuilderFactory.newInstance();
            DocumentBuilder builder = factory.newDocumentBuilder();
            //获得Document对象
            Document document = builder.parse(input);
            //获得List(本xml中就是根结点)
            NodeList manList = document.getElementsByTagName("city");
            //遍历标签
            for (int i = 0; i < manList.getLength(); i++) {
                //获得标签
                Node node = manList.item(i);
                //获得标签里面的标签
                NodeList childNodes = node.getChildNodes();
                //新建对象
                WeatherBean WeatherBean2 = new WeatherBean();
                //取出属性值
                String id = node.getAttributes().getNamedItem("id").getNodeValue();
                WeatherBean2.setId(id);

                //遍历city标签里面的标签
                for (int j = 0; j < childNodes.getLength(); j++) {
                    Node childNode = childNodes.item(j);
                    if ("temp".equals(childNode.getNodeName())) {
                        String temp = childNode.getTextContent();
                        WeatherBean2.setTemp(temp);
                    } else if ("weather".equals(childNode.getNodeName())) {
                        String weather = childNode.getTextContent();
                        WeatherBean2.setWeather(weather);
                    } else if ("name".equals(childNode.getNodeName())) {
                        String name = childNode.getTextContent();
                        WeatherBean2.setName(name);
                    } else if ("pm".equals(childNode.getNodeName())) {
                        String pm = childNode.getTextContent();
                        WeatherBean2.setPm(pm);
                    } else if ("wind".equals(childNode.getNodeName())) {
                        String wind = childNode.getTextContent();
                        WeatherBean2.setWind(wind);
                    }
                }
                //加到List中
                itList.add(WeatherBean2);
            }
        } catch (ParserConfigurationException | IOException |
                SAXException e) {
            e.printStackTrace();
        }
        return itList;
    }
}
结果
三种解析方式区别:
(1)
SAX解析器的优点是解析速度快,占用内存少。
DOM在内存中以树形结构存放,因此检索和更新效率会更高。但是对于特别大的文档,解析和加载整个文档将会很耗资源。
PULL解析器的运行方式和SAX类似,都是基于事件的模式。PULL解析器小巧轻便,解析速度快,简单易用。
(2)
DOM,它是生成一个树,有了树以后你搜索、查找都可以做。
SAX和PULL是基于流的,就是解析器从头到尾解析一遍xml文件,解析完了以后你不过想再查找重新解析。
SAX和PULL的区别:
(1)sax的原理是解析器解析过程中通过回调把tag/value值等传给你,你可以比较、操作。
而pull的原理是它只告诉你一个tag开始或者结束了,至于tag/value的值是什么需要你自己去向parser问,所以叫做pull,而sax看起来 是push给你的。
(2)如果在一个XML文档中我们只需要前面一部分数据,但是使用SAX方式或DOM方式会对整个文档进行解析,尽管XML文档中后面的大部分数据我们其实都不需要解析,因此这样实际上就浪费了处理资源。使用PULL方式正合适。
Pull解析器和SAX解析器虽有区别但也有相似性。他们的区别为:SAX解析器的工作方式是自动将事件推入注册的事件处理器进行处理,因此你不能控制事件的处理主动结束;而Pull解析器的工作方式为允许你的应用程序代码主动从解析器中获取事件,正因为是主动获取事件,因此可以在满足了需要的条件后不再获取事件,结束解析。也就是说pull是一个while循环,随时可以跳出,而sax不是,sax是只要解析了,就必须解析完成,在解析过程中在读取到特定tag时调用相应处理事件。这是他们主要的区别。
而他们的相似性在运行方式上,Pull解析器也提供了类似SAX的事件,开始文档START_DOCUMENT和结束文档END_DOCUMENT,开始元素START_TAG和结束元素END_TAG,遇到元素内容TEXT等,但需要调用next() 方法提取它们(主动提取事件)。
