sprigboot异步任务问题引入
线程的睡眠,导致加载不到下面的返回值,所以要用到异步任务
异步注解
- @EnableAsync
- @Async
@EnableAsync 加在springboot启动类中
@Async 加在方法中
异步简单应用代码
AsyncService代码
@Service
@Component	//@Service导包的地址可能导错,所以用@Component和@Service是一样的
public class AsyncService {

    //异步方法,需要添加异步注解
    @Async
    public void asynchronous() {
        try {
            Thread.sleep(5000);
        }catch (Exception e) {
            e.printStackTrace();
        }
        System.out.println("正在加载数据");
    }
}
AsyncController代码
@RestController
public class AsyncController {

    @Autowired
    private AsyncService asyncService;

    @RequestMapping("/async")
    public String asynchronous(){
        asyncService.asynchronous();
        return "hello asynchronous";
    }
}
AsynchronousApplication启动类代码
@EnableAsync		//开启异步任务
@SpringBootApplication
public class AsynchronousApplication {

    public static void main(String[] args) {
        SpringApplication.run(AsynchronousApplication.class, args);
    }

}
springboot异步任务的应用场景
- 发邮件
- 发信息
- app消息推送
- 定时任务
springboot发qq邮件
导入依赖
<!--        mail-->
        <dependency>
            <groupId>org.springframework.boot</groupId>
            <artifactId>spring-boot-starter-mail</artifactId>
        </dependency>
application.yml配置
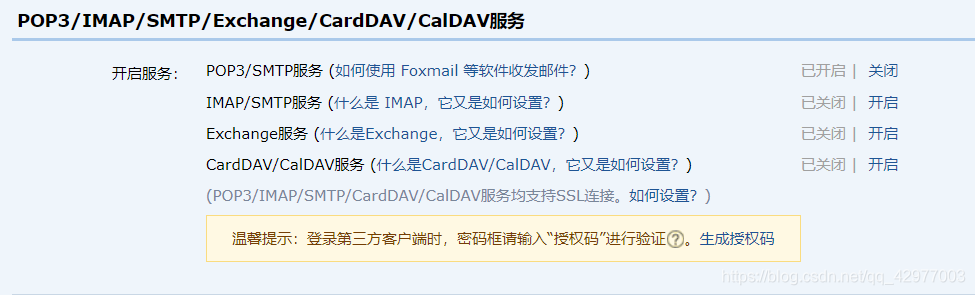
在qq邮箱账户开启邮件服务
spring:
  mail:
    username: 18225xxxxx@qq.ocm
    #授权码
    password: snuhtmpxqxyjdidf
    #视情况而定,网易smtp.163.com 新浪...
    host: smtp.qq.com
    properties:
      mail:
        stmp:
          ssl:
            enable: true
测试代码
简单点的邮件发送
import org.springframework.beans.factory.annotation.Autowired;
import org.springframework.boot.test.context.SpringBootTest;
import org.springframework.mail.SimpleMailMessage;
import org.springframework.mail.javamail.JavaMailSenderImpl;

@SpringBootTest
class AsynchronousApplicationTests {

    @Autowired
    JavaMailSenderImpl javaMailSender;

    @Test
    void contextLoads() {
        SimpleMailMessage mailMessage = new SimpleMailMessage();

        mailMessage.setSubject("klz");
        mailMessage.setText("测试sprinboot邮件发送");
        mailMessage.setTo("[email protected]");
        mailMessage.setFrom("[email protected]");

        javaMailSender.send(mailMessage);
    }

}
复杂点的邮件发送
 @Test
    void contextLoads2() {
        //复杂邮件
        MimeMessage mimeMailMessage = javaMailSender.createMimeMessage();

        try {
            MimeMessageHelper mimeMessageHelper = new MimeMessageHelper(mimeMailMessage, true, "utf-8");

            //主题
            mimeMessageHelper.setSubject("klz");

            StringBuffer stringBuffer = new StringBuffer();

            stringBuffer.append("<h3 style='color:hotpink'>测试sprinboot邮件发送</h3>")
                    .append("<p style='color:green'>hello this only a example!</p>");

            //文本
            mimeMessageHelper.setText(stringBuffer.toString(),true);

            //获取文件路径的两种方式
            //第一种
            //Resource resource = new ClassPathResource("static/haha.gif");
            //File sourceFile =  resource.getFile();
            // 有些系统提示找不到资源,可以把上面的代码换成下面这句:
            ClassPathResource resource = new ClassPathResource("static/haha.gif");
            System.out.println(resource.getURL());
            File sourceFile =  resource.getFile();
            System.out.println(sourceFile.getAbsolutePath());

            //第二种
            //File file = ResourceUtils.getFile("classpath:static/haha.gif");
            //System.out.println(file.getAbsolutePath());

            //附件
//            mimeMessageHelper.addAttachment("aa.png", new File(file.getAbsolutePath()));
            mimeMessageHelper.addAttachment("aa.png", sourceFile);
            mimeMessageHelper.setTo("[email protected]");
            mimeMessageHelper.setFrom("[email protected]");

            //发送
            javaMailSender.send(mimeMailMessage);
        }catch (Exception e) {
            e.printStackTrace();
        }
    }
效果
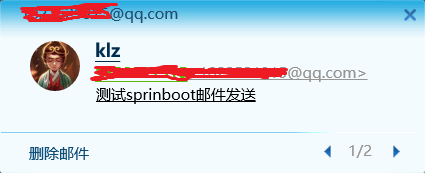
简单邮件发送截图
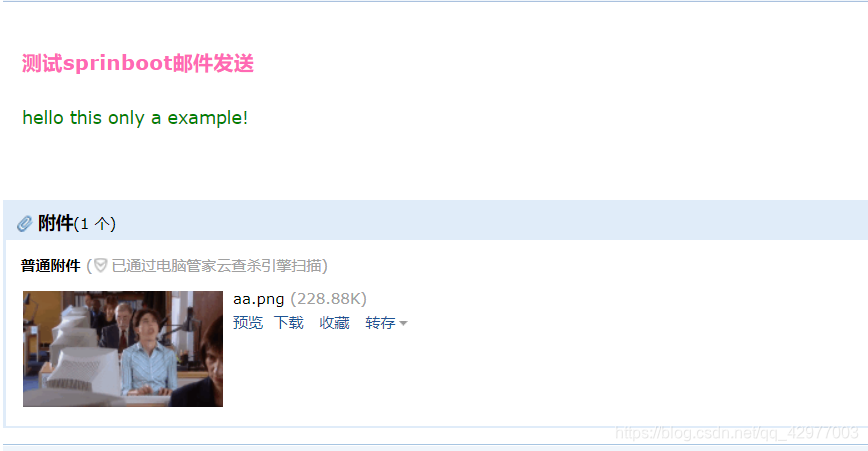
复杂(相对上一个)邮件发送截图
发信息
springboot问题引入
- 怎么发短信?
- 发短信必须用第三方接口吗?
回答: https://zhidao.baidu.com/question/1452646173341952780.html
阿里云短信教程
导入依赖
Java SDK文档:https://help.aliyun.com/document_detail/66496.html?spm=a2c1g.8271268.10000.119.772fdf25aDJoI0
找一个第三方发短信的接口,这里用的是阿里的
<!--       message-->
        <dependency>
            <groupId>com.aliyun</groupId>
            <artifactId>aliyun-java-sdk-core</artifactId>
            <version>4.4.6</version>
        </dependency>
        <dependency>
            <groupId>com.aliyun</groupId>
            <artifactId>aliyun-java-sdk-ecs</artifactId>
            <version>4.17.6</version>
        </dependency>
        <dependency>
            <groupId>org.json</groupId>
            <artifactId>json</artifactId>
            <version>20190722</version>
        </dependency>
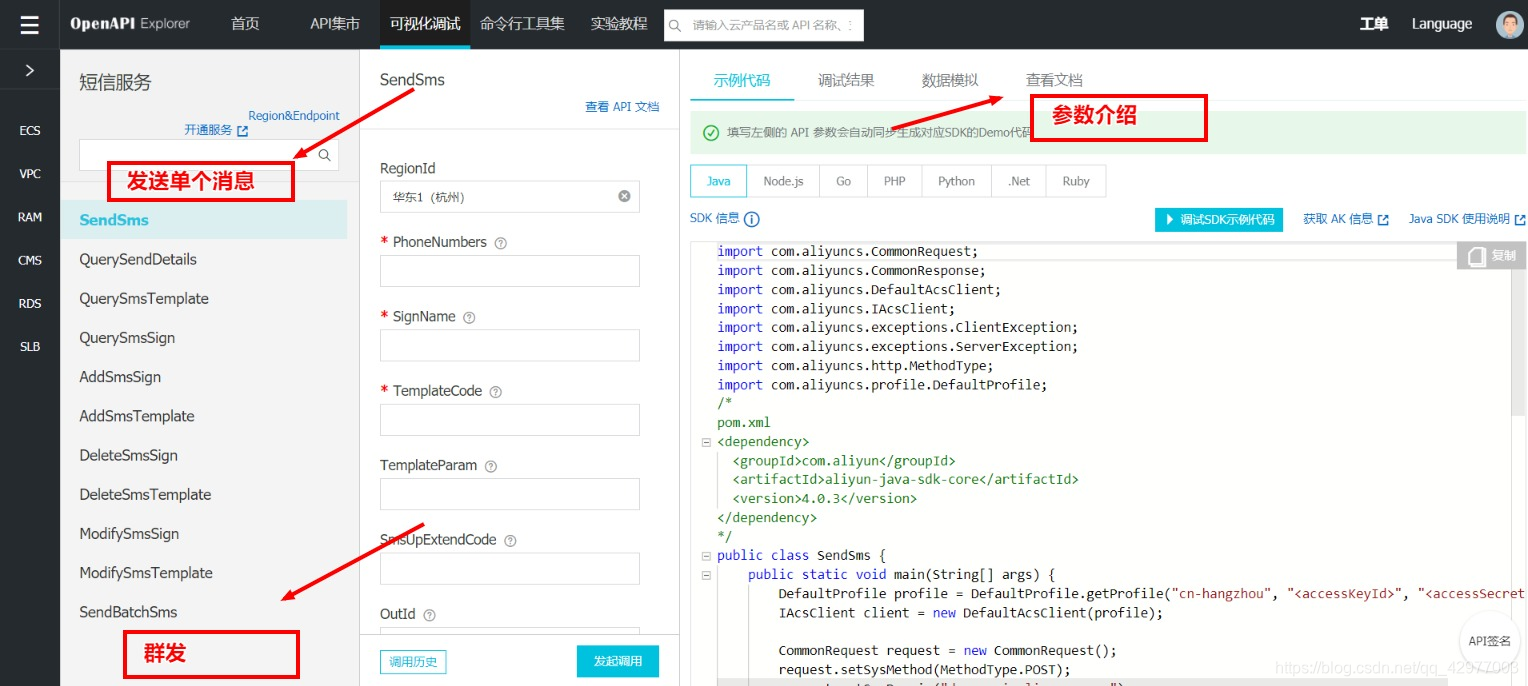
教程
Java SDK文档:https://help.aliyun.com/document_detail/66496.html?spm=a2c1g.8271268.10000.119.772fdf25aDJoI0
签名和消息模板审核完成才可以使用


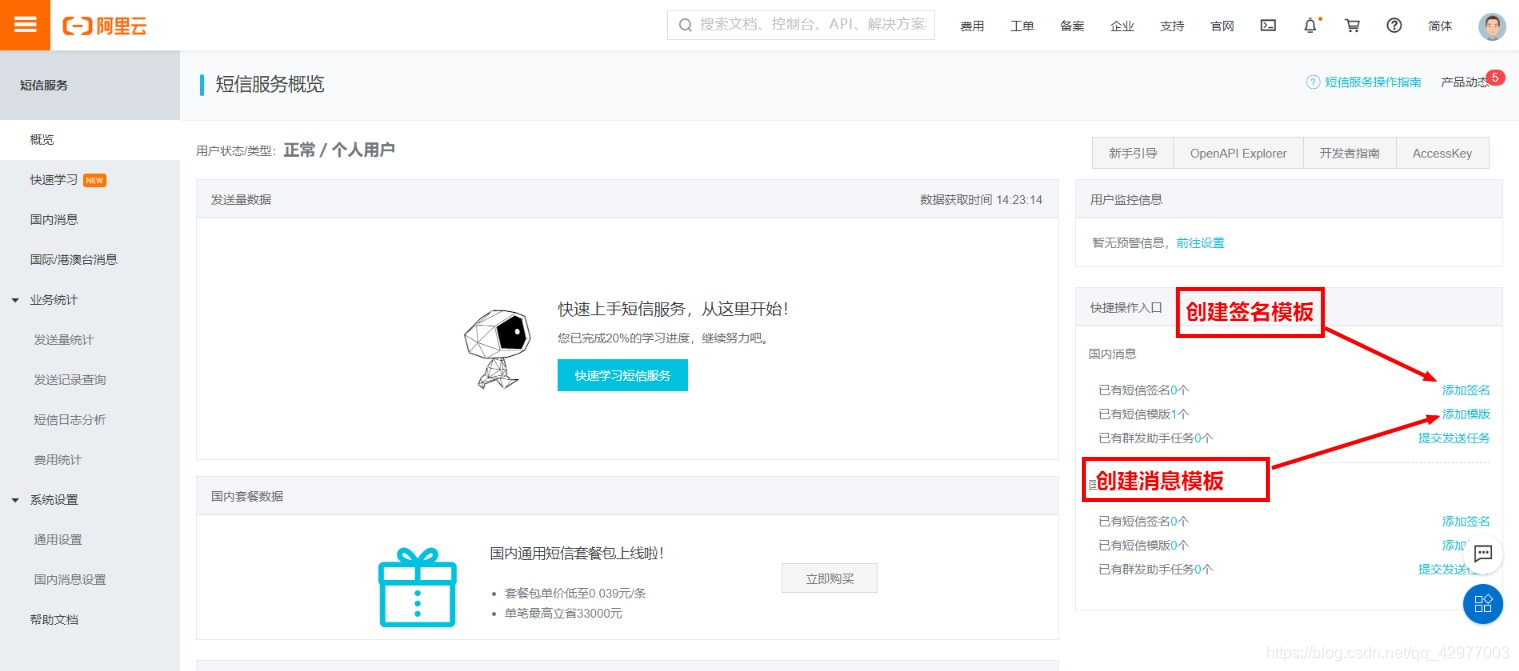

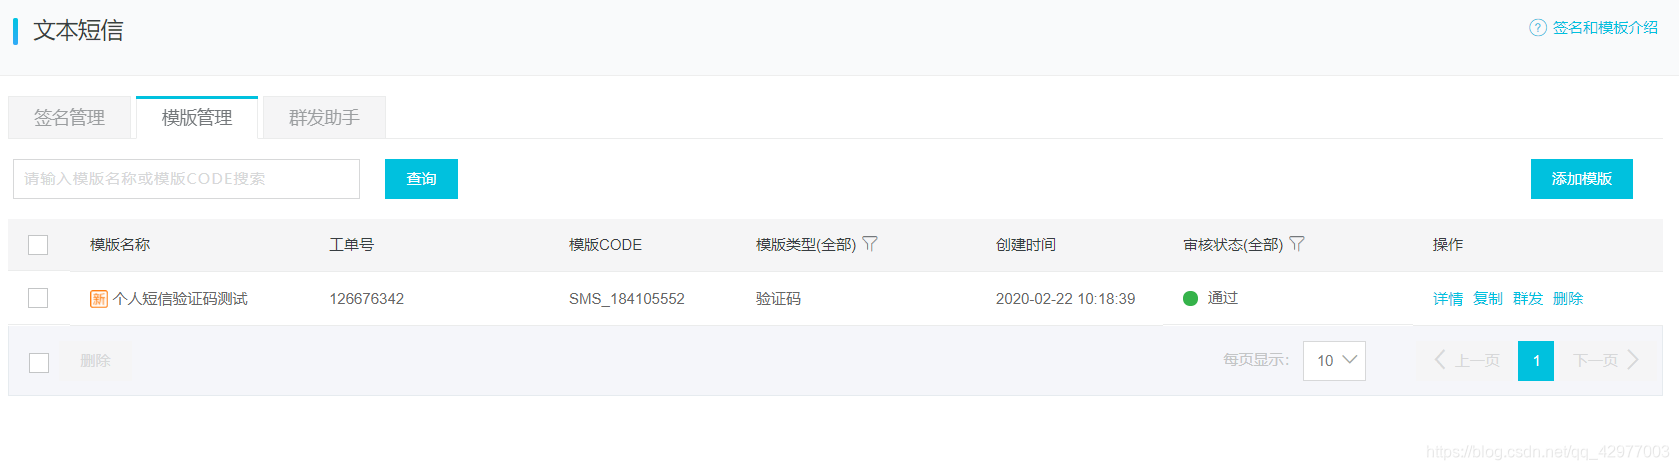
信息模板审核
信息模板一般容易通过审核
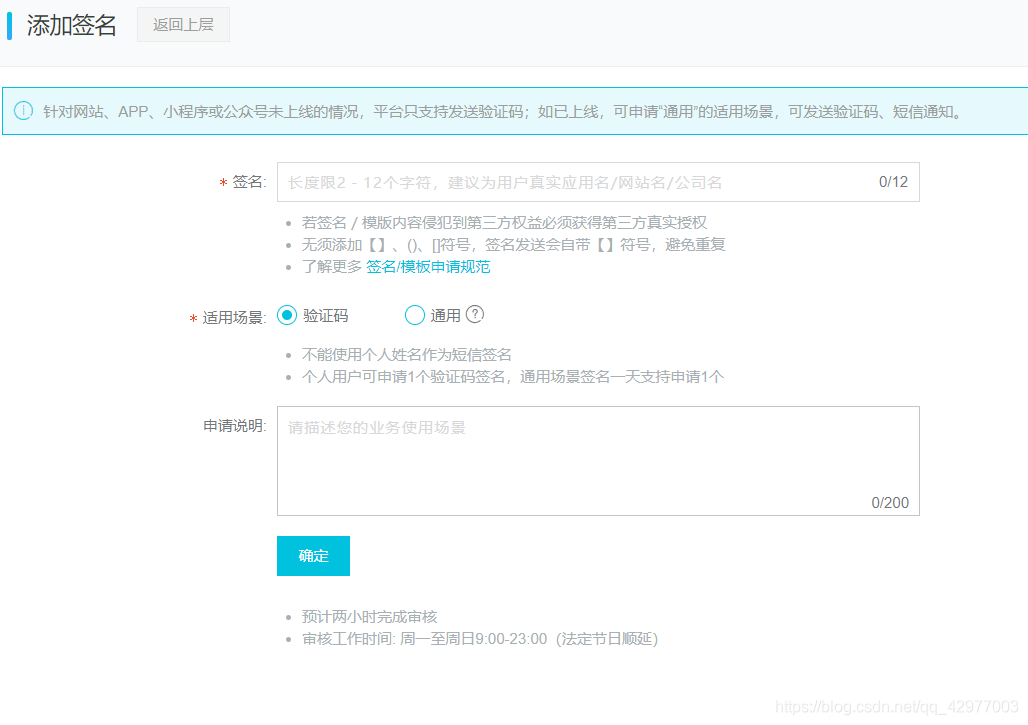
签名名称审核
签名名称,最好讲出你做的东西的名称,我搞了很多次,都审核失败了。申请说明写的有礼貌点,这个是人审核的。

代码
更换自己的AccessKey ID 和 Access Key Secret 和手机号
package com.example.asynchronous.controller;
import com.aliyuncs.CommonRequest;
import com.aliyuncs.CommonResponse;
import com.aliyuncs.DefaultAcsClient;
import com.aliyuncs.IAcsClient;
import com.aliyuncs.exceptions.ClientException;
import com.aliyuncs.exceptions.ServerException;
import com.aliyuncs.http.MethodType;
import com.aliyuncs.profile.DefaultProfile;
import com.example.asynchronous.config.RestTemplateConfig;
import org.springframework.beans.factory.annotation.Autowired;
import org.springframework.web.bind.annotation.RequestMapping;
import org.springframework.web.bind.annotation.RestController;
import java.util.Random;

@RestController
public class SendMessageController {
    @Autowired
    private RestTemplateConfig restTemplateConfig;

    //可以进行一下封装,因为实际情况是传入手机号当作参数
    @RequestMapping("/sendMessage")
    public String sendMessagefOne() {
        //将阿里云的代码考过来,当然也可以将代码放到service中,通过controller调用
        //更换自己的AccessKey ID 和 	Access Key Secret 和 电话号
        DefaultProfile profile = DefaultProfile.getProfile("cn-hangzhou", AccessKey ID, Access Key Secret);
        IAcsClient client = new DefaultAcsClient(profile);
        CommonRequest request = new CommonRequest();

        request.setSysMethod(MethodType.POST);
        request.setSysDomain("dysmsapi.aliyuncs.com"); //第三方网址
        request.setSysVersion("2017-05-25");        //版本
        request.setSysAction("SendSms");            //定值
        request.putQueryParameter("RegionId", "cn-hangzhou");
        request.putQueryParameter("PhoneNumbers", "1837100xxxx");   //手机号
        request.putQueryParameter("SignName", "个人短信验证码");    //签名
        //验证码
        request.putQueryParameter("TemplateCode", "SMS_184105552"); //模板code
        String code = randomUtils();        //获取6位的0-9随机数
        request.putQueryParameter("TemplateParam", "{\"code\":\""+code+"\"}");
        //可选-上行短信扩展码(扩展码字段控制在7位或以下,无特殊需求用户请忽略此字段)
//        request.putQueryParameter("SmsUpExtendCode", "90999");
        //可选:outId为提供给业务方扩展字段,最终在短信回执消息中将此值带回给调用者
        request.putQueryParameter("OutId", "klz");

        try {
            CommonResponse response = client.getCommonResponse(request);
            System.out.println(response.getData());
        } catch (ServerException e) {
            e.printStackTrace();
        } catch (ClientException e) {
            e.printStackTrace();
        }

        return "信息发送成功!";
    }

    //随机数
    public String randomUtils() {
        String code = "";
        Random r = new Random();
        for(int i = 0; i <= 5; i++) {
            code += r.nextInt(9);
        }
        return code;
    }

}
结果
{
	"Message": "账户余额不足",
	"RequestId": "B838DED4-6061-4680-9AA0-64B122782496",
	"Code": "isv.AMOUNT_NOT_ENOUGH"
}


没钱,没法继续了,但是大体应该是这样子的!
其他短信发送
网址
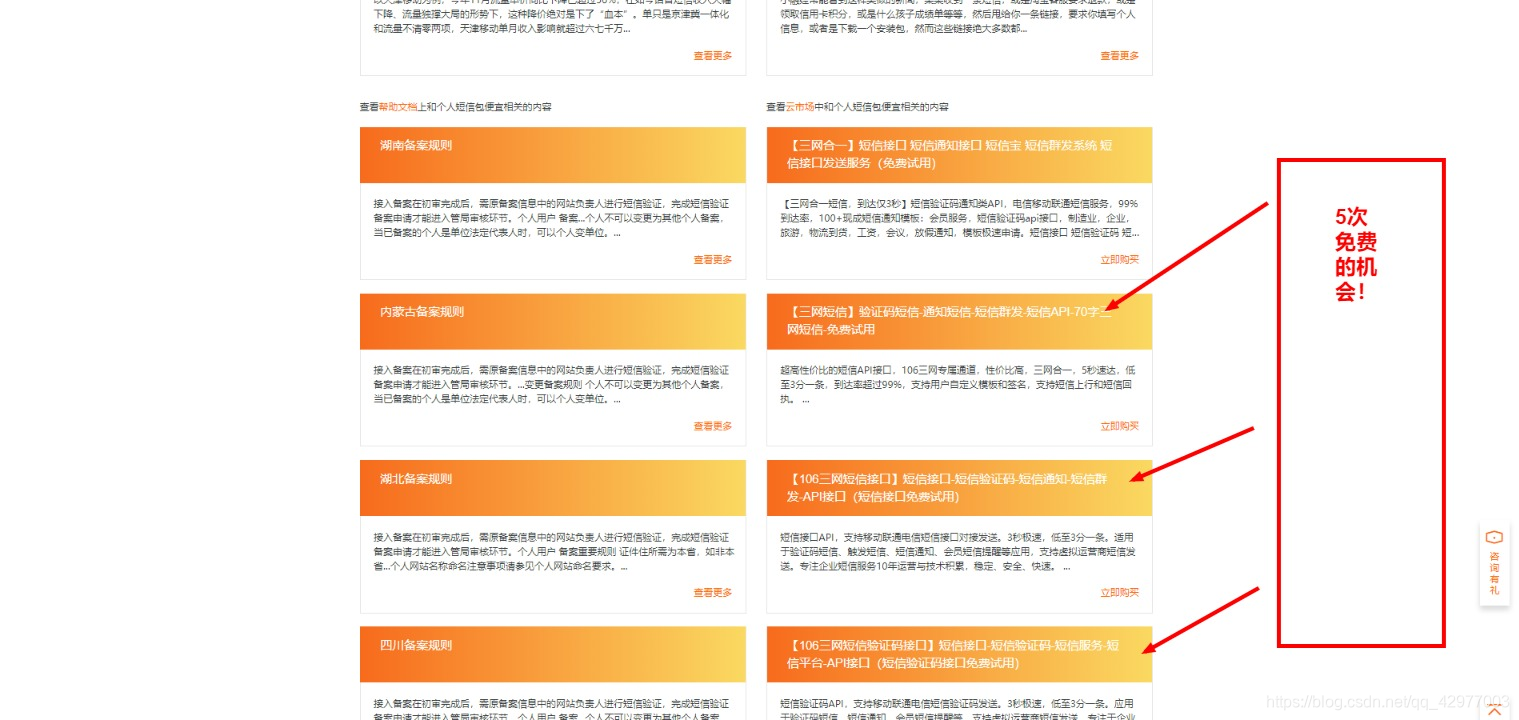
三网短信
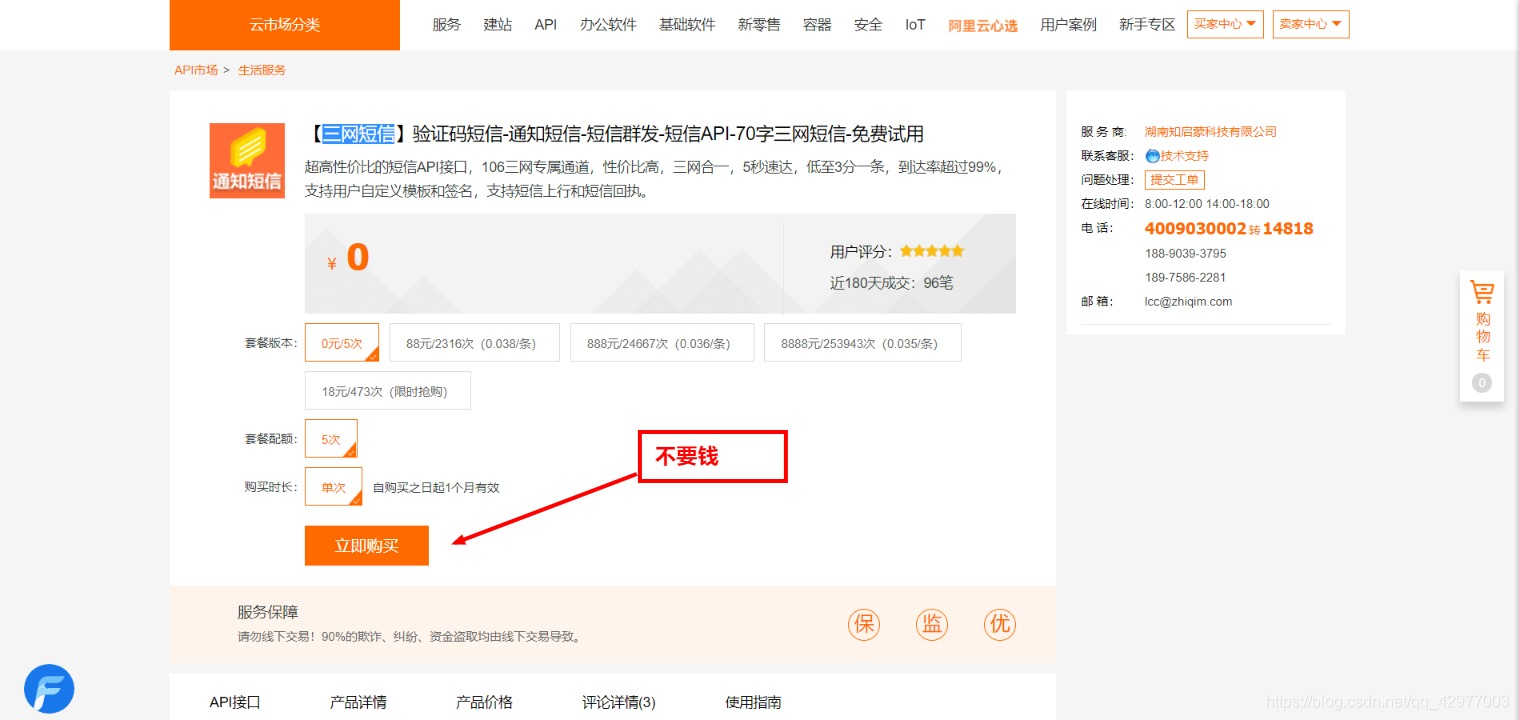

测试
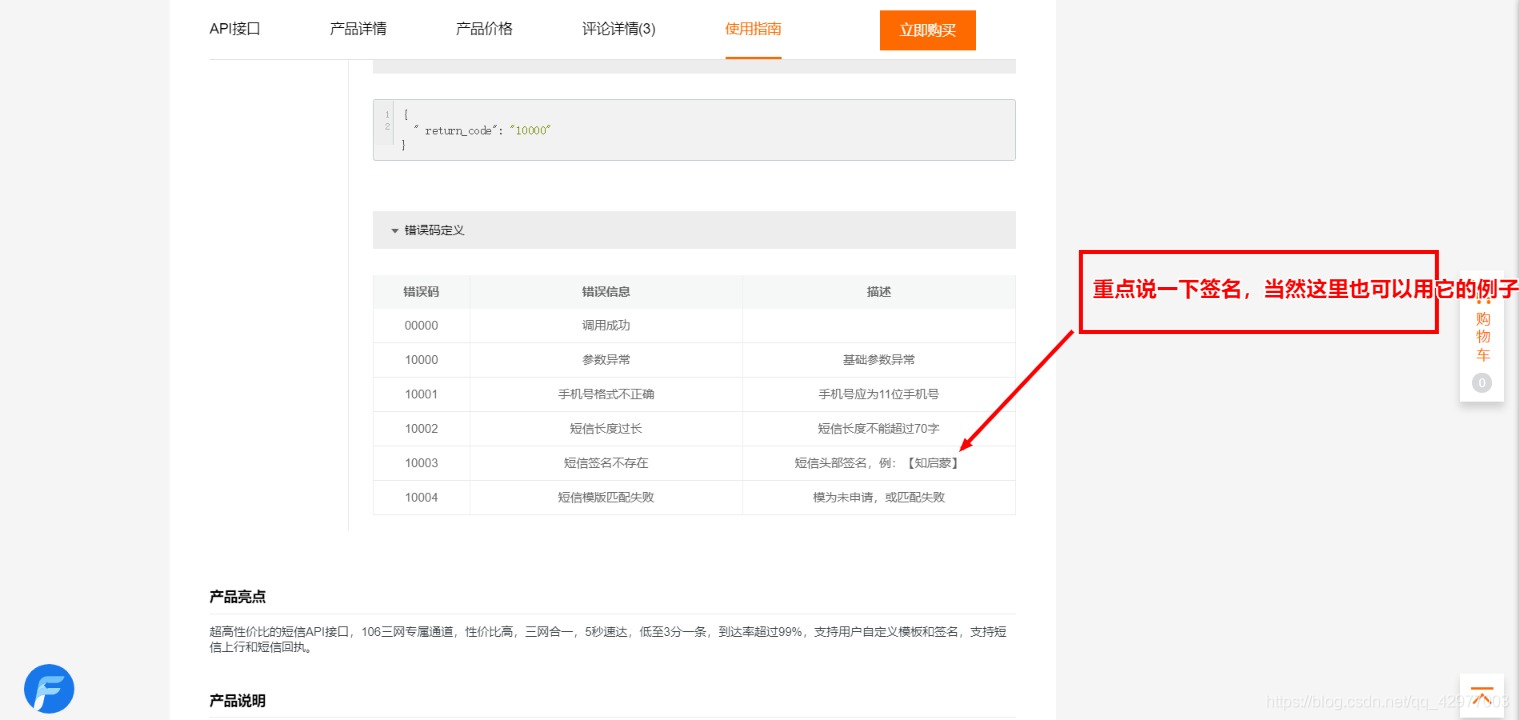
在这里加签名,不然会出错,【xxx】内容,我在这跳了个坑

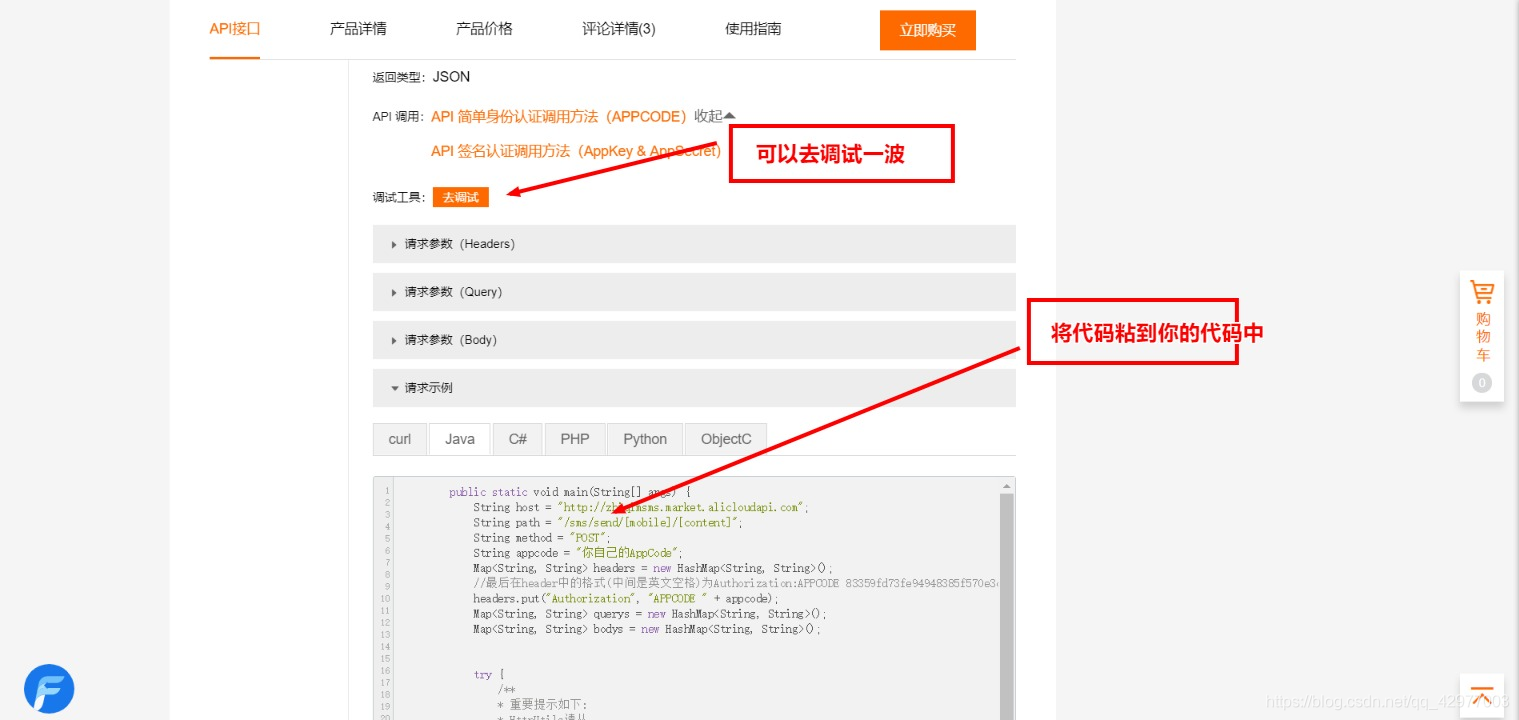
代码
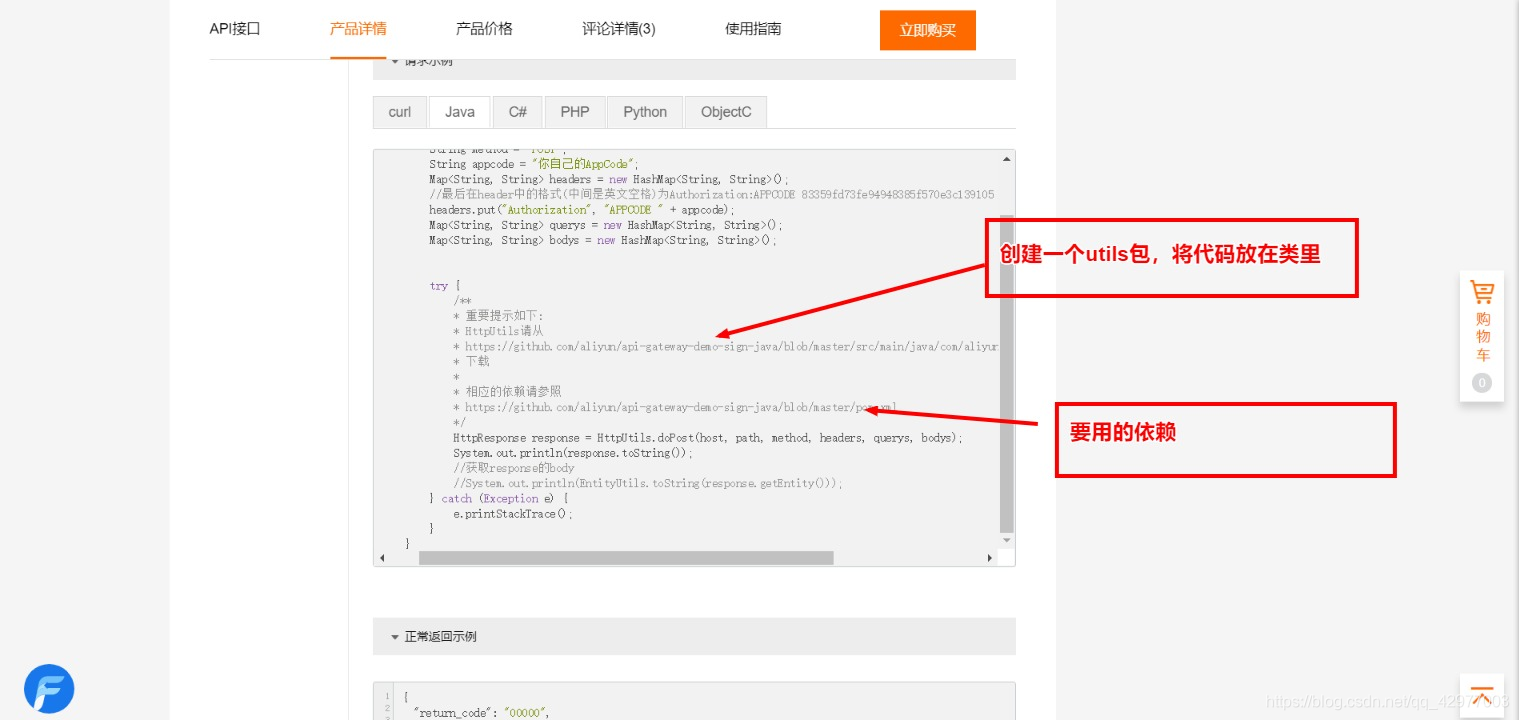
依赖
 <dependency>
            <groupId>org.apache.httpcomponents</groupId>
            <artifactId>httpclient</artifactId>
            <version>4.2.1</version>
        </dependency>
        <dependency>
            <groupId>org.apache.httpcomponents</groupId>
            <artifactId>httpcore</artifactId>
            <version>4.2.1</version>
        </dependency>
        <dependency>
            <groupId>commons-lang</groupId>
            <artifactId>commons-lang</artifactId>
            <version>2.6</version>
        </dependency>
把下面这代码放到一个controller类下就行了
//随机数
    public String randomUtils() {
        String code = "";
        Random r = new Random();
        for(int i = 0; i <= 5; i++) {
            code += r.nextInt(9);
        }
        return code;
    }

    @RequestMapping("/sendMessage2")
    public String sendMessage() {
        String host = "http://zhiqimsms.market.alicloudapi.com";
        String code = randomUtils();        //获取6位的0-9随机数
        String path = "/sms/send/1837100xxx/【短信测试的验证码】:"+code;
        String method = "POST";
        String appcode = "086b38f3adc141e1b4b1f38be584eac6";
        Map<String, String> headers = new HashMap<String, String>();
        //最后在header中的格式(中间是英文空格)为Authorization:APPCODE 83359fd73fe94948385f570e3c139105
        headers.put("Authorization", "APPCODE " + appcode);
        Map<String, String> querys = new HashMap<String, String>();
        Map<String, String> bodys = new HashMap<String, String>();


        try {
            /**
             * 重要提示如下:
             * HttpUtils请从
             * https://github.com/aliyun/api-gateway-demo-sign-java/blob/master/src/main/java/com/aliyun/api/gateway/demo/util/HttpUtils.java
             * 下载
             *
             * 相应的依赖请参照
             * https://github.com/aliyun/api-gateway-demo-sign-java/blob/master/pom.xml
             */
            HttpResponse response = HttpUtils.doPost(host, path, method, headers, querys, bodys);
            System.out.println(response.toString());
            //获取response的body
            //System.out.println(EntityUtils.toString(response.getEntity()));
        } catch (Exception e) {
            e.printStackTrace();
        }

        return "发送信息成功";
    }
大家只有5次的机会,谨慎使用!
springboot定时任务
corn表达式
corn百度百科:https://baike.baidu.com/item/cron/10952601?fr=aladdin
corn表达式参考文档:https://www.cnblogs.com/dubhlinn/p/10740838.html
这里只写了一部分
- M: 分钟(0-59)。
- H:小时(0-23)。
- D:天(1-31)。
- m: 月(1-12)。
- d: 一星期内的天(0~7,0和7均为星期天)。
| 意义 | 表达式 |
|---|---|
| 每隔10秒钟执行一次 | */10 * * * * ? |
| 每隔5分钟执行一次 | 0 */5 * * * ? |
| 每天1点执行一次 | 0 0 1 * * ? |
| 每天24点执行一次 | 0 0 24 * * ? |
| 每月最后一天24点执行一次 | 0 0 24 L * ? |
| 每月最后一个周五,每隔2小时执行一次 | 0 0 */2 ? * 6L |
| 每月的第三个星期五上午10:15执行一次 | 0 15 10 ? * 5#3 |
| 在每天下午2点到下午2:05期间的每1分钟执行 | 0 0-5 14 * * ? |
| 每月的第三个星期五上午10:20执行一次 | 0 20 10 ? * 6#3 |
| 每分钟的第10秒与第20秒都会执行 | 10,20 * * * * ? |
定时任务代码
AsynchronousApplication启动类代码
import org.springframework.boot.SpringApplication;
import org.springframework.boot.autoconfigure.SpringBootApplication;
import org.springframework.scheduling.annotation.EnableAsync;
import org.springframework.scheduling.annotation.EnableScheduling;

@EnableAsync            //开启异步任务
@EnableScheduling       //开启定时任务
@SpringBootApplication
public class AsynchronousApplication {

    public static void main(String[] args) {
        SpringApplication.run(AsynchronousApplication.class, args);
    }
}
ScheduleService代码
import org.springframework.scheduling.annotation.Scheduled;
import org.springframework.stereotype.Service;

@Service
public class ScheduleService {

    //指定时间执行指定任务
    //corn表达式
    //"秒域 分域 时域 日域 月域 周域 年域"
    @Scheduled(cron = "40 0 9 * * 0-7")
    public void taskSchedule() {
        System.out.println("执行定时任务!");
    }
}
例子
链接:https://pan.baidu.com/s/18EkyaIe7acdpqvWVB8wgyw
提取码:fysx
