文章目录
代码地址:github-spring-cloud地址
前言:本篇文章在上一篇文章基础上进行修改,因为虽然我们做到了利用一个消息总线触发刷新,而刷新所有客户端配置的目的,但是这种方式并不合适。原因有两点:
1、破坏了微服务各节点的对等性,2、如果客户端ip有变化,这时我们就需要修改WebHook的配置。
上篇文章的架构模式稍微改变一下(图片来源网络)
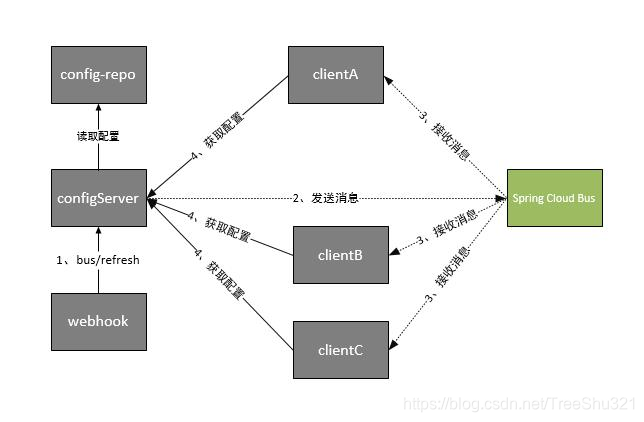
这时Spring Cloud Bus做配置更新步骤如下:
- 提交代码触发post给Server端发送bus/refresh
- Server端接收到请求并发送给Spring Cloud Bus
- Spring Cloud bus接到消息并通知给其它客户端
- 其它客户端接收到通知,请求Server端获取最新配置
- 全部客户端均获取到最新的配置
项目示例
config-server-bug
pom文件
<?xml version="1.0" encoding="UTF-8"?>
<project xmlns="http://maven.apache.org/POM/4.0.0"
         xmlns:xsi="http://www.w3.org/2001/XMLSchema-instance"
         xsi:schemaLocation="http://maven.apache.org/POM/4.0.0 http://maven.apache.org/xsd/maven-4.0.0.xsd">
    <parent>
        <artifactId>spring-cloud-learn</artifactId>
        <groupId>com.sl.learn.cloud</groupId>
        <version>1.0-SNAPSHOT</version>
    </parent>
    <modelVersion>4.0.0</modelVersion>

    <groupId>com.sl.learn.cloud</groupId>
    <artifactId>config-server-bus</artifactId>
    <version>1.0-SNAPSHOT</version>

    <dependencies>
        <dependency>
            <groupId>org.springframework.cloud</groupId>
            <artifactId>spring-cloud-starter-netflix-eureka-client</artifactId>
        </dependency>
        <dependency>
            <groupId>org.springframework.cloud</groupId>
            <artifactId>spring-cloud-starter-bus-amqp</artifactId>
        </dependency>
        <dependency>
            <groupId>org.springframework.boot</groupId>
            <artifactId>spring-boot-starter-web</artifactId>
        </dependency>
        <dependency>
            <groupId>org.springframework.boot</groupId>
            <artifactId>spring-boot-starter-actuator</artifactId>
        </dependency>
        <!-- https://mvnrepository.com/artifact/org.springframework.cloud/spring-cloud-starter-netflix-hystrix -->
        <dependency>
            <groupId>org.springframework.cloud</groupId>
            <artifactId>spring-cloud-config-server</artifactId>
        </dependency>

    </dependencies>

</project>
配文文件application.properties
spring.application.name=config-server-bus
server.port=8088
eureka.client.serviceUrl.defaultZone=http://localhost:8080/eureka/
spring.cloud.config.server.git.uri=https://github.com/FadeHub/SpringCloudConfig
spring.cloud.config.server.git.searchPaths=repo
spring.cloud.config.label=master
spring.cloud.config.username=
spring.cloud.config.password=

management.endpoints.web.exposure.include= *
management.endpoint.health.show-details= always
management.endpoint.shutdown.enabled= true
info.app.name =  spring-boot-actuator
info.app.version =  1.0.0
info.app.test =  test


## 开启消息跟踪
spring.cloud.bus.trace.enabled=true

spring.rabbitmq.host=localhost
spring.rabbitmq.port=5672
spring.rabbitmq.username=guest
spring.rabbitmq.password=guest
启动类Application
@SpringBootApplication
@RestController
@RefreshScope
@EnableEurekaClient
@EnableConfigServer
@EnableDiscoveryClient
public class ConfigServerBusApplication {

    public static void main(String[] args) {
        SpringApplication.run(ConfigServerBusApplication.class,args);
    }

}
依次启动eureka,config-serve-bus,config-client。
按照上篇的测试方式,访问客户端测试均可以正确返回信息。同样修改配置文件,将值改为:hello config server bus update并提交到仓库中。在win10下使用下面命令来模拟webhook。
curl -v -X POST http://localhost:8088/actuator/refresh
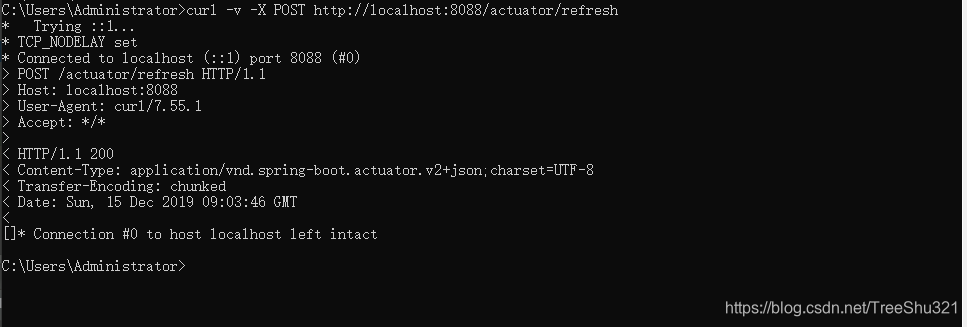
执行完成后,访问客户端,返回:hello config server bus update
