白天基本泡在机房,自己电脑基本用不到,到了晚上回去用还需要用U盘把自己的程序拷回去,又悲催的发现自己用的机房里的那台电脑所有的USB接口都不能用了,估计是USB模块与主板的接点断掉了,啥插上去都没反应。。。mmp。。。。
于是想到了用云盘同步代码,机房网速虽然不咋滴,同步代码还是可以的。
百度云盘有同步功能,但是要会员才能用,毕竟带宽是宝贵的,不花钱肯定不能分给你。。。
而玩游戏从来不花一分钱的我唯有自力更生,想要自己搭一个云盘,去阿里云上9块9租了一个学生机,又刚好看到论坛上有搭建nextcloud的教程点击打开链接,便按照他的教程一步一步来,可能是软件版本升级的问题或者环境问题,有几步被卡住。又查了好多资料,终于搭建成功。
环境:centos7 64位
1.首先要安装nginx和php7-fpm
在开始安装 Nginx 和 php7-fpm 之前,我们还学要先添加 EPEL 包的仓库源。使用如下命令:
yum -y install epel-release现在开始从 EPEL 仓库来安装 Nginx:
yum -y install nginx
然后就是安装 PHP7-FPM 以及 Nextcloud 需要的一些包。
yum -y install php70w-fpm php70w-cli php70w-gd php70w-mcrypt php70w-mysql php70w-pear php70w-xml php70w-mbstring php70w-pdo php70w-json php70w-pecl-apcu php70w-pecl-apcu-devel
最后,从服务器终端里查看 PHP 的版本号,以便验证 PHP 是否正确安装。
php -v
2.配置php7-fpm
在这一个步骤中,我们将配置 php-fpm 与 Nginx 协同运行。Php7-fpm 将使用 nginx 用户来运行,并监听9000 端口。
使用 vim 编辑默认的 php7-fpm 配置文件。
vim /etc/php-fpm.d/www.conf
user
和
group
赋值为
nginx
。
在第 22 行,确保 php-fpm 运行在指定端口。
listen = 127.0.0.1:9000
保存文件并退出 vim 编辑器。
下一步,就是在 /var/lib/ 目录下创建一个新的文件夹 session,并将其拥有者变更为 nginx 用户。
然后启动 php-fpm 和 Nginx,并且将它们设置为随开机启动的服务。
PHP7-FPM 配置完成
3.安装和配置MariaDB(之前没用过这个数据库,查了查资料 ,说是开发mysql的团队开发的,使用起来与mysql并无太大差别,看其他教程也有使用mysql安装)
可以直接使用 yum 命令从 CentOS 默认远程仓库中安装mariadb-server 包。
yum -y install mariadb mariadb-server
现在开始配置 MariaDB 的 root 用户密码。
mysql_secure_installation
键入 Y ,然后设置 MariaDB 的 root 密码。(注意这一块要先按一下Y,之前没用过mariadb,还以为要我输入密码 ,愣是搞了半天
 )
)
这样就设置好了密码,现在登录到 mysql shell 并为 Nextcloud 创建一个新的数据库和用户。这里我创建名为nextcloud_db 的数据库以及名为 nextclouduser 的用户,用户密码为 nextclouduser@。当然了,要给你自己的系统选用一个更安全的密码。(建议直接改为自己设置的用户名和密码)
mysql -u root -p
输入 MariaDB 的 root 密码,即可登录 mysql shell。
输入以下 mysql 查询语句来创建新的数据库和用户。
nextcloud_db 数据库和 nextclouduser 数据库用户创建完成。
4.为 Nextcloud 生成一个自签名 SSL 证书
注意这里的SSL证书是自签名的,所以当你使用https连接时,会提醒你该站点证书不合法,勾选忽略或选择信任继续前往该站点就可以了。如果想要获取合法的证书,可以在阿里云上免费申请。
这里我使用 OpenSSL 来创建自己的自签名 SSL 证书。
为 SSL 文件创建新目录:
mkdir -p /etc/nginx/cert/
如下,使用 openssl 生成一个新的 SSL 证书。
openssl req -new -x509 -days 365 -nodes -out /etc/nginx/cert/nextcloud.crt -keyout /etc/nginx/cert/nextcloud.key
最后使用 chmod 命令将所有证书文件的权限设置为 600。
5.下载和安装 Nextcloud
我直接使用 wget 命令下载 Nextcloud 到服务器上,因此需要先行安装 wget。此外,还需要安装 unzip 来进行解压。使用 yum 命令来安装这两个程序。
yum -y install wget unzip
先进入 /tmp 目录,然后使用 wget 从官网下载最新的 Nextcloud 10。(注:现在最新的是nextcloud 13版本)
解压 Nextcloud,并将其移动到 /usr/share/nginx/html/ 目录。
下一步,转到 Nginx 的 web 根目录为 Nextcloud 创建一个 data 文件夹。
变更 nextcloud 目录的拥有者为 nginx 用户和组。
chown nginx:nginx -R nextcloud/
6.在NGINX上为nextcloud配置虚拟主机
在步骤 5 我们已经下载好了 Nextcloud 源码,并配置好了让它运行于 Nginx 服务器中,但我们还需要为它配置一个虚拟主机。在 Nginx 的 conf.d 目录下创建一个新的虚拟主机配置文件 nextcloud.conf。
将以下内容粘贴到虚拟主机配置文件中:
保存文件并退出 vim。测试一下该 Nginx 配置文件是否有错误,没有的话就可以重启服务了。
此处注意虚拟主机的配置需要遵守一定的规则,如果测试不通过,请查看一下配置是否正确,我直接复制上面的代码,运行是正确的。
7.为nextcloud配置SElinux和firewallD规则
我们将以强制模式运行 SELinux,因此需要一个 SELinux 管理工具来为 Nextcloud 配置 SELinux。
yum -y install policycoreutils-python
然后以 root 用户来运行以下命令,以便让 Nextcloud 运行于 SELinux 环境之下。如果你是用的其他名称的目录,记得将 nextcloud 替换掉。
此处若出现问题,请检查一下selinux的配置文件,查看selinux是否开启,若没开启,则开启后再尝试。
接下来,我们要启用 firewalld 服务,同时为 Nextcloud 开启 http 和 https 端口。
启动 firewalld 并设置随系统启动。
现在使用
firewall-cmd 命令来开启 http 和 https 端口,然后重新加载防火墙。
至此,服务器配置完成。
8.nextcloud安装
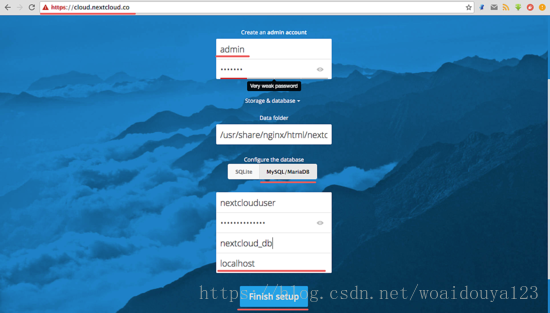
打开你的 Web 浏览器,输入你为 Nextcloud 设置的域名,我这里设置为 cloud.nextcloud.co,然后会重定向到安全性更好的 https 连接。(这里要注意一下,输入网址的时候要使用https,否则打开的是nginx的页面,如果没有域名,直接访问https://ip地址 就可以了)
设置你的管理员用户名和密码,然后输入数据验证信息,点击 '完成安装 (Finish Setup)'。
Nextcloud 管理面板大致如下:

<li class="tool-item tool-active is-like "><a href="javascript:;"><svg class="icon" aria-hidden="true">
<use xlink:href="#csdnc-thumbsup"></use>
</svg><span class="name">点赞</span>
<span class="count">2</span>
</a></li>
<li class="tool-item tool-active is-collection "><a href="javascript:;" data-report-click="{"mod":"popu_824"}"><svg class="icon" aria-hidden="true">
<use xlink:href="#icon-csdnc-Collection-G"></use>
</svg><span class="name">收藏</span></a></li>
<li class="tool-item tool-active is-share"><a href="javascript:;" data-report-click="{"mod":"1582594662_002"}"><svg class="icon" aria-hidden="true">
<use xlink:href="#icon-csdnc-fenxiang"></use>
</svg>分享</a></li>
<!--打赏开始-->
<!--打赏结束-->
<li class="tool-item tool-more">
<a>
<svg t="1575545411852" class="icon" viewBox="0 0 1024 1024" version="1.1" xmlns="http://www.w3.org/2000/svg" p-id="5717" xmlns:xlink="http://www.w3.org/1999/xlink" width="200" height="200"><defs><style type="text/css"></style></defs><path d="M179.176 499.222m-113.245 0a113.245 113.245 0 1 0 226.49 0 113.245 113.245 0 1 0-226.49 0Z" p-id="5718"></path><path d="M509.684 499.222m-113.245 0a113.245 113.245 0 1 0 226.49 0 113.245 113.245 0 1 0-226.49 0Z" p-id="5719"></path><path d="M846.175 499.222m-113.245 0a113.245 113.245 0 1 0 226.49 0 113.245 113.245 0 1 0-226.49 0Z" p-id="5720"></path></svg>
</a>
<ul class="more-box">
<li class="item"><a class="article-report">文章举报</a></li>
</ul>
</li>
</ul>
</div>
</div>
<div class="person-messagebox">
<div class="left-message"><a href="https://blog.csdn.net/woaidouya123">
<img src="https://profile.csdnimg.cn/7/A/F/3_woaidouya123" class="avatar_pic" username="woaidouya123">
<img src="https://g.csdnimg.cn/static/user-reg-year/2x/4.png" class="user-years">
</a></div>
<div class="middle-message">
<div class="title"><span class="tit"><a href="https://blog.csdn.net/woaidouya123" data-report-click="{"mod":"popu_379"}" target="_blank">我爱吃豆芽呀</a></span>
</div>
<div class="text"><span>发布了34 篇原创文章</span> · <span>获赞 57</span> · <span>访问量 11万+</span></div>
</div>
<div class="right-message">
<a href="https://im.csdn.net/im/main.html?userName=woaidouya123" target="_blank" class="btn btn-sm btn-red-hollow bt-button personal-letter">私信
</a>
<a class="btn btn-sm bt-button personal-watch" data-report-click="{"mod":"popu_379"}">关注</a>
</div>
</div>
</div>

白天基本泡在机房,自己电脑基本用不到,到了晚上回去用还需要用U盘把自己的程序拷回去,又悲催的发现自己用的机房里的那台电脑所有的USB接口都不能用了,估计是USB模块与主板的接点断掉了,啥插上去都没反应。。。mmp。。。。
于是想到了用云盘同步代码,机房网速虽然不咋滴,同步代码还是可以的。
百度云盘有同步功能,但是要会员才能用,毕竟带宽是宝贵的,不花钱肯定不能分给你。。。
而玩游戏从来不花一分钱的我唯有自力更生,想要自己搭一个云盘,去阿里云上9块9租了一个学生机,又刚好看到论坛上有搭建nextcloud的教程点击打开链接,便按照他的教程一步一步来,可能是软件版本升级的问题或者环境问题,有几步被卡住。又查了好多资料,终于搭建成功。
环境:centos7 64位
1.首先要安装nginx和php7-fpm
在开始安装 Nginx 和 php7-fpm 之前,我们还学要先添加 EPEL 包的仓库源。使用如下命令:
yum -y install epel-release现在开始从 EPEL 仓库来安装 Nginx:
yum -y install nginx
然后就是安装 PHP7-FPM 以及 Nextcloud 需要的一些包。
yum -y install php70w-fpm php70w-cli php70w-gd php70w-mcrypt php70w-mysql php70w-pear php70w-xml php70w-mbstring php70w-pdo php70w-json php70w-pecl-apcu php70w-pecl-apcu-devel
最后,从服务器终端里查看 PHP 的版本号,以便验证 PHP 是否正确安装。
php -v
2.配置php7-fpm
在这一个步骤中,我们将配置 php-fpm 与 Nginx 协同运行。Php7-fpm 将使用 nginx 用户来运行,并监听9000 端口。
使用 vim 编辑默认的 php7-fpm 配置文件。
vim /etc/php-fpm.d/www.conf
user
和
group
赋值为
nginx
。
在第 22 行,确保 php-fpm 运行在指定端口。
listen = 127.0.0.1:9000
保存文件并退出 vim 编辑器。
下一步,就是在 /var/lib/ 目录下创建一个新的文件夹 session,并将其拥有者变更为 nginx 用户。
然后启动 php-fpm 和 Nginx,并且将它们设置为随开机启动的服务。
PHP7-FPM 配置完成
3.安装和配置MariaDB(之前没用过这个数据库,查了查资料 ,说是开发mysql的团队开发的,使用起来与mysql并无太大差别,看其他教程也有使用mysql安装)
可以直接使用 yum 命令从 CentOS 默认远程仓库中安装mariadb-server 包。
yum -y install mariadb mariadb-server
现在开始配置 MariaDB 的 root 用户密码。
mysql_secure_installation
键入 Y ,然后设置 MariaDB 的 root 密码。(注意这一块要先按一下Y,之前没用过mariadb,还以为要我输入密码,愣是搞了半天)
这样就设置好了密码,现在登录到 mysql shell 并为 Nextcloud 创建一个新的数据库和用户。这里我创建名为nextcloud_db 的数据库以及名为 nextclouduser 的用户,用户密码为 nextclouduser@。当然了,要给你自己的系统选用一个更安全的密码。(建议直接改为自己设置的用户名和密码)
mysql -u root -p
输入 MariaDB 的 root 密码,即可登录 mysql shell。
输入以下 mysql 查询语句来创建新的数据库和用户。
nextcloud_db 数据库和 nextclouduser 数据库用户创建完成。
4.为 Nextcloud 生成一个自签名 SSL 证书
注意这里的SSL证书是自签名的,所以当你使用https连接时,会提醒你该站点证书不合法,勾选忽略或选择信任继续前往该站点就可以了。如果想要获取合法的证书,可以在阿里云上免费申请。
这里我使用 OpenSSL 来创建自己的自签名 SSL 证书。
为 SSL 文件创建新目录:
mkdir -p /etc/nginx/cert/
如下,使用 openssl 生成一个新的 SSL 证书。
openssl req -new -x509 -days 365 -nodes -out /etc/nginx/cert/nextcloud.crt -keyout /etc/nginx/cert/nextcloud.key
最后使用 chmod 命令将所有证书文件的权限设置为 600。
5.下载和安装 Nextcloud
我直接使用 wget 命令下载 Nextcloud 到服务器上,因此需要先行安装 wget。此外,还需要安装 unzip 来进行解压。使用 yum 命令来安装这两个程序。
yum -y install wget unzip
先进入 /tmp 目录,然后使用 wget 从官网下载最新的 Nextcloud 10。(注:现在最新的是nextcloud 13版本)
解压 Nextcloud,并将其移动到 /usr/share/nginx/html/ 目录。
下一步,转到 Nginx 的 web 根目录为 Nextcloud 创建一个 data 文件夹。
变更 nextcloud 目录的拥有者为 nginx 用户和组。
chown nginx:nginx -R nextcloud/
6.在NGINX上为nextcloud配置虚拟主机
在步骤 5 我们已经下载好了 Nextcloud 源码,并配置好了让它运行于 Nginx 服务器中,但我们还需要为它配置一个虚拟主机。在 Nginx 的 conf.d 目录下创建一个新的虚拟主机配置文件 nextcloud.conf。
将以下内容粘贴到虚拟主机配置文件中:
保存文件并退出 vim。测试一下该 Nginx 配置文件是否有错误,没有的话就可以重启服务了。
此处注意虚拟主机的配置需要遵守一定的规则,如果测试不通过,请查看一下配置是否正确,我直接复制上面的代码,运行是正确的。
7.为nextcloud配置SElinux和firewallD规则
我们将以强制模式运行 SELinux,因此需要一个 SELinux 管理工具来为 Nextcloud 配置 SELinux。
yum -y install policycoreutils-python
然后以 root 用户来运行以下命令,以便让 Nextcloud 运行于 SELinux 环境之下。如果你是用的其他名称的目录,记得将 nextcloud 替换掉。
此处若出现问题,请检查一下selinux的配置文件,查看selinux是否开启,若没开启,则开启后再尝试。
接下来,我们要启用 firewalld 服务,同时为 Nextcloud 开启 http 和 https 端口。
启动 firewalld 并设置随系统启动。
现在使用
firewall-cmd 命令来开启 http 和 https 端口,然后重新加载防火墙。
至此,服务器配置完成。
8.nextcloud安装
打开你的 Web 浏览器,输入你为 Nextcloud 设置的域名,我这里设置为 cloud.nextcloud.co,然后会重定向到安全性更好的 https 连接。(这里要注意一下,输入网址的时候要使用https,否则打开的是nginx的页面,如果没有域名,直接访问https://ip地址 就可以了)
设置你的管理员用户名和密码,然后输入数据验证信息,点击 '完成安装 (Finish Setup)'。
Nextcloud 管理面板大致如下:
<li class="tool-item tool-active is-like "><a href="javascript:;"><svg class="icon" aria-hidden="true">
<use xlink:href="#csdnc-thumbsup"></use>
</svg><span class="name">点赞</span>
<span class="count">2</span>
</a></li>
<li class="tool-item tool-active is-collection "><a href="javascript:;" data-report-click="{"mod":"popu_824"}"><svg class="icon" aria-hidden="true">
<use xlink:href="#icon-csdnc-Collection-G"></use>
</svg><span class="name">收藏</span></a></li>
<li class="tool-item tool-active is-share"><a href="javascript:;" data-report-click="{"mod":"1582594662_002"}"><svg class="icon" aria-hidden="true">
<use xlink:href="#icon-csdnc-fenxiang"></use>
</svg>分享</a></li>
<!--打赏开始-->
<!--打赏结束-->
<li class="tool-item tool-more">
<a>
<svg t="1575545411852" class="icon" viewBox="0 0 1024 1024" version="1.1" xmlns="http://www.w3.org/2000/svg" p-id="5717" xmlns:xlink="http://www.w3.org/1999/xlink" width="200" height="200"><defs><style type="text/css"></style></defs><path d="M179.176 499.222m-113.245 0a113.245 113.245 0 1 0 226.49 0 113.245 113.245 0 1 0-226.49 0Z" p-id="5718"></path><path d="M509.684 499.222m-113.245 0a113.245 113.245 0 1 0 226.49 0 113.245 113.245 0 1 0-226.49 0Z" p-id="5719"></path><path d="M846.175 499.222m-113.245 0a113.245 113.245 0 1 0 226.49 0 113.245 113.245 0 1 0-226.49 0Z" p-id="5720"></path></svg>
</a>
<ul class="more-box">
<li class="item"><a class="article-report">文章举报</a></li>
</ul>
</li>
</ul>
</div>
</div>
<div class="person-messagebox">
<div class="left-message"><a href="https://blog.csdn.net/woaidouya123">
<img src="https://profile.csdnimg.cn/7/A/F/3_woaidouya123" class="avatar_pic" username="woaidouya123">
<img src="https://g.csdnimg.cn/static/user-reg-year/2x/4.png" class="user-years">
</a></div>
<div class="middle-message">
<div class="title"><span class="tit"><a href="https://blog.csdn.net/woaidouya123" data-report-click="{"mod":"popu_379"}" target="_blank">我爱吃豆芽呀</a></span>
</div>
<div class="text"><span>发布了34 篇原创文章</span> · <span>获赞 57</span> · <span>访问量 11万+</span></div>
</div>
<div class="right-message">
<a href="https://im.csdn.net/im/main.html?userName=woaidouya123" target="_blank" class="btn btn-sm btn-red-hollow bt-button personal-letter">私信
</a>
<a class="btn btn-sm bt-button personal-watch" data-report-click="{"mod":"popu_379"}">关注</a>
</div>
</div>
</div>