配置环境:服务器系统:CentOS 7.6;本地NTP服务器10.0.0.11(联网),客户机10.0.0.31(未联网)
想法:将本地服务器时钟同步阿里云NTP服务器,本地客户机时钟同步本地服务器。
目的:防止因为服务器间时钟不同步的问题,出现安全隐患或者未知的错误。
chrony简介
chrony是一个开源的自由软件,它能保持系统时钟与时间服务器同步,让时间保持精确。它由两个程序组成:chrongd和chronyc 。chronyd是一个后台运行的守护进程,用于调整内核运行的系统时钟和时间服务器同步,它确定计算机增减时间的比率,并对此进行补偿。
1、CentOS系统自带chrony,但是为了防止出错,还是要重新安装/更新一下它:
服务器/客户机都需要安装!
yum -y install chrony
2、安装完成后,启动服务并设置为开机自动启动,然后检查一下服务状态:
systemctl start chronyd.service
#启动服务
systemctl enable chronyd.service
#设置为开机自动启动
systemctl status chronyd.service
#检查当前服务状态
服务状态正常的话应该如下:

3、防火墙设置
NTP使用UDP协议123号端口,防火墙设置为允许 NTP 即可
firewall-cmd  --add-service=ntp  --permanent
firewall-cmd  --reload
4、默认配置文件 /etc/chrony.conf 部分说明:
# Use public servers from the pool.ntp.org project.(使用pool.ntp.org项目中的公共服务器)
# Please consider joining the pool (http://www.pool.ntp.org/join.html).
#理论上,以server开头添加的公共服务器可以添加任意台
server 0.centos.pool.ntp.org iburst
server 1.centos.pool.ntp.org iburst
server 2.centos.pool.ntp.org iburst
server 3.centos.pool.ntp.org iburst


# Record the rate at which the system clock gains/losses time.
#chronyd程序的主要行为之一,根据实际时间计算出服务器增减时间的比率,
#然后记录到一个文件中,在系统重启后为系统做出最佳时间补偿调整。
driftfile /var/lib/chrony/drift

# Allow the system clock to be stepped in the first three updates
# if its offset is larger than 1 second.
#通常,chronyd将根据需求通过减慢或加速时钟,
#使得系统逐步纠正所有时间偏差。在某些特定情况下,
#系统时钟可能会漂移过快,导致该调整过程消耗很长的时间来纠正系统时钟。
#该指令强制chronyd在调整期大于某个阀值时步进调整系统时钟,
#但只有在因为chronyd启动时间超过指定限制(可使用负值来禁用限制),没有更多时钟更新时才生效。
makestep 1.0 3


# Enable kernel synchronization of the real-time clock (RTC).
#将启用一个内核模式,在该模式中,系统时间每11分钟会拷贝到实时时钟(RTC)
rtcsync


# Enable hardware timestamping on all interfaces that support it.
#在支持它的所有接口上启用硬件时间戳。
#hwtimestamp *
#hwtimestamp eth0
#hwtimestamp ens33

# Increase the minimum number of selectable sources required to adjust
#增加调整所需的最小可选来源数量
# the system clock.
#minsources 2

# Allow NTP client access from local network.
#允许NTP客户端从本地网络访问。可以指定一台主机或者一个网段允许或拒绝访问
#allow 192.168.0.0/16
#deny 192.168.10.0/24

# Serve time even if not synchronized to a time source.
#local stratum 10

# Specify file containing keys for NTP authentication.
#keyfile /etc/chrony.keys

# Specify directory for log files.
logdir /var/log/chrony

# Select which information is logged.
#log measurements statistics tracking
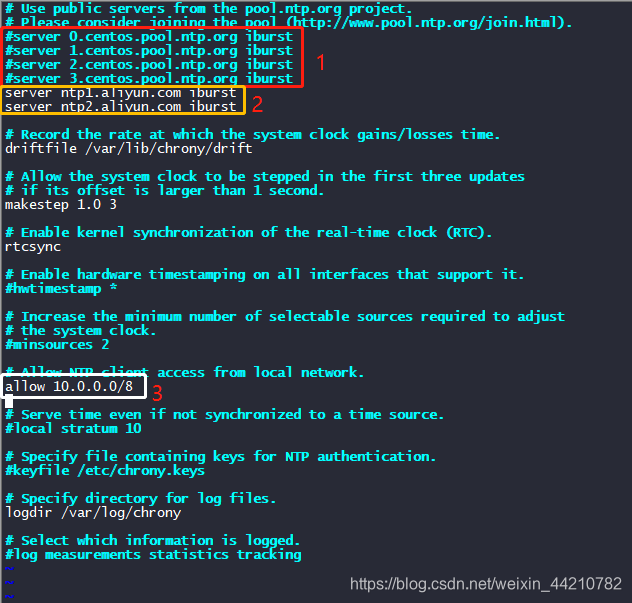
5、配置本地服务器的 /etc/chrony.conf 文件
一个有三处需要修改:
注释掉原有的授时服务器地址;添加阿里云授时服务器地址(也可以换成国家授时服务器地址:210.72.145.44);修改允许访问的网段(根据实际情况修改,我们的实验机网段是10.0.0.0/8),
修改完成后保存并退出。
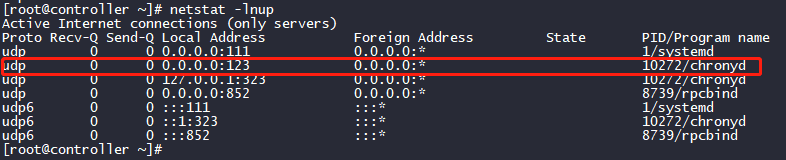
6、重启服务,检查服务器端口情况
systemctl restart chronyd.service
#重启服务
ss -lun
#检查服务器UDP端口
#或者用
ss -lu
#或者用
netstat -lnup
使用ss -lun命令的

使用ss -lu命令的

使用netstat -lnup的
7、客户端 /etc/chrony.conf 文件配置
仅需要将原有的server服务器注释掉,新增我们本地服务器的地址,其他的配置项不需要修改。

然后重启服务
systemctl restart chronyd.service
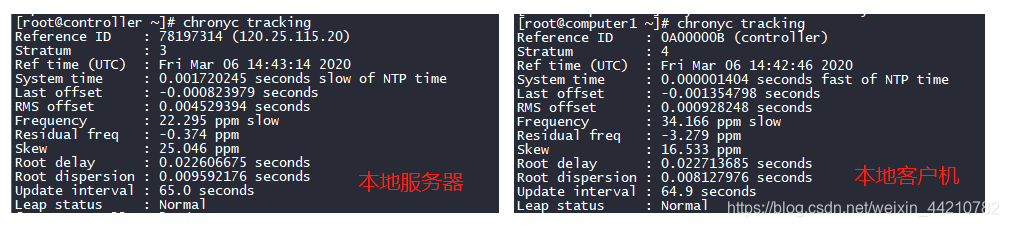
8、校准时间并验证
注意:先校准本地服务器的时间,再去校准本地客户机的时间
chronyc tracking
#校准时间
两台机器同时使用 date 查看系统时间,如果时间一样就是同步成功:

可以看到两台机器的时间是一样的。
其他常用命令:
查看时间同步源:
chronyc sources -v

查看时间同步源状态:
chronyc sourcestats -v

硬件时间默认为UTC:
timedatectl set-local-rtc 1

启用NTP时间同步:
timedatectl set-ntp yes

检查NTP访问是否对特定主机可用
chronyc accheck

显示NTP源在线/离线
chronyc activity

手动添加一台新的NTP服务器
chronyc add server

在客户端报告已访问到服务器
chronyc clients

手动移除NTP服务器或对等服务器
chronyc delete

手动设置守护进程时间
chronyc settime
其他的命令可以参考:chronyc命令使用帮助 或者使用 chronyc --help
