该系列OkHttp源码分析基于OkHttp3.14.0版本
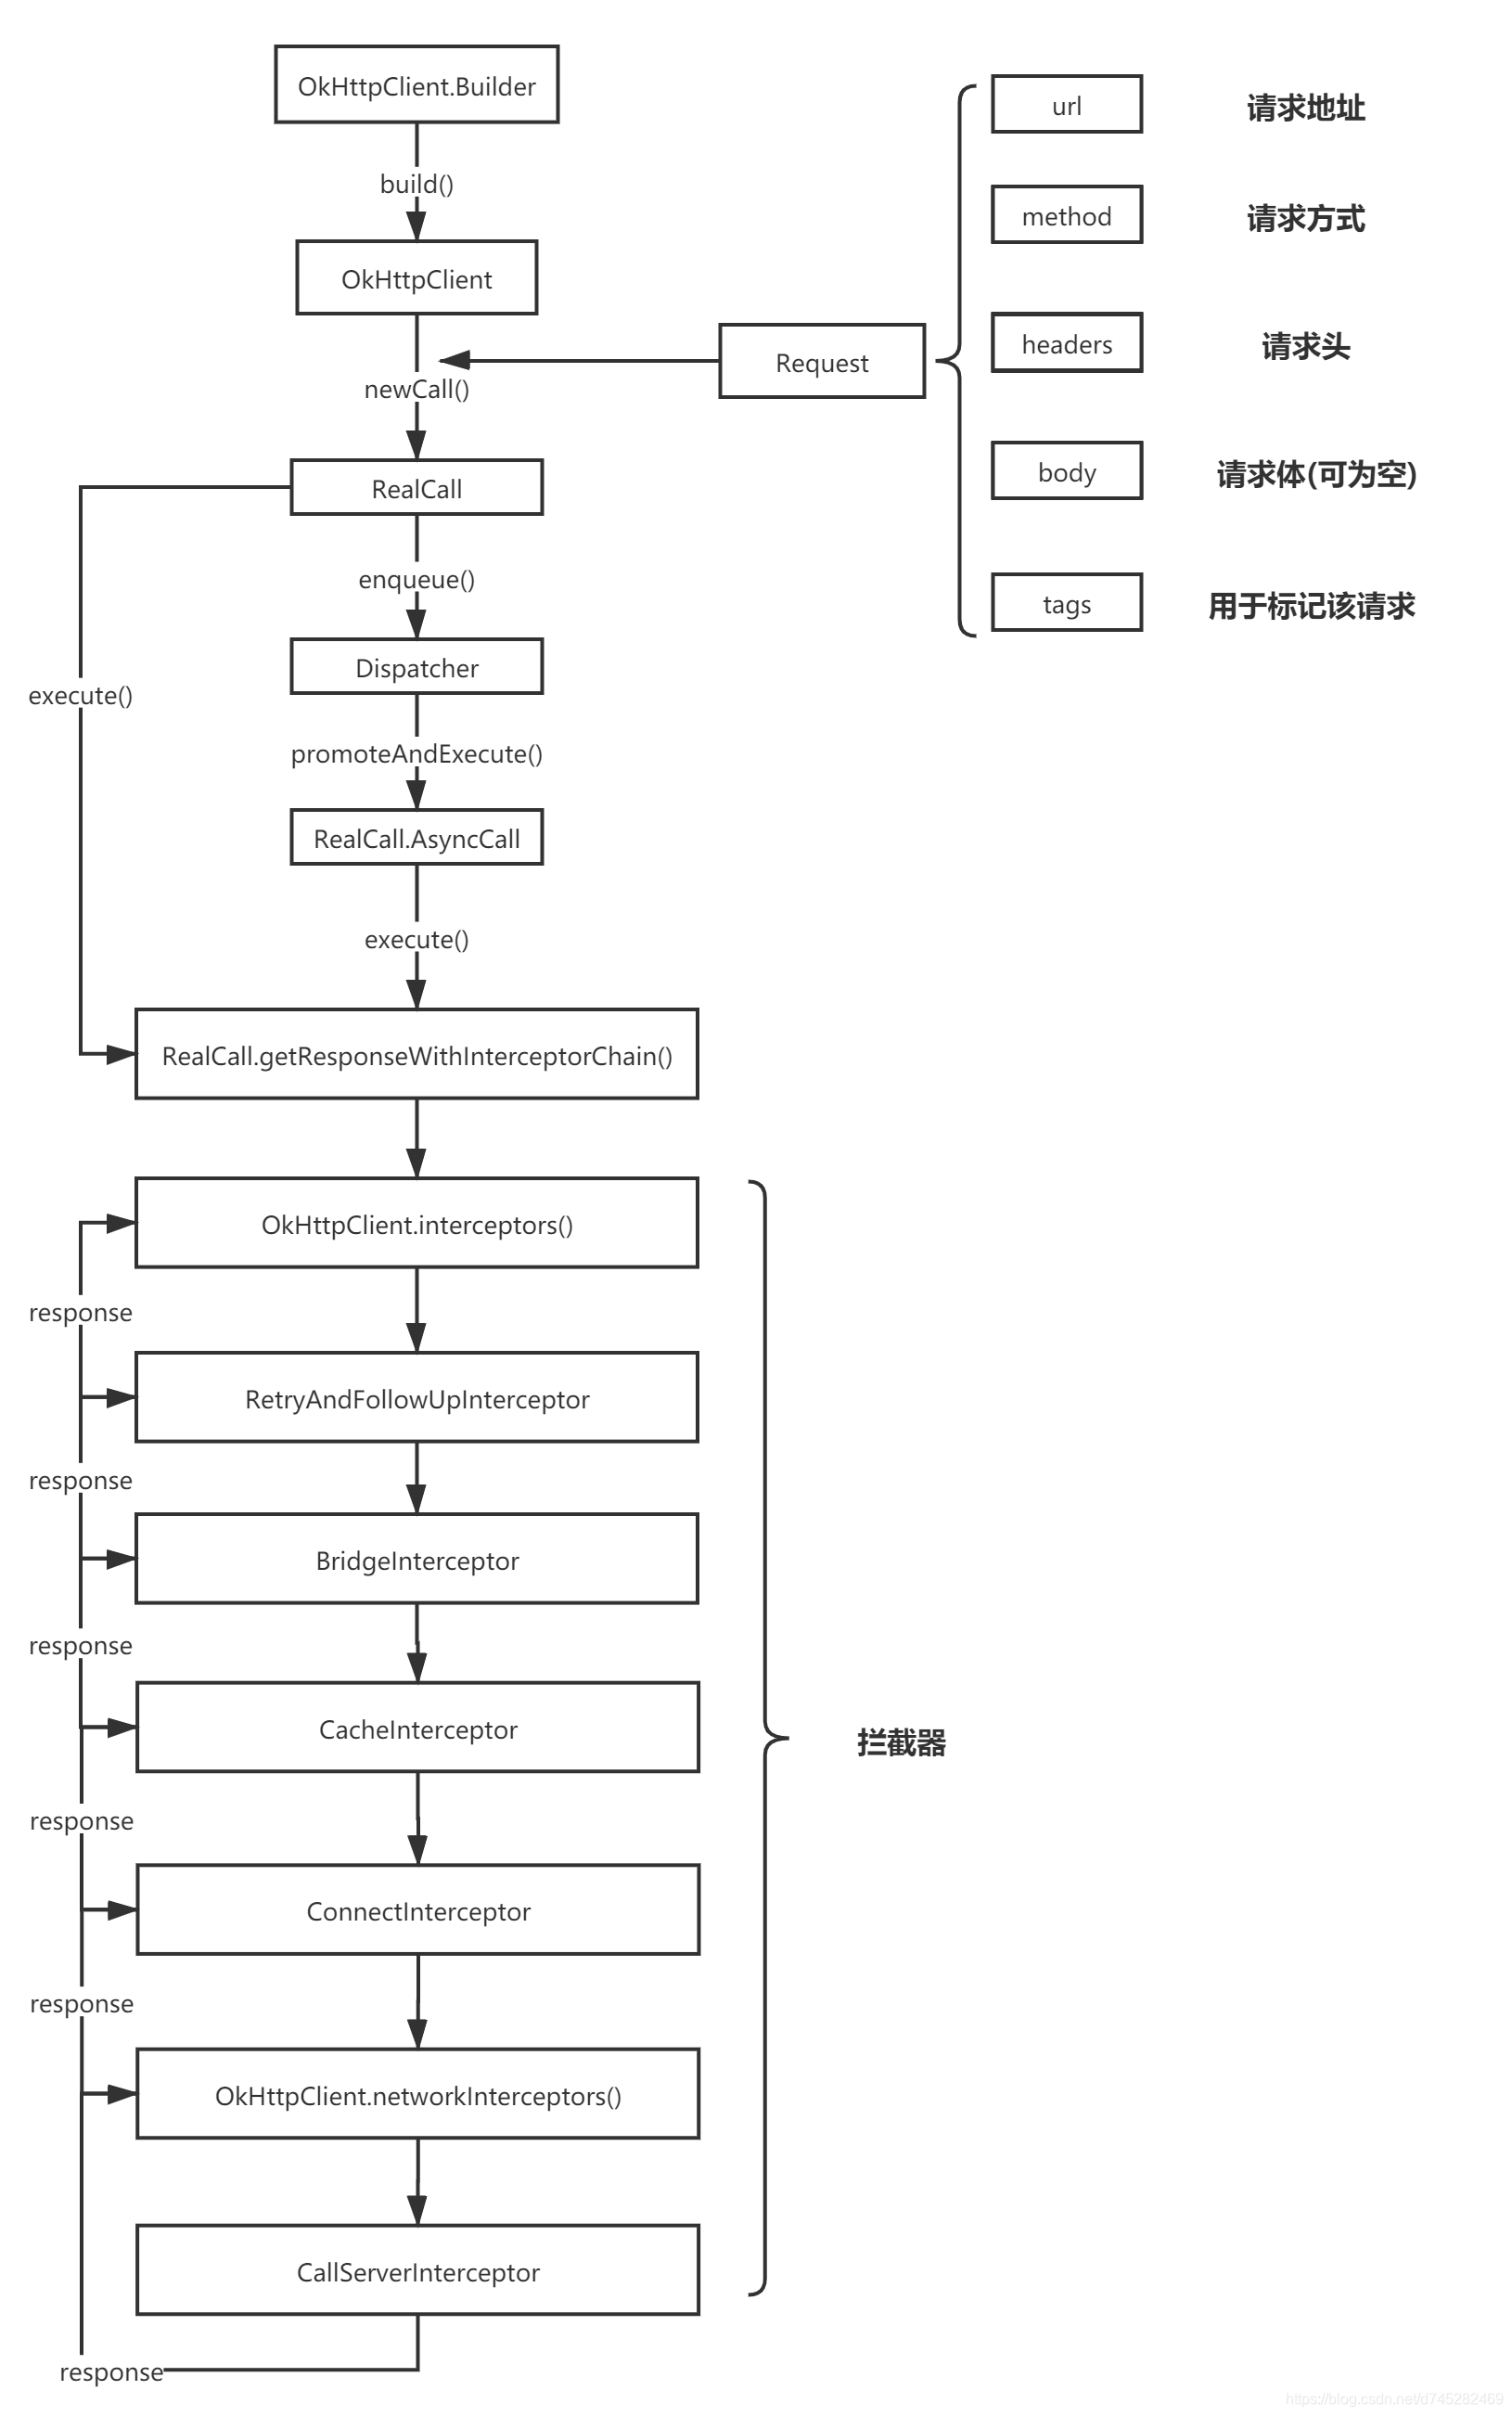
流程图
配置OkHttpClient
OkHttpClient client = new OkHttpClient.Builder()
                .addInterceptor(new TestInterceptor())
                .cache(new Cache(getCacheDir(),1024))
                .eventListener(new OkHttpListener())
                .build();
OkHttpClient就像配置一个浏览器一样,我们可以指定一些参数,比如超时时间、cookie持久化、代理等等。
使用建造者模式进行配置,基本上所有的配置参数都会有一个默认值,我们只需要针对我们关心的配置进行修改就好了。比如我这里主要进行了一下配置:
- 添加了一个拦截器
- 设置了缓存目录以及缓存大小
- 设置了一个事件监听器,方便我Debug
配置请求Request
 Request request = new Request.Builder()
                .url("...")
                .get()
                .header("Content-type","txt/html")
                .build();
配置Request就是配置我们的请求,需要我们指定url、method、body等等。
同样适用建造者模式。
执行请求
同步请求execute()
Response response = client.newCall(request).execute();
很简单的一行代码,首先调用client.newCall(),然后调用execute()。
那么我们先看看这个newCall()方法都干了些什么。
@Override public Call newCall(Request request) {
    return RealCall.newRealCall(this, request, false /* for web socket */);
  }
原来实际是实例化了一个RealCall,那就简单了,继续跟进看看在RealCall中的execute()干了啥。
@Override public Response execute() throws IOException {
  synchronized (this) {
    //不允许同时执行
    if (executed) throw new IllegalStateException("Already Executed");
    executed = true;
  }
  transmitter.timeoutEnter();
  transmitter.callStart();
  try {
    client.dispatcher().executed(this);//同步任务中,dispatcher并没有太多参与
    return getResponseWithInterceptorChain();//这里返回实际的请求结果
  } finally {
    client.dispatcher().finished(this);
  }
}
代码很少,逻辑也很清晰。首先使用了一个同步块判断该请求是否已经执行,然后调用transmitter.timeoutEnter()开始进入超时判断,再调用transmitter.callStart()通知eventListener开始执行请求了,之后调用dispatcher.executed()用于将该请求加入到运行中队列,最后调用getResponseWithInterceptorChain()向服务器发送请求并接受服务器响应。
由于异步请求也会调用getResponseWithInterceptorChain(),所以这个方法会留在下面再分析。
异步请求enqueue()
client.newCall(request).enqueue(new Callback() {
            @Override
            public void onFailure(Call call, IOException e) {
                doSomething...
            }

            @Override
            public void onResponse(Call call, Response response) throws IOException {
                doSomething...
            }
        });
和同步请求一样,实际都是在RealCall中调用方法,只不过异步请求调用的是enqueue()。
@Override public void enqueue(Callback responseCallback) {
  synchronized (this) {
    //只允许执行一次
    if (executed) throw new IllegalStateException("Already Executed");
    executed = true;
  }
  transmitter.callStart();
  client.dispatcher().enqueue(new AsyncCall(responseCallback));
}
代码比同步请求更少了,同样先判断是否已经执行了,然后调用dispatcher.enqueue()。
void enqueue(AsyncCall call) {
  synchronized (this) {
    readyAsyncCalls.add(call);//将任务添加到准备队列

    // Mutate the AsyncCall so that it shares the AtomicInteger of an existing running call to
    // the same host.

    // 对AsyncCall进行突变,使其与同一主机共享现有运行调用的AtomicInteger。
    if (!call.get().forWebSocket) {//非websocket协议的请求
      //找到已经存在的同一主机的请求
      AsyncCall existingCall = findExistingCallWithHost(call.host());
      if (existingCall != null) call.reuseCallsPerHostFrom(existingCall);
    }
  }
  promoteAndExecute();
}
这个方法首先将该异步任务加入到准备队列中,然后查找准备队列和允许队列中是否存在同一host的任务,如果存在就将当前异步任务的host修改为已存在的任务的host(这一步的目的是什么?我也不太清楚,难道我理解错了?)。最后调用promoteAndExecute()。
private boolean promoteAndExecute() {
  assert (!Thread.holdsLock(this));

  List<AsyncCall> executableCalls = new ArrayList<>();//可以执行的请求集合
  boolean isRunning;
  synchronized (this) {
    //遍历准备队列,找出其中可执行的请求任务
    for (Iterator<AsyncCall> i = readyAsyncCalls.iterator(); i.hasNext(); ) {
      AsyncCall asyncCall = i.next();

      if (runningAsyncCalls.size() >= maxRequests) break; // Max capacity. 超过最大的并发请求
      if (asyncCall.callsPerHost().get() >= maxRequestsPerHost) continue; // Host max capacity. 超过同主机最大并发请

      i.remove();//从准备队列中移除
      asyncCall.callsPerHost().incrementAndGet();
      executableCalls.add(asyncCall);//加入到可执行请求集合中
      runningAsyncCalls.add(asyncCall);//加入到正在执行的请求队列中
    }
    isRunning = runningCallsCount() > 0;//是否有正在执行的请求
  }

  //遍历所有可执行的请求,并交由线程池执行
  for (int i = 0, size = executableCalls.size(); i < size; i++) {
    AsyncCall asyncCall = executableCalls.get(i);
    asyncCall.executeOn(executorService());//执行异步请求
  }

  return isRunning;
}
这个方法主要做了两件事,1、从准备任务队列(runningAsyncCalls)中将可执行的任务移除并添加到运行中任务队列(runningAsyncCalls)和可执行任务集合(executableCalls);2、调用所有可执行任务的executeOn(),开始执行异步任务。
这里可以看到,OkHttp对异步任务数量是做了限制的,最多允许同时执行maxRequests=64个异步任务,同一host下的异步任务最多允许同时存在maxRequestsPerHost=5个。
另外我们先看看executorService()这个方法,这个方法是用来创建线程池的。
public synchronized ExecutorService executorService() {
  if (executorService == null) {
    //创建线程池
    //核心线程数量:0
    //所有线程数量:2147483647
    //非核心线程的最大空闲时间:60秒
    executorService = new ThreadPoolExecutor(0, Integer.MAX_VALUE, 60, TimeUnit.SECONDS,
        new SynchronousQueue<>(), Util.threadFactory("OkHttp Dispatcher", false));
  }
  return executorService;
}
可以看到,这里使用了懒汉式的单例创建线程池,该线程池是一个无界线程池,虽然线程池是无界的,但是我们前面说了,OkHttp自己做了异步请求任务数量的限制。
现在我们回到前面,去看看executeOn()这个方法。
void executeOn(ExecutorService executorService) {
  assert (!Thread.holdsLock(client.dispatcher()));
  boolean success = false;
  try {
    executorService.execute(this);//使用线程池执行该任务
    success = true;
  } catch (RejectedExecutionException e) {
    //线程池已经满了
    InterruptedIOException ioException = new InterruptedIOException("executor rejected");
    ioException.initCause(e);
    transmitter.noMoreExchanges(ioException);
    responseCallback.onFailure(RealCall.this, ioException);
  } finally {
    if (!success) {
      client.dispatcher().finished(this); // This call is no longer running!
    }
  }
}
这个方法就更简单了,就是使用线程池来执行任务AsynCall。既然如此,那么我们就看看AsynCall.execute()。
@Override protected void execute() {
  boolean signalledCallback = false;
  transmitter.timeoutEnter();//进入超时判断
  try {
    Response response = getResponseWithInterceptorChain();//这里和同步请求一样的方式去获取结果
    signalledCallback = true;
    // 这里可以发现,callback是在非主线程的,而且线程的名称估计就是"OkHttp Dispatcher"
    responseCallback.onResponse(RealCall.this, response);
  } catch (IOException e) {
    if (signalledCallback) {
      // Do not signal the callback twice!
      Platform.get().log(INFO, "Callback failure for " + toLoggableString(), e);
    } else {
      responseCallback.onFailure(RealCall.this, e);
    }
  } finally {
    client.dispatcher().finished(this);
  }
}
这里的话就和执行同步请求类似了,同样调用getResponseWithInterceptorChain()去发起请求和获取响应。
总结下来,执行异步请求主要的逻辑是这样的:
- 将任务添加到准备队列中
- 如果没有超出最大执行任务数量,则从准备队列中将任务移除并添加到可执行集合和执行中任务队列
- 使用懒汉式单例线程池执行任务
- 调用
getResponseWithInterceptorChain()发起请求并返回响应结果
拦截器责任链获取响应结果
在前面的源码分析中,我们提到,无论是在同步请求还是异步请求,最终实际向服务器发送请求以及获取服务器响应结果的都是在getResponseWithInterceptorChain()这个方法中,这个方法也是OkHttp的一大亮点所在,冲分的展现了责任链模式的优势之处。下面仔细的来品一品这个方法:
Response getResponseWithInterceptorChain() throws IOException {
  // Build a full stack of interceptors.
  // 拦截器的调用是从0开始的
  List<Interceptor> interceptors = new ArrayList<>();
  interceptors.addAll(client.interceptors());//添加自定义的拦截器
  interceptors.add(new RetryAndFollowUpInterceptor(client));//重试/重定向拦截器

  //将用户的请求构造为发送到服务器的请求,将服务器返回构造为对用户友好的返回
  interceptors.add(new BridgeInterceptor(client.cookieJar()));

  interceptors.add(new CacheInterceptor(client.internalCache()));//缓存拦截器
  interceptors.add(new ConnectInterceptor(client));//负责和服务器建立连接
  if (!forWebSocket) {
    //如果不是websocket请求,则将配置OkHttpClient时自定义的拦截器添加进来
    //可以看到和上面最先添加的拦截器比起来,这里的拦截器顺序更靠后了,意味着更接近底层
    //比如可以在链接尚未建立时打断?
    interceptors.addAll(client.networkInterceptors());
  }
  interceptors.add(new CallServerInterceptor(forWebSocket));//负责向服务器发数据以及读数据

  //这里就是拦截器链开始的地方,可以看到index第一次为0,后续每次为index+1
  Interceptor.Chain chain = new RealInterceptorChain(interceptors, transmitter, null, 0,
      originalRequest, this, client.connectTimeoutMillis(),
      client.readTimeoutMillis(), client.writeTimeoutMillis());

  boolean calledNoMoreExchanges = false;
  try {
    //开始责任链模式
    Response response = chain.proceed(originalRequest);
    if (transmitter.isCanceled()) {
      closeQuietly(response);
      throw new IOException("Canceled");
    }
    return response;
  ...省略部分代码
}
整个方法逻辑分为两个部分,1、首先将所有拦截器添加到一个集合中;2、从index=0开始调用拦截器的proceed()方法开启整个责任链。
我们从这个方法可以看到,OkHttp对拦截器的调用顺序:
- 自定义的拦截器(在正式和服务器建立连接前)
- 重试/重定向拦截器(RetryAndFollowUpInterceptor)
- 桥接拦截器(BridgeInterceptor)
- 缓存拦截器(CacheInterceptor)
- 连接拦截器(ConnectInterceptor)
- 自定义拦截器(已和服务器建立连接)
- 与服务器交互的拦截器(CallServerInterceptor)
这里存在两种自定义拦截器,它们之间的局别在于调用时是顺序,一个是在和服务器建立连接之前,一个是在和服务器建立连接之后。
整个责任链是如何工作的呢?我们进入到RealInterceptorChain.proceed()中看看:
public Response proceed(Request request, Transmitter transmitter, @Nullable Exchange exchange)
    throws IOException {
    ...省略部分代码
  // Call the next interceptor in the chain.
  // 调用下一个拦截器
  RealInterceptorChain next = new RealInterceptorChain(interceptors, transmitter, exchange,
      index + 1, request, call, connectTimeout, readTimeout, writeTimeout);
  Interceptor interceptor = interceptors.get(index);//从集合中获取拦截器
  Response response = interceptor.intercept(next);
    ...省略部分代码
  return response;
}
当忽略其他用于校验的代码后,我们可以很明显看到整个方法的逻辑,将责任链RealInterceptorChain的index+1,并调用索引为index的拦截器的intercept()方法,将责任链传递下去。后面只要每个拦截器都调用RealInterceptorChain.proceed(),那么整个责任链就可以完美的执行了。
