Opening Overview
It will be convenient and efficient to split a large program into many small components, so that every participant can foucus on its own development part. And those components are what we called Microservices. Spring Boot Framework can make this work rapid and smooth, just as it introduces itself “Spring Boot makes it easy to create stand-alone,
production-grade Spring based Applications that you can just run” on the official website.
To build this small project with Spring Boot, we need make some preparations:
DevTools: Java JDK, Intellij IDEA, MAVEN, MySQL
- Installing the JDK and configuring the environment variables.
- Download the maven from the Apache Maven Website and then configure its localrepository and mirror (for faster JDKs download) via modifying the settings.xml.
- Configuring the JDK and maven inside the IDEA.
- Installing the MySQL and start the server.
Beginning
Creating and initialing the table
CREATE TABLE stars (
	id int not null auto_increment,
	name varchar(20) not null,
	team varchar(10) not null,
	skills varchar(20) not null,
	primary key(id)
	) ENGINE=InnoDB AUTO_INCREMENT=1 DEFAULT CHARSET=utf8mb4;

INSERT INTO stars (name,team,skills) VALUES
("Iverson","76ers","crossover"),
("Kobe","Lakers","fade-away"),
("McGrady","Rockets","jump-shoot");
COMMIT;
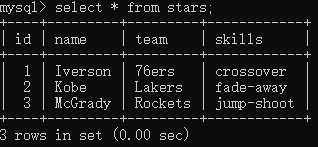
After execution, the table stars holds the data we inserted in:
Building the Spring Boot Program
- Creating the new project via Spring Intializr and import the following modules:
- spring web: display the data in the webpage
- spring devtools: for the hot-deploy
- mybatis framework: operate the data stored in the database
- mysql driver: connect to mysql driver
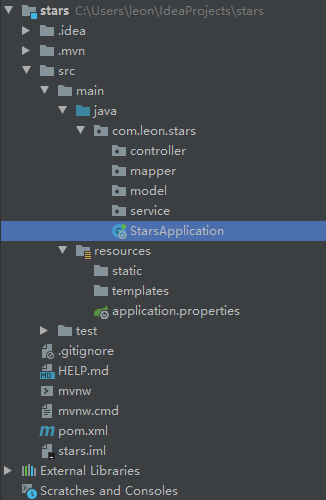
After maven project import, we create some package that necessary for the task. And the project has the menu as showed in the picture, and we will write every code in the these packages from below to the top:
2. Writing the database and mybatis configuations into application.properties(or yml)
## mysql configuration
spring.datasource.url=jdbc:mysql://localhost:3306/leon?characterEncoding=utf8&useSSL=false&serverTimezone=UTC
spring.datasource.username=root
spring.datasource.password=Leon0512
spring.datasource.driver-class-name=com.mysql.cj.jdbc.Driver

## MyBatis configuration
mybatis.mapper-locations=classpath*:mapper/*Mapper.xml
## the path of Dao interface file
mybatis.type-aliases-package=com.leon.stars.mapper
- Creating Stars.class under the model package
package com.leon.stars.model;

public class Stars {
    private int id;
    private String name;
    private String team;
    private String skills;

    public int getId() {return id;}

    public void setId(int id) {this.id = id;}

    public String getName() {return name;}

    public void setName(String name) {this.name = name;}

    public String getTeam() {return team;}

    public void setTeam(String team) {this.team = team;}

    public String getSkills() {return skills;}

    public void setSkills(String skills) {this.skills = skills;}
}
Model layer is also called entity layer or POJO layer, where we define the variables and basic methods that correspond to the table structure. You can use generate tool to generate getter、setter、toString method or constructor quickly. Or even more effiefficient by the Lombok you can done this work by annotation. This we may talk later.
- Creating StarsMapper interface in mapper package and corresponding mapper.xml
package com.leon.stars.mapper;

import com.leon.stars.model.Stars;
import java.util.List;
import org.apache.ibatis.annotations.Mapper;

@Mapper                 // indicates this is a Mapper interface
public interface StarsMapper {
    List<Stars> queryAll();

    Stars getStarsById(int id);

    void delete(int id);

    void update(Stars stars);

    void add(Stars stars);
}
Mapper layer is also known as dao layer which indicates the data access object, we provide the basic add, delete, update and query method in this interface and place the concrete implements into the mapper.xml file.
<?xml version="1.0" encoding="UTF-8" ?>
<!DOCTYPE mapper
        PUBLIC "-//mybatis.org//DTD Mapper 3.0//EN"
        "http://mybatis.org/dtd/mybatis-3-mapper.dtd">
<mapper namespace="com.leon.stars.mapper.StarsMapper">

    <select id="queryAll" resultType="com.leon.stars.model.Stars">
    select * from stars
  </select>
</mapper>
We write down a query method in the xml file for a simple test. You can copy this xml template from the documents of MyBatis website. In fact, you can auto generate mapper.xml by adding the MyBatis-Generator plugin which we will not discuss here.
- Creating StarsService.class that call the mapper layer
package com.leon.stars.service;

import com.leon.stars.mapper.StarsMapper;
import com.leon.stars.model.Stars;
import org.springframework.beans.factory.annotation.Autowired;
import org.springframework.stereotype.Service;
import java.util.List;

@Service              // indicates this is service
public class StarsService {

    @SuppressWarnings("SpringJavaInjectionPointsAutowiringInspection")
    @Autowired       // injects the StarsMapper
    private StarsMapper starsMapper;

    public List<Stars> getAll() {
        return starsMapper.queryAll();
    }
}
If the service has many methods, you should create a service interface to define all the methods and put the concrete implements into the impl class. Service takes charge of logic process. It calls the mapper layer, and receive the data transfer from the mapper layer.
- Creating the StarsController.class under controller package
package com.leon.stars.controller;

import com.leon.stars.model.Stars;
import com.leon.stars.service.StarsService;
import org.springframework.beans.factory.annotation.Autowired;
import org.springframework.web.bind.annotation.RequestMapping;
import org.springframework.web.bind.annotation.RestController;
import java.util.List;

@RestController      // equals to @Controller + @Responbody
public class StarsController {

    @Autowired
    StarsService starsService;

    @RequestMapping("/stars",)         // offer the site for the web
    public List<Stars> query() {
        List<Stars> stars = starsService.queryAll();
        return stars;
    }
}
Controller layer is responsible for interaction with the web, receives the request ,calls the service layer and return specific data to the web. After steps above, type the “http://localhost:8080/stars” in the explorer you will get the json data disply in the webpage:

Then the web can render the front-page with this json data. But I don’t how to do this. We will talk about receiving data from front-page and making the corresponding dababase opreation next time if I could be some acquaintant with the front-end work.
