传输控制协议(Transmission Control Protocol,TCP)是一种可靠、面向连接、面向数据流的传输协议,许多高层应用协议(包括HTTP、FTP等)都是以它为基础的,TCP协议非常适合数据的连续传输。

TCP协议工作原理
如图10.9所示,TCP协议能够为应用程序提供可靠的通信连接,使一台计算机发出的字节流无差错地送达网络上的其他计算机。因此,对可靠性要求高的数据通信系统往往使用TCP协议传输数据,但在正式收发数据前通信双方必须首先建立连接。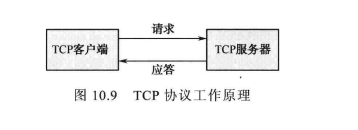
TCP编程模型
下面介绍一下基于TCP协议的经典编程模型,程序编写的流程如图10.10所示。

首先启动服务器,一段时间后启动客户端,它与此服务器经过三次握手后建立连接。此后的一段时间内,客户端向服务器发送一个请求,服务器处理这个请求,并为客户端发回一个响应。这个过程一直持续下去,直到客户端为服务器发一个文件结束符,并关闭客户端连接,接着服务器也关闭服务器端的连接,结束运行或等待一个新的客户端连接。
Qt 中通过QTcpSocket类和QTcpServer类实现TCP协议的编程。下面介绍如何实现一个基于TCP协议的网络聊天室应用,它同样也由客户端和服务器两部分组成。
TCP服务器编程实例
以下内容是服务器端的编程,建立工程TcpServer.pro。
(1)头文件“tcpserver.h”中声明了需要的各种控件,TcpServer继承自QDialog,实现了服务器端的对话框显示与控制。其具体代码如下:
#ifndef TCPSERVER_H
#define TCPSERVER_H

#include <QDialog>
#include <QDialog>
#include <QListWidget>
#include <QLabel>
#include <QLineEdit>
#include <QPushButton>
#include <QGridLayout>
#include "server.h"
class tcpserver : public QDialog
{
    Q_OBJECT

public:
    tcpserver(QWidget *parent = 0);
    ~tcpserver();

private:
    QListWidget *ContentListWidget;
    QLabel *PortLabel;
    QLineEdit *PortLineEdit;
    QPushButton *CreateBtn;
    QGridLayout *mainLayout;
    int port;
    Server *server;
public slots:
    void slotCreateServer();
    void updateServer(QString,int);
};

#endif // TCPSERVER_H
(2)在源文件“tcpserver.cpp”中,TcpServer类的构造函数主要实现窗体各控件的创建、布局等,其具体代码如下:
#include "tcpserver.h"
#pragma execution_character_set("utf-8")   //中文输入
tcpserver::tcpserver(QWidget *parent)
    : QDialog(parent)
{
    setWindowTitle((tr("TCP Server")));

    ContentListWidget=new QListWidget;

    PortLabel=new QLabel(tr("端口:"));
    PortLineEdit=new QLineEdit;

    CreateBtn=new QPushButton(tr("创建聊天室:"));

    mainLayout=new QGridLayout(this);
    mainLayout->addWidget(ContentListWidget,0,0,1,2);
    mainLayout->addWidget(PortLabel,1,0);
    mainLayout->addWidget(PortLineEdit,1,1);
    mainLayout->addWidget(CreateBtn,2,0,1,2);

    port=8010;
    PortLineEdit->setText(QString::number(port));

    connect(CreateBtn,SIGNAL(clicked()),this,SLOT(slotCreateServer()));
}

tcpserver::~tcpserver()
{
}

void tcpserver::slotCreateServer()
{
    server=new Server(this,port);   //创建一个server对象
    //将server对象的updateServer()信号与相应的槽函数进行连接
    connect(server,SIGNAL(updateServer(QString,int)),this,SLOT(updateServer(QString,int)));
    CreateBtn->setEnabled(false);
}

void tcpserver::updateServer(QString msg, int length)
{
    ContentListWidget->addItem(msg.left(length));
}

以上完成了服务器的界面设计,下面将详细完成聊天室的服务器端功能。
(1)在工程文件“TcpServer.pro”中添加如下语句:
QT+=network
(2)在工程“TcpServer.pro”中添加C++类文件“tcpclientsocketh”及
“tcpclientsocket.cpp”,TopClientSocket继承自QTcpSocket,创建一个TCP套接字,以便在服务器端实现与客户端程序的通信。
头文件“tcpclientsocket.h”的具体代码如下:
#ifndef TCPCLIENTSOCKET_H
#define TCPCLIENTSOCKET_H
#pragma execution_character_set("utf-8")   //中文输入
#include <QTcpSocket>
#include <QObject>

class TcpClientSocket : public QTcpSocket
{
    Q_OBJECT    //添加宏(Q_OBJECT)是为了实现信号与槽的通信
public:
    TcpClientSocket(QObject *parent=0);
signals:
    void updateClients(QString,int);
    void disconnected(int);

protected slots:
    void dataReceived();
    void slotDisconnected();
};

#endif // TCPCLIENTSOCKET_H
(3)在源文件“tcpclientsocket.cpp”中,的具体代码如下:
#include "tcpclientsocket.h"
#pragma execution_character_set("utf-8")   //中文输入


TcpClientSocket::TcpClientSocket(QObject *parent)
{
    //readyRead()是QIODevice的signal,由QTcpSocket继承而来。QIODevice是所有输入\输出设备
    //的一个抽象类,其中定义了基本的接口,在QT中,QTcpSocket也被看做一个QIODevice,readyRead()信号在有数据到来时发出
    connect(this,SIGNAL(readyRead()),this,SLOT(dataReceived()));
    //disconnected()信号在有数据到来时发出
    connect(this,SIGNAL(disconnected()),this,SLOT(slotDisconnected()));
}

void TcpClientSocket::dataReceived()
{
    while(bytesAvailable()>0)       //从套接字中将有效数据取出,然后发出updateClients()信号.
    {                               //updateClients()信号是通知服务器向聊天室内的所有成员广播信息
        int length=bytesAvailable();
        char buf[1024];
        read(buf,length);

        QString msg=buf;
        emit updateClients(msg,length);
    }
}

void TcpClientSocket::slotDisconnected()
{
    emit disconnected(this->socketDescriptor());
}
(4)在工程“TcpServer.pro”中添加C++类文件“server.h”及“server.cpp”,Server继承自QTcpServer,实现一个TCP协议的服务器。利用QTcpServer,开发者可以监听到指定端口的TCP连接。其具体代码如下:
#ifndef SERVER_H
#define SERVER_H

#include <QTcpServer>
#include <QObject>
#include "tcpclientsocket.h"


class Server : public QTcpServer
{
    Q_OBJECT   //添加宏(Q_OBJECT)是为了实现信号与槽
public:
    Server(QObject *parent=0,int port=0);
    QList<TcpClientSocket *> TcpClientSocketList;  //用来保存与每一个客户端连接的TcpClientSocket

signals:
    void updateServer(QString,int);
public slots:
    void updateClients(QString,int);
    void slotDisconnected(int);
protected:
    void incomingConnection(int socketDescriptor);
};

#endif // SERVER_H
#include "server.h"
#pragma execution_character_set("utf-8")   //中文输入

//QHostAddress::LocaHost 表示IPV4的本机地址127.0.0.1;
//QHostAddress::LocaHostIPv6b表示IPv6的任意地址
//QHostAddress::Broadcast表示广播地址255.255.255.255
//QHostAddress::Any表示IPv4的任意地址0.0.0.0
//QHostAddress::AnyIPv6表示IPv6的任意地址
Server::Server(QObject *parent,int port)        //QObject *parent/QWidget *parent,当指定了parent后,Qt就会介入,在合适的时候调用对应的delete操作。
    :QTcpServer(parent)
{
    listen(QHostAddress::Any,port);     //在指定的端口对任意地址进行监听
}


void Server::incomingConnection(int socketDescriptor)
{
    //创建一个新的TcpClientSocket与客户端通信
    TcpClientSocket *tcpClientSocket=new TcpClientSocket(this);
    //连接TcpClientSocket的updateClients信号
    connect(tcpClientSocket,SIGNAL(updateClients(QString,int)),this,SLOT(updateClients(QString,int)));
    //连接TcpClientSocket的disconnected信号
    connect(tcpClientSocket,SIGNAL(disconnected(int)),this,SLOT(slotDisconnected(int)));
    //将新创建的TcpClientSocket的套接字描述符指定为参数sockedDescriptor
    tcpClientSocket->setSocketDescriptor(socketDescriptor);
    //将tcpClientSocket加入客户端套接字列表以便管理
    TcpClientSocketList.append(tcpClientSocket);
}
//updateClients()函数将任意客户端发来的信息进行广播,保证聊天室所有客户均能看到其他人的发言
void Server::updateClients(QString msg, int length)
{
    emit updateServer(msg,length);  //发出updateServer信号,用来通知服务器对话框更新相应的显示状态
    for(int i=0;i<TcpClientSocketList.count();i++)      //实现信息的广播,tcpClientSockedList中保存
    {                                                   //了所有与服务器相连的TcpClientSocket对象
        QTcpSocket *item=TcpClientSocketList.at(i);
        if(item->write(msg.toLatin1(),length)!=length)
        {
            continue;
        }
    }
}
//slotDisconnected()函数实现从tcpClientSocketList列表中将断开连接的
//TcpClientSocketList对象删除的功能
void Server::slotDisconnected(int descriptor)
{
    for(int i=0;i<TcpClientSocketList.count();i++)
    {
        QTcpSocket *item=TcpClientSocketList.at(i);
        if(item->socketDescriptor()==descriptor)
        {
            TcpClientSocketList.removeAt(i);
            return;
        }
    }
    return;
}

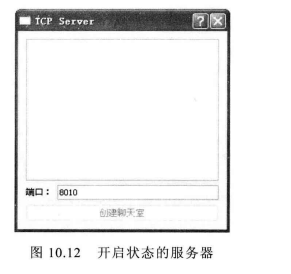
此时运行服务器端工程“TcpServer.pro”编译通过。单击“创建聊天室”
便开通了一个TCP聊天室的服务器,如图10.12所示。