文章目录
一、Spring-AOP原理
1.1 BeanPostProcessor
Bean的后置处理器。Spring在实例化Bean的过程中,会获得BeanPostProcessor的所有实现类,并分别调用实现类实现接口的那两个方法。
在Bean初始化之前会调用postProcessBeforeInitialization方法。在Bean初始化之后会调用postProcessAfterInitialization方法。在Spirng提供的众多后置处理器实现类中,有一个类AbstractAutoProxyCreator是用来处理AOP的。
public interface BeanPostProcessor {
   default Object postProcessBeforeInitialization(Object bean, String beanName) throws BeansException {
      return bean;
   }
   default Object postProcessAfterInitialization(Object bean, String beanName) throws BeansException {
      return bean;
   }
}
1.2 代理对象如何生成
1.2.0 寻找入口
在Spirng实例化Bean放入单例池之前,如果Bean有切面的织入,那么该bean就会被Spring代理(JDK Proxy或CGLIB),被代理的对象会放入单例池中,代理对象实现了功能增强,也就是AOP。
在上一篇 Spirng-IoC原理中提到,实例化Bean的过程是在AbstractAutowireCapableBeanFactory的``doCreateBean方法中完成的。在属性依赖注入后(也就是执行完populateBean后 )。调用了initializeBean`方法。这个方法为Bean添加了后置处理器。
1.2.1 initializeBean源码:
initializeBean:
protected Object initializeBean(final String beanName, final Object bean, @Nullable RootBeanDefinition mbd) {
  // 调用JDK的安全验证机制
  if (System.getSecurityManager() != null) {
    // 实现PrivilegedAction接口的匿名内部类
    AccessController.doPrivileged((PrivilegedAction<Object>) () -> {
      invokeAwareMethods(beanName, bean);
      return null;
    }, getAccessControlContext());
  } else {
    // 为bean实例包装相关属性:如名称、类加载器、所属容器等。
    invokeAwareMethods(beanName, bean);
  }

  Object wrappedBean = bean;
  // 如果Bean定义不为null或者bean定义不是合成的.
  if (mbd == null || !mbd.isSynthetic()) {
    // 调用BeanPostProcessors后置处理器,在Bean初始化之前做一些处理
    wrappedBean = applyBeanPostProcessorsBeforeInitialization(wrappedBean, beanName);
  }

  try {
    // 调用bean实例初始化方法。这个方法是在SpringBean定义配置文件中通过init-method属性指定的
    // xml配置和注解配置、JSR注解配置是一样的。
    invokeInitMethods(beanName, wrappedBean, mbd);
  } catch (Throwable ex) {...省略异常信息...}
  if (mbd == null || !mbd.isSynthetic()) {
    // 调用BeanPostProcessors后置处理器,在Bean初始化之后做一些处理
    // 此方法中aop的入口
    wrappedBean = applyBeanPostProcessorsAfterInitialization(wrappedBean, beanName);
  }
  return wrappedBean;
}

// bean实例 初始化之后执行
@Override
public Object applyBeanPostProcessorsAfterInitialization(Object existingBean, String beanName)
  throws BeansException {

  Object result = existingBean;
  for (BeanPostProcessor processor : getBeanPostProcessors()) {
    // 调用所有后置处理器额方法。
    Object current = processor.postProcessAfterInitialization(result, beanName);
    if (current == null) {
      return result;
    }
    result = current;
  }
  return result;
}
可以看出在其中调用了applyBeanPostProcessorsAfterInitialization方法来应用后置处理器。而在这个方法中,遍历了所有的BeanPostProcessor,并且调用了BeanPostProcessor的后置处理方法postProcessAfterInitialization。
上面刚说过,BeanPostProcessor的实现类由很多。完成AOP的类是AbstractAutoProxyCreator,所以只看这个类的postProcessAfterInitialization方法:
-
// 如果子类将bean标识为要代理的bean,则使用已配置的侦听器创建代理
@Override
public Object postProcessAfterInitialization(@Nullable Object bean, String beanName) {
  if (bean != null) {
    Object cacheKey = getCacheKey(bean.getClass(), beanName);
    if (this.earlyProxyReferences.remove(cacheKey) != bean) {
      // core1 必要时包裹
      return wrapIfNecessary(bean, beanName, cacheKey);
    }
  }
  return bean;
}
在这里面调用了一个核心方法wrapIfNecessary,
-
protected Object wrapIfNecessary(Object bean, String beanName, Object cacheKey) {
  // 如果beanName有长度。并且代理源beans包含这个beanName。就直接返回
  if (StringUtils.hasLength(beanName) && this.targetSourcedBeans.contains(beanName)) {
    return bean;
  }

  // 判断是否需要代理这个Bean
  if (Boolean.FALSE.equals(this.advisedBeans.get(cacheKey))) {
    return bean;
  }

  // 如果是基础类,或者应该跳过的类,
  // 所谓isInfrastructureClass就是指,Advice,PointCut,Advisor
  if (isInfrastructureClass(bean.getClass()) || shouldSkip(bean.getClass(), beanName)) {
    this.advisedBeans.put(cacheKey, Boolean.FALSE);
    return bean;
  }

  // Create proxy if we have advice.
  // 如果有通知,就创建代理。
  // 获取这个Bean的通知
  Object[] specificInterceptors = getAdvicesAndAdvisorsForBean(bean.getClass(), beanName, null);
  if (specificInterceptors != DO_NOT_PROXY) {
    this.advisedBeans.put(cacheKey, Boolean.TRUE);
    // 创建代理
    Object proxy = createProxy(
      bean.getClass(), beanName, specificInterceptors, new SingletonTargetSource(bean));
    this.proxyTypes.put(cacheKey, proxy.getClass());
    return proxy;
  }

  this.advisedBeans.put(cacheKey, Boolean.FALSE);
  return bean;
}
可以看到有一个createProxy创建代理对象。
protected Object createProxy(Class<?> beanClass, @Nullable String beanName,
								 @Nullable Object[] specificInterceptors, TargetSource targetSource) {
  ...省略不重要信息...
  // core1. 重代理工厂中获取代理对象。通过classLoader
  return proxyFactory.getProxy(getProxyClassLoader());
}

public Object getProxy(@Nullable ClassLoader classLoader) {
  // core1.
  return createAopProxy().getProxy(classLoader);
}
其中createAopProxy()方法,就是创建了了一个工厂,后面是调用工厂的getProxy来生产代理对象。
createAopProxy其实就是选择代理策略——使用JDK动态代理或是CGLIB动态代理。@Override public AopProxy createAopProxy(AdvisedSupport config) throws AopConfigException { if (config.isOptimize() || config.isProxyTargetClass() || hasNoUserSuppliedProxyInterfaces(config)) { Class<?> targetClass = config.getTargetClass(); if (targetClass == null) { throw new AopConfigException("TargetSource cannot determine target class: " + "Either an interface or a target is required for proxy creation."); } if (targetClass.isInterface() || Proxy.isProxyClass(targetClass)) { // core1 JdkDynamicAopProxy return new JdkDynamicAopProxy(config); } // core2 ObjenesisCglibAopProxy return new ObjenesisCglibAopProxy(config); } else { // core1 JdkDynamicAopProxy return new JdkDynamicAopProxy(config); } } @Override public Object getProxy(@Nullable ClassLoader classLoader) { if (logger.isTraceEnabled()) { logger.trace("Creating JDK dynamic proxy: " + this.advised.getTargetSource()); } // 获取所有的代理接口 Class<?>[] proxiedInterfaces = AopProxyUtils.completeProxiedInterfaces(this.advised, true); findDefinedEqualsAndHashCodeMethods(proxiedInterfaces); return Proxy.newProxyInstance(classLoader, proxiedInterfaces, this); }JDK动态代理很经典的调用了
Proxy.newProxyInstance来创建代理对象。至于CGLIB同样也是返回的代理对象
1.2.2 返回代理的对象
至此,可以看出,如果Bean想要使用AOP增强,那么initializeBean方法实际上返回的是一个被代理过得Bean对象。initializeBean方法继续往高层返回对象到IoC容器中(也就是初始化Bean)。最后容器中放入的Bean就是实现了AOP理念的Bean对象。
返回对象
↓↓↓↓
initializeBean——————>doCreateBean——>createBean——>doGetBean——>getBean——>preInstantiateSingletons——>finishBeanFactoryInitialization——>refresh——>构造方法。
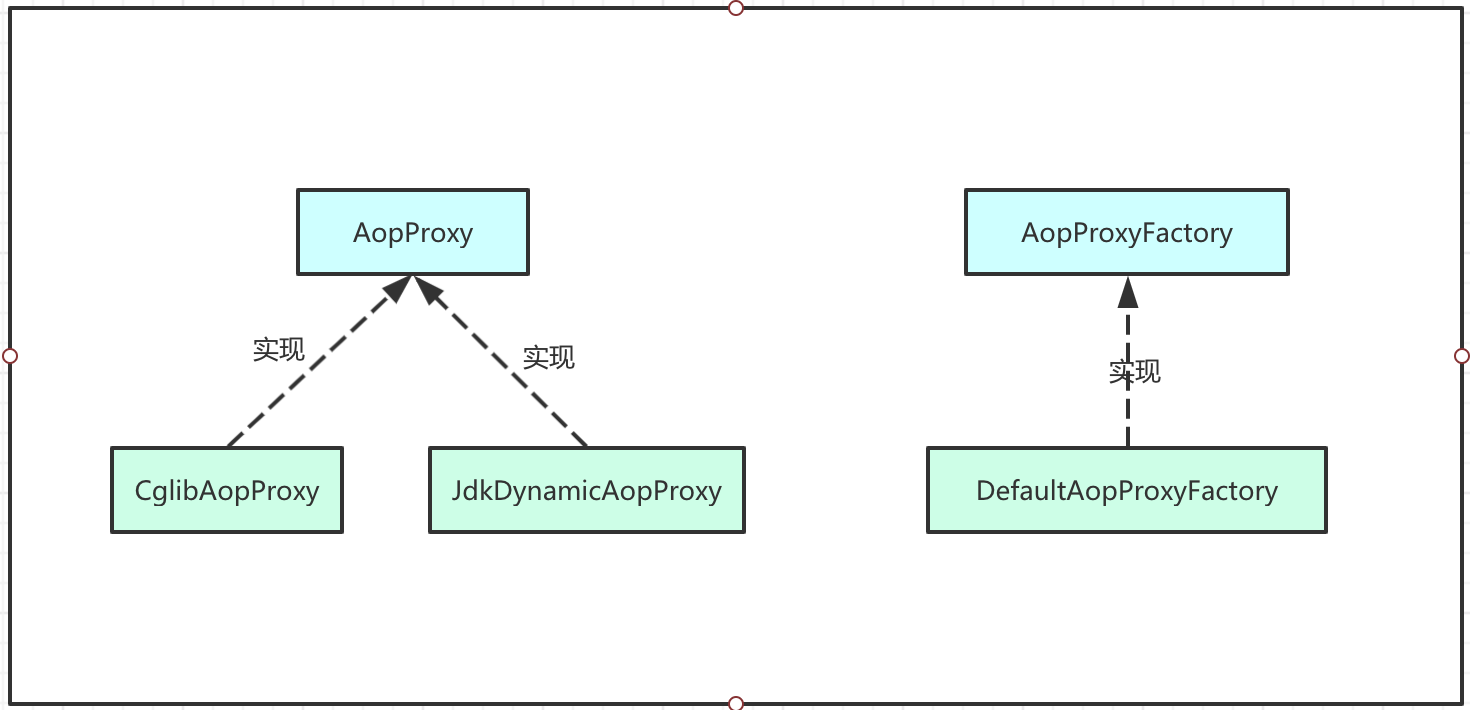
1.2.3 AopProxy&AopProxyFactory
这是一个典型的简单工厂模式应用
1.3 切面如何织入
1.3.0 通过invoke回调
代理对象如何生成,1.2.1已经讲得很明白。那么代理对象生成之后,切面是如何织入的呢?
InvocationHandler是JDK动态代理的核心,代理对象调用方法都委派给invoke方法。从JdkDynamicAopProxy源码中可知道,它也实现了InvocationHandler接口,直接来看重写的invoke方法
public Object invoke(Object proxy, Method method, Object[] args) throws Throwable {
  Object oldProxy = null;
  boolean setProxyContext = false;

  TargetSource targetSource = this.advised.targetSource;
  Object target = null;

  try {
    ...省略不重要信息...

    Object retVal;

    if (this.advised.exposeProxy) {
      // Make invocation available if necessary.
      oldProxy = AopContext.setCurrentProxy(proxy);
      setProxyContext = true;
    }
    target = targetSource.getTarget();
    Class<?> targetClass = (target != null ? target.getClass() : null);

    // 从方法上获取拦截器链,
    // 如果有拦截器,应用拦截器,并执行连接点
    // 如果没有拦截器,直接反射执行连接点
    // core1. getInterceptorsAndDynamicInterceptionAdvice
    List<Object> chain = this.advised.getInterceptorsAndDynamicInterceptionAdvice(method, targetClass);

    if (chain.isEmpty()) {
      Object[] argsToUse = AopProxyUtils.adaptArgumentsIfNecessary(method, args);
      retVal = AopUtils.invokeJoinpointUsingReflection(target, method, argsToUse);
    }
    else {
      new ReflectiveMethodInvocation(proxy, target, method, args, targetClass, chain);
      retVal = invocation.proceed();
    }

    ...省略不重要信息...
  }
  finally {
    if (target != null && !targetSource.isStatic()) {
      // Must have come from TargetSource.
      targetSource.releaseTarget(target);
    }
    if (setProxyContext) {
      // Restore old proxy.
      AopContext.setCurrentProxy(oldProxy);
    }
  }
}
1.3.1 获取拦截器链
有个核心步骤:从此方法上获取拦截器链,如果有拦截器,应用拦截器。并执行连接点(JoinPoint):如果没有拦截器,则直接反射执行连接点。这里的关键是如何获取拦截器链的。以及它是如何执行的。
从上面源码可知:this.advised.getInterceptorsAndDynamicInterceptionAdvice返回了拦截器链,来看一下这个方法:
-
public List<Object> getInterceptorsAndDynamicInterceptionAdvice(Method method, @Nullable Class<?> targetClass) {
  MethodCacheKey cacheKey = new MethodCacheKey(method);
  List<Object> cached = this.methodCache.get(cacheKey);
  if (cached == null) {
    // core1.
    cached = this.advisorChainFactory.getInterceptorsAndDynamicInterceptionAdvice(
      this, method, targetClass);
    this.methodCache.put(cacheKey, cached);
  }
  return cached;
}
根据上面源码:第一次从缓存中获取
cacheKey一定为空,所以实际上获取拦截器链是通过AdvisorChainFactory.getInterceptorsAndDynamicInterceptionAdvice方法获取到的。并且将结果保存到了缓存中。接下来来看这个方法:public List<Object> getInterceptorsAndDynamicInterceptionAdvice( Advised config, Method method, @Nullable Class<?> targetClass) { AdvisorAdapterRegistry registry = GlobalAdvisorAdapterRegistry.getInstance(); Advisor[] advisors = config.getAdvisors(); List<Object> interceptorList = new ArrayList<>(advisors.length); Class<?> actualClass = (targetClass != null ? targetClass : method.getDeclaringClass()); Boolean hasIntroductions = null; for (Advisor advisor : advisors) { if (advisor instanceof PointcutAdvisor) { // Add it conditionally. PointcutAdvisor pointcutAdvisor = (PointcutAdvisor) advisor; if (config.isPreFiltered() || pointcutAdvisor.getPointcut().getClassFilter().matches(actualClass)) { MethodMatcher mm = pointcutAdvisor.getPointcut().getMethodMatcher(); boolean match; if (mm instanceof IntroductionAwareMethodMatcher) { if (hasIntroductions == null) { hasIntroductions = hasMatchingIntroductions(advisors, actualClass); } match = ((IntroductionAwareMethodMatcher) mm).matches(method, actualClass, hasIntroductions); } else { match = mm.matches(method, actualClass); } if (match) { MethodInterceptor[] interceptors = registry.getInterceptors(advisor); if (mm.isRuntime()) { // Creating a new object instance in the getInterceptors() method // isn't a problem as we normally cache created chains. for (MethodInterceptor interceptor : interceptors) { interceptorList.add(new InterceptorAndDynamicMethodMatcher(interceptor, mm)); } } else { interceptorList.addAll(Arrays.asList(interceptors)); } } } } else if (advisor instanceof IntroductionAdvisor) { IntroductionAdvisor ia = (IntroductionAdvisor) advisor; if (config.isPreFiltered() || ia.getClassFilter().matches(actualClass)) { Interceptor[] interceptors = registry.getInterceptors(advisor); interceptorList.addAll(Arrays.asList(interceptors)); } } else { Interceptor[] interceptors = registry.getInterceptors(advisor); interceptorList.addAll(Arrays.asList(interceptors)); } } return interceptorList; }这个方法的注释://这有点棘手…我们必须先处理introductions,//但我们需要保留最终列表中的顺序。
这个方法执行完之后,Advised中配置的能够应用到连接点或目标对象的所有Advisor全部被转化成MethodInterceptor。然后来看一下,拦截器链是如何工作的。
1.3.2 应用拦截器链
if (chain.isEmpty()) {
  Object[] argsToUse = AopProxyUtils.adaptArgumentsIfNecessary(method, args);
  retVal = AopUtils.invokeJoinpointUsingReflection(target, method, argsToUse);
}
else {
  new ReflectiveMethodInvocation(proxy, target, method, args, targetClass, chain);
  retVal = invocation.proceed();
}
从1.3.0源码的片段中可以看出,如果得到的拦截器为空,则直接反射调用目标方法,否则创建MethodInvocation,调用其process方法,触发拦截器链的执行。
-
来看
proceed方法,具体代码如下:public Object proceed() throws Throwable { // 如果拦截器执行完了,执行连接点 if (this.currentInterceptorIndex == this.interceptorsAndDynamicMethodMatchers.size() - 1) { return invokeJoinpoint(); } Object interceptorOrInterceptionAdvice = this.interceptorsAndDynamicMethodMatchers.get(++this.currentInterceptorIndex); // 动态匹配,运行时参数是否满足条件 if (interceptorOrInterceptionAdvice instanceof InterceptorAndDynamicMethodMatcher) { InterceptorAndDynamicMethodMatcher dm = (InterceptorAndDynamicMethodMatcher) interceptorOrInterceptionAdvice; Class<?> targetClass = (this.targetClass != null ? this.targetClass : this.method.getDeclaringClass()); if (dm.methodMatcher.matches(this.method, targetClass, this.arguments)) { return dm.interceptor.invoke(this); } else { // 匹配失败时,略过当前拦截器,执行下一个拦截器 return proceed(); } } else { // 它是一个拦截器,因此我们只需要调用它:切入点将在构造此对象之前进行静态评估。 return ((MethodInterceptor) interceptorOrInterceptionAdvice).invoke(this); } } protected Object invokeJoinpoint() throws Throwable { return AopUtils.invokeJoinpointUsingReflection(this.target, this.method, this.arguments); } public static Object invokeJoinpointUsingReflection(@Nullable Object target, Method method, Object[] args) throws Throwable { try { ReflectionUtils.makeAccessible(method); return method.invoke(target, args); } catch (InvocationTargetException ex) {...省略异常信息...} }可以看到proceed中,执行了拦截器和通知的回调方法。拦截器链调用就完美完成了。切入点是通过反射
method.invoke来调用的。
1.4 Spring AOP的一些补充
proceed方法是Joinpoint的抽象方法
二、Advised/Advice/Advisor
2.0 推断抽象
看到源码的部分肯定是已经对Spring AOP能够熟练使用了。
来看一个切面类:
package com.abc.aop;

import org.aspectj.lang.ProceedingJoinPoint;
import org.aspectj.lang.annotation.Around;
import org.aspectj.lang.annotation.Aspect;
import org.aspectj.lang.annotation.Pointcut;
import org.springframework.beans.factory.config.BeanDefinition;
import org.springframework.context.annotation.Scope;
import org.springframework.stereotype.Component;

@Component
@Scope(BeanDefinition.SCOPE_SINGLETON)
@Aspect
public class LogAop {
	@Pointcut("@annotation(com.abc.aop.Log)")
	public void aspect() {}

	@Around("aspect()")
	public Object around(ProceedingJoinPoint joinPoint) throws Throwable {
		Object obj;
		System.out.println("我是前置消息");
		obj = joinPoint.proceed();
		System.out.println("我是后置消息");
		return obj;
	}
}
该切面有三个重要点:
- @Aspect——标识切面
- @Pointcut——切入点
- @Around(“aspect()”)环绕通知
切入点就行坐标一样,可以找到目标方法的位置,但是找到目标方法干什么呢?——要执行业务处理(比如日志)。那有了advice(前置通知,后置通知等等)才能知道要干什么。
所以aop分为两个步骤来对方法进行增强:1.找到方法 2.执行业务代码。这两步就可以抽象成一个Advisor
从英文的角度理解:advice是建议,pointCut是地点,advisor是顾问。顾问知道要去什么地方,还知道要去那个地方提出什么建议。
再来看advised。是动词的过去式,可以理解为一个列表,它代表所有的已经有建议的顾问,包含了所有的顾问——advisor,而advisor包含一个pointCut和一个advice。
当Spring对advice想要做处理时,就可以找到advised这个列表,对其中的某些advice进行修改。
所以又将advice和advisor抽象成了advised。
2.1 源码解析
-
Advice: 源码中注释:Tag interface for Advice. Implementations can be any type of advice, such as Interceptors.这个最简单!通知的标记接口。实现可以是任何类型的advice,比如拦截器。
其主要分成两类:普通advice 与Interceptor:
看一下Advice的子类继承体系:
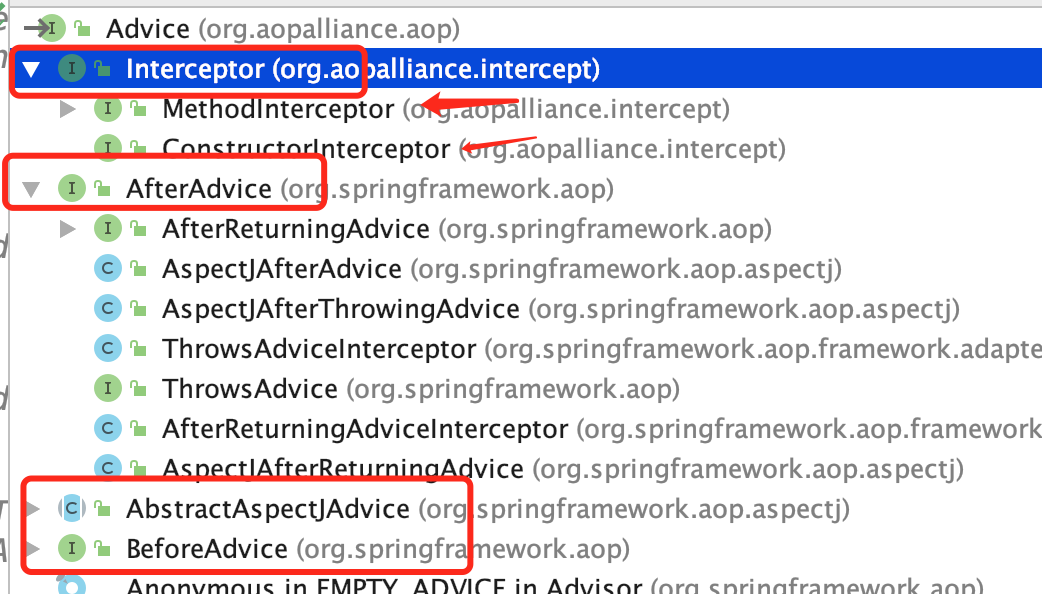
public interface Advice {空方法}可以看到Advice类的子类有两大派:即Intercepter和其他Advice。
在Proxy中最终执行的其实都是MethodInterceptor,因此这些Advice最终都是交给 AdvisorAdapter -> 将 advice 适配成 MethodInterceptor
-
Advisor:源码中注释:Base interface holding AOP advice (action to take at a joinpoint)and a filter determining the applicability of the advice (such as a pointcut). This interface is not for use by Spring users, but to allow for commonality in support for different types of advice.通常来讲:
Advisor包含一个Advice和一个PointCut。public interface Advisor { Advice EMPTY_ADVICE = new Advice() {}; Advice getAdvice(); boolean isPerInstance(); }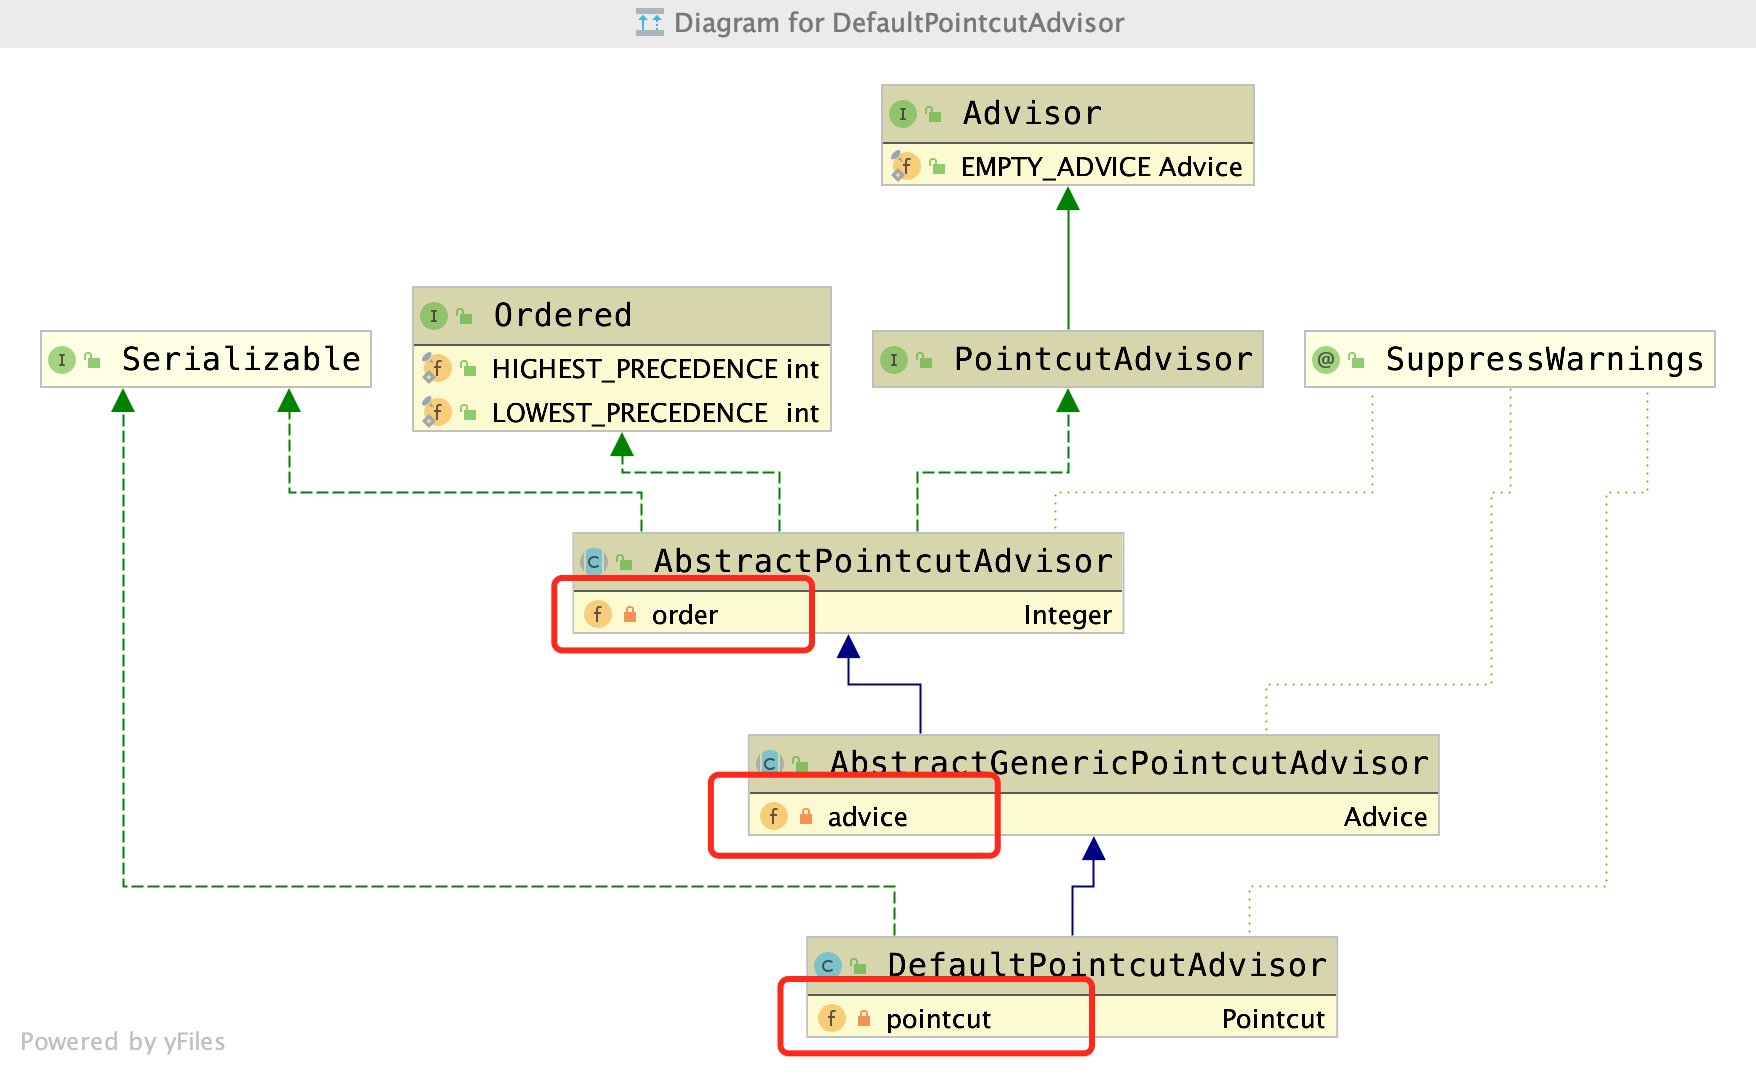
使用的最多的就是
DefaultPointcutAdvisor,从UML图可以看出DefaultPointcutAdvisor包含一个Advice和一个PointCut。并且实现了Ordered接口——即切面执行顺序。 -
Advised:源码中注释:Interface to be implemented by classes that hold the configuration of a factory of AOP proxies. This configuration includes the Interceptors and other advice, Advisors, and the proxied interfaces接口由 实现AOP代理工厂配置的类实现。此配置包括拦截器和其他advice、Advisors和代理接口。
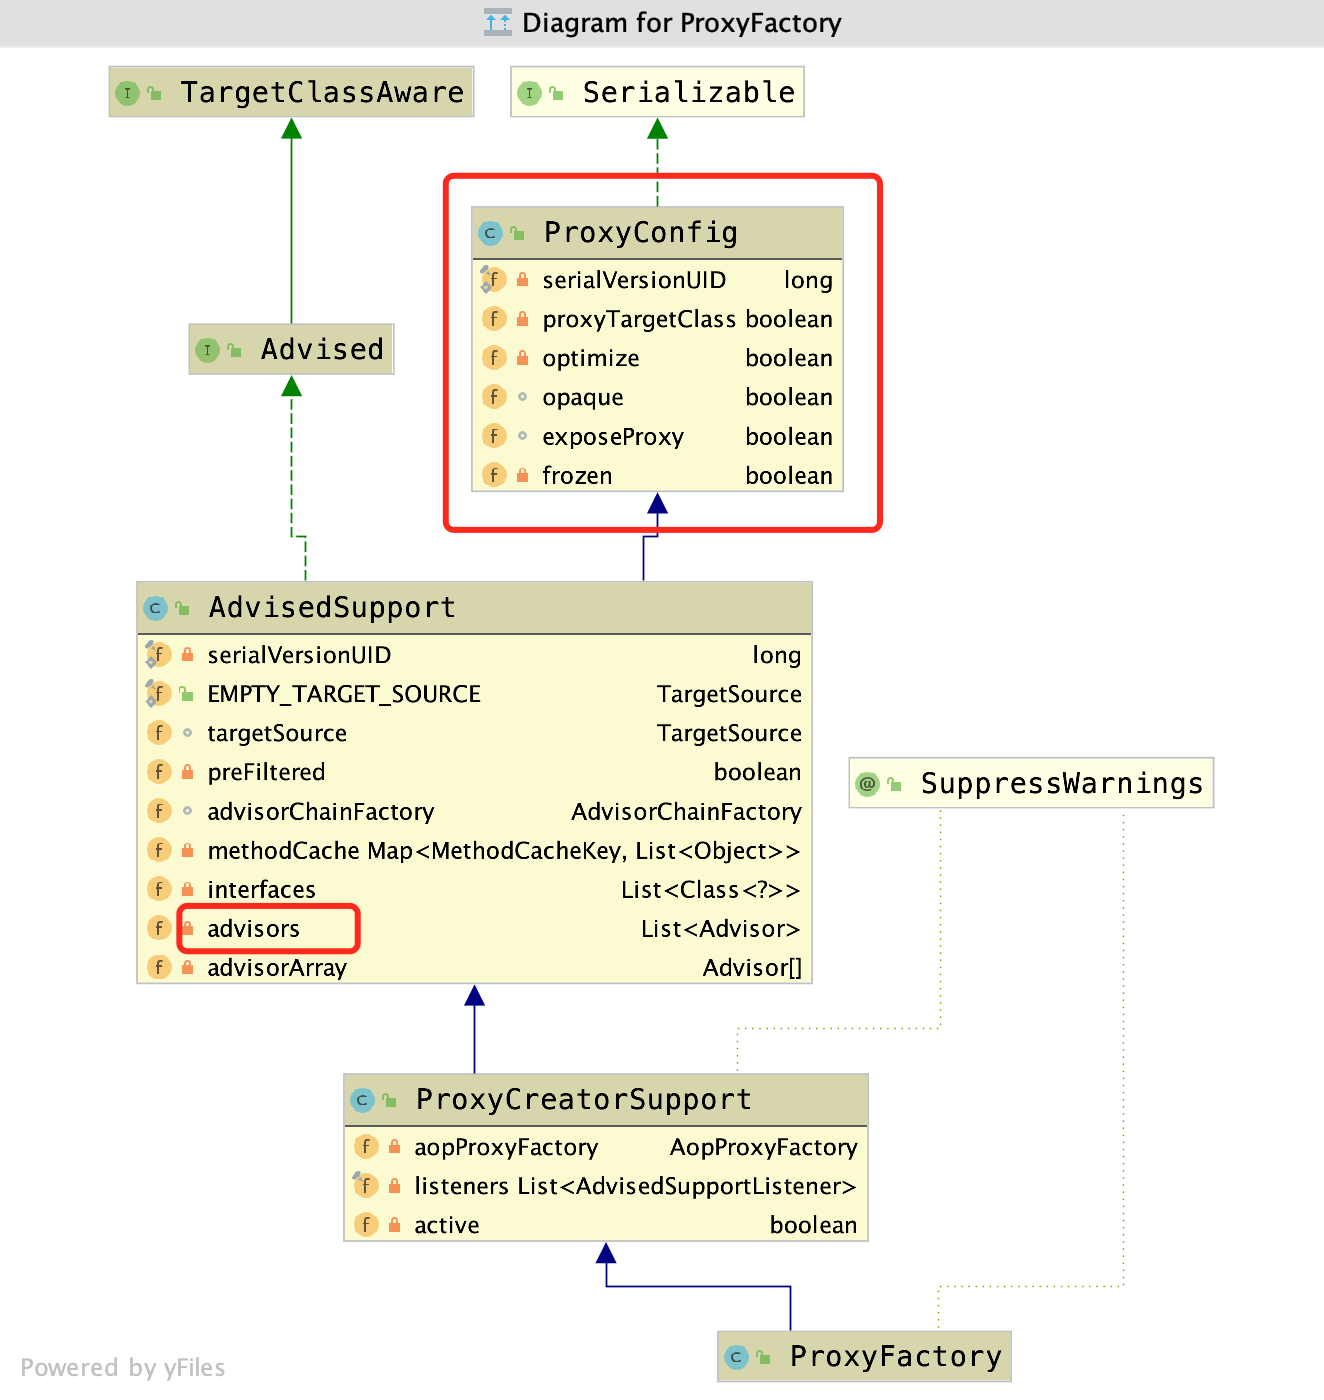
// 这个 Advised 接口的实现着主要是代理生成的对象与AdvisedSupport (Advised的支持器)
public interface Advised extends TargetClassAware {
  // 这个 frozen 决定是否 AdvisedSupport 里面配置的信息是否改变
  boolean isFrozen();
  // 是否代理指定的类, 而不是一些 Interface
  boolean isProxyTargetClass();
  // 返回代理的接口
  Class<?>[] getProxiedInterfaces();
  // 判断这个接口是否是被代理的接口
  boolean isInterfaceProxied(Class<?> intf);
  // 设置代理的目标对象
  void setTargetSource(TargetSource targetSource);
  // 获取代理的对象
  TargetSource getTargetSource();
  // 判断是否需要将 代理的对象暴露到 ThreadLocal中, 而获取对应的代理对象则通过 AopContext 获取
  void setExposeProxy(boolean exposeProxy);
  // 返回是否应该暴露 代理对象
  boolean isExposeProxy();
  // 设置 Advisor 是否已经在前面过滤过是否匹配 Pointcut (极少用到)
  void setPreFiltered(boolean preFiltered);
  // 获取 Advisor 是否已经在前面过滤过是否匹配 Pointcut (极少用到)
  boolean isPreFiltered();
  // 获取所有的 Advisor
  Advisor[] getAdvisors();
  // 增加 Advisor 到链表的最后
  void addAdvisor(Advisor advisor) throws AopConfigException;
  // 在指定位置增加 Advisor
  void addAdvisor(int pos, Advisor advisor) throws AopConfigException;
  // 删除指定的 Advisor
  boolean removeAdvisor(Advisor advisor);
  // 删除指定位置的 Advisor
  void removeAdvisor(int index) throws AopConfigException;
  // 返回 Advisor 所在位置de index
  int indexOf(Advisor advisor);
  // 将指定的两个 Advisor 进行替换
  boolean replaceAdvisor(Advisor a, Advisor b) throws AopConfigException;
  // 增加 Advice <- 这个Advice将会包裹成 DefaultPointcutAdvisor
  void addAdvice(Advice advice) throws AopConfigException;
  // 在指定 index 增加 Advice <- 这个Advice将会包裹成 DefaultPointcutAdvisor
  void addAdvice(int pos, Advice advice) throws AopConfigException;
  // 删除给定的 Advice
  boolean removeAdvice(Advice advice);
  // 获取 Advice 的索引位置
  int indexOf(Advice advice);
  // 将 ProxyConfig 通过 String 形式返回
  String toProxyConfigString();
}
X、关于SpringAop的一些问题
1. BeanFactoryPostProcessor和BeanPostProcessor的区别?
BeanFactoryPostProcessor实现该接口,==可以在spring的bean创建之前,修改bean的定义属性。==也就是说,Spring允许BeanFactoryPostProcessor在容器实例化任何其它bean之前读取配置元数据,并可以根据需要进行修改,
- 例如可以把bean的scope从singleton改为prototype,
- 也可以把property的值给修改掉。
- 可以同时配置多个BeanFactoryPostProcessor,
- 并通过设置
order属性来控制各个BeanFactoryPostProcessor的执行次序。
BeanPostProcessorBeanPostProcessor,可以在spring容器实例化bean之后,==在执行bean的初始化方法前后,添加一些自己的处理逻辑。==这里说的初始化方法,指的是下面两种:
BeanPostProcessor是在spring容器加载了bean的定义文件并且实例化bean之后执行的。BeanPostProcessor的执行顺序是在BeanFactoryPostProcessor之后
2. JDK安全验证机制?
if (System.getSecurityManager() != null) {
  AccessController.doPrivileged((PrivilegedAction<Object>) () -> {
    ((BeanFactoryAware) autowireCandidateResolver).setBeanFactory(DefaultListableBeanFactory.this);
    return null;
  }, getAccessControlContext());
}
SecurityManager应用场景:当运行未知的Java程序的时候,该程序可能有恶意代码(删除系统文件、重启系统等),为了防止运行恶意代码对系统产生影响,需要对运行的代码的权限进行控制,这时候就要启用Java安全管理器。
AccessController.doPrivileged的作用: Java默认不打开安全检查,如果不打开,本地程序拥有所有权限。但是如果程序中加了 System.setSecurityManager(new SecurityManager());则Java程序会检验权限。
例子:假设有这样一种情况:A程序想在 /Users/apple/Desktop 这个目录中新建一个文件,但是它没有相应的权限,但是它引用了另外一个Jar包B,刚好B有权限在/Users/apple/Desktop目录中新建文件,还有更巧的是B在新建文件的时候采用的是AccessController.doPrivileged方法进行的,这种情况下,A就可以调用B的创建文件的方法进行创建文件了。
3. init-method 和@PostConstruct?
@PostConstruct是javax的内容,是Java提案的规范。init-method是Spring中Bean的生命周期,在初始化bean时调用的。其实@PostConstruct和 init-method配置作用效果是一样的,只是使用场景不同。
使用@PostConstruct只需要加载方法上即可:
@Service(value = "cityService")
public class CityServiceImpl implements CityService {
	@PostConstruct
	public void beforeConstruct() {
		System.out.println("CityService实例创建完成后执行此代码");
	}

	@PreDestroy
	public void destoryConstruct() {
		System.out.println("CityService销毁之前执行此代码");
	}
}
使用init-method配置,是在@Bean中使用。
@Bean(name = "t", initMethod = "init", destroyMethod = "destroy")
public TestAtBeanImpl testAtBeanImpl() {
  return new TestAtBeanImpl();
}

public class TestAtBeanImpl implements TestAtBean {
	@Override
	public void testAtBean() {
		System.out.println("testAtBean");
	}

	public void init() {
		System.out.println("TestAtBeanImpl-->this is init method1 ");
	}
	public void destroy() {
		System.out.println("TestAtBeanImpl-->this is destroy method1");
	}
}
4. Advised、Advice、Advisor?
Advised:包含所有的Advisor 和 Advice
Advice:通知,前置通知,后置通知,环绕通知。指的就是Advice
Advisor:通知 + 切入点的适配器
5 Facets和Artifacts的区别:
Facets和Artifacts的区别:
Facets 表示这个module有什么特征,比如 Web,Spring和Hibernate等;
Artifact 是maven中的一个概念,表示某个module要如何打包,例如war exploded、war、jar、ear等等这种打包形式;
一个module有了 Artifacts 就可以部署到应用服务器中了!
在给项目配置Artifacts的时候有好多个type的选项,exploed是什么意思:
explode 在这里你可以理解为展开,不压缩的意思。也就是war、jar等产出物没压缩前的目录结构。建议在开发的时候使用这种模式,便于修改了文件的效果立刻显现出来。
默认情况下,IDEA的 Modules 和 Artifacts 的 output目录 已经设置好了,不需要更改,打成 war包 的时候会自动在 WEB-INF目录 下生产 classes目录,然后把编译后的文件放进去。
6. AspectJ和Sprig AOP
SpringAop 早期也实现了AOP理念,但是由于语法过于复杂,不如@AspectJ简单。所以后来Spring提供了@AspectJ support,也就是说Spring AOP并不是借助了@AspectJ来实现的AOP,只是把原来的语法弄得跟@AspectJ一样简单。
-
所以要使用SpringAOP时,要加
@EnableAspectJAutoProxy这样一个注解来启用@AspectJ -
在使用SpringAOP的时候要导入aspectj的jar包,但是并没用它的底层。只使用了它的语法风格
-
@EnableAspectJAutoProxy这个注解中有个proxyTargetClass属性,默认值为false,为true的时候无论目标对象有无接口,都会使用CGLIB做代理。
6.1 为什么添加了@EnableAspectJAutoProxySpring才有AOP的功能
源码分析,来看 @EnableAspectJAutoProxy的源码:
@Target(ElementType.TYPE)
@Retention(RetentionPolicy.RUNTIME)
@Import(AspectJAutoProxyRegistrar.class) // 导入了AspectJAutoProxyRegistrar这个类。
public @interface EnableAspectJAutoProxy {
	boolean proxyTargetClass() default false;
	boolean exposeProxy() default false;
}
通过源码可以看到,使用注解 @EnableAspectJAutoProxy就会导入一个类 AspectJAutoProxyRegistrar,就是这个切面自动代理注册的类将后置处理器加入到Spring的体系中的,这样Spring在初始化的时候,调用的后置处理器就多了一个 AutoProxyCreator来执行AOP切面织入.
7. aop的表达式
wthin 只描述到类。
execution 所有的粒度都能描述execution(* com.xyz.service.AccountService.*(..))
@annotation对方法进行aop织入,使用注解方式
@wthin对类进行织入,使用注解方式
this限制连接点匹配 AOP 代理的 bean 引用为指定类型的类
@this限制连接点匹配 AOP 代理的 bean的注解为指定类型的注解
target限制连接点匹配目标对象为指定类型的类。
@target限制连接点匹配目标对象有指定的注解。
8. 关于初始化getBean和主动调用getBean
初始化getBean调用的是 AbstractBeanFactory的doGetBean方法。而 主动调用getBean是调用 DefaultListableBeanFactory的getBean方法
但最终都是调用AbstractBeanFactory的doGetBean方法
9. lookup-method
业务应用场景:一个单例模式的bean A需要引用另外一个非单例模式的bean B,为了在我们每次引用的时候都能拿到最新的bean B,可以让bean A通过实现ApplicationContextWare来感知applicationContext(即可以获得容器上下文),从而能在运行时通过ApplicationContext.getBean(String beanName)的方法来获取最新的bean B。但是如果用ApplicationContextAware接口,就让我们与Spring代码耦合了,违背了反转控制原则(IoC,即bean完全由Spring容器管理,我们自己的代码只需要用bean就可以了)。
// 定义一个水果类
public class Fruit {
    public Fruit() {
        System.out.println("I got Fruit");
    }
}

// 苹果
public class Apple extends Fruit {
    public Apple() {
        System.out.println("I got a fresh apple");
    }
}

// 香蕉
public class Bananer extends Fruit {
    public Bananer () {
        System.out.println("I got a  fresh bananer");
    }
}

// 水果盘,可以拿到水果
public abstract class FruitPlate{
    // 抽象方法获取新鲜水果
    protected abstract Fruit getFruit();
}
<!-- 这是2个非单例模式的bean -->
<bean id="apple" class="cn.com.willchen.test.di.Apple" scope="prototype"/>
<bean id="bananer" class="cn.com.willchen.test.di.Bananer " scope="prototype"/>

<bean id="fruitPlate1" class="cn.com.willchen.test.di.FruitPlate">
    <lookup-method name="getFruit" bean="apple"/>
</bean>
<bean id="fruitPlate2" class="cn.com.willchen.test.di.FruitPlate">
    <lookup-method name="getFruit" bean="bananer"/>
</bean>
其中,最为核心的部分就是lookup-method的配置和FruitPlate.getFruit()方法。上面代码中,我们可以看到getFruit()方法是个抽象方法,我们并没有实现它啊,那它是怎么拿到水果的呢。这里的奥妙就是Srping应用了CGLIB(动态代理)类库。Spring在初始化容器的时候对配置的bean做了特殊处理,Spring会对bean指定的class做动态代理,代理标签中name属性所指定的方法,返回bean属性指定的bean实例对象。每次我们调用fruitPlate1或者fruitPlate2这2个bean的getFruit()方法时,其实是调用了CGLIB生成的动态代理类的方法。
