java NIO基本介绍
-
Java NIO 全称 java non-blocking IO,是指 JDK 提供的新 API。从 JDK1.4 开始,Java 提供了一系列改进的输入/输出的新特性,被统称为 NIO(即 New IO),是同步非阻塞的
-
NIO 相关类都被放在 java.nio 包及子包下,并且对原 java.io 包中的很多类进行改写。
-
NIO 有三大核心部分:Channel(通道),Buffer(缓冲区), Selector(选择器)
-
NIO是 面向缓冲区 ,或者面向 块 编程的。数据读取到一个它稍后处理的缓冲区,需要时可在缓冲区中前后移动,这就增加了处理过程中的灵活性,使用它可以提供非阻塞式的高伸缩性网络
-
Java NIO的非阻塞模式,使一个线程从某通道发送请求或者读取数据,但是它仅能得到目前可用的数据,如果目前没有数据可用时,就什么都不会获取,而不是保持线程阻塞,所以直至数据变的可以读取之前,该线程可以继续做其他的事情。 非阻塞写也是如此,一个线程请求写入一些数据到某通道,但不需要等待它完全写入,这个线程同时可以去做别的事情。
-
通俗理解:NIO是可以做到用一个线程来处理多个操作的。假设有10000个请求过来,根据实际情况,可以分配50或者100个线程来处理。不像之前的阻塞IO那样,非得分配10000个。
-
HTTP2.0使用了多路复用的技术,做到同一个连接并发处理多个请求,而且并发请求的数量比HTTP1.1大了好几个数量级。
NIO和BIO的比较
- BIO 以流的方式处理数据,而 NIO 以块的方式处理数据,块 I/O 的效率比流 I/O 高很多
- BIO 是阻塞的,NIO 则是非阻塞的
- BIO基于字节流和字符流进行操作,而 NIO 基于 Channel(通道)和 Buffer(缓冲区)进行操作,数据总是从通道读取到缓冲区中,或者从缓冲区写入到通道中。Selector(选择器)用于监听多个通道的事件(比如:连接请求,数据到达等),因此使用单个线程就可以监听多个客户端通道
NIO三大核心原理示意图
- Selector 、 Channel 和 Buffer 的关系图(简单版)
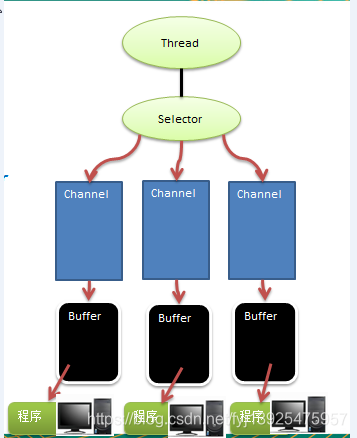
关系图的说明:
- 每个channel 都会对应一个Buffer
- Selector 对应一个线程, 一个线程对应多个channel(连接)
- 该图反应了有三个channel 注册到 该selector //程序
- 程序切换到哪个channel 是有事件决定的, Event 就是一个重要的概念
- Selector 会根据不同的事件,在各个通道上切换
- Buffer 就是一个内存块 , 底层是有一个数组
- 数据的读取写入是通过Buffer, 这个和BIO , BIO 中要么是输入流,或者是 输出流, 不能双向,但是NIO的Buffer 是可以读也可以写, 需要 flip 方法切换
- channel 是双向的, 可以返回底层操作系统的情况, 比如Linux , 底层的操作系统 通道就是双向的.
缓冲区(Buffer)
-
基本介绍
缓冲区(Buffer):缓冲区本质上是一个可以读写数据的内存块,可以理解成是一个容器对象(含数组),该对象提供了一组方法,可以更轻松地使用内存块,缓冲区对象内置了一些机制,能够跟踪和记录缓冲区的状态变化情况。Channel 提供从文件、网络读取数据的渠道,但是读取或写入的数据都必须经由 Buffer
-
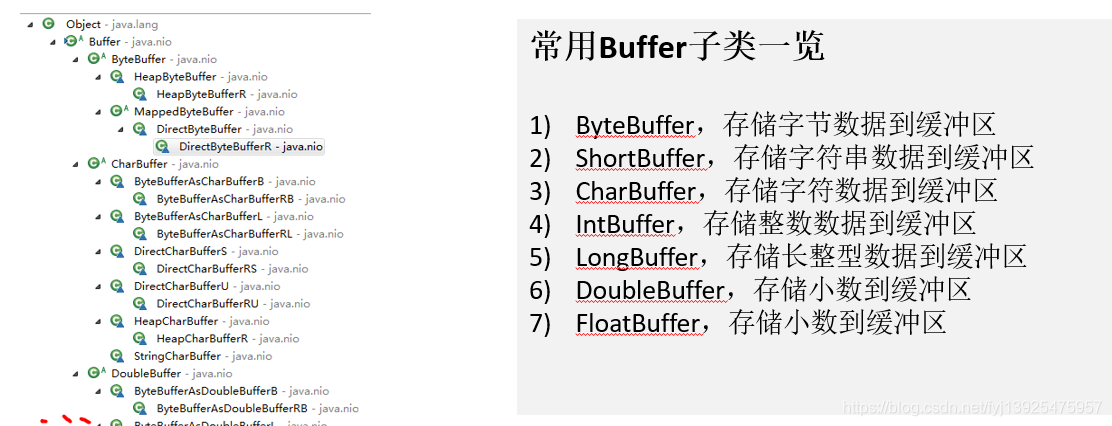
Buffer类及其子类
- 在 NIO 中,Buffer 是一个顶层父类,它是一个抽象类, 类的层级关系图:
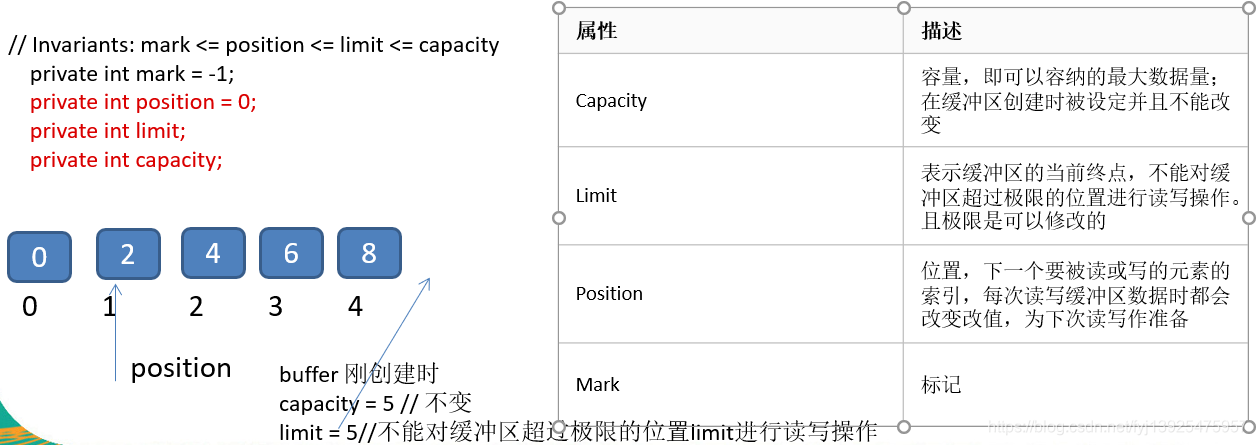
- Buffer类定义了所有的缓冲区都具有的四个属性来提供关于其所包含的数据元素的信息:
- 代码示例
public class BufferTest {
    public static void main(String[] args) {
        // 1.创建一个初始容量为5的IntBuffer
        IntBuffer intBuffer = IntBuffer.allocate(5);
        // 2.向intBuffer存放数据  capacity()返回缓冲区的容量
        for (int i = 0; i < intBuffer.capacity(); i++) {
            intBuffer.put(i*2);
        }

        // 将buffer切换,读写切换
        intBuffer.flip();
        while (intBuffer.hasRemaining()) {
            System.out.println(intBuffer.get());
        }
    }
}
通道(Channel)
- 基本介绍
- NIO的通道类似于流,但有些区别如下:
通道可以同时进行读写,而流只能读或者只能写
通道可以实现异步读写数据
通道可以从缓冲读数据,也可以写数据到缓冲:- BIO 中的 stream 是单向的,例如 FileInputStream 对象只能进行读取数据的操作,而 NIO 中的通道(Channel)是双向的,可以读操作,也可以写操作。
- Channel在NIO中是一个接口public interface Channel extends Closeable{}
- 常用的 Channel 类有:FileChannel、DatagramChannel、ServerSocketChannel 和 SocketChannel。【ServerSocketChanne 类似 ServerSocket , SocketChannel 类似 Socket】
- FileChannel 用于文件的数据读写,DatagramChannel 用于 UDP 的数据读写,ServerSocketChannel 和 SocketChannel 用于 TCP 的数据读写。
- FileChannel类
FileChannel主要用来对本地文件的IO操作,常见方法有:
- public int read(ByteBuffer dst) ,从通道读取数据并放到缓冲区中
- public int write(ByteBuffer src) ,把缓冲区的数据写到通道中
- public long transferFrom(ReadableByteChannel src, long position, long count),从目标通道中复制数据到当前通道
- public long transferTo(long position, long count, WritableByteChannel target),把数据从当前通道复制给目标通道
应用实例:
- 本地文件写数据
使用前面学习后的ByteBuffer(缓冲)和FileChannel,将“Hello,World”写到入到file01.txt文件夹中
public class FileChannelTest01 {
    public static void main(String[] args) throws IOException {
        // 使用前面学习后的ByteBuffer(缓冲)和FileChannel,将“Hello,World”写到入到file01.txt文件夹中

        // 步骤:
        // 1.创建一个输出流OutputStream,
        FileOutputStream fileOutputStream = new FileOutputStream("D://file01.txt");
        // 2.通过输出流获取一个FileChannel通道
        FileChannel fileChannel = fileOutputStream.getChannel();
        // 3.将字符串"Hello,World"放入到ByteBuffer中
        String str = "Hello,World";
        ByteBuffer byteBuffer = ByteBuffer.allocate(str.length());
        byteBuffer.put(str.getBytes());
        // 4.将byteBuffer进行flit,从读状态改到写
        byteBuffer.flip();
        // 5.将ByteBuffer写入到FileChannel中
        int write = fileChannel.write(byteBuffer);
        System.out.println("一共写出了"+ write +"字节");
        // 6.关闭流
        fileOutputStream.close();
    }
}
- 本地文件读数据
使用ByteBuffer和FileChannel,将file01.txt中的数据读入,并显示到控制台
public class FileChannelTest02 {
    public static void main(String[] args) throws Exception {
        // 使用ByteBuffer和FileChannel,将file01.txt中的数据读入,并显示到控制台
        // 步骤:
        // 1. 获取文件输入流
        File file = new File("D://file01.txt");
        FileInputStream fileInputStream = new FileInputStream(file);
        // 2. 从输入流中获取FileChannel
        FileChannel channel = fileInputStream.getChannel();
        // 3. 创建ByteBuffer
        ByteBuffer byteBuffer = ByteBuffer.allocate((int) file.length());
        // 4. 从FileChannel通道中读入数据到ByteBuffer
        channel.read(byteBuffer);
        // 5.输出到控制台
        System.out.println(new String(byteBuffer.array()));
        // 6. 关闭流
        fileInputStream.close();
    }
}
- 使用一个Buffer完成一个文件的读写
使用FileChannel完成一个文件的拷贝
public class FileChannelTest03 {
    public static void main(String[] args) throws IOException {
        // 使用FileChannel完成一个文件的拷贝
        // 步骤:
        // 1.创建文件输入流,并获取对应的FileChannel
        File file = new File("D://file01.txt");
        FileInputStream fileInputStream = new FileInputStream(file);
        FileChannel inputStreamChannel = fileInputStream.getChannel();
        // 2.创建文件输出流,并获取对应的FileChannel
        File outFile = new File("D://file02.txt");
        FileOutputStream fileOutputStream = new FileOutputStream(outFile);
        FileChannel outputStreamChannel = fileOutputStream.getChannel();
        // 3.创建ByteBuffer,将输入流的FileChannel读到ByteBuffer中
        ByteBuffer byteBuffer = ByteBuffer.allocate((int) file.length());
        int read = inputStreamChannel.read(byteBuffer);
        System.out.println("读入数据的数量:" + read);
        // 4.反转Buffer,将ByteBuffer的数据写入到输出流的FileChannel中
        byteBuffer.flip();
        int write = outputStreamChannel.write(byteBuffer);
        System.out.println("写入数据的数量:" + write);
        // 5.关闭流
        fileInputStream.close();
        fileOutputStream.close();
    }
}
- 拷贝文件TransferFrom方法
要求:使用FileChannel和方法transferFrom()方法完成文件的拷贝
public class FileChannelTest04 {
    public static void main(String[] args) throws IOException {
        // 使用FileChannel和方法transferFrom()方法完成文件的拷贝
        // 步骤:
        // 1.获取文件输入流及其通道
        File inFile = new File("D://file01.txt");
        FileInputStream fileInputStream = new FileInputStream(inFile);
        FileChannel inputStreamChannel = fileInputStream.getChannel();
        // 2.获取文件输出流及其通道
        File outFile = new File("D://file03.txt");
        FileOutputStream fileOutputStream = new FileOutputStream(outFile);
        FileChannel outputStreamChannel = fileOutputStream.getChannel();
        // 3.使用文件输出流的通道的transferFrom()完成拷贝
        outputStreamChannel.transferFrom(inputStreamChannel,0, inFile.length());
        // 4.关闭流
        fileInputStream.close();
        fileOutputStream.close();
    }
}
- 关于Buffer和Channel的注意事项和细节
- ByteBuffer 支持类型化的put 和 get, put 放入的是什么数据类型,get就应该使用相应的数据类型来取出,否则可能有 BufferUnderflowException 异常。
- 可以将一个普通Buffer 转成只读Buffer
- NIO 还提供了 MappedByteBuffer, 可以让文件直接在内存(堆外的内存)中进行修改, 而如何同步到文件由NIO 来完成.
- 前面我们讲的读写操作,都是通过一个Buffer 完成的,NIO 还支持 通过多个Buffer (即 Buffer 数组) 完成读写操作,即 Scattering 和 Gathering
Selector(选择器)
- 基本介绍
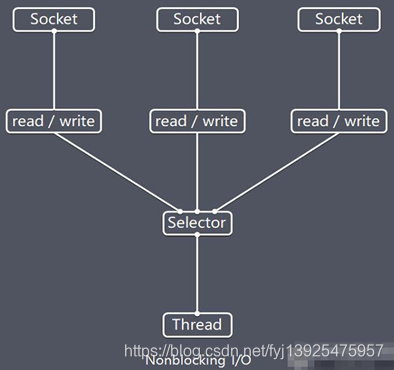
- Java 的 NIO,用非阻塞的 IO 方式。可以用一个线程,处理多个的客户端连接,就会使用到Selector(选择器)
- Selector 能够检测多个注册的通道上是否有事件发生(注意:多个Channel以事件的方式可以注册到同一个Selector),如果有事件发生,便获取事件然后针对每个事件进行相应的处理。这样就可以只用一个单线程去管理多个通道,也就是管理多个连接和请求。【示意图】
- 只有在 连接/通道 真正有读写事件发生时,才会进行读写,就大大地减少了系统开销,并且不必为每个连接都创建一个线程,不用去维护多个线程
- 避免了多线程之间的上下文切换导致的开销
- 特点说明:
- Netty 的 IO 线程 NioEventLoop 聚合了 Selector(选择器,也叫多路复用器),可以同时并发处理成百上千个客户端连接。
- 当线程从某客户端 Socket 通道进行读写数据时,若没有数据可用时,该线程可以进行其他任务。
- 线程通常将非阻塞 IO 的空闲时间用于在其他通道上执行 IO 操作,所以单独的线程可以管理多个输入和输出通道。
- 由于读写操作都是非阻塞的,这就可以充分提升 IO 线程的运行效率,避免由于频繁 I/O 阻塞导致的线程挂起。
- 一个 I/O 线程可以并发处理 N 个客户端连接和读写操作,这从根本上解决了传统同步阻塞 I/O 一连接一线程模型,架构的性能、弹性伸缩能力和可靠性都得到了极大的提升。
Selector示意图和特点说明:
- Selector类相关的方法
- public abstract class Selector implements Closeable {
- public static Selector open();//得到一个选择器对象
- public int select(long timeout);//监控所有注册的通道,当其中有 IO 操作可以进行时,将对应的 SelectionKey 加入到内部集合中并返回,参数用来设置超时时间
- public Set selectedKeys();//从内部集合中得到所有的 SelectionKey
}
selector.select()//阻塞
selector.select(1000);//阻塞1000毫秒,在1000毫秒后返回
selector.wakeup();//唤醒selector
selector.selectNow();//不阻塞,立马返还
- NIO非阻塞网络编程原理分析图
NIO非阻塞网络编程相关(Selector、SelectionKey、ServerSocketChannel和SocketChannel)关系图梳理
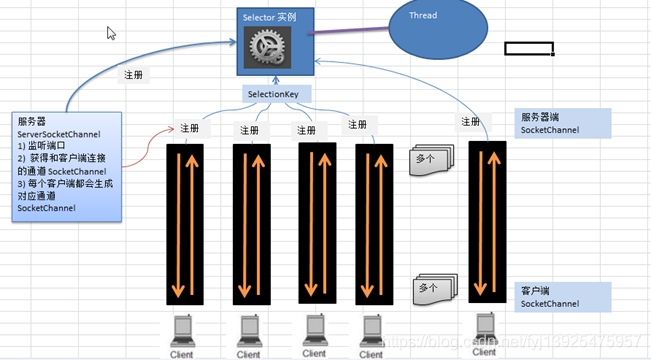
对右图的说明:
- 当客户端连接时,会通过ServerSocketChannel 得到 SocketChannel
- Selector 进行监听 select 方法, 返回有事件发生的通道的个数.
- 将socketChannel注册到Selector上, register(Selector sel, int ops), 一个selector上可以注册多个SocketChannel
- 注册后返回一个 SelectionKey, 会和该Selector 关联(集合)
- 进一步得到各个 SelectionKey (有事件发生)
- 在通过 SelectionKey 反向获取 SocketChannel , 方法 channel()
- 可以通过 得到的 channel , 完成业务处理
- 代码案例
编写一个NIO入门案例,实现服务器和客户端的之间的数据的简单通讯
代码如下:
服务器端:
public class NIOServer {
    public static void main(String[] args) throws IOException {
        // NIO编程的服务端
        // 步骤:
        // 1. 创建ServerSocketChannel并绑定端口7777,设置为非阻塞
        ServerSocketChannel serverSocketChannel = ServerSocketChannel.open();
        serverSocketChannel.socket().bind(new InetSocketAddress(7777));
        serverSocketChannel.configureBlocking(false);
        // 2. 创建Selector选择器,并把ServerSocketChannel注册到Selector选择器中监听accept事件
        Selector selector = Selector.open();
        serverSocketChannel.register(selector, SelectionKey.OP_ACCEPT);
        // 3. 循环轮询选Selector中注册的Channel是否有事件发生,
        while (true) {
            if (selector.select() == 0) {
                // 没有事件发生,跳出此次循环
                continue;
            }
            // 有事件发生,获取发生事件的所有的selectionKeys,并遍历
            Set<SelectionKey> selectionKeys = selector.selectedKeys();
            Iterator<SelectionKey> iterator = selectionKeys.iterator();
            while (iterator.hasNext()) {
                SelectionKey selectionKey = iterator.next();
                // 4. 处理accept连接事件,使用ServerSocketChannel.accept返回一个连接通道,并注册到Selector中监听read事件,设置为非阻塞
                if (selectionKey.isAcceptable()) {
                    SocketChannel socketChannel = serverSocketChannel.accept();
                    socketChannel.configureBlocking(false);
                    socketChannel.register(selector, SelectionKey.OP_READ);
                    System.out.println("客户端已连接,客户端连接的数量为:"+ selector.keys().size() );
                }

                // 5. 处理read事件,
                if (selectionKey.isReadable()) {
                    SocketChannel socketChannel = (SocketChannel) selectionKey.channel();
                    ByteBuffer byteBuffer = ByteBuffer.allocate(1024);
                    int read = socketChannel.read(byteBuffer);
                    System.out.println(new String(byteBuffer.array()));
                  }
                // 手动从集合中移动当前的selectionKey, 防止重复操作
                iterator.remove();
                }

            }
        }
}
客户端:
public class NIOClient {
    public static void main(String[] args) throws Exception{
        // NIO编程客户端

        //得到一个网络通道
        SocketChannel socketChannel = SocketChannel.open();
        //设置非阻塞
        socketChannel.configureBlocking(false);
        //提供服务器端的ip 和 端口
        InetSocketAddress inetSocketAddress = new InetSocketAddress("127.0.0.1", 7777);
        //连接服务器
        if (!socketChannel.connect(inetSocketAddress)) {
            while (!socketChannel.finishConnect()) {
                System.out.println("因为连接需要时间,客户端不会阻塞,可以做其它工作..");
            }
        }

        //...如果连接成功,就发送数据
        String str = "hello, 你好2222~";
        //Wraps a byte array into a buffer
        ByteBuffer buffer = ByteBuffer.wrap(str.getBytes());
        //发送数据,将 buffer 数据写入 channel
        socketChannel.write(buffer);
        System.in.read();
    }
}
