前言
在之前我们已经了解了Shiro的使用流程,但是我们是在配置文件配置的用户,角色,在实际应用中,我们会在数据库获取信息,下面我们介绍Shiro与Spring的整合过程
1.搭建Spring环境
- 首先我们在Eclipse中创建一个maven项目
- 添加Spring的依赖jar包
	    <dependency>
			<groupId>org.springframework</groupId>
			<artifactId>spring-core</artifactId>
			<version>5.0.5.RELEASE</version>
		</dependency>
		<dependency>
			<groupId>org.springframework</groupId>
			<artifactId>spring-beans</artifactId>
			<version>5.0.5.RELEASE</version>
		</dependency>
		<dependency>
			<groupId>org.springframework</groupId>
			<artifactId>spring-context</artifactId>
			<version>5.0.5.RELEASE</version>
		</dependency>

		<dependency>
			<groupId>org.springframework</groupId>
			<artifactId>spring-jdbc</artifactId>
			<version>5.0.5.RELEASE</version>
		</dependency>
		<dependency>
			<groupId>org.springframework</groupId>
			<artifactId>spring-tx</artifactId>
			<version>5.0.5.RELEASE</version>
		</dependency>
		<dependency>
			<groupId>org.springframework</groupId>
			<artifactId>spring-web</artifactId>
			<version>5.0.5.RELEASE</version>
		</dependency>
		<dependency>
			<groupId>org.springframework</groupId>
			<artifactId>spring-webmvc</artifactId>
			<version>5.0.5.RELEASE</version>
		</dependency>
		<dependency>
			<groupId>org.springframework</groupId>
			<artifactId>spring-test</artifactId>
			<version>5.0.5.RELEASE</version>
		</dependency>

		<!-- https://mvnrepository.com/artifact/org.apache.commons/commons-lang3 -->
        <dependency>
            <groupId>org.apache.commons</groupId>
            <artifactId>commons-lang3</artifactId>
            <version>3.7</version>
        </dependency>
- 配置web.xml
<?xml version="1.0" encoding="UTF-8"?>
<web-app xmlns:xsi="http://www.w3.org/2001/XMLSchema-instance" xmlns="http://java.sun.com/xml/ns/javaee" xsi:schemaLocation="http://java.sun.com/xml/ns/javaee http://java.sun.com/xml/ns/javaee/web-app_3_0.xsd" id="WebApp_ID" version="3.0">
  <context-param>
      <param-name>contextConfigLocation</param-name>
      <param-value>classpath:spring/spring-*.xml</param-value>
  </context-param>
  <listener>
      <listener-class>org.springframework.web.context.ContextLoaderListener</listener-class>
  </listener>
  <servlet>
      <servlet-name>DispatcherServlet</servlet-name>
      <servlet-class>org.springframework.web.servlet.DispatcherServlet</servlet-class>
      <init-param>
          <param-name>contextConfigLocation</param-name>
          <param-value>classpath:spring/spring-mvc.xml</param-value>
      </init-param>
  </servlet>
  <servlet-mapping>
      <servlet-name>DispatcherServlet</servlet-name>
      <url-pattern>/</url-pattern>
  </servlet-mapping>

</web-app>
- 配置spring-mvc.xml
<?xml version="1.0" encoding="UTF-8"?>
<beans xmlns="http://www.springframework.org/schema/beans"
	xmlns:xsi="http://www.w3.org/2001/XMLSchema-instance" xmlns:context="http://www.springframework.org/schema/context"
	xmlns:mvc="http://www.springframework.org/schema/mvc"
	xsi:schemaLocation="http://www.springframework.org/schema/beans http://www.springframework.org/schema/beans/spring-beans.xsd
        http://www.springframework.org/schema/context http://www.springframework.org/schema/context/spring-context-4.1.xsd
        http://www.springframework.org/schema/mvc http://www.springframework.org/schema/mvc/spring-mvc-4.1.xsd">

	<!-- scan the package and the sub package -->
	<context:component-scan base-package="com.wmx.shiro" />

	<!-- 静态资源默认servlet配置 允许使用/做映射 -->
	<mvc:default-servlet-handler />

	<!-- if you use annotation you must configure following setting -->
	<mvc:annotation-driven />

	<!-- configure the InternalResourceViewResolver -->
    <bean class="org.springframework.web.servlet.view.InternalResourceViewResolver"
            id="internalResourceViewResolver">
        <!-- 前缀 -->
        <property name="prefix" value="/WEB-INF/view/" />
        <!-- 后缀 -->
        <property name="suffix" value=".html" />
    </bean>

</beans>
- 在WEB_INF文件夹下新建view文件夹,新增一个user.html文件
<!DOCTYPE html>
<html>
<head>
<meta charset="UTF-8">
<title>Insert title here</title>
</head>
<body>
    <h2>User Page</h2>
</body>
</html>
- 新建UserController
package com.wmx.shiro.control;

import org.springframework.stereotype.Controller;
import org.springframework.web.bind.annotation.RequestMapping;

@Controller
@RequestMapping("/user")
public class UserControler {

    @RequestMapping("/toUserPage")
    public String toUserPage() {
        return "user";
    }

}
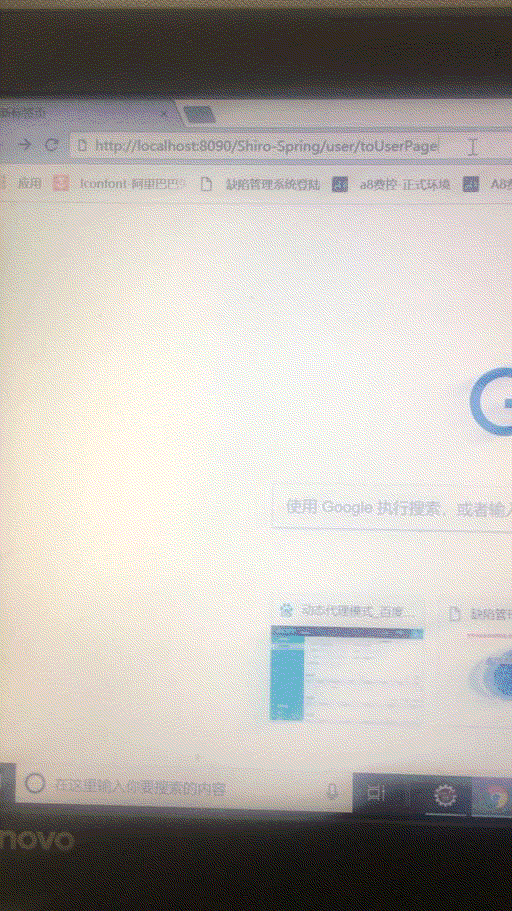
- 启动项目,访问http://localhost:8090/Shiro-Spring/user/toUserPage进入user.html页面

2.Spring与Shiro整合
- Shiro 提供了与 Web 集成的支持,其通过一个ShiroFilter 入口来拦截需要安全控制的URL,然后进行相应的控制
- ShiroFilter 类似于如 Strut2/SpringMVC 这种web 框架的前端控制器,是安全控制的入口点,其负责读取配置(如ini 配置文件),然后判断URL 是否需要登录/权限等工作。
Shiro与Spring整合步骤如下:
- 导入shiro依赖jar包
        <dependency>
            <groupId>org.apache.shiro</groupId>
            <artifactId>shiro-core</artifactId>
            <version>1.4.0</version>
        </dependency>
        <dependency>
            <groupId>org.apache.shiro</groupId>
            <artifactId>shiro-spring</artifactId>
            <version>1.4.0</version>
        </dependency>
        <dependency>
            <groupId>org.apache.shiro</groupId>
            <artifactId>shiro-web</artifactId>
            <version>1.4.0</version>
        </dependency>
- 在web.xml中配置ShiroFilter服务器
  <filter>
    <filter-name>ShiroFilter</filter-name>
    <filter-class>org.springframework.web.filter.DelegatingFilterProxy</filter-class>
    <!-- 设置true由servlet容器控制filter的生命周期 -->
    <init-param>
      <param-name>targetFilterLifecycle</param-name>
      <param-value>true</param-value>
    </init-param>
  </filter>
  <filter-mapping>
    <filter-name>ShiroFilter</filter-name>
    <url-pattern>/*</url-pattern>
  </filter-mapping>
- 自定义Realm 继承AuthorizingRealm 重写 AuthorizationInfo(授权) 和 AuthenticationInfo(认证)
public class ShiroDbRealm extends AuthorizingRealm {

    /**
     * *授权
     */
    @Override
    protected AuthorizationInfo doGetAuthorizationInfo(PrincipalCollection principals) {
        String userName = (String) principals.getPrimaryPrincipal();
        List<String> permissionList=new ArrayList<String>();
        permissionList.add("user:add");
        permissionList.add("user:delete");
        if (userName.equals("wmx")) {
            permissionList.add("user:query");
        }
        SimpleAuthorizationInfo info=new SimpleAuthorizationInfo();
        info.addStringPermissions(permissionList);
        info.addRole("admin");
        return info;
    }

    /**
     * * 认证
     */
    @Override
    protected AuthenticationInfo doGetAuthenticationInfo(AuthenticationToken token) throws AuthenticationException {
        //1. 把 AuthenticationToken 转换为 UsernamePasswordToken
		UsernamePasswordToken upToken = (UsernamePasswordToken) token;
		//2. 从 UsernamePasswordToken 中来获取 username
		String username = upToken.getUsername();
		//3. 调用数据库的方法, 从数据库中查询 username 对应的用户记录
		System.out.println("从数据库中获取 username: " + username + " 所对应的用户信息.");

		//4. 若用户不存在, 则可以抛出 UnknownAccountException 异常
		if("unknown".equals(username)){
			throw new UnknownAccountException("用户不存在!");
		}
		//5. 根据用户信息的情况, 决定是否需要抛出其他的 AuthenticationException 异常.
		if("monster".equals(username)){
			throw new LockedAccountException("用户被锁定");
		}
		//6. 根据用户的情况, 来构建 AuthenticationInfo 对象并返回. 通常使用的实现类为: SimpleAuthenticationInfo
		//以下信息是从数据库中获取的.
		//1). principal: 认证的实体信息. 可以是 username, 也可以是数据表对应的用户的实体类对象.
		Object principal = username;
		//2). credentials: 密码.
		Object credentials = "123456";
		//3). realmName: 当前 realm 对象的 name. 调用父类的 getName() 方法即可

		SimpleAuthenticationInfo info = null; //new SimpleAuthenticationInfo(principal, credentials, realmName);
		info = new SimpleAuthenticationInfo(principal, credentials, super.getName());
		return info;
	}

}
- 配置spring-shiro.xml
<?xml version="1.0" encoding="UTF-8"?>
<beans xmlns="http://www.springframework.org/schema/beans"
       xmlns:xsi="http://www.w3.org/2001/XMLSchema-instance"
       xsi:schemaLocation="http://www.springframework.org/schema/beans http://www.springframework.org/schema/beans/spring-beans.xsd">
    <!--注入自定义的Realm-->
    <bean id="shiroDbRealm" class="com.wmx.shiro.realm.ShiroDbRealm"></bean>
    <bean id="securityManager" class="org.apache.shiro.web.mgt.DefaultWebSecurityManager">
        <property name="realm" ref="shiroDbRealm"></property>
    </bean>

    <!--配置ShiroFilter-->
    <bean id="shiroFilter" class="org.apache.shiro.spring.web.ShiroFilterFactoryBean">
        <property name="securityManager" ref="securityManager"></property>
        <!--登入页面-->
        <property name="loginUrl" value="/toLoginUI"></property>
        <!--登入成功页面-->
        <property name="successUrl" value="/index"/>
        <property name="filters">
            <map>
                <!--退出过滤器,可以不配置-->
                <entry key="logout" value-ref="logoutFilter" />
            </map>
        </property>
        <!--URL的拦截-->
        <property name="filterChainDefinitions" >
            <value>
                 /login = anon <!-- 不需要经过认证能访问 -->
                 /toLoginUI = anon <!-- 不需要经过认证能访问 -->
                /** = authc
            </value>
        </property>

    </bean>
    <!--自定义退出LogoutFilter-->
    <bean id="logoutFilter" class="com.wmx.filter.LogoutFilter">
        <property name="redirectUrl" value="/login"/>
    </bean>
</beans>
Shiro中默认的过滤器:
| 过滤器名称 | 过滤器类 | 描述 |
|---|---|---|
| anon | org.apache.shiro.web.filter.authc.AnonymousFilter | 匿名过滤器 |
| authc | org.apache.shiro.web.filter.authc.FormAuthenticationFilter | 如果继续操作,需要做对应的表单验证否则不能通过 |
| authcBasic | org.apache.shiro.web.filter.authc.BasicHttpAuthenticationFilter | 基本http验证过滤,如果不通过,跳转屋登录页面 |
| logout | org.apache.shiro.web.filter.authc.LogoutFilter | 登录退出过滤器 |
| noSessionCreation | org.apache.shiro.web.filter.session.NoSessionCreationFilter | 没有session创建过滤器 |
| perms | org.apache.shiro.web.filter.authz.PermissionsAuthorizationFilter | 权限过滤器 |
| port | org.apache.shiro.web.filter.authz.PortFilter | 端口过滤器,可以设置是否是指定端口如果不是跳转到登录页面 |
| rest | org.apache.shiro.web.filter.authz.HttpMethodPermissionFilter | http方法过滤器,可以指定如post不能进行访问等 |
| roles | org.apache.shiro.web.filter.authz.RolesAuthorizationFilter | 角色过滤器,判断当前用户是否指定角色 |
| ssl | org.apache.shiro.web.filter.authz.SslFilter | 请求需要通过ssl,如果不是跳转回登录页 |
| user | org.apache.shiro.web.filter.authc.UserFilter | 如果访问一个已知用户,比如记住我功能,走这个过滤器 |
Url的匹配模式
- url模式使用Ant风格模式 ,Ant路径通配符支持 ?,* , **注意通配符匹配不包括目录分隔符“/”:
- ?:匹配一个字符,如 /admin? 将匹配 /admin1,但不匹配 /admin 或 /admin/;
- *:匹配零个或多个字符串,如 /admin 将匹配 /admin、/admin123,但不匹配 /admin/1;
- :匹配路径中的零个或多个路径,如 /admin/ 将匹配 /admin/a 或 /admin/a/b
- URL 匹配顺序
URL 权限采取第一次匹配优先的方式,即从头开始使用第一个匹配的 url 模式对应的拦截器链。如:
– /bb/=filter1
– /bb/aa=filter2
– /=filter3
– 如果请求的url是“/bb/aa”,因为按照声明顺序进行匹配,那么将使用 filter1 进行拦截。
认证流程
Shiro的认证流程和我们
@Controller
@RequestMapping("/shiro")
public class LoginController {

	@RequestMapping(value="/toLoginUI")
    public String login(){
        return "login";
    }

	@RequestMapping("/login")
    public String login(@RequestParam("username") String username,
            @RequestParam("password") String password){

        Subject currentUser = SecurityUtils.getSubject();

        if (!currentUser.isAuthenticated()) {
            // 把用户名和密码封装为 UsernamePasswordToken 对象
            UsernamePasswordToken token = new UsernamePasswordToken(username, password);
            // rememberme
            token.setRememberMe(true);
            try {
                // 执行登录.
                currentUser.login(token);
            } catch (AuthenticationException ae) {
                //unexpected condition?  error?
                System.out.println("登录失败: " + ae.getMessage());
                return "redirect:toLoginUI";
            }
        }
        return "list";
    }

}
测试
- 在view文件夹下新建login.html页面
<!DOCTYPE html>
<html>
<head>
<meta charset="UTF-8">
<title>Insert title here</title>
</head>
<body>
    <h2>Login Page</h2>
    <form action="login">
           用户名:<input type="text" name="username" />
           密码:   <input type="password" name="password" />
     <button type="submit">提交</button>
    </form>
</body>
</html>
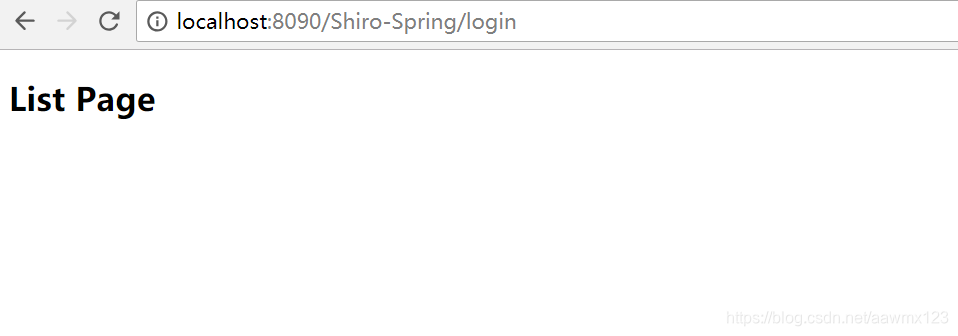
在view文件夹下新建list.html页面
<!DOCTYPE html>
<html>
<head>
<meta charset="UTF-8">
<title>Insert title here</title>
</head>
<body>
    <h2>List Page</h2>
</body>
</html>
如下图所示,我们访问user/toUserPage会自动定位到登录页面
输入账号:unknown 密码:随意输入提交,控制台输出
从数据库中获取 username: unknown 所对应的用户信息.
登录失败: 用户不存在!
输入账号:monster 密码随意输入,提交,控制台输出
从数据库中获取 username: monster 所对应的用户信息.
登录失败: 用户被锁定扫描二维码关注公众号,回复: 9676376 查看本文章
输入账号:任意账号 密码:123456,提交,登录成功,进入list.html页面