事件的冒泡(Bubble)
- 所谓的冒泡指的就是事件的向上传导,当后代元素上的事件被触发时,其祖先元素的相同事件也会被触发
- 在开发中大部分情况冒泡都是有用的,如果不希望发生事件冒泡可以通过事件对象来取消冒泡
<!DOCTYPE html>
<html>
	<head>
		<meta charset="UTF-8">
		<title></title>
		<style type="text/css">
			#box1{
				width: 200px;
				height: 200px;
				background-color: yellowgreen;
			}

			#s1{
				background-color: yellow;
			}

		</style>
		<script type="text/javascript">

			window.onload = function(){

				//为s1绑定一个单击响应函数
				var s1 = document.getElementById("s1");
				s1.onclick = function(event){
					event = event || window.event;
					con("我是span的单击响应函数");
				};

				//为box1绑定一个单击响应函数
				var box1 = document.getElementById("box1");
				box1.onclick = function(event){
					event = event || window.event;
					alert("我是div的单击响应函数");
				};

				//为body绑定一个单击响应函数
				document.body.onclick = function(){
					alert("我是body的单击响应函数");
				};
			};
		</script>
	</head>
	<body>

		<div id="box1">
			我是box1
			<span id="s1">我是span</span>
		</div>

	</body>
</html>
可以发现,点击
div会同时触发div与body的点击事件,点击span会同时触发div与body的点击事件,这就是一种事件的冒泡,而想组织此事件的冒泡只需要添加一个属性即可解决。
移除冒泡
可以将事件对象的
cancelBubble设置为true,即可取消冒泡<!DOCTYPE html> <html> <head> <meta charset="UTF-8"> <title></title> <style type="text/css"> #box1{ width: 200px; height: 200px; background-color: yellowgreen; } #s1{ background-color: yellow; } </style> <script type="text/javascript"> window.onload = function(){ //为s1绑定一个单击响应函数 var s1 = document.getElementById("s1"); s1.onclick = function(event){ event = event || window.event; console.log("我是span的单击响应函数"); //取消冒泡 //可以将事件对象的cancelBubble设置为true,即可取消冒泡 event.cancelBubble = true; }; //为box1绑定一个单击响应函数 var box1 = document.getElementById("box1"); box1.onclick = function(event){ event = event || window.event; console.log("我是div的单击响应函数"); event.cancelBubble = true; }; //为body绑定一个单击响应函数 document.body.onclick = function(){ console.log("我是body的单击响应函数"); }; }; </script> </head> <body> <div id="box1"> 我是box1 <span id="s1">我是span</span> </div> </body> </html>
通过设置
event.cancelBubble = true;以后,可以发现,移除了事件的冒泡
冒泡示例
<!DOCTYPE html>
<html>
	<head>
		<meta charset="UTF-8">
		<title></title>
		<style type="text/css">
			#box1{
				width: 100px;
				height: 100px;
				background-color: red;
				/*
				 * 开启box1的绝对定位
				 */
				position: absolute;
			}

		</style>

		<script type="text/javascript">
			window.onload = function(){

				/*
				 * 使div可以跟随鼠标移动
				 */
				//获取box1
				var box1 = document.getElementById("box1");
				//绑定鼠标移动事件
				document.onmousemove = function(event){

					//解决兼容问题
					event = event || window.event;

					//获取滚动条滚动的距离
					/*
					 * chrome认为浏览器的滚动条是body的,可以通过body.scrollTop来获取
					 * 火狐等浏览器认为浏览器的滚动条是html的,
					 */
					var st = document.body.scrollTop || document.documentElement.scrollTop;
					var sl = document.body.scrollLeft || document.documentElement.scrollLeft;

					//获取到鼠标的坐标
					/*
					 * clientX和clientY
					 * 	用于获取鼠标在当前的可见窗口的坐标
					 * div的偏移量,是相对于整个页面的
					 */
					var left = event.clientX;
					var top = event.clientY;

					//设置div的偏移量
					box1.style.left = left + sl + "px";
					box1.style.top = top + st + "px";

				};

				var box2 = document.getElementById("box2");
				box2.onmousemove = function(event){
					event = event || window.event;
				};

			};
		</script>
	</head>
	<body style="height: 1000px;width: 2000px;">
		<div id="box2" style="width: 500px; height: 500px; background-color: #bfa;"></div>
		<div id="box1"></div>
	</body>
</html>
允许事件冒泡

组织事件冒泡
添加代码
event.cancelBubble = true;
组织冒泡以后,大盒子不再同时响应事件,因此,红色盒子无法穿越进去

事件的委派
指将事件统一绑定给元素的共同的祖先元素,这样当后代元素上的事件触发时,会一直冒泡到祖先元素,从而通过祖先元素的响应函数来处理事件。
事件委派是利用了冒泡,通过委派可以减少事件绑定的次数,提高程序的性能
示例:
<!DOCTYPE html>
<html>
	<head>
		<meta charset="utf-8" />
		<title></title>
		<script type="text/javascript">

			window.onload = function(){

				var u1 = document.getElementById("u1");

				//点击按钮以后添加超链接
				var btn01 = document.getElementById("btn01");
				btn01.onclick = function(){
					//创建一个li
					var li = document.createElement("li");
					li.innerHTML = "<a href='javascript:;' class='link'>新建的超链接</a>";

					//将li添加到ul中
					u1.appendChild(li);
				};

				//为ul绑定一个单击响应函数
				u1.onclick = function(event){
					event = event || window.event;

					/*
					 * target
					 * 	- event中的target表示的触发事件的对象
					 */

					//如果触发事件的对象是我们期望的元素,则执行否则不执行
					if(event.target.className == "link"){
						alert("我是ul的单击响应函数");
					}
				};

			};

		</script>
	</head>
	<body>
		<button id="btn01">添加超链接</button>

		<ul id="u1" style="background-color: #bfa;">
			<li>
				<p>我是p元素</p>
			</li>
			<li><a href="javascript:;" class="link">超链接一</a></li>
			<li><a href="javascript:;" class="link">超链接二</a></li>
			<li><a href="javascript:;" class="link">超链接三</a></li>
		</ul>

	</body>
</html>
事件的传播
关于事件的传播网景公司和微软公司有不同的理解
微软公司微软公司认为事件应该是由内向外传播,也就是当事件触发时,应该先触发当前元素上的事件,然后再向当前元素的祖先元素上传播,也就说事件应该在冒泡阶段执行。
网景公司网景公司认为事件应该是由外向内传播的,也就是当前事件触发时,应该先触发当前元素的最外层的祖先元素的事件,然后在向内传播给后代元素
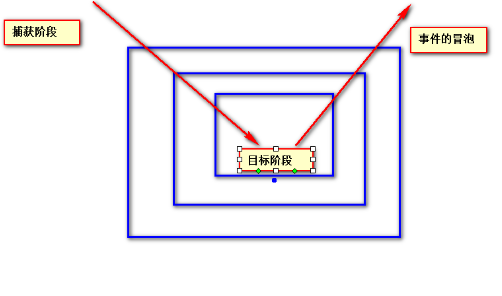
W3CW3C综合了两个公司的方案,将事件传播分成了三个阶段
- 捕获阶段
- 在捕获阶段时从最外层的祖先元素,向目标元素进行事件的捕获,但是默认此时不会触发事件
- 目标阶段
- 事件捕获到目标元素,捕获结束开始在目标元素上触发事件
- 冒泡阶段
- 如果希望在捕获阶段就触发事件,可以将addEventListener()的第三个参数设置为true(
一般情况下我们不会希望在捕获阶段触发事件,所以这个参数一般都是false)IE8及以下的浏览器中没有捕获阶段
<!DOCTYPE html>
<html>
	<head>
		<meta charset="UTF-8">
		<title></title>
		<style type="text/css">

			#box1{
				width: 300px;
				height: 300px;
				background-color: yellowgreen;
			}

			#box2{
				width: 200px;
				height: 200px;
				background-color: yellow;
			}

			#box3{
				width: 150px;
				height: 150px;
				background-color: skyblue;
			}

		</style>

		<script type="text/javascript">

			window.onload = function(){

				/*
				 * 分别为三个div绑定单击响应函数
				 */
				var box1 = document.getElementById("box1");
				var box2 = document.getElementById("box2");
				var box3 = document.getElementById("box3");

				bind(box1,"click",function(){
					alert("我是box1的响应函数")
				});

				bind(box2,"click",function(){
					alert("我是box2的响应函数")
				});

				bind(box3,"click",function(){
					alert("我是box3的响应函数")
				});

			};


			function bind(obj , eventStr , callback){
				if(obj.addEventListener){
					//大部分浏览器兼容的方式
					obj.addEventListener(eventStr , callback , true);
				}else{

					//IE8及以下
					obj.attachEvent("on"+eventStr , function(){
						//在匿名函数中调用回调函数
						callback.call(obj);
					});
				}
			}
		</script>
	</head>

	<body>

		<div id="box1">
			<div id="box2">
				<div id="box3"></div>
			</div>
		</div>

	</body>
</html>

拖拽实例
<!DOCTYPE html>
<html>
<head>
    <meta charset="UTF-8">
    <title></title>
    <style type="text/css">

        #box1{
            width: 100px;
            height: 100px;
            background-color: red;
            position: absolute;
        }

        #box2{
            width: 100px;
            height: 100px;
            background-color: yellow;
            position: absolute;

            left: 200px;
            top: 200px;
        }

    </style>

    <script type="text/javascript">

        window.onload = function(){
            //获取box1
            var box1 = document.getElementById("box1");
            var box2 = document.getElementById("box2");
            var img1 = document.getElementById("img1");

            //开启box1的拖拽
            drag(box1);
            //开启box2的
            drag(box2);
			//开启img1的
            drag(img1);

        };

        /*
         * 提取一个专门用来设置拖拽的函数
         * 参数:开启拖拽的元素
         */
        function drag(obj){
            //当鼠标在被拖拽元素上按下时,开始拖拽  onmousedown
            obj.onmousedown = function(event){

                //设置box1捕获所有鼠标按下的事件
                /*
                 * setCapture()
                 * 	- 只有IE支持,但是在火狐中调用时不会报错,
                 * 		而如果使用chrome调用,会报错
                 */
                obj.setCapture && obj.setCapture();

                event = event || window.event;
                //div的偏移量 鼠标.clentX - 元素.offsetLeft
                //div的偏移量 鼠标.clentY - 元素.offsetTop
                var ol = event.clientX - obj.offsetLeft;
                var ot = event.clientY - obj.offsetTop;

                //为document绑定一个onmousemove事件
                document.onmousemove = function(event){
                    event = event || window.event;
                    //当鼠标移动时被拖拽元素跟随鼠标移动 onmousemove
                    var left = event.clientX - ol;
                    var top = event.clientY - ot;

                    //修改box1的位置
                    obj.style.left = left+"px";
                    obj.style.top = top+"px";

                };

                //为document绑定一个鼠标松开事件
                document.onmouseup = function(){
                    //当鼠标松开时,被拖拽元素固定在当前位置	onmouseup
                    //取消document的onmousemove事件
                    document.onmousemove = null;
                    //取消document的onmouseup事件
                    document.onmouseup = null;
                    //当鼠标松开时,取消对事件的捕获
                    obj.releaseCapture && obj.releaseCapture();
                };

                /*
                 * 当我们拖拽一个网页中的内容时,浏览器会默认去搜索引擎中搜索内容,
                 * 	此时会导致拖拽功能的异常,这个是浏览器提供的默认行为,
                 * 	如果不希望发生这个行为,则可以通过return false来取消默认行为
                 *
                 * 但是这招对IE8不起作用
                 */
                return false;

            };
        }


    </script>
</head>
<body>

    我是一段文字

    <div id="box1"></div>

    <div id="box2"></div>

    <img src="img/an.jpg" id="img1" style="position: absolute;"/>
</body>
</html>