参考书作者:郭霖
我会将所学的知识简单记录下来以便于大家快速查阅资料,另外郭霖大侠没有提到的东西我也会作出补充
我们
通常情况下,每个需要访问网络的应用程序都会有一个自己的服务器,我们可以向服务器提交数据,也可以从服务器
上获取数据。在网络上传输数据时最常用的格式用两种:XML和JSON
解析XML格式数据
我们就搭建一个最简单的Web服务器,在这个服务器上提供一段XML文本,然后我们程序访问这个服务器,再对得到的XML文本
进行解析
大家先下载好Apache服务器(百度搜索或者直接在官网上下载),一直默认安装就行了,
下面打开浏览器验证一下

接下来在你的安装目录Apache\htdocs目录下新建一个名为get_data.xml的文件,编辑这个文件
<apps>
	<app>
		<id>1</id>
		<name>Google Maps</name>
		<version>1.0</version>
	</app>
	<app>
		<id>2</id>
		<name>Chrome</name>
		<version>2.1</version>
	</app>
	<app>
		<id>3</id>
		<name>Google Play</name>
		<version>2.3</version>
	</app>
</apps>
在浏览器访问http://127.0.0.1/get_data.xml可以看到内容 现在我们就解析这个返回的XML文件
为了方便起见,我们在下面这个项目上进行解析XML
比较常用的解析XML方法有Pull解析和SAX解析当然还有DOM解析,这里我们只介绍前两种解析
Pull和SAX解析方式
Pull解析我们只需要添加一个私有方法,然后在sendRequestWithOkHttp方法中调用parserXMLWithPull方法
SAX解析我们需要创建一个新的类ContentHandler,这个类继承自DefaultHandler类,并重写父类的5个方法
我们修改MainActivity中的代码
package com.gougoucompany.clarence.networktest;

import android.support.v7.app.AppCompatActivity;
import android.os.Bundle;
import android.util.Log;
import android.view.View;
import android.widget.Button;
import android.widget.TextView;

import org.xml.sax.InputSource;
import org.xml.sax.XMLReader;
import org.xmlpull.v1.XmlPullParser;
import org.xmlpull.v1.XmlPullParserFactory;

import java.io.BufferedReader;
import java.io.IOException;
import java.io.InputStream;
import java.io.InputStreamReader;
import java.io.StringReader;
import java.net.HttpURLConnection;
import java.net.URL;

import javax.xml.parsers.SAXParserFactory;

import okhttp3.OkHttpClient;
import okhttp3.Request;
import okhttp3.Response;

public class MainActivity extends AppCompatActivity implements View.OnClickListener{

    TextView responseText;

    @Override
    protected void onCreate(Bundle savedInstanceState) {
        super.onCreate(savedInstanceState);
        setContentView(R.layout.activity_main);
        Button sendRequest = (Button) findViewById(R.id.send_request);
        responseText = (TextView) findViewById(R.id.response_text);
        sendRequest.setOnClickListener(this);
    }

    @Override
    public void onClick(View v) {
        if(v.getId() == R.id.send_request) {
            //sendRequestWithURLConnection();

            /*今天,我们有许多出色的网络通信库都可以替代原生的HttpURLConnection,而其中OkHttp是比较出色的一个
            * 现在已经成为了广大安卓开发者首选的网络通信库 OkHttp的项目主页地址是: http://github.com/square/okhttp
            * 可以查看最新的版本
            * 我们要现在app/build.gradle文件中加入OkHttp库的依赖,会自动下载两个库OkHttp和Okio库
            * 我们来看OkHttp的使用步骤
            * 1. 创建OkHttpClient实例
            * 2. 创建一个Request对象
            * 3. 使用OkHttpClient的newCall()方法创建一个Call对象,并调用它的execute()方法来发送请求和接受服务器返回的数据
            * 4. 使用Response对象接受服务器返回的数据 然后使用response.body().string()方法获得具体的内容
            * 这种是使用"GET"方法提交请求
            *
            * 下来看如何使用"POST"方法提交请求
            * 先构建一个RequestBody对象来存放待提交的数据
            * RequestBody requestBody = new FormBody.Builder()
            * .add("username", "admin")
            * .add("password", "123456")
            * .builder();
            * 然后在Request.Builder构造器调用post()方法将RequestBody对象传入
            * Request request = new Request.Builder()
            * .url("http://www.baidu.com")
            * .post(requestBody)
            * .build();后面的都一样了*/
            sendRequestWithOkHttp();
        }
    }

    private void sendRequestWithOkHttp() {
        //开启线程来发起网络请求
        new Thread(new Runnable () {
            @Override
            public void run() {
                try {
                    OkHttpClient client = new OkHttpClient();
                    Request request = new Request.Builder()
                            //指定访问的服务器地址是电脑本机
                            .url("http://10.0.2.2/get_data.xml") //通过url()方法设定目标的网络地址
                            .build();
                    Response response = client.newCall(request).execute();
                    String responseData = response.body().string();
                    Log.d("MainActivity", responseData);
                    //showResponse(responseData);
                    parseXMLWithPull(responseData);
                    //parseXMLWithSAX(responseData);
                } catch(Exception e)
                {
                    e.printStackTrace();
                }
            }
        }).start();
    }

    private void parseXMLWithSAX(String xmlData) {
        /*parseXMLWithSAX()方法中先是创建了一个SAXParserFactory对象,然后
        * 再获取到XMLReader对象,接着将我们编写的ContentHandler的实例设置到XMLReader中
        * ,最后调用parse()方法执行解析就好了*/
        try {
            SAXParserFactory factory = SAXParserFactory.newInstance();
            XMLReader xmlReader = factory.newSAXParser().getXMLReader();
            ContentHandler handler = new ContentHandler();
            //将ContentHandler实例设置到xmlReader中
            xmlReader.setContentHandler(handler);
            //开始执行解析
            xmlReader.parse(new InputSource(new StringReader(xmlData)));
        } catch(Exception e) {
            e.printStackTrace();
        }
    }

    private void parseXMLWithPull(String xmlData) {
        try {
            //获得一个XmlPullParserFactory实例
            XmlPullParserFactory factory = XmlPullParserFactory.newInstance();
            //得到XmlPullParser对象
            XmlPullParser xmlPullParser = factory.newPullParser();
            //调用xmlPullParser的setInput方法将服务器返回的XML数据传入开始解析
            xmlPullParser.setInput(new StringReader(xmlData));
            //获得当前的解析事件
            int eventType = xmlPullParser.getEventType();
            String id = "";
            String name = "";
            String version = "";
            while (eventType != XmlPullParser.END_DOCUMENT) {
                //getName()方法获得当前节点的名字
                String nodeName = xmlPullParser.getName();
                //如果发现节点名等于id,name或version,就调用nextText()方法来获取节点内具体的内容
                switch(eventType) {
                    //开始解析节点
                    case XmlPullParser.START_TAG: {
                        if ("id".equals(nodeName)) {
                            id = xmlPullParser.nextText();
                        } else if ("name".equals(nodeName)) {
                            name = xmlPullParser.nextText();
                        } else if ("version".equals(nodeName)) {
                            version = xmlPullParser.nextText();
                        }
                        break;
                    }
                    //完成解析某个节点就将id,name,version全都打印出来
                    case XmlPullParser.END_TAG: {
                        if("app".equals(nodeName)) {
                            Log.d("MainActivity", "id is " + id);
                            Log.d("MainActivity", "name is " + name);
                            Log.d("MainActivity", "version is " + version);
                        }
                        break;
                    }
                    default:
                        break;
                }
                eventType = xmlPullParser.next();
            }
        } catch(Exception e) {
            e.printStackTrace();
        }
    }

    private void sendRequestWithURLConnection() {
        //开启线程来发起网络请求
        new Thread(new Runnable() {
            @Override
            public void run() {
                HttpURLConnection connection = null;
                BufferedReader reader = null;
                try{
                    URL url = new URL("https://www.baidu.com");
                    //获取HttpURLConnection实例
                    connection = (HttpURLConnection) url.openConnection();
                    connection.setRequestMethod("GET");
                    //设置连接超时
                    connection.setConnectTimeout(8000);
                    //设置读取超时的毫秒数
                    connection.setReadTimeout(8000);
                    //获取到服务器返回的输入流,字节输入流InputStream对象
                    InputStream in = connection.getInputStream();
                    //下面对获取到的输入流进行读取
                    reader = new BufferedReader(new InputStreamReader(in));
                    StringBuilder response = new StringBuilder();
                    String line;
                    while((line = reader.readLine()) != null) {
                        response.append(line);
                    }
                    showResponse(response.toString());
                } catch (Exception e) {
                    e.printStackTrace();
                } finally {
                    if(reader != null) {
                        try{
                            reader.close();
                        } catch(IOException e) {
                            e.printStackTrace();
                        }
                    }
                    if(connection != null) {
                        connection.disconnect(); //将Http连接关闭掉
                    }
                }
            }
        }).start();
    }

    private void showResponse(final String response) {
        runOnUiThread(new Runnable() {
            @Override
            public void run() {
                //在这里进行UI操作,将结果显示到界面上
                responseText.setText(response);
            }
        });
    }
}
新建类ContentHandler
package com.gougoucompany.clarence.networktest;

import android.util.Log;

import org.xml.sax.Attributes;
import org.xml.sax.SAXException;
import org.xml.sax.helpers.DefaultHandler;

/**
 * Created by Clarence on 2018/4/13.
 * Sax解析是一种特别常用的xml解析方式,虽然用法比Pull解析要复杂一些,但在
 * 语义方面会更加清楚
 * 通常情况下我们都会新建一个类继承自DefaultHandler,并重写父类的5个方法
 */

public class ContentHandler extends DefaultHandler {

    private String nodeName;

    private StringBuilder id;

    private StringBuilder name;

    private StringBuilder version;

    //开始xml解析的时候调用
    @Override
    public void startDocument() throws SAXException {
        id = new StringBuilder();
        name = new StringBuilder();
        version = new StringBuilder();
    }

    //开始解析某个节点的时候调用
    @Override
    public void startElement(String uri, String localName, String qName, Attributes attributes) throws SAXException {
        //记录当前的节点名
        nodeName = localName;
    }

    //characters()方法会在获取节点中的内容的时候调用
    //StringBuilder的append(char[], int offset, int len)方法将数组从下标offset开始的len个字符依次添加到当前字符串的末尾
    @Override
    public void characters(char[] ch, int start, int length) throws SAXException {
       //根据当前节点名判断将内容添加到哪一个StringBuilder对象中
        if("id".equals(nodeName)) {
            id.append(ch, start,length);
        } else if("name".equals(nodeName)) {
            name.append(ch, start, length);
        } else if("version".equals(nodeName)) {
            version.append(ch, start, length);
        }
    }

    //会在完成解析某个节点的时候调用
    @Override
    public void endElement(String uri, String localName, String qName) throws SAXException {
        if("app".equals(localName)){
            Log.d("ContentHandler", "id is " + id.toString().trim());
            Log.d("ContentHandler", "name is " + name.toString().trim());
            Log.d("ContentHandler", "version is " + version.toString().trim());
            //最后要将StringBuilder清空掉 java.lang.StringBuilder.setLength(int newLength)来改变字符序列的长度
            id.setLength(0);
            name.setLength(0);
            version.setLength(0);
        }
    }

    //会在完成整个xml解析的时候调用
    @Override
    public void endDocument() throws SAXException {
        super.endDocument();
    }
}
下面是解析服务器发送的xml文件后得到的信息,我们将它显示到日志Debug中
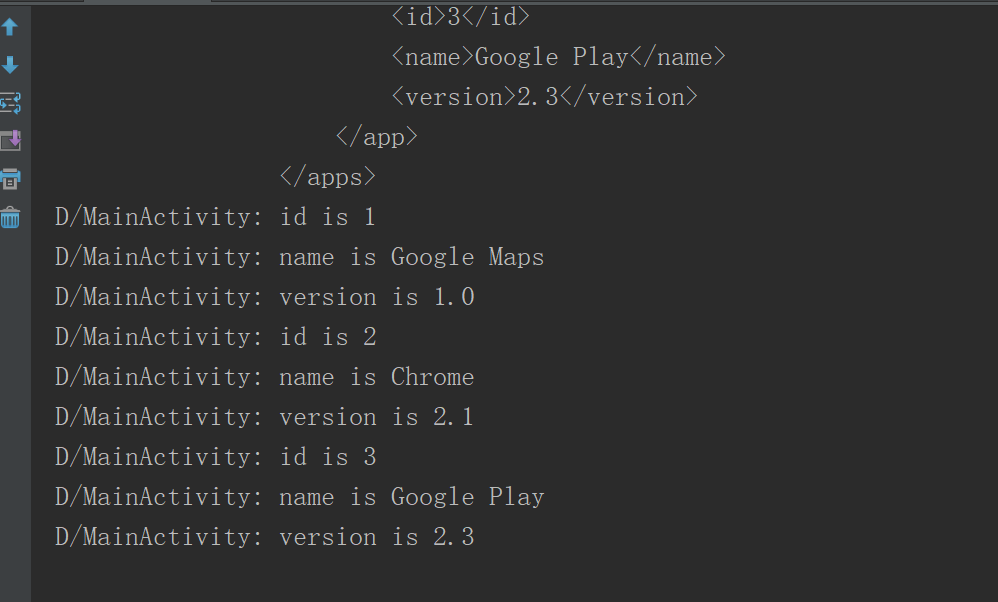
需要注意的是:模拟机访问127.0.0.1都是访问模拟器本身,你想在模拟器上访问安装模拟器的电脑,
那么就使用Android内置的ip:10.0.2.2 另外记住要打开模拟器网络开关
解析JSON格式数据
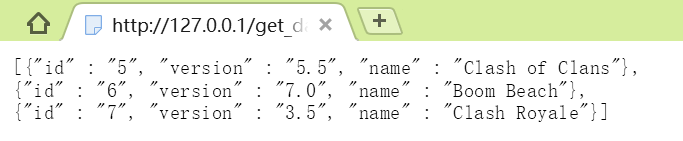
我们在Apache\htdocs目录中新建一个get_data.json的文件,然后编辑这个文件,并加入如下JSON格式的内容
[{"id" : "5", "version" : "5.5", "name" : "Clash of Clans"},
{"id" : "6", "version" : "7.0", "name" : "Boom Beach"},
{"id" : "7", "version" : "3.5", "name" : "Clash Royale"}]
在浏览器中访问http://127.0.0.1/get_data.json
解析JSON数据也有很多方法,可以使用官方提供的JSONObject,也可以使用谷歌的开源库GSON。另外,一些第三方的
开源库如Jackson、FastJSON等也非常不错。这里我们介绍前两种
JSONObject解析 首先将服务器返回的数据传入到了一个JSONArray对象中,然后循环遍历这个JSONArray,从中取出的每一个元素都是一个JSONObject对象,每个JSONObject对象中又会包含id,name和version这些数据。接下来只需要调用getString()
方法将这些数据取出,并打印出来即可。
要使用GJSON,必须在项目中添加GSON库的依赖。编辑app/build.gradle文件,在dependencies闭包中添加如下内容:
dependencies {
    compile fileTree(dir: 'libs', include: ['*.jar'])
    androidTestCompile('com.android.support.test.espresso:espresso-core:2.2.2', {
        exclude group: 'com.android.support', module: 'support-annotations'
    })
    compile 'com.android.support:appcompat-v7:24.2.1'
    testCompile 'junit:junit:4.12'
    compile 'com.squareup.okhttp3:okhttp:3.10.0'
    compile 'com.google.code.gson:gson:2.7'
}
GSON库可以将一段JSON格式的字符串自动映射成一个对象。
eg: 比如一段JSON格式的数据 {"name" : "Tom", "age" : 20}
我们可以定义一个Person类,并加入name和age这两个字段
Gson gson= new Gson();
Person person = gson.fromJson(jsonData, Person.class);
如果需要解析的是一段JSON数组会稍微麻烦一点,我们需要借助TypeToken将期望解析的数据类型
传入到fromJson()方法中
List<Person> people = gson.fromJson(jsonData, new TypeToken<List<Persion>>(){}.getType());
fromJson中提供两个参数,分别是json字符串以及需要转换成对象的类型
new TypeToken<List<People>>(){}.geType(),这个位置的参数是一个Type,表示是xx类型,但是Type是个
接口如下:
public interface Type {
    /**
     * Returns a string describing this type, including information
     * about any type parameters.
     *
     * @implSpec The default implementation calls {@code toString}.
     *
     * @return a string describing this type
     * @since 1.8
     */
    default String getTypeName() {
        return toString();
    }
}
new XXX();这样是一个构造函数,但是接口是不能直接new的,所以这时用到了匿名内部类,实现接口称为一种具体的类型
TypeToken,它是gson提供的数据类型转换器,可以支持各种数据类型转换,先调用TypeToken<T>的构造器得到匿名内部类,
再由该匿名内部类对象调用getType()方法得到想要转换成的type,这里type就是List<People>类型
我们先增加一个App类,并加入id、name和version这三个字段,并自动生成getter和setter方法
package com.gougoucompany.clarence.networktest;

/**
 * Created by Clarence on 2018/4/14.
 */

public class App {

    private String id;

    private String name;

    private String version;

    public String getId() {
        return id;
    }

    public void setId(String id) {
        this.id = id;
    }

    public String getName() {
        return name;
    }

    public void setName(String name) {
        this.name = name;
    }

    public String getVersion() {
        return version;
    }

    public void setVersion(String version) {
        this.version = version;
    }
}
然后修改MainActivity中的代码
我们只要添加一个私有的方法,然后在这个方法完成解析任务
    //使用GSON开源库解析json格式的数据
    private void parseJSONWithGSON(String jsonData) {
        Gson gson = new Gson();
        List<App> appList = gson.fromJson(jsonData, new TypeToken<List<App>>(){}.getType());
        for (App app : appList) {
            Log.d("MainActivity", "id is " + app.getId());
            Log.d("MainActivity", "name is " + app.getName());
            Log.d("MainActivity", "version is " + app.getVersion());
        }
    }
这样点击按钮之后就会打印出数据
优化程序:
一个应用程序很可能会在许多地方都是用到网络功能,而发送HTTP请求的代码基本都是相同的,我们应该将这些
通用的网络操作提取到一个公共的类里,并提供一个静态方法,当想要发起网络请求的时候,只需简单调用一下这个
方法即可 新建一个HttpUtil工具类
先是使用HttpURLConnection来处理网络请求
package com.gougoucompany.clarence.networktest;

import java.io.BufferedReader;
import java.io.InputStream;
import java.io.InputStreamReader;
import java.net.HttpURLConnection;
import java.net.URL;

/**
 * Created by Clarence on 2018/4/14.
 * 将通用的网络操作提取到一个公共的类里
 */

public class HttpUtil {

    public static String sendHttpRequest(String address) {
        HttpURLConnection connection = null;
        try {
            URL url = new URL(address);
            connection = (HttpURLConnection) url.openConnection();
            connection.setRequestMethod("GET");
            connection.setConnectTimeout(8000);
            connection.setReadTimeout(8000);

            /*httpUrlConnection.setDoOutput(true);以后就可以使用conn.getOutputStream().write()
            httpUrlConnection.setDoInput(true);以后就可以使用conn.getInputStream().read();
            get请求用不到conn.getOutputStream(),因为参数直接追加在地址后面,因此默认是false。
            post请求(比如:文件上传)需要往服务区传输大量的数据,这些数据是放在http的body里面的,
            因此需要在建立连接以后,往服务端写数据. 因为总是使用conn.getInputStream()获取服务端
            的响应,因此默认值是true。  */
            connection.setDoInput(true);
            connection.setDoOutput(true);

            InputStream in = connection.getInputStream();

            //InputStreamReader是字节流通向字符流的桥梁:它使用指定的charset读取字节并将其解码为字符
            //为了达到效率,可以在BufferedReader内包装InputStreamReader
            BufferedReader reader = new BufferedReader(new InputStreamReader(in));
            StringBuilder response = new StringBuilder();
            String line;
            while ((line = reader.readLine()) != null) {
                response.append(line);
            }
            return response.toString();
        } catch(Exception e) {
            e.printStackTrace();

            //返回异常的名称
            return e.getMessage();
        } finally {
            if(connection != null) {
                connection.disconnect();
            }
        }
    }
}
注意:
网络请求通常都是属于耗时操作,而sendHttpRequest()方法内部并没有开启线程,这样就可能导致在
调用sendHttpRequest()方法的时候使得主线程被阻塞住
但是在sendHttpRequest()方法中开启一个线程来发起HTTP请求,那么服务器相应的数据是无法进行返回的,所有的
耗时逻辑都是在子线程里进行的,sendHttpRequest()方法会在服务器还没来得及响应的时候就执行结束了,当然也就
无法返回响应的数据了。那么我们可以使用java的回调机制来解决这个问题
首先需要定义一个接口
* Created by Clarence on 2018/4/14.
* 我们在接口中定义了两个方法,onFinish()方法表示当服务成功相应我们的请求的时候调用
* onError()表示当进行网络操作出现错误的时候调用.onFinish()方法中的参数代表着服务器返回的
* 参数,而onError()方法中的参数记录着错误的详细信息
package com.gougoucompany.clarence.networktest;

/**
 * Created by Clarence on 2018/4/14.
 */

public interface HttpCallbackListener {

    void onFinish(String response);

    void onError(Exception e);
}
接着修改HttpUtil中的代码
package com.gougoucompany.clarence.networktest;

import java.io.BufferedReader;
import java.io.InputStream;
import java.io.InputStreamReader;
import java.net.HttpURLConnection;
import java.net.URL;

/**
 * Created by Clarence on 2018/4/14.
 * 将通用的网络操作提取到一个公共的类里
 */

public class HttpUtil {

    public static void sendHttpRequest(final String address, final HttpCallbackListener listener) {
        new Thread(new Runnable(){
            @Override
            public void run() {
                HttpURLConnection connection = null;
                try {
                    URL url = new URL(address);
                    connection = (HttpURLConnection) url.openConnection();
                    connection.setRequestMethod("GET");
                    connection.setConnectTimeout(8000);
                    connection.setReadTimeout(8000);

            /*httpUrlConnection.setDoOutput(true);以后就可以使用conn.getOutputStream().write()
            httpUrlConnection.setDoInput(true);以后就可以使用conn.getInputStream().read();
            get请求用不到conn.getOutputStream(),因为参数直接追加在地址后面,因此默认是false。
            post请求(比如:文件上传)需要往服务区传输大量的数据,这些数据是放在http的body里面的,
            因此需要在建立连接以后,往服务端写数据. 因为总是使用conn.getInputStream()获取服务端
            的响应,因此默认值是true。  */
                    connection.setDoInput(true);
                    connection.setDoOutput(true);

                    InputStream in = connection.getInputStream();

                    //InputStreamReader是字节流通向字符流的桥梁:它使用指定的charset读取字节并将其解码为字符
                    //为了达到效率,可以在BufferedReader内包装InputStreamReader
                    BufferedReader reader = new BufferedReader(new InputStreamReader(in));
                    StringBuilder response = new StringBuilder();
                    String line;
                    while ((line = reader.readLine()) != null) {
                        response.append(line);
                    }
                    if(listener != null) {
                        //回调onFinish()方法
                        listener.onFinish(response.toString());
                    }
                } catch(Exception e) {
                    if(listener != null) {
                        //回调onError()方法
                        listener.onError(e);
                    }
                } finally {
                    if(connection != null) {
                        connection.disconnect();
                    }
                }
            }
        }).start();
    }
}
我们首先给sendHttpRequest()方法添加一个HttpCallbackListener参数,并在方法的内部开启了一个子线程,然后在子线程中执行具体的网络操作。(子线程中是无法通过return返回数据的)这里我们将服务器响应的数据传入了HttpCallbackListener的onFinish()方法中,如果出现了异常就将异常原因传入到onError()方法中。
现在sendHttpRequest()方法接受两个参数,我们还需将HttpCallbackListener实例传入
HttpUtil.sendHttpRequest(address,, new HttpCallbackListener() {
	@Override
	public void onFinish(String response) {
	//在这里根据返回内容执行具体的逻辑
	}

	@Override
	public void onError(Exception e){
	//在这里对异常情况进行处理
	}
}
使用OkHttp来处理网络请求就非常的简单了
我们在HttpUtil类中添加一个静态方法如下
 public static void sendOkHttpRequest(String address, okhttp3.Callback callback) {
        OkHttpClient client = new OkHttpClient();
        Request request = new Request.Builder()
                .url(address)
                .build();
        client.newCall(request).enqueue(callback);

    }
/*
 * Copyright (C) 2014 Square, Inc.
 *
 * Licensed under the Apache License, Version 2.0 (the "License");
 * you may not use this file except in compliance with the License.
 * You may obtain a copy of the License at
 *
 *      http://www.apache.org/licenses/LICENSE-2.0
 *
 * Unless required by applicable law or agreed to in writing, software
 * distributed under the License is distributed on an "AS IS" BASIS,
 * WITHOUT WARRANTIES OR CONDITIONS OF ANY KIND, either express or implied.
 * See the License for the specific language governing permissions and
 * limitations under the License.
 */
package okhttp3;

import java.io.IOException;

public interface Callback {
  /**
   * Called when the request could not be executed due to cancellation, a connectivity problem or
   * timeout. Because networks can fail during an exchange, it is possible that the remote server
   * accepted the request before the failure.
   */
  void onFailure(Call call, IOException e);

  /**
   * Called when the HTTP response was successfully returned by the remote server. The callback may
   * proceed to read the response body with {@link Response#body}. The response is still live until
   * its response body is {@linkplain ResponseBody closed}. The recipient of the callback may
   * consume the response body on another thread.
   *
   * <p>Note that transport-layer success (receiving a HTTP response code, headers and body) does
   * not necessarily indicate application-layer success: {@code response} may still indicate an
   * unhappy HTTP response code like 404 or 500.
   */
  void onResponse(Call call, Response response) throws IOException;
}
可以看到okhttp3.Callback是OkHttp库中自带的一个回调接口,类似于我们刚才自己编写的HttpCallbackListener
OkHttp在equeue()方法的内部帮我们开启好子线程,然后会在子线程中去执行HTTP请求,并将最终的结果回调到okhttp3.Callback中
我们在调用sendOkHttpRequest()方法的时候可以这样写。
HttpUtil.sendOkHttpRequest(address, new okhttp3.Callback(){

	@Override
	public void onResponse(Call call, Response response) throws IOException{
	//得到服务器返回的具体内容
	String responseData = resposne.body().toString(0;)
	}

	@Override
	public void onFailure(Call call, IOException e) {
	//在这里对异常情况进行处理

	}
})
要注意的是不论是HttpURLConnection还是OkHttp,最终的回调接口都是在子线程中执行,因此我们不可以在这里执行
任何的UI操作,除非借助RunOnUiThread()方法切换到主线程中执行。