1. 读写锁
 1 // 独占锁(写锁):一次只能被一个线程占有
 2 // 共享锁(读锁):可以被多个线程同时占有
 3 // 运行结果分析:写锁保证操作的原子性,读锁不能保证操作的原子性
 4 // 注意:lock锁一定要配对,不然可能会导致死锁
 5 // 个人理解:写操作即为修改数据,会改变原有的数据,因此必须保证其写操作的完整性,
 6 // 不能被中途打断,所以不能同时被多个线程调用
 7 // 读操作即为查询数据,原有数据不会改变,因此可被多个线程同时调用
 8
 9 public class ReadWriteLockDemo1 {
10     public static void main(String[] args) {
11         MyCacheLock myCacheLock = new MyCacheLock();
12
13         for (int i = 1; i <= 5; i++) {
14             int temp = i;
15             new Thread(() -> {
16                 myCacheLock.write(temp, "_" + temp + "_");
17             }).start();
18         }
19
20         for (int i = 1; i <= 5; i++) {
21             int temp = i;
22             new Thread(() -> {
23                 myCacheLock.read(temp);
24             }).start();
25         }
26     }
27 }
28
29 class MyCacheLock {
30     private volatile Map<Integer, Object> map = new HashMap<>();
31     // 创建读写锁
32     ReadWriteLock lock = new ReentrantReadWriteLock();
33
34     // 写
35     public void write(Integer key, Object value) {
36         // 写锁加锁
37         lock.writeLock().lock();
38         try {
39             // 业务编码
40             System.out.println(Thread.currentThread().getName() + "写入" + key);
41             map.put(key, value);
42             System.out.println(Thread.currentThread().getName() + "写入成功");
43         } catch (Exception e) {
44             e.printStackTrace();
45         } finally {
46             // 释放写锁
47             lock.writeLock().unlock();
48         }
49     }
50
51     // 读
52     public void read(Integer key) {
53         // 读锁加锁
54         lock.readLock().lock();
55         try {
56             // 业务编码
57             System.out.println(Thread.currentThread().getName() + "读取" + key);
58             Object value = map.get(key);
59             System.out.println(Thread.currentThread().getName() + "读取结果" + value);
60         } catch (Exception e) {
61             e.printStackTrace();
62         } finally {
63             // 释放读锁
64             lock.readLock().unlock();
65         }
66     }
67 }
2. 阻塞队列

阻塞:当队列满时,还往里存,此时就会阻塞; 当队列为空时,还往外取,此时也会阻塞。
我们为什么要使用阻塞队列?
在多线程下,线程之间通信,我们需要关心的是线程的 —唤醒!
例如:在消息投递过程中,消息发送方和接受方 可通过消息中间件MQ 来异步解决阻塞问题。
 1 // put(E e)  一直等待
 2 // offer(E e, long timeout, TimeUnit unit) 超时等待,队列还是满即返回false
 3 // offter(E e) 返回false,不报异常
 4 // add(E e) 执行这行报异常 java.lang.IllegalStateException: Queue full
 5 public class BlockingDemo {
 6     public static void main(String[] args) throws InterruptedException {
 7         // 参数:队列初始容量  设置为3
 8         ArrayBlockingQueue queue = new ArrayBlockingQueue<>(3);
 9
10         // 添加一个元素
11         queue.put(1);
12         // 取两次
13         System.out.println(queue.take());
14         System.out.println(queue.take()); // 执行到此,一直等待
15
16
17         // put(E e)添加元素
18         /*queue.put(1);
19         queue.put(2);
20         queue.put(3);
21         queue.put(4); // 执行到此,一直等待
22
23         System.out.println(queue.poll()); // 1
24         System.out.println(queue.poll()); // 2
25         System.out.println(queue.poll()); // 3
26         System.out.println(queue.poll()); // null
27         */
28
29         // -----------------------------------------------------------
30         // offer(E e, long timeout, TimeUnit unit)添加元素
31         /*System.out.println(queue.offer(1, 3L, TimeUnit.SECONDS)); // true
32         System.out.println(queue.offer(2, 3L, TimeUnit.SECONDS)); // true
33         System.out.println(queue.offer(3, 3L, TimeUnit.SECONDS)); // true
34         System.out.println(queue.offer(4, 3L, TimeUnit.SECONDS)); // 等待3秒,false (超时等待,队列还是满即返回false)
35         */
36
37         // ----------------------------------------------------------------
38         // offter(E e)添加元素
39         /*System.out.println(queue.offer(1)); // true
40         System.out.println(queue.offer(2)); // true
41         System.out.println(queue.offer(3)); // true
42         System.out.println(queue.offer(4)); // 返回false,不报异常
43
44         System.out.println(queue.poll()); // 1
45         System.out.println(queue.poll()); // 2
46         System.out.println(queue.poll()); // 3
47         System.out.println(queue.poll()); // null
48         */
49
50         // -------------------------------------------------
51         // add(E e)添加元素
52         /*queue.add(1);
53         queue.add(2);
54         queue.add(3);
55         // 添加第4个元素
56         queue.add(4);  //执行这行报异常 java.lang.IllegalStateException: Queue full
57
58         System.out.println(queue.remove());
59         System.out.println(queue.remove());
60         System.out.println(queue.remove());
61         System.out.println(queue.remove());
62         */
63     }
64 }
特殊的阻塞队列——同步队列
 1 // 同步队列
 2 public class SynchronousQueueDemo {
 3     public static void main(String[] args) {
 4         // 特殊的阻塞队列  容量固定为1
 5         SynchronousQueue<Object> queue = new SynchronousQueue<>();
 6
 7         // 添加元素
 8         new Thread(() -> {
 9             try {
10                 // 延时 以便看效果
11                 TimeUnit.SECONDS.sleep(3);
12                 queue.put(1);
13                 TimeUnit.SECONDS.sleep(3);
14                 queue.put(2);
15                 TimeUnit.SECONDS.sleep(3);
16                 queue.put(3);
17             } catch (InterruptedException e) {
18                 e.printStackTrace();
19             }
20         },"A").start();
21
22         // 取出元素
23         new Thread(() -> {
24             try {
25                 TimeUnit.SECONDS.sleep(3);
26                 System.out.println(queue.take());
27                 TimeUnit.SECONDS.sleep(3);
28                 System.out.println(queue.take());
29                 TimeUnit.SECONDS.sleep(3);
30                 System.out.println(queue.take());
31             } catch (InterruptedException e) {
32                 e.printStackTrace();
33             }
34         },"B").start();
35     }
36 }
3. 线程池
池化技术:程序运行会占用系统资源,提高程序的使用率,降低我们一个性能消耗
线程池,连接池,内存池,对象池......
为什么要使用线程池? 线程复用
线程池:
三大方法:
1. Executors.newSingleThreadExecutor() 单例,只有一个线程
2. Executors.newFixedThreadPool(5) 固定线程数 参数:线程数量
3. Executors.newCachedThreadPool() 线程数可变,可伸缩
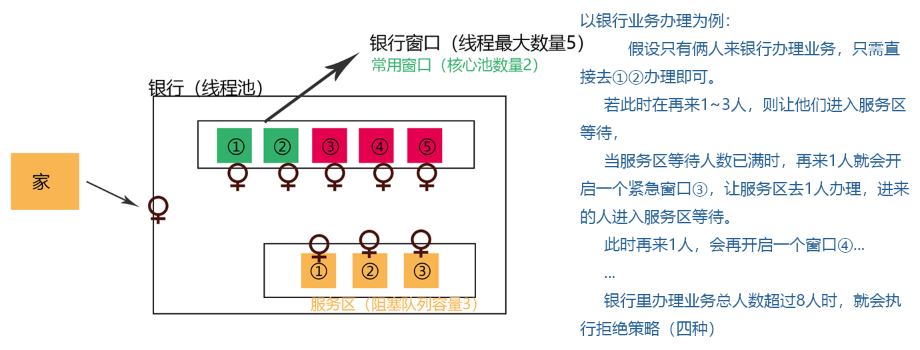
七大参数:
1. int corePoolSize // 核心池线程数
2. int maximumPoolSize // 最大线程数
3. long keepAliveTime // 超时等待时间
4. TimeUnit unit // keepAliveTime参数的时间单位
5. BlockingQueue< Runnable > workQueue // 阻塞队列
6. ThreadFactory threadFactory // 线程工厂
7. RejectedExecutionHandler handler // 拒绝策略 (见下面)
四种拒绝策略:
1. AbortPolicy() // 直接报异常,丢弃任务
2. DiscardOldestPolicy() // 线程池关闭之前,尝试去获取
3. DiscardPolicy() // 直接返回
4. CallerRunsPolicy() // 从哪来回哪去
 1 public class ThreadPoolExecutorDemo1 {
 2     public static void main(String[] args) {
 3         ThreadPoolExecutor executor = new ThreadPoolExecutor(
 4                 2, // 核心池线程数
 5                 5, // 最大线程数
 6                 5L,   // 超时等待时间
 7                 TimeUnit.SECONDS,  // keepAliveTime参数的时间单位
 8                 new LinkedBlockingDeque<>(3), // 阻塞队列
 9                 Executors.defaultThreadFactory(), // 线程工厂
10                 new ThreadPoolExecutor.AbortPolicy()  // 拒绝策略
11         );
12
13         /*
14         * new ThreadPoolExecutor.CallerRunsPolicy()  // 从哪来回哪去
15          * new ThreadPoolExecutor.DiscardOldestPolicy() // 线程池关闭之前,尝试去获取
16         * new ThreadPoolExecutor.DiscardPolicy() //  直接返回
17         * new ThreadPoolExecutor.AbortPolicy()// 直接报异常,丢弃任务
18         */
19
20         try {
21             for (int i = 0; i < 15; i++) {
22                 executor.execute(() -> {
23                     System.out.println(Thread.currentThread().getName() + "__ok");
24                 });
25             }
26         } catch (Exception e) {
27             e.printStackTrace();
28         } finally {
29             // 关闭线程池
30             executor.shutdown();
31         }
32     }
33 }
最大线程池 该如何设置?
CPU密集型: Runtime.getRuntime().availableProcessors() 获取当前CPU核数
IO密集型: 假设当前有50个线程都是进程经常操作大IO资源的,比较耗时! 我们则需要保证设置的线程池数量大于 50