AOP:面向切面编程;该技术可以很大程度的简化代码,我们先不对AOP进行展开,先看例子,从例子中逐步了解AOP技术的作用。
注:本篇博客使用的数据库连接技术为 HikariCP,具体性能分析与详细(不常用的用法)请看我的下一篇博客:数据源库连接池。
为什么使用AOP
开头说了,AOP技术可以很大程度的简化代码,那如何简化呢,我们往下看;
我们先定义一个springtest web项目;建立如下图的一个简单的框架结构:

CalculatorService.java
package com.jd.calculator.service;

public class CalculatorService implements ICalculatorService {

	public int mul(int a, int b) {
		System.out.println("This mul method begins");
		System.out.println("This mul method args:["+a+","+b+"]");
		return a*b;
	}

	public int div(int a, int b) {
		System.out.println("This div method begins");
		System.out.println("This div method args:["+a+","+b+"]");
		return a/b;
	}
}
Test.java
package com.jd.test;

import com.jd.calculator.service.CalculatorService;
import com.jd.calculator.service.ICalculatorService;

public class Test {

	public static void main(String[] args) {
		ICalculatorService calculatorService = new CalculatorService();
		System.out.println(calculatorService.mul(2, 2));
	}
}
显示结果如下:

但是,我们发现:我们仅写了乘和除两种方法,就出现了冗余的代码,如果我们将加、减、混合运算等都写出来,我们就会发现大段代码的冗余,因此,针对 CalculatorService.java 中代码作出修改,如下:
package com.jd.calculator.service;

public class CalculatorService implements ICalculatorService {

	public int mul(int a, int b) {
		before("mul",a,b);
		return a*b;
	}

	public int div(int a, int b) {
		before("mul",a,b);
		return a/b;
	}

	public void before(String methodName, int a, int b) {
		System.out.println("This "+methodName+" method begins");
		System.out.println("This "+methodName+" method args:["+a+","+b+"]");
	}
}
这样的话,当方法过多时,我们就可以去除很多冗余的代码;但是,我们依旧会发现,每次调用一次 before 方法还是多余的,而AOP技术可以在此的基础上继续优化代码。
AOP技术的实现
实现AOP技术我们需要以下jar包:
先看一些概念:
| 概念 |
说 明 |
| 切面(Aspect) |
一个横切关注点的模块化,这个关注点可能会横切多个对象。它是横切关注点的另一种表达方式。 |
| 连接点(Joinpoint) |
在程序执行过程中某个特定的点,比如某方法调用的时候或者处理异常的时候。在Spring AOP中,一个连接点表示一个方法的执行,即所有方法都可以嵌入横切逻辑。 |
| 切入点(Pointcut) |
匹配连接点的断言。它通常是一个表达式,有专门的语法,用于指明在哪里(或者说在哪些方法调用上)嵌入横切逻辑 |
| 通知(Advice) |
在切面的某个特定的连接点上执行的动作,也就是我们前面提到的横切逻辑,如日志处理逻辑,事务处理逻辑。切入点致命在哪里嵌入横切逻辑,通知指明切入什么,即干什么。 |
| 目标对象(Target Object) |
被一个或者多个切面所通知的对象,也被称作被通知对象 |
| 代理对象(Proxy Object) |
AOP框架创建的对象,它和目标对象遵循同样的接口,使用它的方式和使用目标对象的方式是一样的,但是它是目标对象的增强版,“通知”中的代码执行将会被代理对象的方法调用触发。在Spring中,AOP代理可以是JDK动态代理或者CGLIB代理。 |
修改 CalculatorService.java 代码
package com.jd.calculator.service;

import org.springframework.stereotype.Service;

@Service  //注解,方便在xml中实例化
public class CalculatorService implements ICalculatorService {

	public int mul(int a, int b) {
		return a*b;
	}

	public int div(int a, int b) {
		return a/b;
	}
}
新建切面包,创建切面类 CalculatorAspect.java
package com.jd.aspect;

import org.aspectj.lang.JoinPoint;
import org.aspectj.lang.Signature;
import org.aspectj.lang.annotation.Aspect;
import org.aspectj.lang.annotation.Before;
import org.springframework.stereotype.Component;

@Aspect  //拥有该注解的类为切面类
@Component
public class CalculatorAspect {

	@Before("execution(public int com.jd.calculator.service.CalculatorService.*(..))")
	public void before(JoinPoint jp) {
		Object [] args = jp.getArgs();
		//获取代理类和被代理类的信息。
		Signature signature = jp.getSignature();
		//获取方法名称
		String methodName = signature.getName();
		System.out.println("This "+methodName+" method begins.");
		System.out.println("This "+methodName+" arg: ["+args[0]+","+args[1]+"]");
	}
}
@Before 为前置增强,其功能是在目标方法执行之前执行,()中的参数为固定格式 "execution(public 数据类型 目标方法的路径(参数列表))" 其中,路径的末尾用 * 表示匹配指定路径的所有子方法,(..) 表示匹配所有参数,即不限个数与类型
建立Spring的xml文件 application.xml;配置如下:
<?xml version="1.0" encoding="UTF-8"?>
<beans xmlns="http://www.springframework.org/schema/beans"
	xmlns:xsi="http://www.w3.org/2001/XMLSchema-instance"
	xmlns:context="http://www.springframework.org/schema/context"
	xmlns:aop="http://www.springframework.org/schema/aop"
	xsi:schemaLocation="http://www.springframework.org/schema/beans http://www.springframework.org/schema/beans/spring-beans.xsd
		http://www.springframework.org/schema/context http://www.springframework.org/schema/context/spring-context-4.3.xsd
		http://www.springframework.org/schema/aop http://www.springframework.org/schema/aop/spring-aop-4.3.xsd">

	<context:component-scan base-package="com.jd"></context:component-scan>
	<aop:aspectj-autoproxy></aop:aspectj-autoproxy>

</beans>
<aop:aspectj-autoproxy></aop:aspectj-autoproxy> 的作用是将被 @Aspect 标记的切面类自动生成代理;
Test.java
package com.jd.test;

import org.springframework.context.support.ClassPathXmlApplicationContext;
import com.jd.calculator.service.ICalculatorService;

public class Test {

	public static void main(String[] args) {
		ClassPathXmlApplicationContext application = new ClassPathXmlApplicationContext("application.xml");
		//注意:这里的获取是 接口.class,不是 类.class
		ICalculatorService calculatorService = application.getBean(ICalculatorService.class);
		System.out.println(calculatorService.mul(2, 2));
		application.close();
	}
}
执行该代码可得如下结果:

乍一看,代码似乎没有变少反而变多了,但是细想一下我们可以发现,当 CalculatorService.java 中方法有很多的时候,这种技术可以减少很多冗余的代码。
现在我们简单说一下 AOP切面编程技术

上图是我手动绘制的示意图,其中最左边的条形框就是目标方法,而目标方法右边的均属于切面,从关系上来说,切面类似于生活中的代理;我们想要执行目标方法,不需要自取去寻找方法,只要找到代理即可,由代理执行方法;
从执行顺序来说,调用目标方法,会先调用切面,所有相关切面调用之后,再执行目标函数,类似于上示意图;
AOP的增强方法
前置增强
package com.jd.aspect;

import org.aspectj.lang.JoinPoint;
import org.aspectj.lang.Signature;
import org.aspectj.lang.annotation.Aspect;
import org.aspectj.lang.annotation.Before;
import org.springframework.stereotype.Component;

@Aspect  //拥有该注解的类为切面类
@Component
public class CalculatorAspect {

	//前置增强:目标方法执行之前执行
	@Before("execution(public int com.jd.calculator.service.CalculatorService.*(..))")
	public void before(JoinPoint jp) {
		Object [] args = jp.getArgs();
		Signature signature = jp.getSignature();
		String methodName = signature.getName();
		System.out.println("This "+methodName+" method begins.");
		System.out.println("This "+methodName+" arg: ["+args[0]+","+args[1]+"]");
	}
}
@Before 为前置增强,其功能是在目标方法执行之前执行,()中的参数为固定格式 "execution(public 数据类型 目标方法的路径(参数列表))" 其中,路径的末尾用 * 表示匹配指定路径的所有子方法,(..) 表示匹配所有参数,即不限个数与类型
后置增强 (仅修改增强方法,因此仅放出增强方法的代码)
//后置增强:目标方法执行完毕执行
@After("execution(public int com.jd.calculator.service.CalculatorService.*(..))")
public void After(JoinPoint jp) {
	Signature signature = jp.getSignature();
	String name = signature.getName();
	System.out.println("This "+name+" method ends.");
}
@After 为后置增强,其功能是在目标方法执行完毕后执行,其余同前置增强;
返回增强
//返回增强:目标方法执行return之后执行
@AfterReturning(value="execution(public int com.jd.calculator.service.CalculatorService.*(..))",returning="result")
public void AfterReturning(JoinPoint jp, Object result) {
	Signature signature = jp.getSignature();
	String name = signature.getName();
	System.out.println("This "+name+" method result "+result+".");
}
@AfterReturning 为返回增强,其功能是在目标方法执行return之后执行,有两个参数,value 和 returning ,value 同上(参数只有一个可直接写参数值);returning 的参数值为返回结果不需要拼写同目标方法的返回值,但是,必须和后置增强方法中的 Object类 的参数相同;
后置增强和返回增强的区别:正常情况下,后置增强先于返回增强执行;异常情况下后置增强执行,返回增强不执行(后文验证);
异常增强
//异常增强:在目标方法发生异常时执行
@AfterThrowing(value="execution(public int com.jd.calculator.service.CalculatorService.*(..))",throwing="e")
public void After(JoinPoint jp,Exception e) {
	Signature signature = jp.getSignature();
	String name = signature.getName();
	System.out.println("This "+name+" method Exception"+e+".");
}
@AfterThrowing 异常增强,其功能是在目标方法出现异常时执行,同样有两个参数,value 和 throwing 的用法类似于返回增强的参数,这里不再累述。
还有一个增强方法为 @Around 即循环增强,可以同时实现以上四种增强方法,在下文中详述。
AOP的运行时机
以上四种增强方法的执行顺序为(加目标方法):前置增强 --> 目标方法 --> 后置增强 --> 返回值 --> 返回增强 或 前置增强 --> 目标方法 --> 后置增强 --> 返回值异常 --> 异常增强
仅修改 CalculatorAspect.java 中代码,其余部分直接使用以上相对应的代码即可;
package com.jd.aspect;

import org.aspectj.lang.JoinPoint;
import org.aspectj.lang.Signature;
import org.aspectj.lang.annotation.After;
import org.aspectj.lang.annotation.AfterReturning;
import org.aspectj.lang.annotation.AfterThrowing;
import org.aspectj.lang.annotation.Aspect;
import org.aspectj.lang.annotation.Before;
import org.springframework.stereotype.Component;

@Aspect
@Component
public class CalculatorAspect {

	//前置增强:目标方法执行之前执行
	@Before("execution(public int com.jd.calculator.service.CalculatorService.*(..))")
	public void before(JoinPoint jp) {
		Object [] args = jp.getArgs();
		//获取代理类和被代理类的信息。
		Signature signature = jp.getSignature();
		String methodName = signature.getName();
		System.out.println("This "+methodName+" method begins.");
		System.out.println("This "+methodName+" arg: ["+args[0]+","+args[1]+"]");
	}

	//后置增强:目标方法执行完毕执行
	@After("execution(public int com.jd.calculator.service.CalculatorService.*(..))")
	public void After(JoinPoint jp) {
		Signature signature = jp.getSignature();
		String name = signature.getName();
		System.out.println("This "+name+" method ends.");
	}

	//返回增强:目标方法执行return之后执行
	//后置增强和返回增强的区别:正常情况下,后置增强先于返回增强执行;异常情况下后置增强执行,返回增强不执行
	@AfterReturning(value="execution(public int com.jd.calculator.service.CalculatorService.*(..))",returning="result")
	public void AfterReturning(JoinPoint jp, Object result) {
		Signature signature = jp.getSignature();
		String name = signature.getName();
		System.out.println("This "+name+" method result "+result+".");
	}

	//异常增强:在目标方法发生异常时执行
	@AfterThrowing(value="execution(public int com.jd.calculator.service.CalculatorService.*(..))",throwing="e")
	public void After(JoinPoint jp,Exception e) {
		Signature signature = jp.getSignature();
		String name = signature.getName();
		System.out.println("This "+name+" method Exception"+e+".");
	}
}
Test.java
package com.jd.test;

import org.springframework.context.support.ClassPathXmlApplicationContext;
import com.jd.calculator.service.ICalculatorService;

public class Test {

	public static void main(String[] args) {
		ClassPathXmlApplicationContext application = new ClassPathXmlApplicationContext("application.xml");
		//注意:这里的获取是 接口.class,不是 类.class
		ICalculatorService calculatorService = application.getBean(ICalculatorService.class);
		System.out.println(calculatorService.mul(2, 2));
		application.close();
	}
}
执行结果如下:

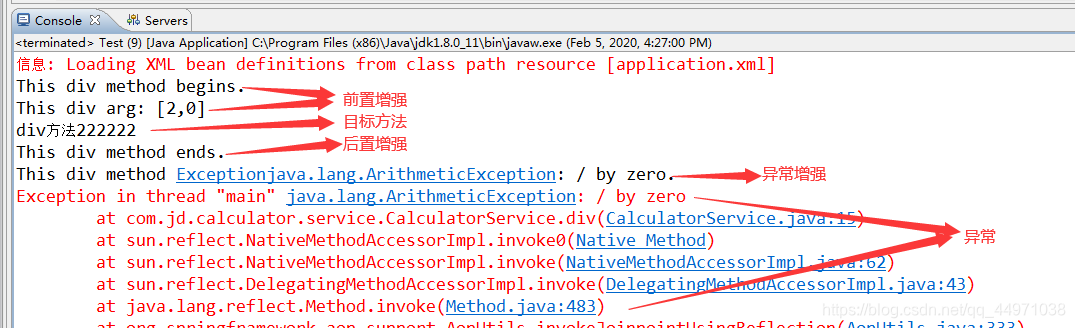
我们修改 Test.java 中的代码,将调用乘法方法改为调用除法方法,并将除数设为 0 (故意除法异常)
package com.jd.test;

import org.springframework.context.support.ClassPathXmlApplicationContext;
import com.jd.calculator.service.ICalculatorService;

public class Test {

	public static void main(String[] args) {
		ClassPathXmlApplicationContext application = new ClassPathXmlApplicationContext("application.xml");
		//注意:这里的获取是 接口.class,不是 类.class
		ICalculatorService calculatorService = application.getBean(ICalculatorService.class);
		System.out.println(calculatorService.div(2, 0));
		application.close();
	}
}
执行结果如下:
@Around 循环增强 以及 @Pointcut 作用
@Around 循环增强可以直接实现以上四种增强方法; @Pointcut 是为了简化增强注解的value参数,形式如下:
CalculatorAspect.java
package com.jd.aspect;

import org.aspectj.lang.ProceedingJoinPoint;
import org.aspectj.lang.annotation.Around;
import org.aspectj.lang.annotation.Aspect;
import org.aspectj.lang.annotation.Pointcut;
import org.springframework.stereotype.Component;

@Aspect
@Component
public class CalculatorAspect {

	@Pointcut("execution(public int com.jd.calculator.service.CalculatorService.*(..))")
	public void pointCut() {

	}

	//循环增强:可实现以上所有增强
	@Around("pointCut()")  //简化部分
	public Object around(ProceedingJoinPoint joinPoint) {
		Object result = null;
		Object target = joinPoint.getTarget();  //目标对象
		String methodName = joinPoint.getSignature().getName();
		Object [] params = joinPoint.getArgs();

		try {
			try {
				//前置增强
				System.out.println(target.getClass().getName()+": This "+methodName+" method begins.");
				System.out.println(target.getClass().getName()+": Parameters of the "+methodName+"method:["+params[0]+","+params[1]+"]");
				//执行目标对象内的方法
				result = joinPoint.proceed();
			}finally {
				//后置增强
				System.out.println(target.getClass().getName()+": This "+methodName+" method ends");
			}
			//返回增强
			System.out.println(target.getClass().getName()+": This "+methodName+" method result: "+result);
		}catch(Throwable e){
			//异常增强
			System.out.println(target.getClass().getName()+": Execption of the "+methodName+": "+e);
		}
		return result;
	}
}
Test.java
package com.jd.test;

import org.springframework.context.support.ClassPathXmlApplicationContext;
import com.jd.calculator.service.ICalculatorService;

public class Test {

	public static void main(String[] args) {
		ClassPathXmlApplicationContext application = new ClassPathXmlApplicationContext("application.xml");
		//注意:这里的获取是 接口.class,不是 类.class
		ICalculatorService calculatorService = application.getBean(ICalculatorService.class);
		System.out.println(calculatorService.div(2, 1));
		application.close();
	}
}
执行结果如下:

Spring XML配置 以及 切面的执行顺序
直接在 xml 中配置 <aop:aspectj-autoproxy></aop:aspectj-autoproxy> 自动生成代理切面的执行顺序为字母顺序,即下图中先执行 ArgAspect 切面,再执行 ArgAspect 切面;也可以在各个切面中注解 @Order("数字") 指定切面的执行顺序,数字越小优先级越高。
另外一种配置方法如下:

如上,我们建立两个类(就是我们将其作为切面类的类,因为这里没用使用 @Aspect 注解,因此为普通的类),一个输出参数,一个输出目标方法的名字;代码如下:
ArgAspect.java
package com.jd.aspect;

import org.aspectj.lang.JoinPoint;

public class ArgAspect {

	public void before(JoinPoint jp) {
		Object [] args = jp.getArgs();
		System.out.println("Arg of the "+jp.getSignature().getName()+" method: ["+args[0]+","+args[1]+"]");
	}
}
MethodAspect.java
package com.jd.aspect;

import org.aspectj.lang.JoinPoint;

public class MethodAspect {

	public void before(JoinPoint jp) {
		String name = jp.getSignature().getName();
		System.out.println("This "+name+" method begins");
	}
}
application.xml
<?xml version="1.0" encoding="UTF-8"?>
<beans xmlns="http://www.springframework.org/schema/beans"
	xmlns:xsi="http://www.w3.org/2001/XMLSchema-instance"
	xmlns:context="http://www.springframework.org/schema/context"
	xmlns:aop="http://www.springframework.org/schema/aop"
	xsi:schemaLocation="http://www.springframework.org/schema/beans http://www.springframework.org/schema/beans/spring-beans.xsd
		http://www.springframework.org/schema/context http://www.springframework.org/schema/context/spring-context-4.3.xsd
		http://www.springframework.org/schema/aop http://www.springframework.org/schema/aop/spring-aop-4.3.xsd">

	<context:component-scan base-package="com.jd"></context:component-scan>

	<bean id="argAspect" class="com.jd.aspect.ArgAspect"></bean>
	<bean id="methodAspect" class="com.jd.aspect.MethodAspect"></bean>

	<aop:config>
		<aop:pointcut expression="execution(public int com.jd.calculator.service.CalculatorService.*(..))" id="pointCut"/>
		<aop:aspect ref="methodAspect" order="1">
			<aop:before method="before" pointcut-ref="pointCut"/>
		</aop:aspect>
		<aop:aspect ref="argAspect" order="2">
			<aop:before method="before" pointcut-ref="pointCut"/>
		</aop:aspect>
	</aop:config>
</beans>
使用 bean标签 直接生成类实例(因为这里没用使用 @Aspect 注解,因此为普通的类),然后使用 aop标签 进行配置具体的内容,aop:pointcut 作用同 @Pointcut;aop:aspect 指定已生成的类的实例为切面类实例;aop:before 前置增强,method 指定前置增强的方法为那个方法, pointcut-ref 指定 Pointcut;order 则是指定切面的执行顺序;
Test.java
package com.jd.test;

import org.springframework.context.support.ClassPathXmlApplicationContext;
import com.jd.calculator.service.ICalculatorService;

public class Test {

	public static void main(String[] args) {
		ClassPathXmlApplicationContext application = new ClassPathXmlApplicationContext("application.xml");
		//注意:这里的获取是 接口.class,不是 类.class
		ICalculatorService calculatorService = application.getBean(ICalculatorService.class);
		System.out.println(calculatorService.div(2, 1));
		application.close();
	}
}
执行结果如下:
