JDK与CGLIb动态代理的区别
废话不多说,直接上例子:

这是例子的简单框架结构;
MathService.java
package com.jd.math;

import org.springframework.stereotype.Service;

@Service
public class MathService implements IMathService {

	@Override
	public int add(int a, int b) {
		return a+b;
	}

	@Override
	public int div(int a, int b) {
		return a/b;
	}
}
MathAOP.java
package com.jd.aop;

import org.aspectj.lang.JoinPoint;
import org.aspectj.lang.Signature;
import org.aspectj.lang.annotation.Aspect;
import org.aspectj.lang.annotation.Before;
import org.springframework.stereotype.Component;

@Aspect
@Component
public class MathAOP {

	@Before("execution(public int com.jd.math.MathService.*(..))")
	public void before(JoinPoint jp) {
		Signature signature = jp.getSignature();
		System.out.println("Thw "+signature.getName()+" method begins.");
	}
}
我们先定义一个目标类 MathService,在其中定义两个算法分别为加和除;然后定义一个切面类 MathAOP;
配置 application.xml 文件:
<?xml version="1.0" encoding="UTF-8"?>
<beans xmlns="http://www.springframework.org/schema/beans"
	xmlns:xsi="http://www.w3.org/2001/XMLSchema-instance"
	xmlns:aop="http://www.springframework.org/schema/aop"
	xmlns:context="http://www.springframework.org/schema/context"
	xsi:schemaLocation="http://www.springframework.org/schema/beans http://www.springframework.org/schema/beans/spring-beans.xsd
		http://www.springframework.org/schema/context http://www.springframework.org/schema/context/spring-context-4.3.xsd
		http://www.springframework.org/schema/aop http://www.springframework.org/schema/aop/spring-aop-4.3.xsd">

	<context:component-scan base-package="com.jd"></context:component-scan>
	<aop:aspectj-autoproxy></aop:aspectj-autoproxy>
</beans>这里我们使用的代理是JDL动态代理;
Test.java
package com.jd.test;

import org.springframework.context.support.ClassPathXmlApplicationContext;

import com.jd.math.IMathService;
import com.jd.math.MathService;

public class Test {

	public static void main(String[] args) {
		ClassPathXmlApplicationContext applicationContext = new ClassPathXmlApplicationContext("application.xml");
		IMathService mathService = applicationContext.getBean(IMathService.class);
		System.out.println(mathService.getClass().getName());  //获取类名
		System.out.println(mathService.getClass().getSuperclass());  //获取父类
		Class clazz = mathService.getClass();  //获取该类实现的接口
		Class [] array = clazz.getInterfaces();
		for(Class c:array) {
			System.out.println("-->"+c);
		}
		applicationContext.close();
	}
}
我们可以看到输出结果如下:

我们发现:JDK动态代理 产生的代理类与目标类没有继承关系;代理类是目标类实现的接口的实现类;
然后我们使用 CGLIb动态代理 看一下;
配置 application.xml 文件(添加属性:proxy-target-class="true";默认为false,即默认为JDK动态代理):
<?xml version="1.0" encoding="UTF-8"?>
<beans xmlns="http://www.springframework.org/schema/beans"
	xmlns:xsi="http://www.w3.org/2001/XMLSchema-instance"
	xmlns:aop="http://www.springframework.org/schema/aop"
	xmlns:context="http://www.springframework.org/schema/context"
	xsi:schemaLocation="http://www.springframework.org/schema/beans http://www.springframework.org/schema/beans/spring-beans.xsd
		http://www.springframework.org/schema/context http://www.springframework.org/schema/context/spring-context-4.3.xsd
		http://www.springframework.org/schema/aop http://www.springframework.org/schema/aop/spring-aop-4.3.xsd">

	<context:component-scan base-package="com.jd"></context:component-scan>
	<aop:aspectj-autoproxy proxy-target-class="true"></aop:aspectj-autoproxy>
</beans>
同样执行上述的 Test.java 代码,得到的结果如下:

我们发现:CGLIb动态代理 是实现类的子类,继承接口的实现类;因此 Test.java 中获取类可以写实现类,而 JDK动态代理 必须写接口;
小结:
- proxy-target-class="true" CGLIb动态代理,可以使用 IMathService.class 或 MathService.class 获取代理类; proxy-target-class="false"(默认) JDK动态代理,只能使用 IMathService.class 获取代理类;
- CGLIb动态代理产生的代理类是目标类的子类;
- JDK动态代理产生的代理类与目标类没有继承关系,代理类是接口的实现类。
注意:Spring 3.2 版本开始支持 CGLIb动态代理。
区别小结:
- JDK 动态代理基于接口实现,所以实现 JDK 动态代理,必须先定义接口,CGLIb 动态代理基于被代理类实现;
- JDK 动态代理机制是委托机制,委托 hanlder 调用原始实现类方法;CGLIb 则使用继承机制,被代理类和代理类是继承关系,所以代理类对象可以赋值给被代理类类型的变量;如果别代理类有接口,那么代理类对象也可以赋值给该类接口类型的变量。
AOP中隐含的动态代理
一个类中的方法如果被@Transaction注解修饰,则Spring自动为该类生成代理类及代理对象;
先创建一个目标类与目标方法 CarService.java
package com.jd.car
;
import org.springframework.stereotype.Service;

@Service
public class CarService implements ICarService {

	@Override
	public boolean batch() {
		return true;
	}
}
仅为了证明一个类中的方法如果被@Transaction注解修饰,则Spring自动为该类生成代理类及代理对象;因此不再写方法体,直接返回值;然后配置 application.xml
<?xml version="1.0" encoding="UTF-8"?>
<beans xmlns="http://www.springframework.org/schema/beans"
	xmlns:xsi="http://www.w3.org/2001/XMLSchema-instance"
	xmlns:context="http://www.springframework.org/schema/context"
	xmlns:aop="http://www.springframework.org/schema/aop"
	xmlns:p="http://www.springframework.org/schema/p"
	xmlns:tx="http://www.springframework.org/schema/tx"
	xsi:schemaLocation="http://www.springframework.org/schema/beans http://www.springframework.org/schema/beans/spring-beans.xsd
		http://www.springframework.org/schema/context http://www.springframework.org/schema/context/spring-context-4.3.xsd
		http://www.springframework.org/schema/aop http://www.springframework.org/schema/aop/spring-aop-4.3.xsd
		http://www.springframework.org/schema/tx http://www.springframework.org/schema/tx/spring-tx-4.3.xsd">

	<context:component-scan base-package="com.jd"></context:component-scan>

	<bean id="dataSource" class="com.zaxxer.hikari.HikariDataSource" destroy-method="close" p:password="root" p:username="root">
		<property name="driverClassName" value="com.mysql.jdbc.Driver"></property>
		<property name="jdbcUrl" value="jdbc:mysql://127.0.0.7:3306/test"></property>
	</bean>

	<bean class="org.springframework.jdbc.core.JdbcTemplate" p:dataSource-ref="dataSource"></bean>

	<!-- 配置数据源事务管理器 -->
	<bean id="transactionManager" class="org.springframework.jdbc.datasource.DataSourceTransactionManager">
		<property name="dataSource" ref="dataSource"></property>
	</bean>

	<!-- 开启事务注解 -->
	<tx:annotation-driven transaction-manager="transactionManager"/>

</beans>
这是对数据库的连接配置和事务开启配置,详解在我的Spring SOP技术小结 博客中;
Test.java
package com.jd.test;

import org.springframework.context.support.ClassPathXmlApplicationContext;

import com.jd.car.ICarService;

public class Test {

	public static void main(String[] args) {
		//一个类中的方法如果被@Transaction注解修饰,则Spring自动为该类生成代理类及代理对象
		ClassPathXmlApplicationContext applicationContext = new ClassPathXmlApplicationContext("application.xml");
		ICarService carService = applicationContext.getBean(ICarService.class);
		System.out.println(carService.getClass().getName());
		applicationContext.close();
	}
}
直接获取实例的类,我们会得到如下结果:
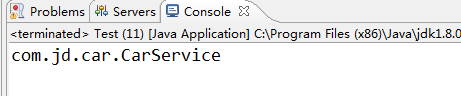
是我们定义的目标类,不是代理类;那如果我们将目标类使用@Transaction注解修饰呢?如下:
package com.jd.car;

import org.springframework.stereotype.Service;
import org.springframework.transaction.annotation.Transactional;

@Service  //事务注解修饰
@Transactional
public class CarService implements ICarService {

	@Override
	public boolean batch() {
		return true;
	}
}
再运行 Test.java 代码我们会得到:

JDK动态代理类产生的实例;我们在看一遍结论:一个类中的方法如果被@Transaction注解修饰,则Spring自动为该类生成代理类及代理对象;
上面提到了动态代理有两种,一种是 JDK动态代理,另一种是 CGLIb动态代理,那如何设置两种代理方式呢?
显然上面默认的,什么都不设置的是 JDK动态代理;其实设置 CGLIb动态代理 就是在设置 JDK动态代理 的基础上再在 application.xml 中添加 <aop:aspectj-autoproxy proxy-target-class="true"></aop:aspectj-autoproxy> 即可;其中值为 false 即默认为 JDK动态代理,因此可以直接省略该行代码;当添加 <aop:aspectj-autoproxy proxy-target-class="true"></aop:aspectj-autoproxy> 代码之后我们再执行 Test.java 可以得到如下结果:

最后再说一下 xml 中的一个标签: import标签;该标签可以引用其他的 xml 文件,使每个 xml 文件变得简洁,如上 application.xml 文件可以写成下面两个文件:
db.xml(数据连接池配置及事务配置)
<?xml version="1.0" encoding="UTF-8"?>
<beans xmlns="http://www.springframework.org/schema/beans"
	xmlns:xsi="http://www.w3.org/2001/XMLSchema-instance"
	xmlns:context="http://www.springframework.org/schema/context"
	xmlns:p="http://www.springframework.org/schema/p"
	xmlns:tx="http://www.springframework.org/schema/tx"
	xsi:schemaLocation="http://www.springframework.org/schema/beans http://www.springframework.org/schema/beans/spring-beans.xsd
		http://www.springframework.org/schema/context http://www.springframework.org/schema/context/spring-context-4.3.xsd
		http://www.springframework.org/schema/tx http://www.springframework.org/schema/tx/spring-tx-4.3.xsd">

	<bean id="dataSource" class="com.zaxxer.hikari.HikariDataSource" destroy-method="close" p:password="root" p:username="root">
		<property name="driverClassName" value="com.mysql.jdbc.Driver"></property>
		<property name="jdbcUrl" value="jdbc:mysql://127.0.0.7:3306/test"></property>
	</bean>

	<bean class="org.springframework.jdbc.core.JdbcTemplate" p:dataSource-ref="dataSource"></bean>

	<!-- 配置数据源事务管理器 -->
	<bean id="transactionManager" class="org.springframework.jdbc.datasource.DataSourceTransactionManager">
		<property name="dataSource" ref="dataSource"></property>
	</bean>

	<!-- 开启事务注解 -->
	<tx:annotation-driven transaction-manager="transactionManager"/>

</beans>application.xml(实例化类和引上面的 xml文件)
<?xml version="1.0" encoding="UTF-8"?>
<beans xmlns="http://www.springframework.org/schema/beans"
	xmlns:xsi="http://www.w3.org/2001/XMLSchema-instance"
	xmlns:context="http://www.springframework.org/schema/context"
	xmlns:aop="http://www.springframework.org/schema/aop"
	xsi:schemaLocation="http://www.springframework.org/schema/beans http://www.springframework.org/schema/beans/spring-beans.xsd
		http://www.springframework.org/schema/context http://www.springframework.org/schema/context/spring-context-4.3.xsd
		http://www.springframework.org/schema/aop http://www.springframework.org/schema/aop/spring-aop-4.3.xsd">

	<context:component-scan base-package="com.jd"></context:component-scan>
	<import resource="db.xml"/>
	<aop:aspectj-autoproxy proxy-target-class="true"></aop:aspectj-autoproxy>

</beans>