文章目录
Node 应用Demo代码
var http = require('http');

var handleRequest = function(request, response) {
  console.log('Received request for URL: ' + request.url);
  response.writeHead(200);
  response.end('Hello World!');
};
var www = http.createServer(handleRequest);
console.log("listen on port:8080");
www.listen(8080);
创建 Dockerfile
创建一个文件 Dockerfile。Dockerfile 描述要生成的镜像。您可以通过扩展现有镜像来构建 Docker 容器镜像。本教程中的镜像扩展了现有的 Node.js 镜像。
FROM node:6.9.2
EXPOSE 8080
COPY server.js .
CMD node server.js
构建的过程是从 Docker 仓库中找到的官方 Node.js LTS 镜像开始,然后暴露端口 8080,接着将您的 server.js 文件复制到镜像中,并启动 Node.js 服务器。
启动 Minikube Docker 守护进程
本教程使用 Minikube,而不是将 Docker 镜像推送到仓库,可以使用与Minikube VM相同的Docker主机构建镜像,以使镜像自动存在。为此,请确保使用Minikube Docker守护进程:
eval $(minikube docker-env)
windows下使用PowerShell执行
minikube docker-env
他会告诉你执行如下命令
# Run this command to configure your shell:
# & minikube docker-env | Invoke-Expression
然后在PowerShell中执行
& minikube docker-env | Invoke-Expression
执行完之后,我们再执行docker images
PS C:\Users\c\Desktop\hellonode> docker images
REPOSITORY                                                                        TAG                 IMAGE ID            CREATED             SIZE
registry.cn-hangzhou.aliyuncs.com/google_containers/kube-proxy                    v1.14.3             004666307c5b        2 months ago        82.1MB
registry.cn-hangzhou.aliyuncs.com/google_containers/kube-apiserver                v1.14.3             9946f563237c        2 months ago        210MB
registry.cn-hangzhou.aliyuncs.com/google_containers/kube-controller-manager       v1.14.3             ac2ce44462bc        2 months ago        158MB
registry.cn-hangzhou.aliyuncs.com/google_containers/kube-scheduler                v1.14.3             953364a3ae7a        2 months ago        81.6MB
registry.cn-hangzhou.aliyuncs.com/google_containers/kube-addon-manager            v9.0                119701e77cbc        7 months ago        83.1MB
registry.cn-hangzhou.aliyuncs.com/google_containers/coredns                       1.3.1               eb516548c180        7 months ago        40.3MB
registry.cn-hangzhou.aliyuncs.com/google_containers/kubernetes-dashboard-amd64    v1.10.1             f9aed6605b81        8 months ago        122MB
registry.cn-hangzhou.aliyuncs.com/google_containers/etcd                          3.3.10              2c4adeb21b4f        8 months ago        258MB
registry.cn-hangzhou.aliyuncs.com/google_containers/k8s-dns-sidecar-amd64         1.14.13             4b2e93f0133d        10 months ago       42.9MB
registry.cn-hangzhou.aliyuncs.com/google_containers/k8s-dns-kube-dns-amd64        1.14.13             55a3c5209c5e        10 months ago       51.2MB
registry.cn-hangzhou.aliyuncs.com/google_containers/k8s-dns-dnsmasq-nanny-amd64   1.14.13             6dc8ef8287d3        10 months ago       41.4MB
registry.cn-hangzhou.aliyuncs.com/google_containers/pause                         3.1                 da86e6ba6ca1        20 months ago       742kB
registry.cn-hangzhou.aliyuncs.com/google_containers/storage-provisioner           v1.8.1              4689081edb10        21 months ago       80.8MB
可以看到我们看到的是Minikube VM中docker的镜像,如果执行eval $(minikube docker-env)或者& minikube docker-env | Invoke-Expression命令。我们看到的如下的镜像
$ docker images
REPOSITORY          TAG                 IMAGE ID            CREATED             SIZE
hello-node          v1                  218dd3dba0d8        23 hours ago        655MB
node                6.9.2               faaadb4aaf9b        2 years ago         655MB
而且如果不执行eval $(minikube docker-env)或者& minikube docker-env | Invoke-Expression命令,在创建好demo镜像后,kubectl get pods 执行遇到问题如下
Failed to pull image "hello-node:v1": rpc error: code = Unknown desc = Error response from daemon: pull access denied for car/configuration, repository does not exist or may require 'docker login'
而且我一开始也研究了半天eval $(minikube docker-env)为啥没用,提示找不到命令,原来是windows下面需要执行& minikube docker-env | Invoke-Expression,果然还是要认真看命令行提示。而且还是linux搭建开发环境比较人性化,windows太难了。。
构建 Docker 镜像
执行完上面的命令之后我们就可以开始构建docker镜像了
docker build -t hello-node:v1 .
现在 Minikube VM 可以运行您构建的镜像了。
PS C:\Users\c\Desktop\hellonode> docker images
REPOSITORY                                                                        TAG                 IMAGE ID            CREATED             SIZE
hello-node                                                                        v1                  7792b6eadc5a        15 minutes ago      655MB
registry.cn-hangzhou.aliyuncs.com/google_containers/kube-proxy                    v1.14.3             004666307c5b        2 months ago        82.1MB
registry.cn-hangzhou.aliyuncs.com/google_containers/kube-controller-manager       v1.14.3             ac2ce44462bc        2 months ago        158MB
registry.cn-hangzhou.aliyuncs.com/google_containers/kube-apiserver                v1.14.3             9946f563237c        2 months ago        210MB
registry.cn-hangzhou.aliyuncs.com/google_containers/kube-scheduler                v1.14.3             953364a3ae7a        2 months ago        81.6MB
registry.cn-hangzhou.aliyuncs.com/google_containers/kube-addon-manager            v9.0                119701e77cbc        7 months ago        83.1MB
registry.cn-hangzhou.aliyuncs.com/google_containers/coredns                       1.3.1               eb516548c180        7 months ago        40.3MB
registry.cn-hangzhou.aliyuncs.com/google_containers/kubernetes-dashboard-amd64    v1.10.1             f9aed6605b81        8 months ago        122MB
registry.cn-hangzhou.aliyuncs.com/google_containers/etcd                          3.3.10              2c4adeb21b4f        8 months ago        258MB
registry.cn-hangzhou.aliyuncs.com/google_containers/k8s-dns-sidecar-amd64         1.14.13             4b2e93f0133d        10 months ago       42.9MB
registry.cn-hangzhou.aliyuncs.com/google_containers/k8s-dns-kube-dns-amd64        1.14.13             55a3c5209c5e        10 months ago       51.2MB
registry.cn-hangzhou.aliyuncs.com/google_containers/k8s-dns-dnsmasq-nanny-amd64   1.14.13             6dc8ef8287d3        10 months ago       41.4MB
registry.cn-hangzhou.aliyuncs.com/google_containers/pause                         3.1                 da86e6ba6ca1        20 months ago       742kB
registry.cn-hangzhou.aliyuncs.com/google_containers/storage-provisioner           v1.8.1              4689081edb10        21 months ago       80.8MB
node
可以看到我们的hello-node镜像已经构建好了。
创建一个管理 Pod 的 Deployment
使用 kubectl run 命令创建一个管理 Pod 的 Deployment。该 Pod 基于镜像 hello-node:v1 运行了一个容器:
PS C:\Users\c\Desktop\hellonode> kubectl run hello-node --image=hello-node:v1 --port=8080
deployment "hello-node" created
查看 Deployment
PS C:\Users\c\Desktop\hellonode> kubectl get deployments
NAME         DESIRED   CURRENT   UP-TO-DATE   AVAILABLE   AGE
hello-node   1         1         1            1           23m
PS C:\Users\c\Desktop\hellonode>
查看 Pod
PS C:\Users\c\Desktop\hellonode> kubectl get pods
NAME                          READY     STATUS    RESTARTS   AGE
hello-node-67f857c88c-fm678   1/1       Running   0          23m
查看Pod描述信息
PS C:\Users\c\Desktop\hellonode> kubectl describe pods hello-node
Name:           hello-node-67f857c88c-fm678
Namespace:      default
Node:           minikube/10.0.2.15
Start Time:     Fri, 16 Aug 2019 23:50:19 +0800
Labels:         pod-template-hash=67f857c88c
                run=hello-node
Annotations:    <none>
Status:         Running
IP:             172.17.0.5
Controlled By:  ReplicaSet/hello-node-67f857c88c
Containers:
  hello-node:
    Container ID:   docker://941055dffcaeeac8a34424153270fe07cfb08bc6905ab8fef1b2832abdacc8a7
    Image:          hello-node:v1
    Image ID:       docker://sha256:7792b6eadc5ab90437f2489de0ccc0279a23de27abff8c2db134ce20dc979606
    Port:           8080/TCP
    State:          Running
      Started:      Fri, 16 Aug 2019 23:50:20 +0800
    Ready:          True
    Restart Count:  0
    Environment:    <none>
    Mounts:
      /var/run/secrets/kubernetes.io/serviceaccount from default-token-gk66v (ro)
Conditions:
  Type              Status
  Initialized       True
  Ready             True
  ContainersReady   True
  PodScheduled      True
Volumes:
  default-token-gk66v:
    Type:        Secret (a volume populated by a Secret)
    SecretName:  default-token-gk66v
    Optional:    false
QoS Class:       BestEffort
Node-Selectors:  <none>
Tolerations:     node.kubernetes.io/not-ready:NoExecute for 300s
                 node.kubernetes.io/unreachable:NoExecute for 300s
Events:
  Type    Reason     Age   From               Message
  ----    ------     ----  ----               -------
  Normal  Scheduled  24m   default-scheduler  Successfully assigned default/hello-node-67f857c88c-fm678 to minikube
  Normal  Pulled     24m   kubelet, minikube  Container image "hello-node:v1" already present on machine
  Normal  Created    24m   kubelet, minikube  Created container hello-node
  Normal  Started    24m   kubelet, minikube  Started container hello-node

PS C:\Users\c\Desktop\hellonode>
查看 log
PS C:\Users\c\Desktop\hellonode> kubectl logs hello-node-67f857c88c-fm678
listen on port:8080
创建 Service
默认情况下,Pod 只能通过 Kubernetes 集群中的内部 IP 地址访问。要使得 hello-node 容器可以从 Kubernetes 虚拟网络的外部访问,必须将 Pod 暴露为 Kubernetes Service。
可以使用 kubectl expose 命令将 Pod 暴露给公网:
PS C:\Users\c\Desktop\hellonode> kubectl expose deployment hello-node --type=LoadBalancer
service "hello-node" exposed
查看 Service
PS C:\Users\c\Desktop\hellonode> kubectl get services
NAME         TYPE           CLUSTER-IP      EXTERNAL-IP   PORT(S)          AGE
hello-node   LoadBalancer   10.99.150.179   <pending>     8080:30552/TCP   1m
kubernetes   ClusterIP      10.96.0.1       <none>        443/TCP          1d
查看 Service的描述信息
PS C:\Users\c\Desktop\hellonode> kubectl describe service hello-node
Name:                     hello-node
Namespace:                default
Labels:                   run=hello-node
Annotations:              <none>
Selector:                 run=hello-node
Type:                     LoadBalancer
IP:                       10.99.150.179
Port:                     <unset>  8080/TCP
TargetPort:               8080/TCP
NodePort:                 <unset>  30552/TCP
Endpoints:                172.17.0.5:8080
Session Affinity:         None
External Traffic Policy:  Cluster
Events:                   <none>
访问 Service
--type=LoadBalancer表示要在集群之外公开服务,向外部暴露服务。外部的负载均衡器可以路由到 NodePort 服务和 ClusterIP服务。(一般常用此类型向外暴露端口,并做负载均衡)。LoadBalancer模式将提供一个外部 IP(external IP) 来访问该服务。在 Minikube 上,LoadBalancer 使得服务可以通过命令 minikube service 访问。
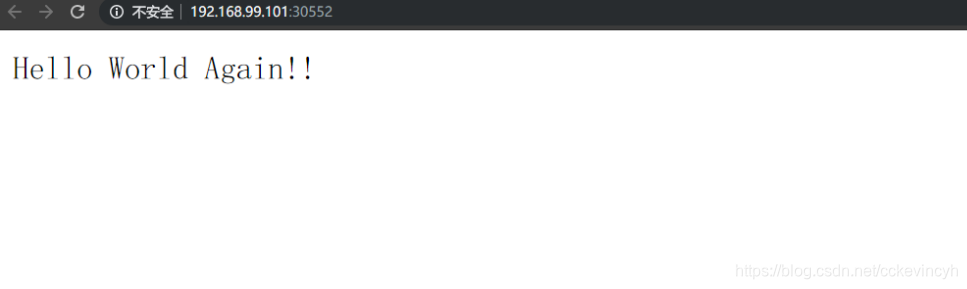
PS C:\Users\c\Desktop\hellonode> minikube service hello-node
* Opening kubernetes service default/hello-node in default browser...

更新应用程序
编辑server.js文件以返回新消息
response.end('Hello World Again!!');
docker build新版本镜像:
docker build -t hello-node:v2 .
Deployment更新镜像:
PS C:\Users\c\Desktop\hellonode> kubectl set image deployment/hello-node hello-node=hello-node:v2
deployment "hello-node" image updated
再次在浏览器查看消息:
$ minikube service hello-nodePS C:\Users\c\Desktop\hellonode> minikube service hello-node
* Opening kubernetes service default/hello-node in default browser...
应用实例伸缩
根据线上需求,扩容和缩容是常会遇到的问题。Scaling 是通过更改 Deployment 中的副本数量实现的。一旦有多个实例,就可以滚动更新,而不会停止服务。通过kubectl scale指令来扩容和缩容。
PS C:\Users\c\Desktop\hellonode> kubectl scale deployments/hello-node --replicas=4
deployment "hello-node" scaled
PS C:\Users\c\Desktop\hellonode> kubectl get pods
NAME                          READY     STATUS    RESTARTS   AGE
hello-node-7f8df9f98d-8l72m   1/1       Running   0          21s
hello-node-7f8df9f98d-gnrld   1/1       Running   0          21s
hello-node-7f8df9f98d-lphps   1/1       Running   0          2m
hello-node-7f8df9f98d-srvj2   1/1       Running   0          21s
从dashboard中也可以看到这4个实例
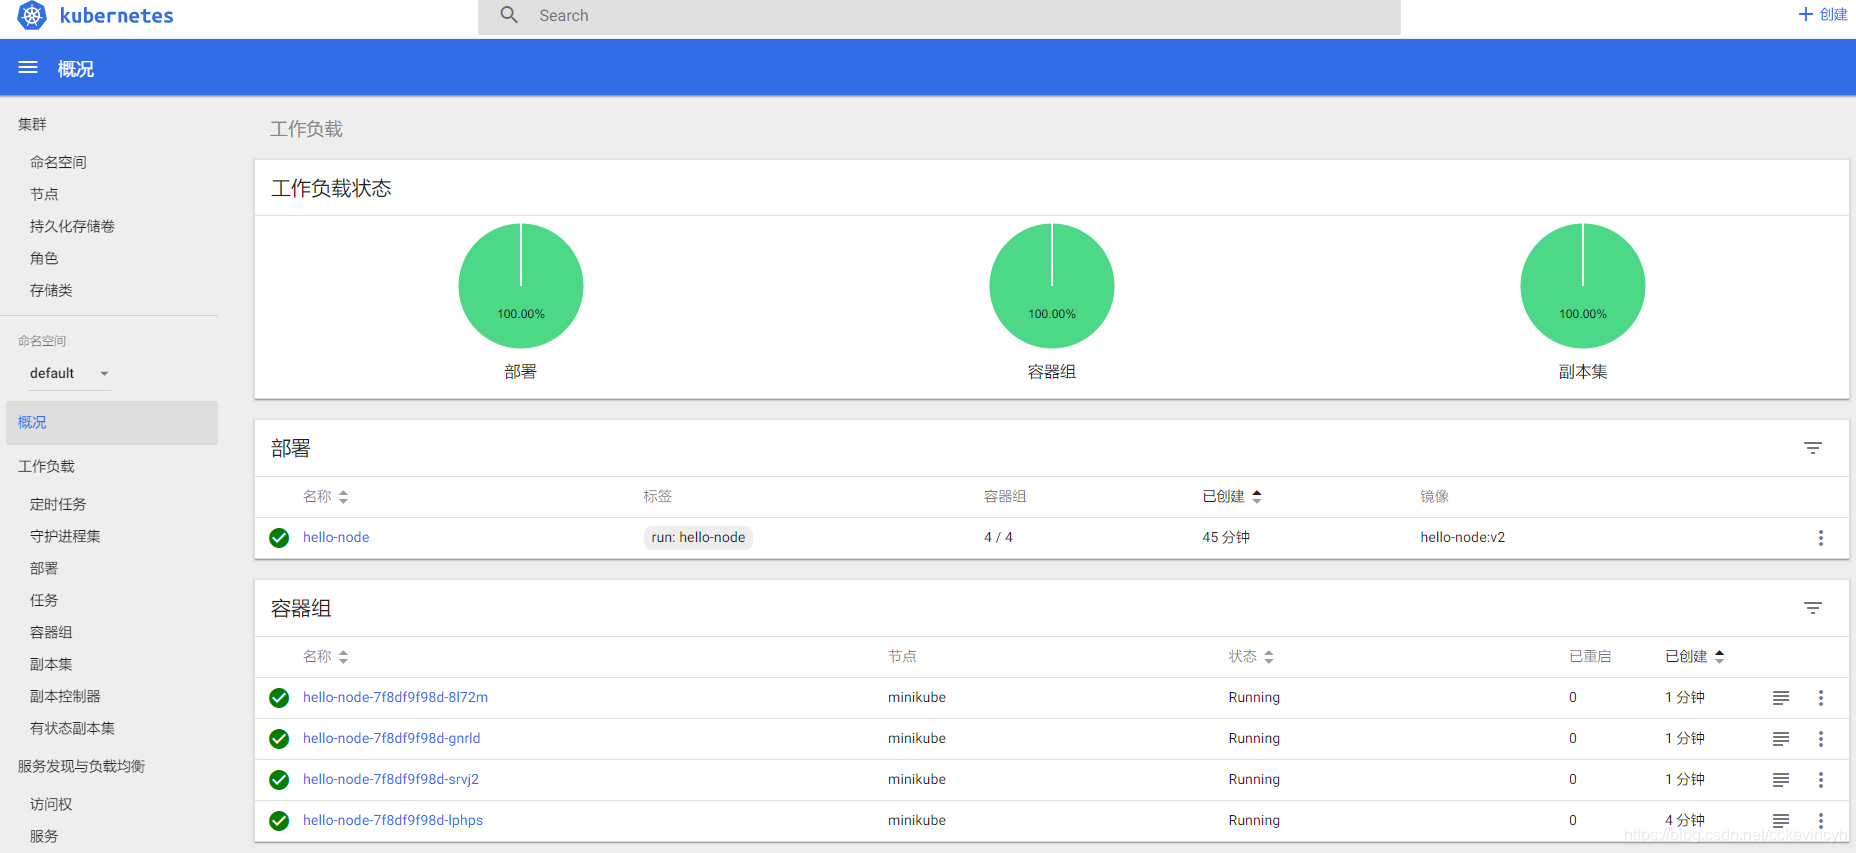
总共有4个实例,那么就可通过Service 的 --type=LoadBalancer 进行负载均衡。
清理删除
删除在群集中创建的资源:
kubectl delete service hello-node
kubectl delete deployment hello-node
停止
minikube stop
参考
感谢下面的博文,在我学习的过程中提供了很多帮助。
https://k8smeetup.github.io/docs/tutorials/stateless-application/hello-minikube/
https://segmentfault.com/a/1190000014116698
