springboot 优雅地配置拦截器过滤器
一、配置拦截器
很久之前写的一个小项目,当时要实现一个功能,配置一个拦截器,拦截 未登录的用户访问一些路由页面。相当于权限处理吧。现在再来回顾一下。
写之前遇到问题,之前springboot实现拦截器的方法是,实现WebMvcConfigurerAdapter即可。但是从源码我们可以看出来,从spring5.0开始 ,该接口已经标识过时注解了,即spring不推荐使用该方法实现拦截器,因为,在Java 8中,可以使用default关键词为接口添加默认的方法。
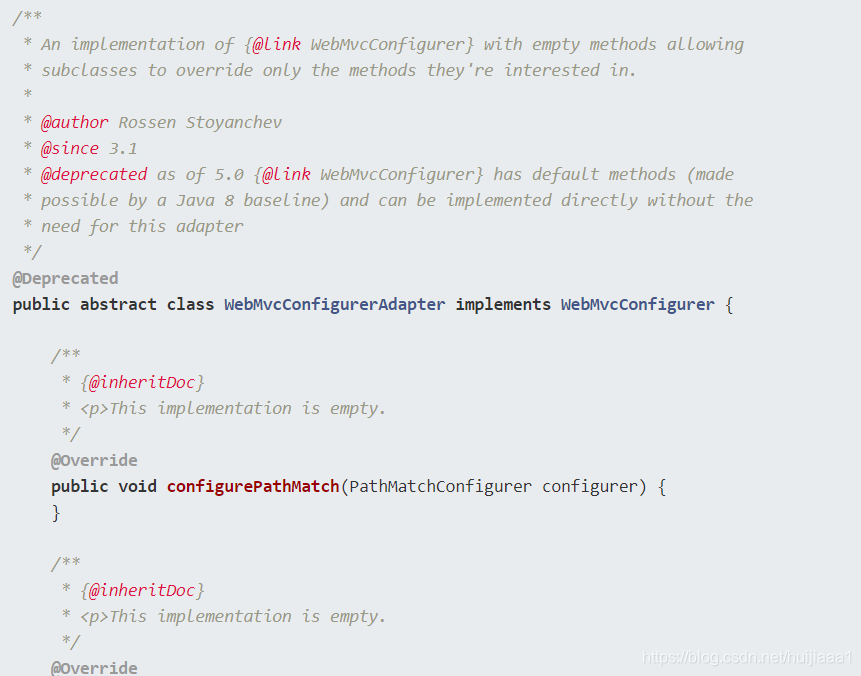
看spring源码上也写的很清楚了,WebMvcConfigurer接口包含了WebMvcConfigurerAdapter类中所有方法的默认实现,因此WebMvcConfigurerAdapter这个适配器就被淘汰了。所以我们只要实现了WebMvcConfigurer接口 即可。
如下:
import org.springframework.context.annotation.Bean;
import org.springframework.context.annotation.Configuration;
import org.springframework.web.servlet.config.annotation.InterceptorRegistry;
import org.springframework.web.servlet.config.annotation.ViewControllerRegistry;
import org.springframework.web.servlet.config.annotation.WebMvcConfigurationSupport;
import org.springframework.web.servlet.config.annotation.WebMvcConfigurer;
import org.springframework.web.servlet.config.annotation.WebMvcConfigurerAdapter;

import interceptors.NoLoginInterceptor;

@Configuration
public class WebappConfig implements WebMvcConfigurer{
@Override
	public void addInterceptors(InterceptorRegistry registry) {
		//拦截访问 /main下的所有静态资源以及自己配置的maint.html
		registry.addInterceptor(new NoLoginInterceptor()).addPathPatterns("/main/**")
		.addPathPatterns("/main.html")
		.addPathPatterns("/about")
		.addPathPatterns("/datas");
	}
}
import javax.servlet.http.HttpServletRequest;
import javax.servlet.http.HttpServletResponse;

import org.springframework.stereotype.Component;
import org.springframework.web.servlet.HandlerInterceptor;
import org.springframework.web.servlet.ModelAndView;

import beans.User;
@Component
public class NoLoginInterceptor implements HandlerInterceptor {

	public NoLoginInterceptor() {
	}
	@Override
	public void afterCompletion(HttpServletRequest request, HttpServletResponse response, Object handler, Exception ex)
			throws Exception {
		HandlerInterceptor.super.afterCompletion(request, response, handler, ex);
	}
	@Override
	public void postHandle(HttpServletRequest request, HttpServletResponse response, Object handler,
			ModelAndView modelAndView) throws Exception {
		// TODO Auto-generated method stub
		HandlerInterceptor.super.postHandle(request, response, handler, modelAndView);
	}

	@Override
	public boolean preHandle(HttpServletRequest request, HttpServletResponse response, Object handler)
			throws Exception {
		String  pubkeypass =  (String) request.getSession().getAttribute("pubkeypass");
		if(pubkeypass==null) {
			System.out.println("非法访问");
			response.sendRedirect("/index");
			return false;
		}
		return true;
	}

}
其实实现WebMvcConfigurer是最简单的。但是我首先用到的并不是这个方法,因为还有个WebMvcConfigurationSupport也可以实现拦截器。但就是这里有点小问题了。通过继承WebMvcConfigurationSupport实现添加拦截器,当启动项目后,发现无法访问静态资源,因为在springboot中默认是加载了mvc的配置,可以查看注释WebMvcAutoConfiguration,这个注释有一个条件注@ConditionalOnMissingBean(WebMvcConfigurationSupport.class)。
也就是说只要在容器中发现有WebMvcConfigurationSupport这个类,那就会失效,WebMvcAutoConfiguration为SpringBoot做了许多自动配置,这时候因为实现了WebMvcConfigurationSupport,所以我们就必须在我们的主类上添加@EnableWebMvc注解,但是这样我就无法访问默认的静态资源了。
这个时候还需要重写addResourceHandlers方法如下:
@Configuration
public class MyConfigurer extends WebMvcConfigurationSupport {

@Override
    protected void addInterceptors(InterceptorRegistry registry) {
       registry.addInterceptor(new NoLoginInterceptor ()).addPathPatterns("/**").excludePathPatterns("/emp/toLogin","/emp/login","/js/**","/css/**","/images/**");
        super.addInterceptors(registry);
    }

    @Override
    protected void addResourceHandlers(ResourceHandlerRegistry registry) {
        registry.addResourceHandler("/**").addResourceLocations("classpath:/static/");
        super.addResourceHandlers(registry);
    }
}
二、配置过滤器
配置过滤器就比较简单了,直接实现Filter即可
import org.springframework.context.annotation.Configuration;
import java.io.IOException;
import javax.servlet.*;
import javax.servlet.annotation.WebFilter;
import javax.servlet.http.HttpServletResponse;
@WebFilter(urlPatterns="/*")
@Configuration
public class IpFilter implements Filter{
 @Override
    public void doFilter(ServletRequest req, ServletResponse res, FilterChain chain) throws IOException, ServletException {

        HttpServletResponse response = (HttpServletResponse) res;
        response.setHeader("Access-Control-Allow-Origin","*");
        response.setHeader("Access-Control-Allow-Credentials", "true");
        response.setHeader("Access-Control-Allow-Methods", "POST, GET, PATCH, DELETE, PUT");
        response.setHeader("Access-Control-Max-Age", "3600");
        response.setHeader("Access-Control-Allow-Headers", "Origin, X-Requested-With, Content-Type, Accept");

        chain.doFilter(req, response);
    }
    @Override
    public void init(FilterConfig filterConfig) {

    }


    @Override
    public void destroy() {

    }
}
@WebFilter注解千万别忘了,如果不想用这个注解,那么需要自己把Filter注解加入Bean容器。如下:
@Configuration
public class FilterConfig {

    @Bean
    public FilterRegistrationBean registrationBean() {
        FilterRegistrationBean filterRegistrationBean = new FilterRegistrationBean(new MyFilter());
        filterRegistrationBean.addUrlPatterns("/*");
        return filterRegistrationBean;
    }
}
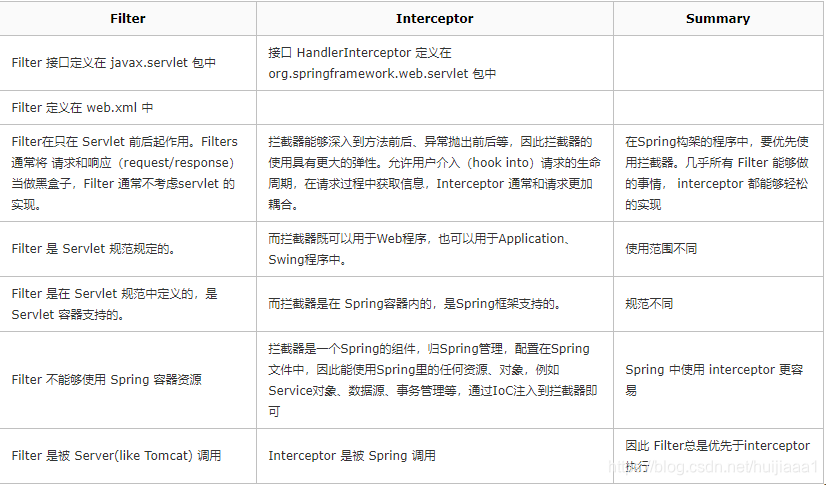
三、两者区别
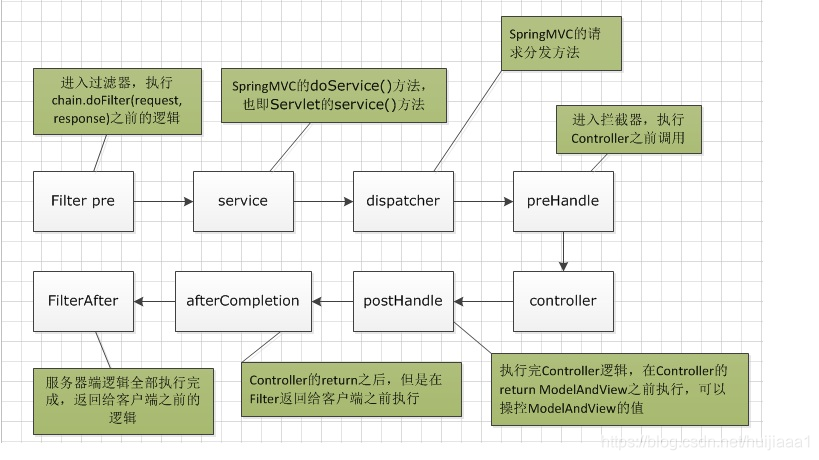
既然我们都知道如何配置拦截器,以及过滤器,那么两者分别有什么作用呢?如下图:
web请求的整个过程:
3.1 应用场景
3.1.1过滤器:
① 过滤器是在web应用启动的时候初始化一次, 在web应用停止的时候销毁.
② 可以对请求的URL进行过滤, 对敏感词过滤, 它在监听器之后,作用在servlet之前,对请求进行过滤;
③ 挡在拦截器的外层
④ Filter 是 Servlet 规范
⑤ 每一次请求时都只调用方法doFilter()进行处理;
⑥ 停止服务器时调用destroy()方法,销毁实例。
3.1.2 拦截器:
① 不依赖Spring容器, 可以使用 Spring 容器管理的Bean
② 拦截器通过动态代理进行
③ 拦截器应用场景, 性能分析, 权限检查, 日志记录
四、总结
我现在的项目,基本上拦截器、过滤器 都算用过了。其中用过滤器实现过滤 频繁的ip的请求。用拦截器 拦截 页面访问权限。两个适用场景不同自然而然就会用到不同的地方,一定要知道其原理,才能更好的使用它。
