一、 概述
1.1 Spring介绍
Spring框架是目前最流行的JavaEE开源框架之一。它的核心功能是IoC(Inverse Of Control:控制反转)和AOP(Aspect Oriented Programming:面向切面编程)。除此以外,Spring还提供了Spring MVC、Spring JDBC,以及业务层事务管理等众多出色的企业级应用技术,它还能整合开源世界众多著名的第三方框架和类库。
1.2 Spring的下载和安装
下载地址:
http://repo.springsource.org/libs-release-local/org/springframework/spring/
下载完成后,直接解压缩即可,无需安装。
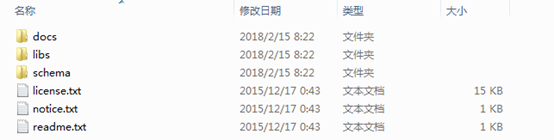
docs:api和开发规范;
libs:jar包和源码包;
schema:约束文件;
1.3 入门示例
1.3.1 环境准备
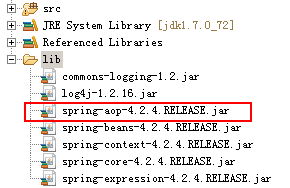
第一步:把Spring的核心jar包导入到工程中;

除此以外,我们还需要导入commons-logging的jar包。由于Spring本身并没有提供该jar包,需要用户自行在网上下载。
第二步:定义一个Bean类。
class UserBean {

	public void sayHi() {
		System.out.println("hello boys");
	}

}
第三步:配置上面定义的Bean。
在src目录下新建一个xml文件,并命名为“beans.xml”。然后,在该文件中配置上面定义的bean。
<?xml version="1.0" encoding="UTF-8"?>
<beans xmlns="http://www.springframework.org/schema/beans"
       xmlns:xsi="http://www.w3.org/2001/XMLSchema-instance"
       xsi:schemaLocation="http://www.springframework.org/schema/beans
      					 http://www.springframework.org/schema/beans/spring-beans.xsd">
	<bean id="userBean" class="com.xjy.demo01hellospring.UserBean"/>
</beans>
1.3.2 编写测试代码
第一步:创建ApplicationContext对象。这里我们使用它的实现类classPathXmlApplicationContext,该类可以从类加载路径下加载xml格式的配置文件。
第二步:调用ApplicationContext对象的getBean方法,该方法用于获取指定id的bean对象;
第三步:调用bean对象方法;
public class Demo01 {

	public static void main(String[] args) {
		//1.加载Spring配置文件
		ClassPathXmlApplicationContext ac = new ClassPathXmlApplicationContext("beans.xml");
		//2.根据bean的id获取对象
		UserBean userBean = (IUserDao) ac.getBean("userBean");
		userBean.sayHi();
	}

}
第四步:测试。
1.4 Bean的配置
如果需要把一个对象交给Spring容器来管理,那么就需要在Spring配置文件的Bean节点对该对象进行配置。
- 配置Bean的语法格式:
<bean id=”” class=”” scope=””/>
参数说明:
-
id:对象的唯一标识。Spring用户会根据ID的值创建对象。
-
class:对象所在类的完整类名。
-
scope:对象的作用范围。该属性的取值为:
1)singleton:默认值,服务器启动时候,Spring容器中就会创建一个对象。如果指定了singleton,那么在Spring容器中只有一个Bean对象。
2)prototype:每次调用获取Bean对象的时候,Spring容器都会创建一个Bean对象。
3)request:在web项目中,该对象只在Request中有效。
4)session:在web项目中,该对象只在Session中有效。
5)globalSession:在web项目中,该对象只在Portlet环境中有效。如果没有Portlet环境,那么该作用域就相当于session。 -
init-method:指定类中初始化方法的名称;
-
destory-method:指定类中销毁方法的名称;
二、 IOC
IOC(Inversion of Control,控制反转或依赖注入)是Spring框架的核心功能之一。所谓控制反转,就是Spring容器负责创建Bean对象,并把对象传入到一个类里面,而不需要我们手动创建对象和手动把对象传入到其他类中。
依赖注入主要分为两种:构造注入和属性注入。
2.1 构造注入
顾名思义,就是使用类中的构造函数,给成员变量赋值。
例如:
public class UserBean {
	private String name;
	private int age;

	public UserBean(String name, int age) {
		this.name = name;
		this.age = age;
	}
	// 省略了setters和getters方法...
}

然后在Spring配置文件中配置该Bean。
```xml
<?xml version="1.0" encoding="UTF-8"?>
<beans xmlns="http://www.springframework.org/schema/beans"
       xmlns:xsi="http://www.w3.org/2001/XMLSchema-instance"
       xsi:schemaLocation="http://www.springframework.org/schema/beans
      					 http://www.springframework.org/schema/beans/spring-beans.xsd">
	<bean id="userBean" class="com.xjy.beans.UserBean"/>
</beans>
运行程序发现出现了异常。
因为默认情况下,Spring容器是调用无参构造函数来创建Bean对象。上面的UserBean提供了有参构造函数,因此JVM就不会再提供无参构造函数了。
【解决办法】
办法一:提供无参构造函数;
办法二:使用构造注入;
构造注入需要在bean标签中使用constructor-arg标签来配置构造函数中的每一个参数。例如:
<bean ...>
	<constructor-arg name=”” value=”” index=”” type=”” ref=””>
	…
</bean>
参数说明:
name:参数名;
value:参数值;
index:参数的下标;
type:参数类型;
ref:引用其他bean对象;
<?xml version="1.0" encoding="UTF-8"?>
<beans xmlns="http://www.springframework.org/schema/beans"
       xmlns:xsi="http://www.w3.org/2001/XMLSchema-instance"
       xsi:schemaLocation="http://www.springframework.org/schema/beans
      					 http://www.springframework.org/schema/beans/spring-beans.xsd">

	<bean id="userBean" class="com.xjy.beans.UserBean">
		<!-- 根据下标设置参数
		<constructor-arg index="0" value="小宝"/>
		<constructor-arg index="1" value="18"/> -->

		<!-- 根据名字设置参数
		<constructor-arg name="name" value="小宝"/>
		<constructor-arg name="age" value="18"/> -->

		<!-- 指定参数类型 -->
		<constructor-arg name="name" value="小宝" type="java.lang.String"/>
		<constructor-arg name="age" value="18" type="int"/>
		<constructor-arg name="birthDate" ref="now"/>
	</bean>

	<bean id="now" class="java.util.Date"/>
</beans>
2.2 属性注入
- 语法格式:
<bean …>
	<property name=”” value=”” ref=””/>
</bean>
参数说明:
name:属性名。注意:Spring是根据setter方法来判断属性的。
value:属性值。
ref:引用其他bean对象。
<?xml version="1.0" encoding="UTF-8"?>
<beans xmlns="http://www.springframework.org/schema/beans"
       xmlns:xsi="http://www.w3.org/2001/XMLSchema-instance"
       xsi:schemaLocation="http://www.springframework.org/schema/beans
      					 http://www.springframework.org/schema/beans/spring-beans.xsd">

	<bean id="userBean" class="com.xjy.beans.UserBean">
		<property name="name" value="大宝"/>
		<property name="age" value="18"/>
		<property name="birthDate" ref="now"/>
	</bean>

	<bean id="now" class="java.util.Date"/>
</beans>
注意:因为执行属性注入前,Spring容器会调用Bean类的无参构造函数创建对象,然后再把属性注入到该对象中。所以Bean类必须要提供一个无参构造函数。
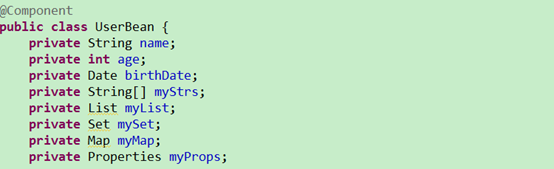
2.3 注入集合
第一步:修改实体类。
public class UserBean {
	private String name;
	private int age;
	private Date birthDate;
	private String[] myStrs;
	private List myList;
	private Set mySet;
	private Map myMap;
	private Properties myProps;

	// 省略了setters和getters方法。。。
}
第二步:在beans.xml文件中配置该Bean。
<?xml version="1.0" encoding="UTF-8"?>
<beans xmlns="http://www.springframework.org/schema/beans"
       xmlns:xsi="http://www.w3.org/2001/XMLSchema-instance"
       xsi:schemaLocation="http://www.springframework.org/schema/beans
      					 http://www.springframework.org/schema/beans/spring-beans.xsd">

	<bean id="userBean" class="com.xjy.beans.UserBean">
		<property name="name" value="大宝"/>
		<property name="age" value="18"/>
		<property name="birthDate" ref="now"/>
		<!-- 注入数组 -->
		<property name="myStrs">
			<array>
				<value>AAA</value>
				<value>BBB</value>
				<value>CCC</value>
			</array>
		</property>
		<!-- 注入set集合 -->
		<property name="mySet">
			<list>
				<value>AAA</value>
				<value>BBB</value>
				<value>CCC</value>
			</list>
		</property>
		<!-- 注入Map集合 -->
		<property name="myMap">
			<props>
				<prop key="keyA">aaa</prop>
				<prop key="keyB">bbb</prop>
			</props>
		</property>
		<!-- 注入properties数据 -->
		<property name="myProps">
			<map>
				<entry key="keyA" value="aaa"/>
				<entry key="keyB" value="bbb"/>
			</map>
		</property>
	</bean>

	<bean id="now" class="java.util.Date"/>
</beans>
第三步:测试。
public class Demo02 {

	public static void main(String[] args) throws Exception {
		ApplicationContext ac = new ClassPathXmlApplicationContext("beans.xml");
		UserBean userBean = (UserBean) ac.getBean("userBean");
		System.out.println(Arrays.toString(userBean.getMyStrs()));
		System.out.println(userBean.getMySet());
		System.out.println(userBean.getMyList());
		System.out.println(userBean.getMyMap());
		System.out.println(userBean.getMyProps());
	}

}
三、使用注解
Spring框架还支持通过注解方式注入Bean对象。
- 使用注解方式的好处:
1) 简单,方便维护;
2) 方便查看。查看源码的时候就可以看到Bean的配置信息。
3.1 使用注解的步骤
第一步:把注解相关的jar包导入到工程中;
第二步:在spring配置文件中加入context命名空间,然后开启注解功能。
<?xml version="1.0" encoding="UTF-8"?>
<beans xmlns="http://www.springframework.org/schema/beans"
	   xmlns:context="http://www.springframework.org/schema/context"
       xmlns:xsi="http://www.w3.org/2001/XMLSchema-instance"
       xsi:schemaLocation="http://www.springframework.org/schema/beans
      					 http://www.springframework.org/schema/beans/spring-beans.xsd
      					 http://www.springframework.org/schema/context
      					 http://www.springframework.org/schema/context/spring-context.xsd">

	<context:component-scan base-package="com.xjy.beans"/>

</beans>
第三步:在注入资源的类上使用@Component注解;
第四步:测试。
public class Demo03 {

	public static void main(String[] args) {
		ApplicationContext ac = new ClassPathXmlApplicationContext("beans.xml");
		UserBean userBean = (UserBean) ac.getBean("userBean");
		System.out.println(userBean);
	}

}
3.2 常用注解
3.2.1 Bean注解
Bean注解包括:@Component、@Controller、@Service、@Repository。它们都可以定义在类上面。而且它们的作用都是一样的,都是让资源交给Spring来管理。只不过它们各自提供了更加明确的语义。
例如:@Service是一般是用来修饰业务类。

value属性:指定资源的名字。可以省略value不写。如果没有指定资源名字,那么默认就是类型名,然后首字母小写,例如:userService。
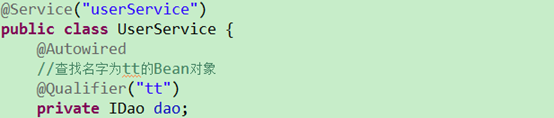
3.2.2 @Autowired
如果在成员属性上使用该注解,那么服务器启动的时候,Spring容器就会自动查找该类型以及它的子类型。如果找到就会创建该类对象,并且注入到该成员属性中。
@Service("userService")
public class UserService {
	//根据属性名查找Bean对象,并把该对象设置到该属性中
	@Autowired
	private IDao dao;

	public UserService() {
		System.out.println("创建UserService对象...");
	}

	public void addUser() {
		dao.add();
	}

}

@Repository
public class StudentDaoImpl implements IDao {

	public StudentDaoImpl() {
		System.out.println("创建StdentDaoImpl对象...");
	}

	public void add() {
		System.out.println("执行StdentDaoImpl对象的add方法...");
	}

}
当使用注解注入属性时,set方法可以省略。但是,如果存在两个或两个以上的子类型,那么就会出现NoUniqueBeanDefinitionException异常。例如:

出现上面问题的原因:
@autowired默认是根据类型执行注入。如果该类型是接口,而接口下有多个实现类的Bean,那么Spring容器就无法自动识别出注入哪个类型的Bean对象。
解决办法:
1)指定不同变量名;
2)使用@Qualifier指定注入Bean对象的名字;
3.2.3 @Qualifier
作用:在自动按照类型注入的基础之上,再按照Bean的名字注入。它不能独立使用,必须和@Autowire一起使用。
3.2.4 @Resource
通过名字注入Bean对象。该注解的功能其实就是@Autowired和@Qualifier功能的结合。

name属性:要注入的Bean对象的名字。
3.2.5 @Value
作用:注入基本数据类型和String类型的数据。
3.2.6 @Scope
作用:设置Bean的作用域。Bean的作用范围有:singleton、prototype、request、session、globalsession。

3.2.7 生命周期相关的注解
@PostConstruct:指定初始化方法;
@PreDestory:指定销毁方法;

四、Spring零配置
刚才给大家演示了如何使用注解方式注入Bean对象。当时还有一个问题,就是无法完全脱离配置文件。如果要完全脱离XML配置文件,那么还需要使用到其他一些注解。
4.1 @Configuration
作用:指定Spring容器从当前类中加载读取配置信息。
4.2 @ComponentScan
作用:指定spring容器初始化时候要扫描的包。
属性:
basePackages:指定要扫描的包。和该注解中的value属性作用一样。

因为没有了配置文件,所以就不能够再使用ClassPathXmlApplicationContext来创建ApplicationContext对象。而要使用AnnotationConfigApplicationContext来创建对象。

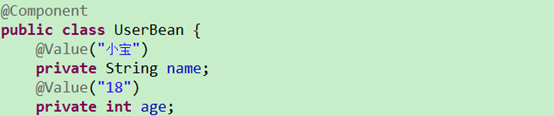
4.3 @PropertySource
作用:加载properties文件中的配置。
属性:
value[]:指定properties文件的位置。如果在src目录下,那么就需要加上classpath前缀。
- 使用步骤:
首先,在src目录下创建一个info.properties配置文件。该文件保存Bean对象的属性值。

然后,在成员属性上使用@Value注解。

接着,新建一个类,该类用于定义配置信息。

最后,测试一下。

运行程序时候,控制台输出:

该异常是由于Spring容器并没有把${user.age}作为占位符,而是把它看成是普通字符串来解析所造成的。
解决办法:创建一个占位符的配置器,并交给Spring容器管理。
4.4 @Bean
作用:该注解只能写在方法上,表明使用此方法创建一个对象,并且交给spring管理。
该注解包含以下的属性:
- name:给当前@Bean注解方法创建的对象指定一个名称(即bean的id)。
@Component
public class DbBean {

	@Bean(name="datasource")
	public DataSource createDS() throws Exception {
		ComboPooledDataSource comboPooledDataSource = new ComboPooledDataSource();
		comboPooledDataSource.setUser("root");
		comboPooledDataSource.setPassword("root");
		comboPooledDataSource.setDriverClass("com.mysql.jdbc.Driver");
		comboPooledDataSource.setJdbcUrl("jdbc:mysql://localhost:3306/aa");
		return comboPooledDataSource;
	}

}

public class Demo03 {

	public static void main(String[] args) throws SQLException {
		ApplicationContext ac = new AnnotationConfigApplicationContext(SpringConfig.class);
		DataSource ds = (DataSource) ac.getBean("datasource");
		System.out.println(ds.getConnection());
	}

}
运行程序发现,Spring容器初始化的时候,就会调用DbBean中的createDs方法创建一个DataSource对象,并且把该对象交给了Spring容器管理。因此,在测试类中可以通过它的名字来访问。
我们重新再看回之前的例子。如果要创建一个占位符的配置器对象,可以在SpringConfig类中添加如下方法:
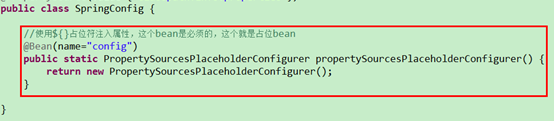
运行程序的时候,Spring容器就不会再把${user.age}当成普通字符串来处理,而是作为一个占位符来处理。
五、SpringTest
SpringTest是Spring框架用来做单元测试的工具。使用SpringTest需要结合Junit一起使用。
5.1 测试环境准备
5.1.1 编写实体类
public class Customer implements Serializable {
	private Long custId;
	private String custName;
	private String custSource;
	private String custIndustry;
	private String custLevel;
	private String custAddress;
	private String custPhone;

	// 省略了setters和getters方法...
}
5.1.2 编写Dao类
public interface ICustomerDao {

	/**
	 * 查询所有客户
	 * @return
	 */
	List<Customer> findAllCustomer();

	/**
	 * 保存客户
	 * @param customer
	 */
	void save(Customer customer);

}

public class CustomerDaoImpl implements ICustomerDao {

	@Override
	public List<Customer> findAllCustomer() {
		System.out.println("查询了所有客户");
		return null;
	}

	@Override
	public void save(Customer customer) {
		System.out.println("保存了客户");
	}

}
5.1.3 编写业务类
public interface ICustomerService {
/**
* 查询所有客户
* @return
*/
List<Customer> findAllCustomer();
/**
* 保存客户
* @param customer
*/
void saveCustomer(Customer customer);
}
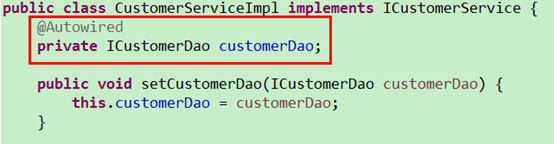
public class CustomerServiceImpl implements ICustomerService {
@Autowired
private ICustomerDao customerDao;
public void setCustomerDao(ICustomerDao customerDao) {
this.customerDao = customerDao;
}
@Override
public List<Customer> findAllCustomer() {
return customerDao.findAllCustomer();
}
@Override
public void saveCustomer(Customer customer) {
customerDao.save(customer);
}
}
5.1.4 编写测试类
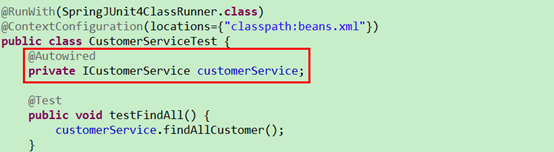
在测试方法上使用@Test注解。测试方法名就是在需要测试的业务方法名前面加上test。
public class CustomerServiceTest {

	private ICustomerService customerService;

	@Test
	public void testFindAll() {
		List<Customer> customers = customerService.findAllCustomer();
		for (Customer customer : customers) {
			System.out.println(customer);
		}
	}

}
5.1.5 编写配置文件
<?xml version="1.0" encoding="UTF-8"?>
<beans xmlns="http://www.springframework.org/schema/beans"
	   xmlns:context="http://www.springframework.org/schema/context"
       xmlns:xsi="http://www.w3.org/2001/XMLSchema-instance"
       xsi:schemaLocation="http://www.springframework.org/schema/beans
      					 http://www.springframework.org/schema/beans/spring-beans.xsd
      					 http://www.springframework.org/schema/context
      					 http://www.springframework.org/schema/context/spring-context.xsd">

	<bean id="customerDao" class="com.xjy.dao.impl.CustomerDaoImpl"></bean>

	<bean id="customerService" class="com.xjy.service.impl.CustomerServiceImpl">
		<property name="customerDao" ref="customerDao"></property>
	</bean>

</beans>
5.1.6 导入jar包

5.2 SpringTest相关注解
@RunWith:指定Junit运行器,它负责执行测试类。
@ContextConfiguration:指定Spring配置文件的位置;

@Autowired:指定要注入的资源;
配置完成后,打开Outline视图。然后找到要运行的方法,鼠标右键点击Run As –> Junit Test即可。

5.3 SpringTest零配置
如果要实现零配置,那么需要对上面程序进行简单的改造即可。实现步骤如下:
第一步:在CustomerServiceImpl上使用@Service注解。

这时候可以把customerDao的setter方法去掉。
第二步:在CustomerDaoImpl上使用@Repository注解。

第三步:修改测试类。

