大家都知道,在Layout布局文件中android:id="@+id/xxx"是为一个控件指定ID值,但是我要讨论的不是这个,我要讲的是@id与@+id在引用其它控件时的区别,先来看看下面的代码:
<div>
</div><div>
</div><div>
</div><div><RelativeLayout xmlns:android="http://schemas.android.com/apk/res/android"
    xmlns:tools="http://schemas.android.com/tools"
    android:layout_width="match_parent"
    android:layout_height="match_parent" >

       <TextView
        android:id="@+id/textView1"
        android:layout_width="wrap_content"
        android:layout_height="wrap_content"
        android:text="@string/textview1" />

    <TextView
        android:id="@+id/textView2"
        android:layout_width="wrap_content"
        android:layout_height="wrap_content"
        android:layout_below="@id/textView1"
        android:text="@string/textview2" />

</RelativeLayout></div>
很简单,TextView1会显示在TextView2上面,效果:

效果如上。可这就是我要说的重点吗?!呵呵,当然不是。我要说的是:现在我把上面的代码改一点,改成:
<RelativeLayout xmlns:android="http://schemas.android.com/apk/res/android"
    xmlns:tools="http://schemas.android.com/tools"
    android:layout_width="match_parent"
    android:layout_height="match_parent" >

    <TextView
        android:id="@+id/textView1"
        android:layout_width="wrap_content"
        android:layout_height="wrap_content"
        android:text="@string/textview1" />

      <TextView
        android:id="@+id/textView2"
        android:layout_width="wrap_content"
        android:layout_height="wrap_content"
        <span style="color:#ff0000;">android:layout_below="@+id/textView1"</span>
        android:text="@string/textview2" />

</RelativeLayout>
唯一的不同就是处处都不同。。。。。。。
我这里就改了一个位置把原来的【android:layout_below="@id/textView1"】改成了【android:layout_below="@+id/textView1"】,额,就多了一个“+”号,那么问题来了,不是在给一个控件声明id值得时候才用“+”号吗,为什么这里也可以用“+”号,而且没有报错呢???
好的,那么恭喜你,终于知道我要说的是什么了。
(好吧,其实我也没想出一个我要说什么的具体名字)
那么我就换一种写法,你可能就明白其中为什么用“+”了,不过在换之前,我们还是把上面第二次出现的代码块从脑海中删去,只留下第一次代码块在脑海中。我们要换的代码就是将第一次贴出来的代码里面的两个TextView的顺序交换一下。下面看代码:
<span style="font-size:14px;"><RelativeLayout xmlns:android="http://schemas.android.com/apk/res/android"
    xmlns:tools="http://schemas.android.com/tools"
    android:layout_width="match_parent"
    android:layout_height="match_parent" >

    <TextView
        android:id="@+id/textView2"
        android:layout_width="wrap_content"
        android:layout_height="wrap_content"
        android:layout_below="@id/textView1"
        android:text="@string/textview2" />

    <TextView
        android:id="@+id/textView1"
        android:layout_width="wrap_content"
        android:layout_height="wrap_content"
        android:text="@string/textview1" />

</RelativeLayout></span><span style="font-size: 24px;">
</span>
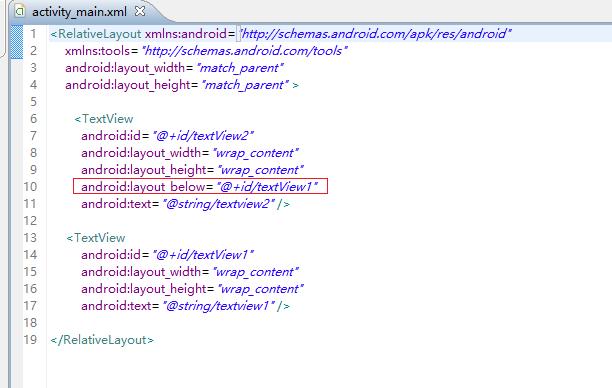
你也许会觉得,好像也没什么不对呀。别急,我把eclipse的代码截图给你看看:

大家可以看到,这时候,们将TextView1的代码放在TextView2的下面,而我们要实现的效果确是让TextView2显示在TextView1的下面,此时,通过“@ID/xxxx”的方式,按理说因该可以的,而事实上确是报错 ,那么这时候,我们再换一种写法,看代码:
,那么这时候,我们再换一种写法,看代码:
我们把上面的控件中对另一个控件的引用中添加一个“+”号,顿时,大喜,有木有。这就恍然大悟为什么可以对ID值进行带“+”号的引用了。这时候再回看第二次贴出的代码,其实这里要不要那个“+”号都没所谓的,不过,当换一个代码的编写顺序,效果就不一样了。这也就解释了报错的原因咯。好吧,还不知道我就直接挑明了说吧:在XML的Layout布局文件中,代码中先写出的控件要引用代码中后写出的控件的时候,其引用中应该添加“+”号,告知该控件这个ID值对应的控件确实存在。
好吧,我的高考语文没及格,语言组织的不好,不过我觉得大体上还是能读懂的,基本上就是这个意思。
<div>
</div><div>
</div><div>
</div><div><RelativeLayout xmlns:android="http://schemas.android.com/apk/res/android"
    xmlns:tools="http://schemas.android.com/tools"
    android:layout_width="match_parent"
    android:layout_height="match_parent" >

       <TextView
        android:id="@+id/textView1"
        android:layout_width="wrap_content"
        android:layout_height="wrap_content"
        android:text="@string/textview1" />

    <TextView
        android:id="@+id/textView2"
        android:layout_width="wrap_content"
        android:layout_height="wrap_content"
        android:layout_below="@id/textView1"
        android:text="@string/textview2" />

</RelativeLayout></div>