一.准备工作
1.步骤
-
创建springboot项目,添加SpringMVC,lombok,thymeleaf(略)
-
添加config,pojo,dao,controller
-
修改application.properties配置文件
-
导入静态资源文件,修改成thymeleaf格式的资源引入
-
运行调试
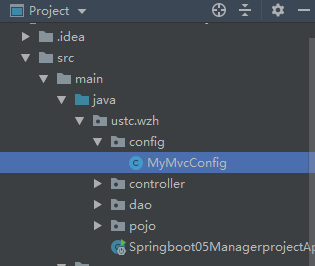
2.添加config,pojo,dao,controller
(1)添加config文件夹并添加MyMvcConfig.java文件,用于配置默认首页访问


import org.springframework.context.annotation.Configuration;
import org.springframework.web.servlet.config.annotation.ViewControllerRegistry;
import org.springframework.web.servlet.config.annotation.WebMvcConfigurer;

//自定义视图解析器
//如果需要自定义一些定制化的功能,只要写个组件交给springboot管理,spring boot会帮我们自动装配
@Configuration
public class MyMvcConfig implements WebMvcConfigurer {

    //默认首页访问
    @Override
    public void addViewControllers(ViewControllerRegistry registry) {
        registry.addViewController("/").setViewName("index");
        registry.addViewController("/index.html").setViewName("index");
    }
}
(2)添加pojo实体类
部门类:Department
import lombok.AllArgsConstructor;
import lombok.Data;
import lombok.NoArgsConstructor;

@Data
@AllArgsConstructor
@NoArgsConstructor
public class Department {

    private Integer id;
    private String departmentName;
}
员工类:Employee
import lombok.Data;
import lombok.NoArgsConstructor;

import java.util.Date;

@Data
@NoArgsConstructor
public class Employee {

    private Integer id;
    private String lastName;
    private String email;
    private Integer gender; //1 male, 0 female
    private Department department;
    private Date birth;

    public Employee(Integer id, String lastName, String email, Integer gender, Department department) {
        this.id = id;
        this.lastName = lastName;
        this.email = email;
        this.gender = gender;
        this.department = department;

        //默认的创建日期
        this.birth = new Date();
    }
}
(3)添加dao层,用于模拟对数据库增删查改
部门dao:DepartmentDao
import org.springframework.stereotype.Repository;
import ustc.wzh.pojo.Department;

import java.util.Collection;
import java.util.HashMap;
import java.util.Map;

@Repository
public class DepartmentDao {

    // 用于模拟数据库中数据
    private static Map<Integer, Department> departments = null;

    // 模拟创建一个部门表
    static{
        departments = new HashMap<>();

        departments.put(101, new Department(101, "D-AA"));
        departments.put(102, new Department(102, "D-BB"));
        departments.put(103, new Department(103, "D-CC"));
        departments.put(104, new Department(104, "D-DD"));
        departments.put(105, new Department(105, "D-EE"));
    }

    // 获取所有部门信息
    public Collection<Department> getDepartments(){
        return departments.values();
    }

    // 模拟指定id得到部门信息
    public Department getDepartment(Integer id){
        return departments.get(id);
    }

}
员工dao:EmployeeDao
import org.springframework.beans.factory.annotation.Autowired;
import org.springframework.stereotype.Repository;
import ustc.wzh.pojo.Department;
import ustc.wzh.pojo.Employee;

import java.util.Collection;
import java.util.HashMap;
import java.util.Map;

@Repository
public class EmployeeDao {

    // 模拟数据库的数据
    private static Map<Integer, Employee> employees = null;

    // 给员工定义所属的部门
    @Autowired
    private DepartmentDao departmentDao;

    static{
        employees = new HashMap<>();

        employees.put(1001, new Employee(1001, "E-AA", "[email protected]", 1, new Department(101, "D-AA")));
        employees.put(1002, new Employee(1002, "E-BB", "[email protected]", 1, new Department(102, "D-BB")));
        employees.put(1003, new Employee(1003, "E-CC", "[email protected]", 0, new Department(103, "D-CC")));
        employees.put(1004, new Employee(1004, "E-DD", "[email protected]", 0, new Department(104, "D-DD")));
        employees.put(1005, new Employee(1005, "E-EE", "[email protected]", 1, new Department(105, "D-EE")));
    }

    // 主键自增
    private static Integer initId = 1006;

    // 增加一个员工信息
    public void save(Employee employee){
        if(employee.getId() == null){
            employee.setId(initId++);
        }

        employee.setDepartment(departmentDao.getDepartment(employee.getDepartment().getId()));
        employees.put(employee.getId(), employee);
    }

    // 查询所有员工信息
    public Collection<Employee> getAll(){
        return employees.values();
    }

    // 通过id获得员工信息
    public Employee get(Integer id){
        return employees.get(id);
    }

    // 删除员工
    public void delete(Integer id){
        employees.remove(id);
    }
}
(4)添加controller层
IndexController :用于跳转到index.html
import org.springframework.stereotype.Controller;
import org.springframework.web.bind.annotation.RequestMapping;

@Controller
public class IndexController {

//    //会解析到templates目录下的index.html页面
//    @RequestMapping({"/","/index.html"})
//    public String index(){
//        return "index";
//    }
}
3.修改application.properties配置文件
-
关闭缓存是为了项目开发时及时更新静态资源文件
-
配置项目启动访问路径: http://localhost:8080/wzh/
# 关闭模版引擎的缓存
spring.thymeleaf.cache=false

# 配置项目启动的访问路径
server.servlet.context-path=/wzh
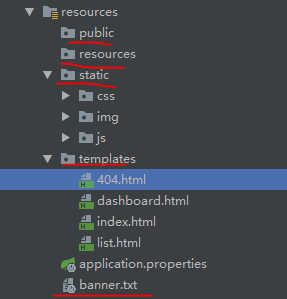
4.导入静态资源文件,修改成thymeleaf格式的资源引入
(1)在文件夹static中放入css,img,js等文件夹和文件,在templates中放入html文件,最外层添加控制台的启动图表样式banner.txt
(2)Thymeleaf格式
头部信息约束:
xmlns:th="http://www.thymeleaf.org"
接管静态资源,由于是URL使用:@{...}
<link th:href="@{/css/bootstrap.min.css}" rel="stylesheet">