LNMP简介
大约在2010年以前,互联网公司最常用的经典Web服务环境组合就是LAMP(即Linux、Apache、MySQL、PHP),近几年随着Nginx Web服务的逐渐流行,又出现了新的Web服务环境组合——LNMP或LEMP,其中LNMP为Linux、Nginx、MySQL、PHP等首字母的缩写,而LEMP中的E则表示Nginx。现在,LNMP已经逐渐成为国内大中型互联网公司网站的主流组合环境,因此,本次测试学习将以LNMP环境为基础,进行学习。下面讲解搭建流程。
安装Nginx
创建目录
[root@localhost ~]# mkdir -p /data/{server,soft}
[root@localhost ~]# ls
anaconda-ks.cfg  install.log  install.log.syslog  公共的  模板  视频  图片  文档  下载  音乐  桌面
[root@localhost ~]# ls date
ls: 无法访问date: 没有那个文件或目录
[root@localhost ~]# ls /date
server  soft
[root@localhost ~]# cd /date/soft/
[root@localhost soft]# ls
[root@localhost soft]# rz
上传文件
[root@localhost soft]# rz
[root@localhost soft]# ls
iwebshop2.1.11090110_data.zip              nginx-1.10.3.tar.gz  ZenTaoPMS_v8.2.5.zip
libiconv-1.14.tar.gz                       pcre-8.39.tar.gz
mysql-5.6.30-linux-glibc2.5-x86_64.tar.gz  php-5.3.29.tar.gz
[root@localhost soft]#
创建专用的启动用户www
[root@localhost soft]# ls /home/
dry1  lost+found
[root@localhost soft]# useradd www -s /sbin/nologin -M
[root@localhost soft]# id www
uid=501(www) gid=501(www) 组=501(www)
[root@localhost soft]#
编译安装nginx
[root@localhost nginx-1.10.3]# tar xf nginx-1.10.3.tar.gz
[root@localhost nginx-1.10.3]# cd nginx-1.10.3
[root@localhost nginx-1.10.3]# ./configure --prefix=/date/server/nginx --user=www --group=www
[root@localhost nginx-1.10.3]# make
[root@localhost nginx-1.10.3]# make install
启动nginx
[root@localhost ~]# /date/server/nginx/sbin/nginx
[root@localhost ~]# netstat -tnulp | grep nginx
tcp        0      0 0.0.0.0:80                  0.0.0.0:*                   LISTEN      8810/nginx
[root@localhost ~]#
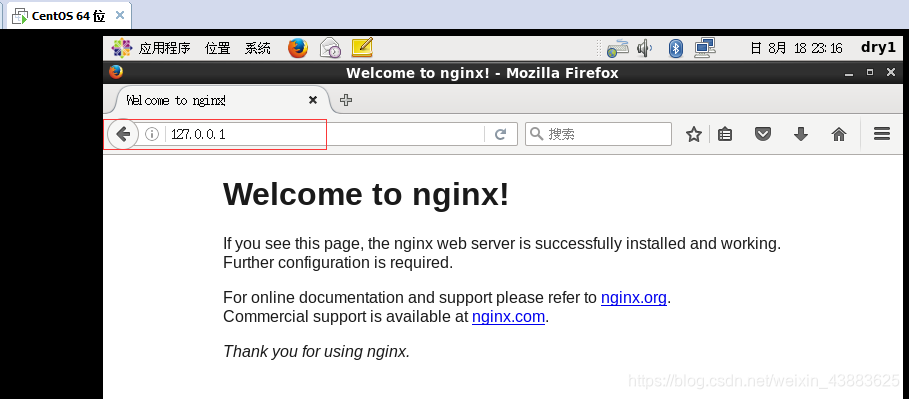
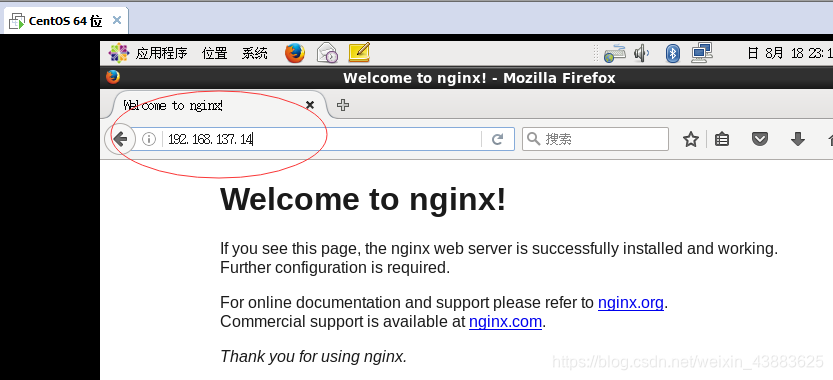
查看浏览器效果,如果出现如下页页面则表示Nginx安装成功
//去掉#号
[root@localhost nginx]# grep -v '#' conf/nginx.conf
//去掉注释及收尾空格
[root@localhost nginx]# egrep -v '#|^$' conf/nginx.conf
nginx简单操作
//检查nginx
[root@localhost nginx]# /date/server/nginx/sbin/nginx -t
nginx: the configuration file /date/server/nginx/conf/nginx.conf syntax is ok
nginx: configuration file /date/server/nginx/conf/nginx.conf test is successful
//关闭nginx
[root@localhost nginx]# /date/server/nginx/sbin/nginx -s stop
[root@localhost nginx]# netstat -tnulp | grep nginx
[root@localhost nginx]# /date/server/nginx/sbin/nginx
[root@localhost nginx]# netstat -tnulp | grep nginx
tcp        0      0 0.0.0.0:80                  0.0.0.0:*                   LISTEN      8993/nginx
//重载nginx
[root@localhost nginx]# /date/server/nginx/sbin/nginx -s reload
//启动后检查
[root@localhost nginx]# netstat -tnulp | grep nginx
tcp        0      0 0.0.0.0:80                  0.0.0.0:*                   LISTEN      8993/nginx
[root@localhost nginx]#
安装总结:
解压 tar
- 作用:解压文件,获取真正的配置文件
配置 configure
- 作用:根据默认的配置项或者更改配置项,生成编译配置文件(Makefile)
编译 make
- 作用:根据 Makefile 内容,编译生成指定的软件所需要的所有文件
安装 make install
- 作用:将编译生成的所有文件,转移到软件指定安装的目录下面
安装mysql
解压软件
[root@localhost soft]# tar xf mysql-5.6.30-linux-glibc2.5-x86_64.tar.gz -C /data/server/
[root@localhost soft]# cd /data/server/
[root@localhost server]# ln -s mysql-5.6.30-linux-glibc2.5-x86_64 mysql
[root@localhost server]# ll
总用量 4
lrwxrwxrwx.  1 root root   34 8月  19 09:41 mysql -> mysql-5.6.30-linux-glibc2.5-x86_64
drwxr-xr-x. 13 root root 4096 8月  19 09:39 mysql-5.6.30-linux-glibc2.5-x86_64
[root@localhost server]#
创建专用用户
[root@localhost mysql]# ls
bin      data  include  man         README   share      support-files
COPYING  docs  lib      mysql-test  scripts  sql-bench
[root@localhost mysql]# useradd -s /sbin/nologin -M mysql
[root@localhost mysql]# id mysql
uid=502(mysql) gid=502(mysql) 组=502(mysql)
[root@localhost mysql]# ls /home/
dry1  lost+found
[root@localhost mysql]#
初始化mysql
[root@localhost mysql]# /data/server/mysql/scripts/mysql_install_db --basedir=/data/server/mysql --datadir=/data/server/mysql/data/ --user=mysql
数据库配置文件管理
[root@localhost mysql]# mv /etc/my.cnf /etc/my.cnf-bak
[root@localhost mysql]# cp /data/server/mysql/support-files/my-default.cnf /etc/my.cnf
数据库启动命令配置
[root@localhost mysql]# cp /data/server/mysql/support-files/mysql.server /etc/init.d/mysqld
[root@localhost mysql]# chmod +x /etc/init.d/mysqld
启动文件修改
sed -i 's#原内容#替换后的内容#g' file
[root@localhost mysql]# sed -i 's#/usr/local/mysql#/data/server/mysql#g' /data/server/mysql/bin/mysqld_safe /etc/init.d/mysqld
数据库文件权限管理
[root@localhost mysql]# chown -R mysql.mysql /data/server/mysql/
启动数据库前检查
[root@localhost mysql]# netstat -tnulp | grep mysql
启动数据库
[root@localhost mysql]# /etc/init.d/mysqld start
Starting MySQL..                                           [确定]
检查数据库启动状态
[root@localhost mysql]# netstat -tnulp|grep mysqld
tcp        0      0 :::3306                     :::*                        LISTEN      5870/mysqld
配置环境变量
[root@localhost bin]# vim /etc/profile
//末尾添加这条配置
PATH=/data/server/mysql/bin:$PATH
//让配置文件生效
[root@localhost bin]# source /etc/profile
[root@localhost ~]# mysql
启动mysql
[root@localhost mysql]# cd /data/server/mysql/bin/
[root@localhost bin]# ls
[root@localhost bin]# ./mysql
Welcome to the MySQL monitor.  Commands end with ; or \g.
Your MySQL connection id is 1
Server version: 5.6.30 MySQL Community Server (GPL)

Copyright (c) 2000, 2016, Oracle and/or its affiliates. All rights reserved.

Oracle is a registered trademark of Oracle Corporation and/or its
affiliates. Other names may be trademarks of their respective
owners.

Type 'help;' or '\h' for help. Type '\c' to clear the current input statement.

mysql> quit
Bye
[root@localhost bin]#
mysql简单操作
//查看默认数据库
mysql> show databases;
//选择使用一个数据库
mysql> use mysql;
//查看当前所在数据库
mysql> select database();
//查看当前登录数据库的用户
mysql> select user();
//查看可以登录mysql数据库的目录
select user,host from mysql.user;
//创建数据库
mysql> create database test;
//为数据库创建一个数据库的用户:
grant all on iwebshop.* to 'iwebshop'@'localhost' identified by '123456';
grant all on 数据库名.表名 to '数据库登录用户'@'数据库登录主机' identified by '登录密码';
mysql> grant all on iwebshop.* to 'iwebshop'@'localhost' identified by '123456';
//刷新权限
mysql> flush privileges;
//删除一个数据库
drop database 数据库;
安装php
安装基本依赖软件
yum install zlib-devel libxml2-devel libjpeg-devel libjpeg-turbo-devel freetype-devel libpng-devel gd-devel libcurl-devel libxslt-devel libxslt-devel -y
安装libiconv软件
[root@localhost soft]# cd /data/soft
[root@localhost soft]tar zxf libiconv-1.14.tar.gz
[root@localhost libiconv-1.14]cd libiconv-1.14
[root@localhost libiconv-1.14]./configure --prefix=/usr/local/libiconv
[root@localhost libiconv-1.14]make
[root@localhost libiconv-1.14]make install
安装其他软件包
wget -O /etc/yum.repos.d/epel.repo http://mirrors.aliyun.com/repo/epel-6.repo
yum -y install libmcrypt-devel mhash mcrypt
安装php
[root@localhost libiconv-1.14]# cd /data/soft/
[root@localhost soft]#
[root@localhost soft]# tar xf php-5.3.29.tar.gz
[root@localhost soft]# cd php-5.3.29
//在解压后的PHP目录内执行
ln -s /data/server/mysql/lib/libmysqlclient.so.18  /usr/lib64/
touch ext/phar/phar.phar

./configure \
--prefix=/data/server/php-5.3.29 \
--with-mysql=/data/server/mysql \
--with-pdo-mysql=mysqlnd \
--with-iconv-dir=/usr/local/libiconv \
--with-freetype-dir \
--with-jpeg-dir \
--with-png-dir \
--with-zlib \
--with-libxml-dir=/usr \
--enable-xml \
--disable-rpath \
--enable-bcmath \
--enable-shmop \
--enable-sysvsem \
--enable-inline-optimization \
--with-curl \
--enable-mbregex \
--enable-fpm \
--enable-mbstring \
--with-mcrypt \
--with-gd \
--enable-gd-native-ttf \
--with-openssl \
--with-mhash \
--enable-pcntl \
--enable-sockets \
--with-xmlrpc \
--enable-zip \
--enable-soap \
--enable-short-tags \
--enable-static \
--with-xsl \
--with-fpm-user=www \
--with-fpm-group=www \
--enable-ftp

[root@localhost php-5.3.29]# ./configure
[root@localhost php-5.3.29]# make install
[root@localhost php-5.3.29]# make
php文件配置
创建目录,生成程序文件,这里失败的话/data/server下就不会有php的目录
[root@localhost php-5.3.29]# ls /data/server/
mysql  mysql-5.6.35-linux-glibc2.5-x86_64  nginx  php-5.3.29
创建一个软链接,方便使用,更新软件时,重新创建软链接即可
[root@localhost php-5.3.29]# cd /data/server/
[root@localhost server]# ln -s php-5.3.29 php
[root@localhost server]# ls
mysql  mysql-5.6.30-linux-glibc2.5-x86_64  php  php-5.3.29
把解压包内的php解析文件拷贝到php安装目录下
[root@localhost server]# cd /data/soft/php-5.3.29
[root@localhost php-5.3.29]# cp php.ini-production /data/server/php/lib/php.ini
修改php.ini文件,开启session功能
[root@localhost php-5.3.29]# vim /data/server/php/lib/php.ini
[Session]
; Handler used to store/retrieve data.
; http://php.net/session.save-handler
session.save_handler = files
原内容:
;session.save_path = "/tmp
修改后内容:
session.save_path = "/tmp
复制php-fpm的配置文件,默认没有该文件但是有一个备份文件
[root@localhost php-5.3.29]# cd /data/server/php/etc/
[root@localhost etc]# cp php-fpm.conf.default php-fpm.conf
启动php,和nginx一样,使用程序目录下的启动命令来启动php,然后检查进程和端口号即可。
[root@localhost etc]# /data/server/php/sbin/php-fpm
[root@localhost etc]# netstat -tnulp | grep php-fpm
tcp        0      0 127.0.0.1:9000              0.0.0.0:*                   LISTEN      10157/php-fpm
php简单操作
启动php
[root@localhost etc]# /data/server/php/sbin/php-fpm
关闭php
[root@localhost etc]# pkill php-fpm
LNMP综合测试之iwebshop部署
Nginx & PHP
[root@localhost nginx-1.10.3]# cd /data/server/nginx/html/
[root@localhost html]# ls
50x.html  index.html
[root@localhost html]# mkdir iwebshop
[root@localhost html]# ls
50x.html  index.html  iwebshop
[root@localhost html]# vim /data/server/nginx/conf/nginx.conf

# 在http配置段内容增加下面的内容
    server {
        listen       80;
        server_name iwebshop.itcast.com;
        #静态请求处理的location
        location / {
            root   html/iwebshop;
            index index.php  index.html index.htm;
        }
        #动态请求处理的location
        location ~* .*\.(php|php5)?$ {
            root html/iwebshop;
            fastcgi_pass  127.0.0.1:9000;
            fastcgi_index index.php;
            include fastcgi.conf;
        }
    }
//配置iwebshop虚拟主机配置文件
[root@localhost html]# vim /etc/hosts
127.0.0.1 iwebshop.itcast.com
修改完配置文件后,检查语法并重启nginx服务
[root@localhost html]# /data/server/nginx/sbin/nginx -t
nginx: the configuration file /data/server/nginx/conf/nginx.conf syntax is ok
nginx: configuration file /data/server/nginx/conf/nginx.conf test is successful
[root@localhost html]# /data/server/nginx/sbin/nginx -s reload
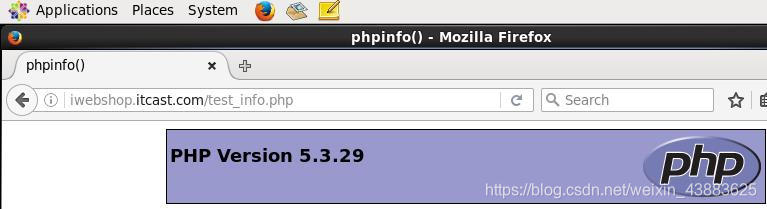
浏览器访问iwebshop.itcast.com/test_info.php
PHP & MySQL
测试PHP与MySQL之间连通性,创建数据库
mysql> show databases;
mysql> create database  iwebshop;      	//创建一个数据库
mysql> mysql -uroot -p123456         		//登录数据库
创建数据库用户
- 创建一个用户iwebshop,权限为全部,并且设置允许登录的网段,和最后设置密码
- flush privileges 创建完用户后,更新一下数据库的信息
- 查看数据库内的用户信息,和对应可以登录的主机
mysql> grant all on wordpress.* to iwebshop@'localhost' identified by '123456';
mysql> flush privileges;
mysql> select user,host from mysql.user;
生成一个mysql的测试文件,到blog的站点目录下,生成一个mysql测试文件
[root@localhost server]# cd /data/server/nginx/html/iwebshop/
[root@localhost iwebshop]# vim test_mysql.php

<?php
//$link_id=mysql_connect('主机名','用户','密码');
//mysql -u用户 -p密码 -h 主机
$link_id=mysql_connect('localhost','iwebshop','123456') or mysql_error();
if($link_id){
       echo "mysql successful by wangshusen !\n";
    }else{
       echo mysql_error();
    }
?>
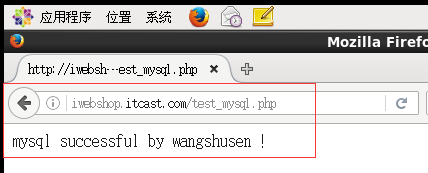
测试PHP与MySQL的连通性,访问http://iwebshop.itcast.com/test_mysql.php出现下面的内容就是测试成功
整体测试
上传iwebshop软件
[root@localhost iwebshop]# cd /data/soft/
[root@localhost iwebshop]# 上传 iwebshop2.1.11090110_data.zip
转移博客到nginx的iwebshop目录中
[root@localhost soft]# unzip iwebshop2.1.11090110_data.zip
[root@localhost soft]# mv iwebshop/* /data/server/nginx/html/iwebshop/
查看文件效果
[root@localhost soft]# ls
iwebshop                       mysql-5.6.30-linux-glibc2.5-x86_64.tar.gz  php-5.3.29
iwebshop2.1.11090110_data.zip  nginx-1.10.3                               php-5.3.29.tar.gz
libiconv-1.14                  nginx-1.10.3.tar.gz                        ZenTaoPMS_v8.2.5.zip
libiconv-1.14.tar.gz           pcre-8.39.tar.gz
[root@localhost soft]# mv iwebshop/* /data/server/nginx/html/iwebshop/
[root@localhost soft]# ls /data/server/nginx/html/iwebshop/
backup   config       favicon.ico  install   license.txt  sitemaps.xsl    upload
chart    controllers  image        language  plugins      test_info.php   views
classes  docs         index.php    lib       runtime      test_mysql.php
修改权限
- 因为我们给我们的nginx配置启动的用户是www,也就是说只有www用户能访问的到的文件才能访问浏览器访问iwebshop.itcast.com/index.php
[root@localhost soft]# chown -R www.www /data/server/nginx/html/iwebshop
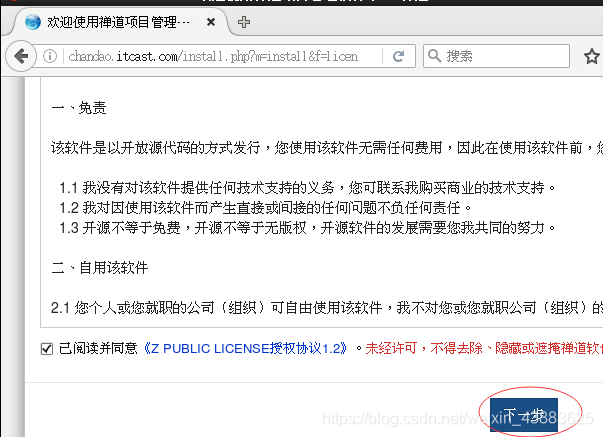
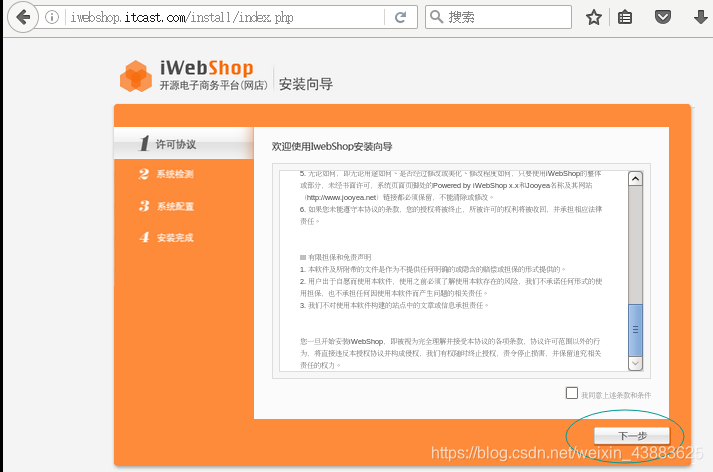
勾选"我同意上述条款和条件"后,点击"下一步"
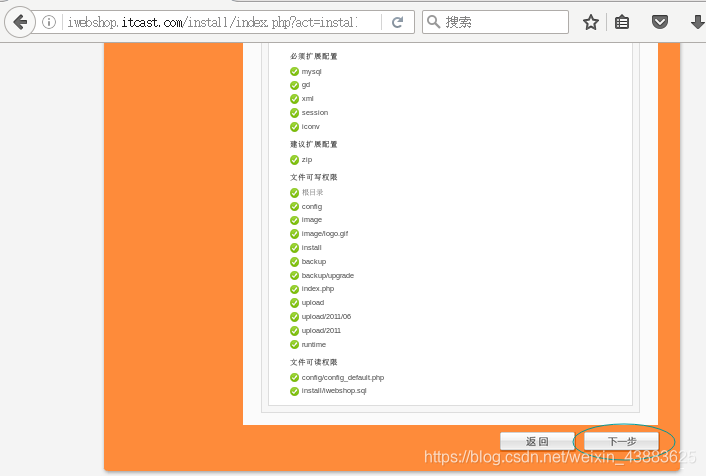
看到绿色提示"您的…",说明我们的基本环境是没有问题的,接下来点击"下一步"
接下来配置配置数据库,配置好登录数据的用户名和密码,点击开始检测

当提示信息为"数据库连接正确",说明我们的数据库配置是没有任何问题的,接下来配置后台的登录信息
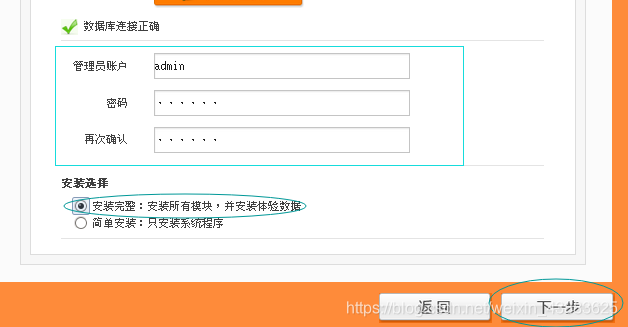
点击下一步,完成咱
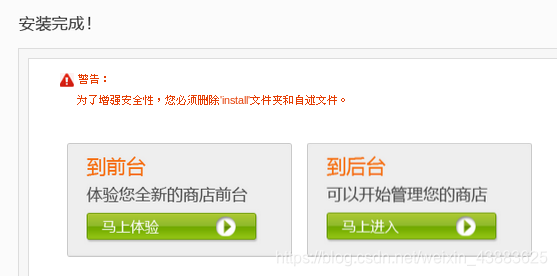
前台地址:http:// iwebshop. itcast. com/ index. php?controller=site&action=index
后台地址:http: //iwebshop. itcast. com/ index. php?controller=systemadmin&action=index
LNMP综合测试之禅道部署
创建禅道配置文件专用的nginx目录
[root@localhost soft]# cd /data/server/nginx/html/
[root@localhost html]# mkdir chandao
[root@localhost html]# ls
50x.html  chandao  index.html  iwebshop
解压软件
[root@localhost soft]#  cd /data/soft
[root@localhost soft]#unzip ZenTaoPMS.8.2.5.zip
将禅道软件转移致专用的nginx目录
[root@localhost soft]# mv zentaopms/* /data/server/nginx/html/chandao/
修改文件的属性
[root@localhost soft]# chown -R www.www /data/server/nginx
nginx文件配置
:set paset  //设置vim编辑器的粘贴方式

[root@localhost soft]# vim /data/server/nginx/conf/nginx.conf
# 在http配置段内容增加下面的内容
    server {
        listen       80;
        server_name chandao.itcast.com;
        #静态请求处理的location
        location / {
            root   html/chandao/www;
            index index.php  index.html index.htm;
        }
        #动态请求处理的location
        location ~* .*\.(php|php5)?$ {
            root html/chandao/www;
            fastcgi_pass  127.0.0.1:9000;
            fastcgi_index index.php;
            include fastcgi.conf;
        }
    }
配置域名解析
[root@localhost soft]# vim /etc/hosts

修改完配置文件后,检查语法并重启nginx服务
[root@localhost soft]# /data/server/nginx/sbin/nginx -t
nginx: the configuration file /data/server/nginx/conf/nginx.conf syntax is ok
nginx: configuration file /data/server/nginx/conf/nginx.conf test is successful
[root@localhost soft]# /data/server/nginx/sbin/nginx -s reload
禅道数据库配置
创建数据库
mysql> show databases;
mysql> create database chandao;
创建数据库用户
mysql> grant all on chandao.* to chandao@'localhost' identified by '123456';
mysql> flush privileges;
mysql> select user,host from mysql.user;
web界面配置禅道
浏览器访问 chandao.itcast.com
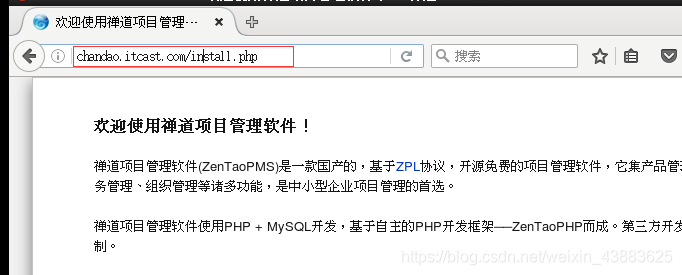
点击"开始安装",下一步