JWT是基于DRF框架上开发的一个专门认证的插件。
认证流程是:用户登录后,后端传给前端一个token,token中包含用户和密码信息。用户调用接口时,需要携带token,后端对token进行解锁,如果解锁成功,允许登录,否则,返回登录失败信息。
1 执行数据迁移
Django工程,执行数据迁移时会自动生成用户表。
python manage.py makemigrations
python manage.py migrate
2 创建超级用户
python manage.py createsuperuser
3 在settings.py文件中,增加认证配置
认证相关配置,在https://www.cnblogs.com/dorian/p/12367627.html工程配置中已经配置了。再复习一下!
3.1 增加认证方式
REST_FRAMEWORK = {
    # JWT 认证
    'DEFAULT_AUTHENTICATION_CLASSES': (
        'rest_framework_jwt.authentication.JSONWebTokenAuthentication',  # JWT认证
        'rest_framework.authentication.SessionAuthentication',  # session认证
        'rest_framework.authentication.BasicAuthentication',  # 基本认证
    ),
}
3.2 更改请求token时的返回数据
用户获取token时,JWT默认只返回token,而实际上我们需要返回更多的用户信息。这时候,需要重写jwt_response_payload_handler方法。在工程配置中,已经在Applications/Organizations/views目录下的JwtHandler.py文件中,已经重写了这个方法。
def jwt_response_payload_handler(token, user=None, request=None):
    """
    【功能描述】直接使用DRF-JWT提供的视图方法时,其默认的返回值只有token,若需要前端接收到用户其它信息,
    需要重写jwt_response_payload_handler方法。
    """

    return {
        'id': user.id,
        'username': user.username,
        'photo_url': user.photo_url,
        'mobile': user.mobile,
        'openid': user.openid,
        'token': token
    }
3.3 在settings.py指定jwt_response_payload_handler方法的位置和Token有效期
# JWT 配置
JWT_AUTH = {
    # 设置生成(签发)jwt token时token有效时间
    'JWT_EXPIRATION_DELTA': datetime.timedelta(days=1),

    # 指定JWT 扩展登录视图生成响应数据调用函数
    'JWT_RESPONSE_PAYLOAD_HANDLER':
        'Applications.Organizations.views.JwtHandler.jwt_response_payload_handler'
}
4 增加路由
找到工程主路由,导入obtain_jwt_token包,并增加路由
from django.contrib import admin
from django.urls import path, include, re_path
from rest_framework.documentation import include_docs_urls
from django.views.static import serve
from TongHeng2 import settings
from rest_framework_jwt.views import obtain_jwt_token

DESCRIPTION = """
        包括仝恒绩效云所有接口文档。包括以下应用:
        1 GeneralTools:常用工具APP
        2 Organizations: 组织机构(包含组织下的人员)APP
        3 Examples:示例APP,用于新知识的测试案例
"""
urlpatterns = [
    path('admin/', admin.site.urls),
    path('Examples/', include('Applications.Examples.urls')),
    path('docs/', include_docs_urls(title='API接口文档', description=DESCRIPTION)),
    path('authorizations/', obtain_jwt_token),
    re_path(r'(?P<path>.*)$', serve, {'document_root': settings.DOCUMENT_ROOT}),

]
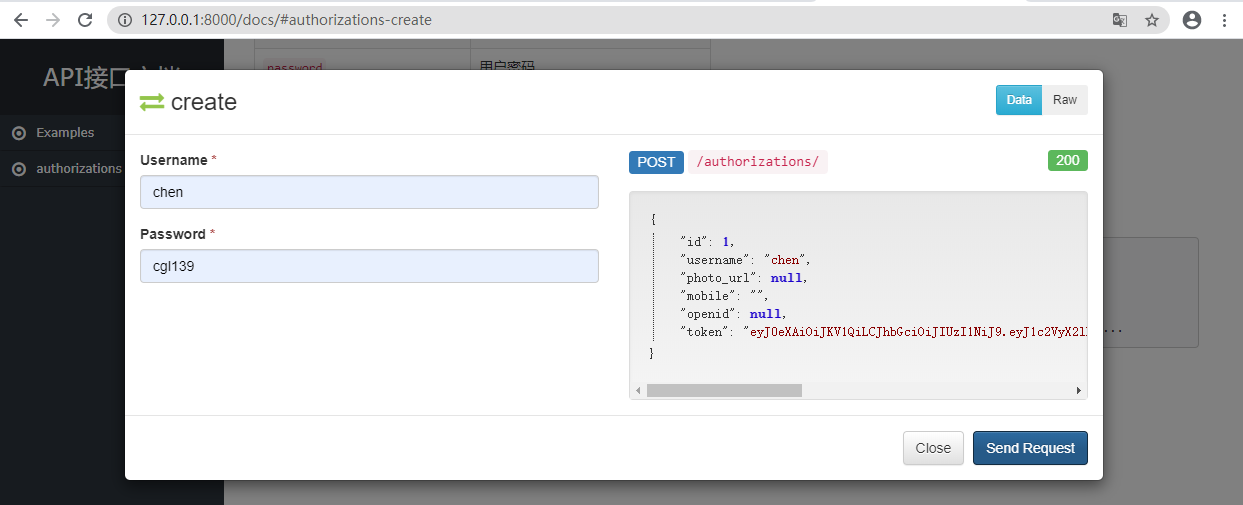
5 运行工程,获取token
6 更改token验证方式
JWT默认token必须封闭在请求头,这就需要每次请求都必须用ajax方法先把token封装在请求头里,如果直接跳转url,则上传不了token。
为此,后台需要更改,改成从url或session中获取token
在GeneralTools目录下,创建文件,命名为:Authentication.py,内容如下:
from rest_framework_jwt.authentication import JSONWebTokenAuthentication


class GetAuthentication(JSONWebTokenAuthentication):
    def get_jwt_value(self, request):
        # 从session中获取token
        # return request.session.get('token')
        # 从url中获取token
        return request.query_params.get('token')
7 增加验证
打开Applications/Examples/views下的ExpHome.py文件,这个文件之前已经写好了,增加验证代码。
from django.shortcuts import render
from rest_framework.views import APIView
from rest_framework.permissions import IsAuthenticated
from GeneralTools.Authentication import GetAuthentication


class ExpHome(APIView):
    authentication_classes = (GetAuthentication,)
    permission_classes = [IsAuthenticated]

    @classmethod
    def get(cls, request):
        """
        【功能描述】主要用于示例展示</br>
        【返回参数】返回用户请求的网页</br>
        """
        return render(request, 'exp-home.html')
8 打开路由/Examples/ExpHome/
因为没有提供token,所以,看到以下效果:

9 用token访问
从接口文档中的接口authorizations中,获取token,并输入到url中,顺利访问到页面。
