本文使用的软件版本及下载地址
cmake https://cmake.org/download/
由于环境为win7-64,选择以安装程序的方式来安装 下载之后运行安装,在路径方面需要注意:

OpenCV是使用c/c++编写的,官方网站提供的版本Qt不能直接使用,需要使用CMake重新编译Qt可用的版本。安装时注意勾选“Add CMake to the system PATH for all users”。
在路径选择上,考虑到创建一个全新的环境,防止之前的环境干扰,改动了一下。


Qt 5.13.0
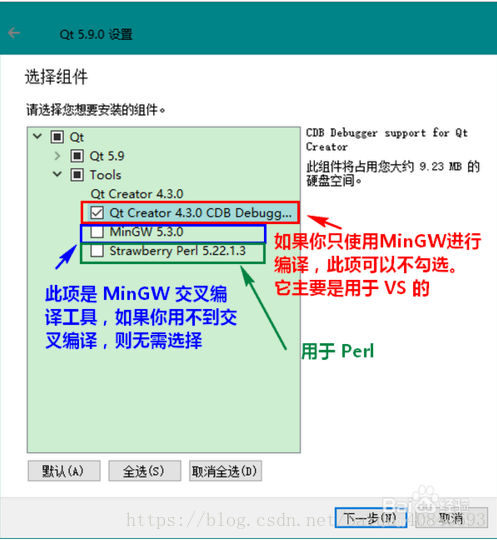
qt分为mingw版本和MSVC版本的编译器:
1.MSVC是指微软的VC编译器;
2.MinGW是指是Minimalist GNU on Windows的缩写。它是一个可自由使用和自由发布的Windows特定头文件和使用GNU工具集导入库的集合,允许你在GNU/Linux和Windows平台生成本地的Windows程序而不需要第三方C运行时库。
https://download.qt.io/official_releases/qt/5.13/5.13.0/
在MInGW64,32有过纠结,参考过:Qt最新版5.13在Windows环境静态编译安装和部署的完整过程(VS 2017/VS 2019)https://blog.csdn.net/zhangpeterx/article/details/91952129
仍旧不是特别懂,干脆把两个组件都下载了minGW7.3.0 32bit和64bit
组件选择参考了下:https://blog.csdn.net/baidu_40840693/article/details/81225571

相关文档:https://doc-snapshots.qt.io/qt5-5.13/index.html
https://doc.qt.io/qt-5/windows.html
创建一个实例demo0测试一下(选择了mingw32)


两个都行?!
opencv 4.1.0
OpenCV——Open Source Computer Vision Library,即开源计算机视觉库,它是基于C语言和部分C++语言来开发,可用于计算机视觉、图像处理以及模式识别和跟踪。
运行安装选好路径后开始解压:

设置系统环境变量,path路径:
%SystemRoot%\system32;%SystemRoot%;%SystemRoot%\System32\Wbem;%SYSTEMROOT%\System32\WindowsPowerShell\v1.0\;D:\cmake\bin;D:\qt\Tools\mingw730_32\bin;D:\qt\5.13.0\mingw73_32\bin;
打开CMake(cmake-gui),设置源文件和生成后的二进制文件路径,source 路径指向解压后的 “opencv”,build 路径可指向自己建的一个 “build” 文件夹;

设置好路径后,点击左下角的 Configure 按钮,弹出窗口

分别设置C与C++编译器路径

点击 Finish 按钮,继续,此时主界面的 Configure 按钮变为 Stop,表示配置进行中,
General configuration for OpenCV 4.1.0 =====================================
Version control: unknown
Platform:
Timestamp: 2019-07-09T07:30:22Z
Host: Windows 6.1.7601 AMD64
CMake: 3.15.0-rc3
CMake generator: MinGW Makefiles
CMake build tool: D:/qt/Tools/mingw730_32/bin/mingw32-make.exe
Configuration: Release
CPU/HW features:
Baseline: SSE SSE2
requested: SSE2
Dispatched code generation: SSE4_1 SSE4_2 FP16 AVX
requested: SSE4_1 SSE4_2 AVX FP16
SSE4_1 (16 files): + SSE3 SSSE3 SSE4_1
SSE4_2 (2 files): + SSE3 SSSE3 SSE4_1 POPCNT SSE4_2
FP16 (1 files): + SSE3 SSSE3 SSE4_1 POPCNT SSE4_2 FP16 AVX
AVX (5 files): + SSE3 SSSE3 SSE4_1 POPCNT SSE4_2 AVX
C/C++:
Built as dynamic libs?: YES
C++ Compiler: D:/qt/Tools/mingw730_32/bin/g++.exe (ver 7.3.0)
C++ flags (Release): -fsigned-char -W -Wall -Werror=return-type -Werror=non-virtual-dtor -Werror=address -Werror=sequence-point -Wformat -Werror=format-security -Wmissing-declarations -Wundef -Winit-self -Wpointer-arith -Wshadow -Wsign-promo -Wuninitialized -Winit-self -Wno-delete-non-virtual-dtor -Wno-comment -Wimplicit-fallthrough=3 -Wno-strict-overflow -fdiagnostics-show-option -fomit-frame-pointer -ffunction-sections -fdata-sections -msse -msse2 -mfpmath=sse -fvisibility=hidden -fvisibility-inlines-hidden -O3 -DNDEBUG -DNDEBUG
C++ flags (Debug): -fsigned-char -W -Wall -Werror=return-type -Werror=non-virtual-dtor -Werror=address -Werror=sequence-point -Wformat -Werror=format-security -Wmissing-declarations -Wundef -Winit-self -Wpointer-arith -Wshadow -Wsign-promo -Wuninitialized -Winit-self -Wno-delete-non-virtual-dtor -Wno-comment -Wimplicit-fallthrough=3 -Wno-strict-overflow -fdiagnostics-show-option -fomit-frame-pointer -ffunction-sections -fdata-sections -msse -msse2 -mfpmath=sse -fvisibility=hidden -fvisibility-inlines-hidden -g -O0 -DDEBUG -D_DEBUG
C Compiler: D:/qt/Tools/mingw730_32/bin/gcc.exe
C flags (Release): -fsigned-char -W -Wall -Werror=return-type -Werror=non-virtual-dtor -Werror=address -Werror=sequence-point -Wformat -Werror=format-security -Wmissing-declarations -Wmissing-prototypes -Wstrict-prototypes -Wundef -Winit-self -Wpointer-arith -Wshadow -Wuninitialized -Winit-self -Wno-comment -Wimplicit-fallthrough=3 -Wno-strict-overflow -fdiagnostics-show-option -fomit-frame-pointer -ffunction-sections -fdata-sections -msse -msse2 -mfpmath=sse -fvisibility=hidden -O3 -DNDEBUG -DNDEBUG
C flags (Debug): -fsigned-char -W -Wall -Werror=return-type -Werror=non-virtual-dtor -Werror=address -Werror=sequence-point -Wformat -Werror=format-security -Wmissing-declarations -Wmissing-prototypes -Wstrict-prototypes -Wundef -Winit-self -Wpointer-arith -Wshadow -Wuninitialized -Winit-self -Wno-comment -Wimplicit-fallthrough=3 -Wno-strict-overflow -fdiagnostics-show-option -fomit-frame-pointer -ffunction-sections -fdata-sections -msse -msse2 -mfpmath=sse -fvisibility=hidden -g -O0 -DDEBUG -D_DEBUG
Linker flags (Release): -Wl,--gc-sections
Linker flags (Debug): -Wl,--gc-sections
ccache: NO
Precompiled headers: YES
Extra dependencies:
3rdparty dependencies:
OpenCV modules:
To be built: calib3d core dnn features2d flann gapi highgui imgcodecs imgproc ml objdetect photo stitching ts video videoio
Disabled: world
Disabled by dependency: -
Unavailable: java js python2 python3
Applications: tests perf_tests apps
Documentation: NO
Non-free algorithms: NO
Windows RT support: NO
GUI:
Win32 UI: YES
VTK support: NO
Media I/O:
ZLib: build (ver 1.2.11)
JPEG: build-libjpeg-turbo (ver 2.0.2-62)
WEBP: build (ver encoder: 0x020e)
PNG: build (ver 1.6.36)
TIFF: build (ver 42 - 4.0.10)
JPEG 2000: build (ver 1.900.1)
OpenEXR: build (ver 1.7.1)
HDR: YES
SUNRASTER: YES
PXM: YES
PFM: YES
Video I/O:
DC1394: NO
FFMPEG: YES (prebuilt binaries)
avcodec: YES (58.35.100)
avformat: YES (58.20.100)
avutil: YES (56.22.100)
swscale: YES (5.3.100)
avresample: YES (4.0.0)
GStreamer: NO
DirectShow: YES
Parallel framework: none
Trace: YES (built-in)
Other third-party libraries:
Lapack: NO
Eigen: NO
Custom HAL: NO
Protobuf: build (3.5.1)
OpenCL: YES (NVD3D11)
Include path: D:/opencv/opencv/sources/3rdparty/include/opencl/1.2
Link libraries: Dynamic load
Python (for build): NO
Java:
ant: NO
JNI: NO
Java wrappers: NO
Java tests: NO
Install to: D:/opencv/opencv/build/install
-----------------------------------------------------------------
Configuring done
CMake编译结束界面如下图,勾选生成列表中的WITH_OPENGL和WITH_QT两项,其他项最好不要改动。

再次点击Configure按钮,红色消失。如果 cmake 的主界面仍有红色区域,则再次点击 Configure 进行配置,直到红色区域完全消失。配置过程中可能需要联网下载dll文件,请保持网络正常连接互联网。

点击Generate按钮,生成makefile文件,成功后,底下会提示Generating done;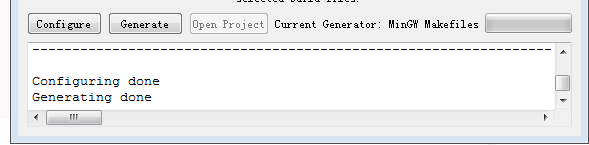
打开cmd,进入刚才设置的目标路径(),输入mingw32-make命令开始编译。
cd /d D:\opencv\opencv\build


这个问题有点磨人,应当算作是官方的一个bug吧,先是看到有人以在cmake中进行修改:
https://github.com/opencv/opencv/issues/14286
在一个问题的最后,提出了bug的解决方式,主要是将两个相关的cmake文件进行了修改。
https://github.com/opencv/opencv/pull/14294/files#diff-845d1f4ac898e8938fc436ed20005547
第二个方式不需要更改cmake的配置,可以按照默认编译成功。

用时大概半小时左右?编译完成后,在cmd命令窗口中输入mingw32-make install安装,该步骤相对较快

编译完成后,在OpenCV的Build路径下即可找到生成的lib文件夹和bin文件夹,可以看到include文件夹,将这三个文件夹放在一起,即完成OpenCV库的编译。


原文:https://blog.csdn.net/qingyang8513/article/details/80339550
官方教程:https://docs.opencv.org/4.1.0/d9/df8/tutorial_root.html
顺便也测试一下:参考https://blog.csdn.net/qingyang8513/article/details/80316982
https://www.jianshu.com/p/c244c9d01fe0
打开Qt Creator,新建项目(第一个widgets,第二个console),此处项目命名为“OpenCV_ShowImage”;

如果选择console,按正常步骤给项目命名,编译器选择qmake(cmake产生的是cmakelist.txt),它项目生成后没有.pro文件;


打开“OpenCV_ShowImage.pro”文件,添加如下路径包含代码:我使用了绝对路径
INCLUDEPATH += D:/opencv/opencv_qt/include #*(这个是opencv解压以后存放的路径+所选的文件)*
LIBS += -L D:/opencv/opencv_qt/lib/libopencv_*.aqt程序运行时总是会报错:XXXX.exe exited with code -1073741515
造成原因,大多是因为缺少了某些dll造成的,可以把程序依赖的dll复制到当前目录下,此问题基本可以解决
添加完整包含:将所有库文件均包含进来,简单粗暴,不过不容易出错;不同版本的OpenCV库,仅需要修改后面的版本号即可。
INCLUDEPATH += $$PWD/../opencv_qt/include\
             $$PWD/../opencv_qt/include/opencv\
              $$PWD/../opencv_qt/include/opencv2

unix|win32: LIBS += -L$$PWD/../opencv_qt/bin/ -llibopencv_calib3d410
unix|win32: LIBS += -L$$PWD/../opencv_qt/bin/ -llibopencv_core410
unix|win32: LIBS += -L$$PWD/../opencv_qt/bin/ -llibopencv_dnn410
unix|win32: LIBS += -L$$PWD/../opencv_qt/bin/ -llibopencv_features2d410
unix|win32: LIBS += -L$$PWD/../opencv_qt/bin/ -llibopencv_flann410
unix|win32: LIBS += -L$$PWD/../opencv_qt/bin/ -llibopencv_highgui410
unix|win32: LIBS += -L$$PWD/../opencv_qt/bin/ -llibopencv_imgcodecs410
unix|win32: LIBS += -L$$PWD/../opencv_qt/bin/ -llibopencv_imgproc410
unix|win32: LIBS += -L$$PWD/../opencv_qt/bin/ -llibopencv_ml410
unix|win32: LIBS += -L$$PWD/../opencv_qt/bin/ -llibopencv_objdetect410
unix|win32: LIBS += -L$$PWD/../opencv_qt/bin/ -llibopencv_photo410
unix|win32: LIBS += -L$$PWD/../opencv_qt/bin/ -llibopencv_stitching410
unix|win32: LIBS += -L$$PWD/../opencv_qt/bin/ -llibopencv_video410
unix|win32: LIBS += -L$$PWD/../opencv_qt/bin/ -llibopencv_videoio410
unix|win32: LIBS += -L$$PWD/../opencv_qt/bin/ -lopencv_ffmpeg410
修改main.cpp:
#include <QCoreApplication>
#include "opencv2/opencv.hpp"//添加Opencv相关头文件

using namespace cv;

int main(int argc, char *argv[])
{
    QCoreApplication a(argc, argv);

    Mat img = cv::imread("test.JPG");//加载图片
    imshow("Image", img);

    return a.exec();
}
编译后结果:(测试图片使用绝对路径或者是build文件夹下)

