文章目录
6、RestfulCRUD
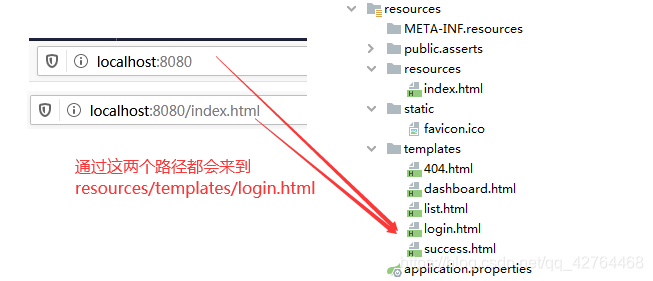
1. 设置登录页面的默认访问路径
方式1:
@Controller
public class HelloController {

    @RequestMapping({"/","/index.html"})
    public String index(){
        return "login";
    }
}
方式2:
@Configuration
public class MyMvcConfig extends WebMvcConfigurerAdapter {

    //所有的WebMvcConfigurerAdapter组件都会一起起作用
    @Bean
    public WebMvcConfigurerAdapter webMvcConfigurerAdapter(){
        WebMvcConfigurerAdapter adapter = new WebMvcConfigurerAdapter() {
            @Override
            public void addViewControllers(ViewControllerRegistry registry) {
                registry.addViewController("/").setViewName("login");
                registry.addViewController("/index.html").setViewName("login");
            }
        };
        return adapter;
    }
}
href与th:href的区别?
在application.properties文件中设置项目路径为:/crud
server.servlet.context-path=/crud
在login.html页面中:超链接使用href
<html lang="en">
	<head>
		<!-- Bootstrap core CSS -->
		<link href="asserts/css/bootstrap.min.css" rel="stylesheet">
		<!-- Custom styles for this template -->
		<link href="asserts/css/signin.css" rel="stylesheet">
	</head>
在浏览器上访问:localhost:8080/crud查看login.html页面,并查看页面源码:

引入外部静态资源BootStrap依赖,并在login.html页面中:超链接使用th:href
  <!--引入bootstrap-->
  <dependency>
      <groupId>org.webjars</groupId>
      <artifactId>bootstrap</artifactId>
      <version>4.0.0</version>
  </dependency>
<html lang="en" xmlns:th="http://www.thymeleaf.org">
	<head>
		<!-- Bootstrap core CSS -->
		<link th:href="@{/asserts/css/signin.css}" rel="stylesheet">
		<!-- Custom styles for this template -->
		<link th:href="@{/webjars/bootstrap/4.0.0/css/bootstrap.css}" rel="stylesheet">
	</head>
在浏览器上访问:localhost:8080/crud查看login.html页面,并查看页面源码:

2. 给登录页面加上国际化
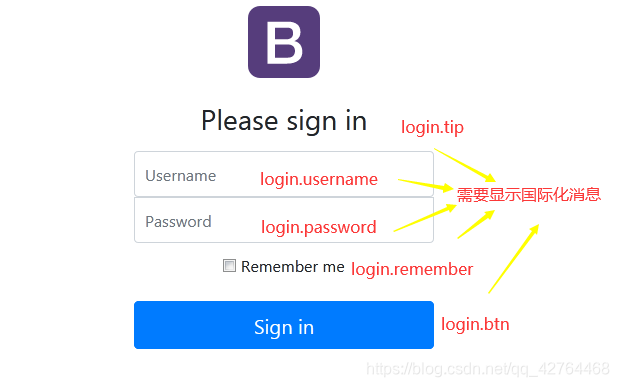
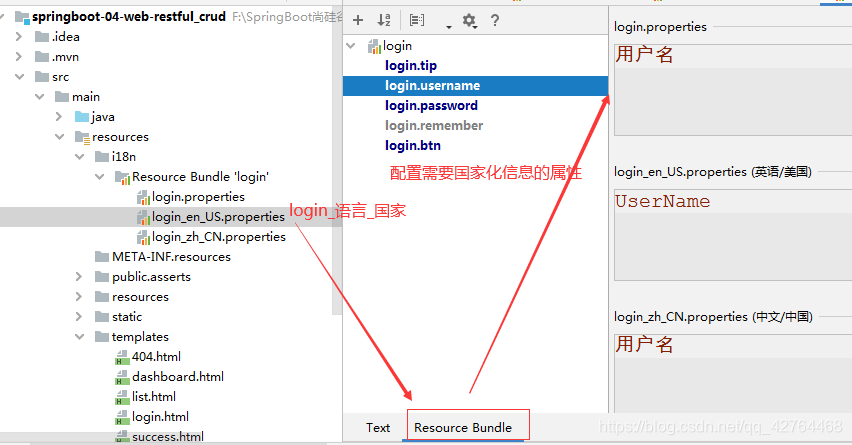
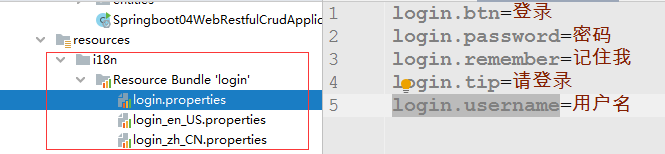
1)、编写国际化配置文件,抽取页面需要显示的国际化消息
2)、SpringBoot自动配置好了管理国际化资源文件的组件;
首先搜索MessageSourceAutoConfiguration这个类,查看源码:
@Conditional({MessageSourceAutoConfiguration.ResourceBundleCondition.class})
@EnableConfigurationProperties
public class MessageSourceAutoConfiguration {
    private static final Resource[] NO_RESOURCES = new Resource[0];

    public MessageSourceAutoConfiguration() {
    }

	//可以通过spring.messages.basename来指定配置文件的基础名
	//如果不指定默认从根路径下面去找
    @Bean
    @ConfigurationProperties(
        prefix = "spring.messages"
    )
    //国际化有关的属性类(basename,encode,cacheDuration等)
    public MessageSourceProperties messageSourceProperties() {
        return new MessageSourceProperties();
    }

	//传入MessageSourceProperties properties参数
    @Bean
    public MessageSource messageSource(MessageSourceProperties properties) {
        ResourceBundleMessageSource messageSource = new ResourceBundleMessageSource();
        //在这里需要进入MessageSourceProperties这个类,查看basename属性
        if (StringUtils.hasText(properties.getBasename())) {
            //设置国际化资源文件的基础名(去掉语言国家代码的配置文件)
            messageSource.setBasenames(StringUtils.commaDelimitedListToStringArray(StringUtils.trimAllWhitespace(properties.getBasename())));
        }

        if (properties.getEncoding() != null) {
            messageSource.setDefaultEncoding(properties.getEncoding().name());
        }

        messageSource.setFallbackToSystemLocale(properties.isFallbackToSystemLocale());
        Duration cacheDuration = properties.getCacheDuration();
        if (cacheDuration != null) {
            messageSource.setCacheMillis(cacheDuration.toMillis());
        }

        messageSource.setAlwaysUseMessageFormat(properties.isAlwaysUseMessageFormat());
        messageSource.setUseCodeAsDefaultMessage(properties.isUseCodeAsDefaultMessage());
        return messageSource;
    }
进入MessageSourceProperties这个类,查看basename属性
public class MessageSourceProperties {
	//配置文件可以直接放在类路径下,默认名称为messages.properties
	//这样即使不写其他配置文件,也能使用国际化功能
    private String basename = "messages";
    private Charset encoding;
    @DurationUnit(ChronoUnit.SECONDS)
    private Duration cacheDuration;
    private boolean fallbackToSystemLocale;
    private boolean alwaysUseMessageFormat;
    private boolean useCodeAsDefaultMessage;
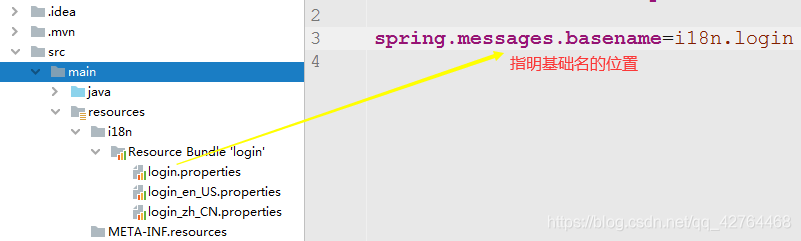
因此,可以在application.properties文件中通过spring.messages.basename来指定配置文件的基础名
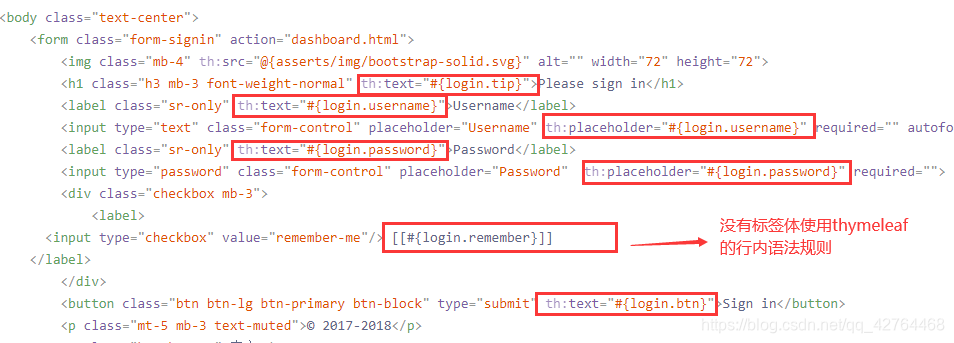
3)、去页面获取国际化的值;
<!DOCTYPE html>
<html lang="en" xmlns:th="http://www.thymeleaf.org">
	<head>
		<meta http-equiv="Content-Type" content="text/html; charset=UTF-8">
		<meta name="viewport" content="width=device-width, initial-scale=1, shrink-to-fit=no">
		<meta name="description" content="">
		<meta name="author" content="">
		<title>Signin Template for Bootstrap</title>
		<!-- Bootstrap core CSS -->
		<link th:href="@{/asserts/css/signin.css}" rel="stylesheet">
		<!-- Custom styles for this template -->
		<link th:href="@{/webjars/bootstrap/4.0.0/css/bootstrap.css}" rel="stylesheet">
	</head>

	<body class="text-center">
		<form class="form-signin" action="dashboard.html">
			<img class="mb-4" th:src="@{/asserts/img/bootstrap-solid.svg}" alt="" width="72" height="72">
			<h1 class="h3 mb-3 font-weight-normal" th:text="#{login.tip}">Please sign in</h1>
			<label class="sr-only" th:text="#{login.username}">Username</label>
			<input type="text" class="form-control" placeholder="Username" th:placeholder="#{login.username}" required="" autofocus="">
			<label class="sr-only" th:text="#{login.password}">Password</label>
			<input type="password" class="form-control" placeholder="Password"  th:placeholder="#{login.password}" required="">
			<div class="checkbox mb-3">
				<label>
          <input type="checkbox" value="remember-me"/> [[#{login.remember}]]
        </label>
			</div>
			<button class="btn btn-lg btn-primary btn-block" type="submit" th:text="#{login.btn}">Sign in</button>
			<p class="mt-5 mb-3 text-muted">© 2017-2018</p>
			<a class="btn btn-sm">中文</a>
			<a class="btn btn-sm">English</a>
		</form>
	</body>
</html>
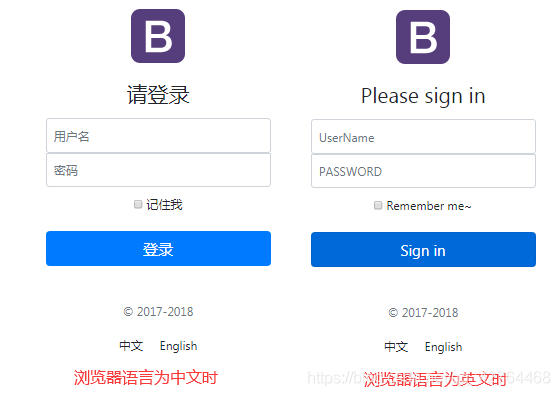
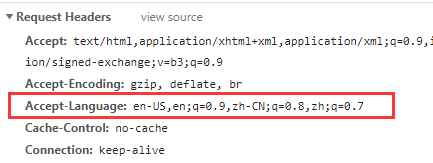
效果:根据浏览器语言设置的信息切换了国际化;
比如,如果浏览器设置的语言为中文就显示中文,如果浏览器设置的语言为英文,页面就显示英文,根据浏览器语言设置,显示页面需要国际化的信息。
原理:
国际化Locale(区域信息对象);LocaleResolver(获取区域信息对象);
		@Bean
		@ConditionalOnMissingBean
		@ConditionalOnProperty(prefix = "spring.mvc", name = "locale")
		public LocaleResolver localeResolver() {
			if (this.mvcProperties
					.getLocaleResolver() == WebMvcProperties.LocaleResolver.FIXED) {
				return new FixedLocaleResolver(this.mvcProperties.getLocale());
			}
			AcceptHeaderLocaleResolver localeResolver = new AcceptHeaderLocaleResolver();
			localeResolver.setDefaultLocale(this.mvcProperties.getLocale());
			return localeResolver;
		}
默认的就是根据请求头带来的区域信息获取Locale进行国际化
4)、点击链接切换国际化
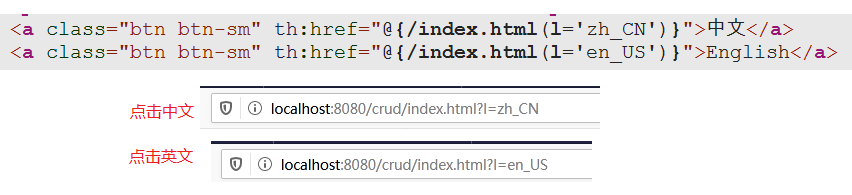
自定义区域解析器类:
import org.springframework.util.StringUtils;
import org.springframework.web.servlet.LocaleResolver;
import javax.servlet.http.HttpServletRequest;
import javax.servlet.http.HttpServletResponse;
import java.util.Locale;

/**
 * 可以在连接上携带区域信息
 */
public class MyLocalResolver implements LocaleResolver {
    public Locale resolveLocale(HttpServletRequest request){
        String l = request.getParameter("l");
        //使用操作系统默认的
        Locale locale = Locale.getDefault();
        if(!StringUtils.isEmpty(l)){
            String[] split = l.split("_");
            //split[0]:语言,split[1]:国家
            locale = new Locale(split[0],split[1]);
        }
        return locale;
    }

    @Override
    public void setLocale(HttpServletRequest httpServletRequest, HttpServletResponse httpServletResponse, Locale locale) {

    }
}
将区域解析器加到容器中:
@Configuration
public class MyMvcConfig extends WebMvcConfigurerAdapter {

    //将自定义的MyLocalResolver创建出来并添加到容器中
    @Bean
    public LocaleResolver localeResolver(){
        return new MyLocalResolver();
    }
}
3. 登陆
开发期间模板引擎页面修改以后,要实时生效
1)、禁用模板引擎的缓存
# 禁用缓存
spring.thymeleaf.cache=false
2)、修改login.html页面,页面修改完成以后ctrl+f9:重新编译;
<body class="text-center">
	<!--给表单加上请求路由和请求方式-->
	<form class="form-signin" action="dashboard.html" th:action="@{/user/login}" method="post">
		<img class="mb-4" th:src="@{/asserts/img/bootstrap-solid.svg}" alt="" width="72" height="72">
		<h1 class="h3 mb-3 font-weight-normal" th:text="#{login.tip}">Please sign in</h1>
		<!--密码错误显示提示信息-->
		<p style="color:red" th:text="${msg}" th:if="${not #strings.isEmpty(msg)}"></p>
		<label class="sr-only"  th:text="#{login.username}">Username</label>
		<!--加上name属性-->
		<input type="text" name="username" class="form-control" placeholder="Username" th:placeholder="#{login.username}" required="" autofocus="">
		<label class="sr-only" th:text="#{login.password}">Password</label>
		<!--加上name属性-->
		<input type="password" name="password" class="form-control" placeholder="Password"  th:placeholder="#{login.password}" required="">
		<div class="checkbox mb-3">
			<label>
		       <input type="checkbox" value="remember-me"/> [[#{login.remember}]]
3)、在MyMvcConfig类中添加:
registry.addViewController("/main.html").setViewName("dashboard");
4)、根据请求路径,编写Controller层
@Controller
public class LoginController {
    //@RequestMapping(value = "/user/login",method = RequestMethod.POST)
    @PostMapping(value = "/user/login")
    //带上前端提交的请求参数
    public String login(@RequestParam("username")String username,
                        @RequestParam("password")String password,
                        Map<String,Object> modelMap){
        if(!StringUtils.isEmpty(username)&& "123456".equals(password)){
            //登录成功
            //return "dashboard";
            //登录成功以后,重定向到当前项目的main.html路径下对应的dashboard.html页面
            return "redirect:/main.html";
        }
        //登录失败,回到登录页面
        modelMap.put("msg","用户名密码错误");
        return "login";
    }
}
4. 拦截器进行登录检查
现在有个问题就是我们可以直接通过http://localhost:8080/crud/main.html访问到dashboard.html这个后台页面,却不用从登录页面登录后进去,如何解决这个问题?
可以配置拦截器
4.1 回顾Springmvc中拦截器
1.在springmvc.xml中配置拦截器:
<mvc:interceptors>
   <mvc:interceptor>
       <!--要拦截的方法-->
       <mvc:mapping path="/user/*"/>
       <!--不要拦截的方法-->
       <!--<mvc:exclude-mapping path=""/>-->
       <!-- 配置拦截对象-->
       <bean class="com.hh.interceptor.MyInterceptor1"/>
   </mvc:interceptor>
</mvc:interceptors>
2.配置前端访问路径:
<a href="/user/testInterceptor">拦截器</a>
3.编写Controller层方法:
@Controller
@RequestMapping("/user")
public class UserController {
    @RequestMapping("/testInterceptor")
    public String testInterceptor(){
        System.out.println("controller...");
        return "success";
    }
}
4.转发到error.jsp:
<h3>错误页面</h3>
5.success.jsp:
<h3>成功页面</h3>
**1. preHandle方法是controller方法(目标方法)执行前拦截的方法 **
public class MyInterceptor1 implements HandlerInterceptor {
    /**
     * return true放行,执行下一个拦截器,如果没有,执行controller中的方法
     * return false不放行,不会执行controller方法
     */
    public boolean preHandle(HttpServletRequest request, HttpServletResponse response, Object handler) throws Exception {
        System.out.println("MyInterceptor执行了....");
        request.getRequestDispatcher("/WEB-INF/jsp/error.jsp").forward(request,response);
        return true;
    }
}
首先,使用preHandle()方法可以实现请求转发或者重定向

其次,这个方法在目标方法Controller层的方法之前执行
return true:就执行下一个拦截器,如果没有就执行Controller方法
return false:无法执行后台方法

2.postHandle是controller方法执行后,在success.jsp执行前执行的方法,。
/**
*后处理方法,controller方法执行之后,success.jsp执行之前执行
*/
public void postHandle(HttpServletRequest request, HttpServletResponse response, Object handler, ModelAndView modelAndView) throws Exception {
   System.out.println("MyInterceptor执行了....");
   request.getRequestDispatcher("/WEB-INF/jsp/error.jsp").forward(request,response);
}
首先,可以使用request或者response跳转到指定的页面

其次:如果指定了跳转的页面,那么controller方法跳转的页面将不会显示。

3.postHandle方法是在success.jsp执行后执行的方法
/**
 * success.jsp跳转页面执行后,执行的方法
 */
public void afterCompletion(HttpServletRequest request, HttpServletResponse response, Object handler, Exception ex) throws Exception {
    System.out.println("MyInterceptor执行了....");
}

request或者response不能再跳转页面了

4.2 SpringBoot设置拦截器
1.配置拦截器,使用preHandle()方法
使用preHandle()方法好处在于,可以在Controller层的方法执行前执行,而且可以转发和重定向。
//ctrl+o选择要实现的方法
public class LoginHandlerInterceptor implements HandlerInterceptor {
    @Override
    public boolean preHandle(HttpServletRequest request, HttpServletResponse response, Object handler) throws Exception {
        Object user = request.getSession().getAttribute("loginUser");
        if(user==null){
            request.setAttribute("msg","没有权限请先登录");
            //未登录,拦截返回登录页面,将请求转发到登录页面
            request.getRequestDispatcher("/index.html").forward(request,response);
        }else{
            //已登录,放行请求,执行Controller层的方法
            return true;
        }
        return false;
    }
}
2.Controller层方法:LoginController()
@Controller
public class LoginController {
    @PostMapping(value = "/user/login")
    public String login(@RequestParam("username")String username,
                        @RequestParam("password")String password,
                        Map<String,Object> modelMap,
                        HttpSession session){
        if(!StringUtils.isEmpty(username)&& "123456".equals(password)){
            //将登录了的用户放在session中
            session.setAttribute("loginUser",username);
            //登录成功以后,重定向到当前项目的main.html路径下对应的dashboard.html页面
            return "redirect:/main.html";
        }
        //登录失败,回到登录页面
        modelMap.put("msg","用户名密码错误");
        return "login";
    }
}
3. 注册拦截器
在MyMvcConfig这个类中注册拦截器:
@Configuration
public class MyMvcConfig extends WebMvcConfigurerAdapter {
    //将组件注册在容器
    @Bean
    public WebMvcConfigurerAdapter webMvcConfigurerAdapter(){
        WebMvcConfigurerAdapter adapter = new WebMvcConfigurerAdapter() {
            //注册拦截器
            @Override
            public void addInterceptors(InterceptorRegistry registry) {
                registry.addInterceptor(new LoginHandlerInterceptor())
                        //拦截所有的路径
                        .addPathPatterns("/**")
                        //排除不想拦截的,登录页面,请求路由,静态资源
                        .excludePathPatterns("/index.html", "/", "/user/login", "/webjars/**", "/asserts/**");
            }
        };
        return adapter;
    }
}