pymongo操作mongoDB的增删改查 | CRUD
环境:python3.6.4,pymongo4.2
pymongo简介
PyMongo是驱动程序,使python程序能够使用Mongodb数据库,使用python编写而成。
mongoDB包含数据库database、集合collection、文档document,接下来也主要对这三个层面上的内容进行增删改查的学习!
【如有不足之处,还望指正】
连接本地mongoDB
# 从pymongo中导入MongoClient
from pymongo import MongoClient

# 实例化
client = MongoClient()
连接远程MongoDB
client=MnogoClient(host="远程服务器地址", post="端口号")

# URI风格连接远程MongoDB
client=MongoClient("mongodb://远程服务器地址:端口号/")
数据库CRUD
使用现有数据库
from pymongo import MongoClient
client = MongoClient()
# 假设已存在名称为 test_database的数据库
test_database = client.test_database
# 也可以使用访问字典的方式访问数据库
test_database = client['test_database'

 - [ ] List item

]
增
【语法】client.数据库名.集合名(需要插入的数据)
from pymongo import MongoClient
client = MongoClient()
new_db_name = client.new_db_name
new_db_name.new_doc.insert_one({'key1':'value1', 'key2':'value2'})
#  插入数据时,如果数据库(new_db_name)不存在,系统自动创建数据库(new_db_name)
删
【语法】client.drop_database(‘数据库名’)
from pymongo import MongoClient
client = MongoClient()
client.drop_database('new_db_name')
# 删除现有数据库
改
以下方法是复制一份数据到新的数据库,复制后如不需要老数据库,需删除
use admin  # 需要在命令行下使用该命令
db.runCommand({renameCollection:"数据库名.集合名", to:"改后的数据库名.改后的集合名"})
查
【语法】client.list_database_names()
【栗子】列出当前所有数据库名称
from pymongo import MongoClient
client = MongoClient()
database_names = client.list_database_names()
print(database_names)
集合CRUD
增
【语法】client.数据库名.集合名.insert_one(需要插入的一条BSON类数据)
【栗子】如果mongoDB中不存在集合’collection_name’,系统会自动创建’collection_name’
from pymongo import MongoClient
client = MongoClient()
client.new_db_name.collection_name.insert_one({'key1':'value1'})
删
【语法】client.数据库名.集合名.drop()
【栗子】删除数据库’db_name’中的集合’collection_name’
from pymongo import MongoClient
client = MongoClient()
client.db_name.collection_name.drop()
改
以下方法是复制一份数据到新的文档,复制后如不需要老文档,需删除
use admin  # 需要在命令行下使用该命令
db.runCommand({renameCollection:"数据库名.集合名", to:"数据库名.改后的集合名"})
查
【语法】client.db_name.list_collection_names()
【栗子】
from pymongo import MongoClient
client = MongoClient()
client.db_name.list_collection_names()
文档CRUD
增
插入一条document
【语法】client.数据库名.集合名.insert_one(需要插入的一条BSON类数据)
【栗子】如果mongoDB中不存在集合’collection_name’,系统会自动创建’collection_name’
from pymongo import MongoClient
client = MongoClient()
client.new_db_name.collection_name.insert_one({'key1':'value1'})
插入多条document
【语法】client.数据库名.集合名.insert_many([需要插入的多条BSON类数据])
【栗子】如果mongoDB中不存在集合’collection_name’,系统会自动创建’collection_name’
from pymongo import MongoClient
client = MongoClient()
datas = [
{'key1':'value1'},
{'key2':'value2'},
{'key3':'value3'},
{'key4':'value4'}
]
client.new_db_name.collection_name.insert_many(datas)
删
删除一条document
【语法】client.db_name.collection_name.delete_one({‘key’:‘value’})
【栗子】从数据库‘db_name’的集合‘collection_name’删除第一条匹配{‘name’:‘2222’}的文档‘document’
from pymongo import MongoClient
client = MongoClient()
client.db_name.collection_name.delete_one({'name':'2222'})
删除多条document
【语法】client.db_name.collection_name.delete_many({‘key’:‘value’})
【栗子】从数据库‘db_name’的集合‘collection_name’删除多条匹配{‘name’:‘111’}的文档‘document’
from pymongo import MongoClient
client = MongoClient()
client.db_name.collection_name.delete_many({'name':'111'})
改
replace_one 替换
【作用】更新与选择器匹配的所有文档
【语法】replace_one({条件dict},{新doc})
【栗子】
# replace_one 替换
client.db_name.collection_name.replace_one({条件dict},{新doc})
update 更新多条
【作用】更新与选择器匹配的所有文档
【语法】update(dict)
【栗子】
update_one 更新一条
【作用】更新与选择器匹配的第一个文档
【语法】update_one(dict)
【栗子】
# 将集合new3中{'name': 'joe'}换成{'age': 33}
client.test12.new3.update_one({'name': 'joe'}, {'$set':{'age': 33}})
修改器
$set
【作用】更新与选择器匹配的文档字段,如果该字段不存在。则新增字段
【语法】db_name.collection_name.update_many({‘name’: ‘joe’},{’$set’:{‘age’: 33}})
【栗子】
# 修改集合new3中一条文档的字段
client.test12.new3.update_many({'name': 'joe'},{'$set':{'age': 33}})
client.test12.new3.update_many({'name': 'joe'},{'$set':{'gender': 'male'}})

from pprint import pprint
for i in client.test12.new3.find({}, {'_id':0}):
    pprint(i)
    print('\n')

# 【输出结果】
# {'age': 33,
     # 原文档age值为28,执行{'$set':{'age': 33}}后修改为33
# 'gender': 'male',
     # 原文档不存在‘gender’字段,执行{'$set':{'gender': 'male'}}后自动添加
# 'location': 'Wisconsin',
# 'name': 'joe',
# 'sex': 'male'}

# {'age': 33,
# 'gender': 'male',
# 'location': 'Wisconsin',
# 'name': 'joe',
# 'sex': 'male'}

# {'age': 50, 'location': 'Wisconsin', 'name': 'ree', 'sex': 'fmale'}
$unset
【作用】删除与选择器匹配的文档字段。
【语法】db_name.collection_name.update_many({‘name’: ‘joe’},{’$set’:{‘gender’: ‘male’}})
【栗子】
# 删除文档的字段
client.test12.new3.update_many({'name': 'joe'},{'$unset':{'gender': 'male'}})

【结果】
# {'age': 33, 'location': 'Wisconsin', 'name': 'joe', 'sex': 'male'}
   # 删除'gender'为 'male'的字段
# {'age': 33, 'location': 'Wisconsin', 'name': 'joe', 'sex': 'male'}
$inc
【作用】修改与{‘name’: ‘joe’}匹配的文档int型字段,仅支持修改数值型字段。
【语法】db_name.collection_name.update_many({‘name’: ‘joe’},{’$inc’:{‘age’:-390}})
【栗子】
# inc 修改器
client.test12.new3.update_one({'name': 'joe'},{'$inc':{'age':-390}})

【结果】
# {'age': -747, 'location': 'Wisconsin', 'name': 'joe', 'sex': 'male'}
   # ‘age’值是被减390后的结果
$push $pushAll
【作用】向已有的数组末尾添加一个元素
【语法】update_one({dict条件},{’$push’:{dict文档内容}})
【栗子】
# 向匹配{'author.email':'[email protected]'}的文档'comments'字段追加ac。
# 如果comments不存在,会在匹配的文档中自动创建

ac = {'content': 'nice post.', 'email': '[email protected]', 'name': 'joe'}
new3.update_one({'author.email':'[email protected]'},{'$push':{'comments':ac}})
$addToSet
【作用】向现有文档添加不重复的字段,如果key不存在则自动创建.
【语法】update_one({条件语句dict},{’$addToSet’:dict})
【栗子】
# $addToSet
new_c={'content': 'nice post.', 'email': '[email protected]', 'name': 'joe'}
new3.update_one({'author.email':'[email protected]'},{'$addToSet':{'comments':new_c}})
$pull & $pullAll
【作用】删除文档重复的 emails 值 ($pull 会删除所有符合条件的记录)
【语法】
【栗子】
# $pull
new3.update_one({'author.email':'[email protected]'},{'$pull':{'comments':new_c}})
$each
【作用】添加多个元素(我的理解是:先遍历出list的每一项,每遍历出一项就添加到对应value中)
【语法】’$each’:list
【栗子】
# $push + $each
new3 = client.test12.new3
new_c=[{'content': 'nice post.', 'email': '[email protected]', 'name': 'joe'},
       {'content': 'nice post.', 'email': '[email protected]', 'name': 'joe'}]
new3.update_one({'author.email':'[email protected]'},{'$push':{'comments':{'$each':new_c}}})
$pop
【作用】删除列表元素(按数组下标移除)
【语法】{’$pop’:{‘key’:索引下标}
【栗子】
# 删除gf列表中的第一个值
client.test12.new3.update_one({'name': 'joe'},{'$pop':{'gf':-1}})
  # 执行后结果为: 'gf': ['mary', 'hero']  原值为:'gf': ['lily', 'mary', 'hero']


# 删除gf列表中的最后一个值
client.test12.new3.update_one({'name': 'joe'},{'$pop':{'gf':1}})
  # 执行后结果为:'gf': ['lily', 'mary']   原值为:'gf': ['lily', 'mary', 'hero']
查
基础用法
find()
【作用】查询出所有匹配的文档,并返回游标类型。
【语法】find(条件语句dict)
【栗子】
# 查询出完整文档
for i in client.test12.new3.find({}):
    print(i)


# 查询出name==ree的文档
for data in client.test12.new3.find({'name': 'ree'}):
    print(data)
find_one()
【作用】查询出第一条匹配的文档,并返回dict类型。
【语法】find_one(条件语句dict)
【栗子】
# 查询出第一条文档
for i in client.test12.new3.find_one({}):
    print(i)

# 查询出name==ree的第一条文档
for data in client.test12.new3.find_one({'name': 'ree'}):
    print(data)
按条件查询
比较操作符
- $lt 小于
【作用】value值小于指定值的文档
【语法】find({‘key’:{’ $lt’:num}})
【栗子】
# 【$lt】查询出high_school小于410的文档
for i in client.test12.new3.find({'school.high_school':{'$lt':410}}):
    print(i)

【结果】
{'_id': ObjectId('5d2a3e0403b7995ac9f9249a'), 'name': 'Lee', 'school': {'high_school': 400, 'uni': 'nanjing'}}
- $lte 小于等于
【作用】value值小于等于指定值的文档
【语法】find({‘key’:{’ $lte’:num}})
【栗子】
# 【$lte】查询出high_school小于等于500的文档
for i in client.test12.new3.find({'school.high_school':{'$lte':500}}):
    print(i)

【结果】
{'_id': ObjectId('5d2a3e0403b7995ac9f9249a'), 'name': 'Lee', 'school': {'high_school': 500, 'uni': 'beijing'}}
{'_id': ObjectId('5d2a3e0403b7995ac9f9249a'), 'name': 'Lee', 'school': {'high_school': 400, 'uni': 'nanjing'}}
- $gt 大于
【作用】value值大于指定值的文档
【语法】find({‘key’:{’ $gt’:num}})
【栗子】
# 【$gt】查询出high_school大于500的文档
for i in client.test12.new3.find({'school.high_school':{'$gt':500}}):
    print(i)

【结果】
{'_id': ObjectId('5d2a3e0403b7995ac9f9249a'), 'name': 'Lee', 'school': {'high_school': 600, 'uni': 'xiada'}}
- $gte 大于等于
【作用】value值大于等于指定值的文档
【语法】find({‘key’:{’ $gte’:num}})
【栗子】
# 【$gte】查询出high_school大于等于600的文档
for i in client.test12.new3.find({'school.high_school':{'$gte':600}}):
    print(i)

【结果】
{'_id': ObjectId('5d2a3e0403b7995ac9f9249a'), 'name': 'Lee', 'school': {'high_school': 800, 'uni': 'beida'}}
{'_id': ObjectId('5d2a3e0403b7995ac9f9249a'), 'name': 'Lee', 'school': {'high_school': 600, 'uni': 'qinghua'}}
$in和 $nin 操作符
- $nin
【作用】匹配集合中 没有 XX值的文档记录
【语法】{‘条件key’: {’ $nin’: [‘条件value1’, ‘条件value2’]}}
【栗子】
# 【'$nin'】匹配 new3 集合中 用户名不是 joe 和 Lee 的文档记录
for data in client.test12.new3.find({'name': {'$nin': ['joe', 'Lee']}}):
    print(data)
- $in
【作用】匹配集合中有XX值的文档记录,匹配一个值即可
【语法】{‘条件key’: {’ $in’: [‘条件value1’, ‘条件value2’]}}
【栗子】
# 【'$in'】匹配 new3 集合中 用户名为 joe 和 Lee 的文档记录
for data in client.test12.new3.find({'name': {'$in': ['joe', 'Lee']}}):
    print(data)
$or
【作用】查询两个条件中其中一个为真的查询结果,可以使用 $or 操作符
【语法】{’ $or’: [{‘条件1key1’: ‘条件1value1’}, {‘条件2key2’: ‘条件2value2’}]}
【栗子】
# 【'$or'】匹配 new3 集合中 'name'为 joe 或 'school.high_school'的值为400 的文档记录
for data in client.test12.new3.find({'$or': [{'name': 'joe'}, {'school.high_school': 400}]}):
    print(data)
null 值查询和 $exists 条件判定
【作用】查找value为None的文档需要加 $exists
【语法】db_name.col_name.find({‘key’: {’ $in’:[None], ’ $exists’:1}})
【栗子】
# 查找出name的值为None的文档
for data in db_name.col_name.find({'name': {' $in':[None], ' $exists':1}}):
	print(data)
查询数组
- $all
【作用】list中完全匹配多个元素的文档 ===》 跟 $in 的区别是, $in是匹配条件表达式中的任何一个value
【语法】find({‘key’:{’ $all’:[列表形式的多个元素]}})
【栗子】
# 查找data=》列表形式的value里都包含2,3,4的文档
for u in db.users.find({'data':{'$all':[2,3,4]}}):
    print(u)
- $size
【作用】匹配指定长度的list文档
【语法】db_name.col_name.find({},{‘key’:{’ $size’:int_num}})
【栗子】
# 查找数组大小为4的文档
for data in db_name.col_name.find({},{'name':{' $size':4}}):
	print(data)
- $slice
【作用】返回某个键匹配的数组的一个指定长度子集
【语法】db_name.col_name.find({‘key1’:‘value1’}, {‘key2’:{’ $slice’:±num}})
【栗子】
# num为正数时,查找出匹配{'title': 'A Blog Post'}的文档,并'comments'只返回前两个值
for i in client.test12.new3.find({'title': 'A Blog Post'},{'comments':{'$slice':2}}):
    pprint(i)

# num为负数时,查找出匹配{'title': 'A Blog Post'}的文档,并'comments'只返回最后一个值
for i in client.test12.new3.find({'title': 'A Blog Post'},{'comments':{'$slice':-1}}):
    pprint(i)

【结果】
==》conmments原值为
'comments': [{'content': 'nice post.',
               'email': '[email protected]',
               'name': 'ma'},
              {'content': 'nice post.',
               'email': '[email protected]',
               'name': 'joe'},
              {'content': 'nice post.',
               'email': '[email protected]',
               'name': 'joe'},
              {'content': 'nice post.',
               'email': '[email protected]',
               'name': 'joe'},
              {'2email': '[email protected]',
               '2name': '2joe',
               'content': '2nice post.'}],

==》执行 'comments':{'$slice':2}时,结果为
'comments': [{'content': 'nice post.',
               'email': '[email protected]',
               'name': 'ma'},
              {'content': 'nice post.',
               'email': '[email protected]',
               'name': 'joe'}],


==》执行 'comments':{'$slice':-1}时,结果为
 'comments': [{'2email': '[email protected]',
               '2name': '2joe',
               'content': '2nice post.'}],
- min()
【作用】
【语法】
【栗子】
具体用法后期补充
- max()
【作用】
【语法】
【栗子】
具体用法后期补充
$sort() 排序
- ASCENDING 升序
【作用】如果是string型的值按照asc码按先后排序,如果是数值型的值按数值从小到大排序
【语法】db_name.collection_name.find(条件语句).sort([(‘按这个字段排序’, ASCENDING)]):
【栗子】
# 从集合new3中查询name中含有Maria字段的文档,并按name的值 升序排序
from pymongo import ASCENDING
for i in client.test12.new3.find({'name':{'$in':['Maria']}}).sort([('name', ASCENDING)]):
    print(i)
- DESCENDING 降序
【作用】如果是string型的值按照asc码按先后排序,如果是数值型的值按数值从大到小排序
【语法】db_name.collection_name.find(条件语句).sort([(‘按这个字段排序’, DESCENDING)]):
【栗子】
# 降序
from pymongo import DESCENDING
for i in client.test12.new3.find({'name':{'$in':['Maria']}}).sort([('name', DESCENDING)]):
    print(i)
limit() 限制
【作用】查询前num条文档
【语法】limit(num)
【栗子】
# 从集合new3中查询前三条文档
for data in client.test12.new3.find().limit(3):
    print(data)
skip() 跳过
【作用】跳过前num条开始查询文档
【语法】skip(num)
【栗子】
# 从第4条开始查出3条文档
for data in client.test12.new3.find().skip(3).limit(3):
    print(data)
where
【作用】用来执行JS
【语法】
【栗子】
具体用法后期补充
count_documents() 统计文档数据量
【作用】统计集合内有多少条文档
【语法】count_documents()
【栗子】
client.test12.new3.count_documents()
IOSDate 查询某一段时间的数据
【作用】查询某一段时间的documents
【语法】IOSDate(“2017-04-20T00:00:00Z”)
【栗子】
db.CollectionAAA.find({ "CreateTime" : { "$gte" : ISODate("2017-04-20T00:00:00Z")
, "$lt" : ISODate("2017-04-21T00:00:00Z") } }).count()
模糊查询
【作用】查询包含某个字段的documents
【语法】{‘字段名’:{’$regex’:‘条件参数’}}
【栗子】
db_name.Collection_name.find_many({"title":{'$regex':"医院"}})
索引
添加索引可以帮助加速查询。使用感受:100多万条document不加索引查询一般需要几十秒甚至1、2分钟,加完索引后基本上0.001-0.003sec就能查询完毕。想了解索引原理的话,可以官网了解一下。
【分类】===》 目前仅介绍单索引、复合索引、TTL索引
- 单索引
是指在单个字段上创建的索引 - 复合索引
是指在多个字段上创建索引 - TTL索引
是指可以设置过期时间的索引 ,到期后文档自动删除 - 多键索引
是指在文档数组的字段上创建索引 - 地理空间索引
- 2d索引
- 2dphere索引
- 文字索引
- 散列索引
- 稀疏索引
- 通配符索引 Partial Indexes
- geoHaystack索引
增 Create
【作用】
【语法】
- 创建单个升序索引:
db_name.collection_name.ensure_index('字段名', pymongo.ASCENDING)
或者
db_name.collection_name.create_index('字段名', pymongo.ASCENDING)
- 创建单个降序索引:
db_name.collection_name.ensure_index('字段名', pymongo.DESCENDING)
或者
db_name.collection_name.create_index('字段名', pymongo.DESCENDING)
- 创建复合索引:
db_name.collection_name.ensure_index([('字段1名', pymongo.ASCENDING),('字段2名', pymongo.DESCENDING)])
或者
db_name.collection_name.create_index([('字段1名', pymongo.ASCENDING),('字段2名', pymongo.DESCENDING)])
【参数】
- unique(boolean) # 默认为False
- name(字符串) # 默认为使用字段名+排序方式组合,也可自定义索引名称
- background(boolean) # 默认为False,后台创建索引
- partialFilterExpression # 用于部分索引
- spare(boolean) # 主要用户稀疏索引,索引指定字段的文档
- expireAfterSeconds(整数) # 用户TTL索引,设置过期时间
- storageEngine # 允许用户在创建索引是基于每个索引配置存储引擎
【栗子】
# 单索引
db_name.collection_name.create_index('title':ASCENDING)

# 符合索引
db_name.collection.create_index([('title':1),('year':-1)])
# 注意:1 = ASCENDING ,-1 = DESCENDING
删 drop_index
【作用】删除索引
【语法】db_name.collection_name.drop_index(“索引名”)
改
需要删除后,重新创建
查 query
【作用】查询数据库中有哪些索引
【语法】db_name.profiles.index_information()
希望打印更清晰一些,使用:
list(db_name.profiles.index_information())
聚合
聚合管道 aggregation pipline
「概念」聚合管道是基于数据处理流水线概念建模的数据聚合框架。
如图,聚合管道就像一个流水线,分成一道一道工序,最后产出成果。
第一阶段:$match阶段按status字段过滤文档,并将那些status等于"A"的文档传递给下一阶段。
第二阶段:$group阶段按cust_id字段对文档进行分组,以计算每个唯一的数量总和cust_id。

聚合管道阶段
- $ addFields(aggregation) == 等效的阶段 ==》$ set 本例中所有addFields均可替换成set实现相同功能
【作用】向文档添加新字段。$ addFields输出包含输入文档和新添加字段中所有现有字段的文档。
「栗子」
STEP1、数据库中有这样两个文档
{
  _id: 1,
  student: "Maya",
  homework: [ 10, 5, 10 ],
  quiz: [ 10, 8 ],
  extraCredit: 0
}
{
  _id: 2,
  student: "Ryan",
  homework: [ 5, 6, 5 ],
  quiz: [ 8, 8 ],
  extraCredit: 8
}
STEP2、在$ addField阶段添加如下三个字段
db.scores.aggregate( [
   {
     $addFields: {
       totalHomework: { $sum: "$homework" } ,
       totalQuiz: { $sum: "$quiz" }
     }
   },
   {
     $addFields: { totalScore:
       { $add: [ "$totalHomework", "$totalQuiz", "$extraCredit" ] } }
   }
] )
STEP3、返回结果如下
{
 {
  "_id" : 1,
  "student" : "Maya",
  "homework" : [ 10, 5, 10 ],
  "quiz" : [ 10, 8 ],
  "extraCredit" : 0,
  "totalHomework" : 25,
  "totalQuiz" : 18,
  "totalScore" : 43
}
{
  "_id" : 2,
  "student" : "Ryan",
  "homework" : [ 5, 6, 5 ],
  "quiz" : [ 8, 8 ],
  "extraCredit" : 8,
  "totalHomework" : 16,      ====》输出新字段
  "totalQuiz" : 16,     ====》输出新字段
  "totalScore" : 40     ====》输出新字段
}
-> 向嵌入式文档添加字段
STEP1、现有文档
{ _id: 1, type: "car", specs: { doors: 4, wheels: 4 } }
{ _id: 2, type: "motorcycle", specs: { doors: 0, wheels: 2 } }
{ _id: 3, type: "jet ski" }
STEP2、向specs中添加新字段“fuel_type”
db.vehicles.aggregate( [
        {
           $addFields: {
              "specs.fuel_type": "unleaded"
           }
        }
   ] )
STEP3、输出结果
{ _id: 1, type: "car",
   specs: { doors: 4, wheels: 4, fuel_type: "unleaded" } }        ====》输出新字段    fuel_type: "unleaded"
{ _id: 2, type: "motorcycle",
   specs: { doors: 0, wheels: 2, fuel_type: "unleaded" } }         ====》输出新字段   fuel_type: "unleaded"
{ _id: 3, type: "jet ski",
   specs: { fuel_type: "unleaded" } }            ====》输出新字段   fuel_type: "unleaded"
-> 覆盖现有字段
STEP1、现有animals文档
{ _id: 1, dogs: 10, cats: 15 }
STEP2、用$ addFields修改现有文档
db.animals.aggregate( [
  {
    $addFields: { "cats": 20 }
  }
] )
STEP3、输出结果
{ _id: 1, dogs: 10, cats: 20 }
-> 用另一个字段替换现有字段
STEP1、现有的fruit文档
{ "_id" : 1, "item" : "tangerine", "type" : "citrus" }
{ "_id" : 2, "item" : "lemon", "type" : "citrus" }
{ "_id" : 3, "item" : "grapefruit", "type" : "citrus" }
STEP2、以下聚合操作用于$addFields将_id每个文档的字段替换为字段的值item ,并使用item静态值替换该字段。
db.fruit.aggregate( [
  {
    $addFields: {
      _id : "$item",    =====》 _id的值替换成 item的值
      item: "fruit"       =====》 item的值替换成  fruit
    }
  }
] )
STEP3、替换后的输出结果
{ "_id" : "tangerine", "item" : "fruit", "type" : "citrus" }
{ "_id" : "lemon", "item" : "fruit", "type" : "citrus" }
{ "_id" : "grapefruit", "item" : "fruit", "type" : "citrus" }
-> 将元素添加到数组
STEP1、使用以下内容创建scores样本集合:
db.scores.insertMany([
   { _id: 1, student: "Maya", homework: [ 10, 5, 10 ], quiz: [ 10, 8 ], extraCredit: 0 },
   { _id: 2, student: "Ryan", homework: [ 5, 6, 5 ], quiz: [ 8, 8 ], extraCredit: 8 }
])
STEP2、使用 $ concatArrays 配合 $ addFields 将元素添加到数组中:
db.scores.aggregate([
   { $match: { _id: 1 } },
   { $addFields: { homework: { $concatArrays: [ "$homework", [ 7 ] ] } } }
])
STEP3、插入数据后的结果
{ "_id" : 1, "student" : "Maya", "homework" : [ 10, 5, 10, 7 ], "quiz" : [ 10, 8 ], "extraCredit" : 0 }
-
$ match(aggregation)
【作用】将符合指定条件的文档传递到下一个管道阶段;
【语法】{ $match: { } } -
$ unset(aggregation)
【作用】用于删除某些字段(可以是顶级字段也可以是嵌入式文档等),然后传入下一阶段;
【语法】{ $ unset: { <字段1>: “”, … } }
⚠️注意:$ unset与$ project等效,但语法有小差异 ({ $project: { “”: 0, “”: 0, … } })
【栗子】
- 排除单个字段的栗子
STEP1、先创建两个文档:
db.books.insertMany([
   { "_id" : 1, title: "Antelope Antics", isbn: "0001122223334", author: { last:"An", first: "Auntie" }, copies: [ { warehouse: "A", qty: 5 }, { warehouse: "B", qty: 15 } ] },
   { "_id" : 2, title: "Bees Babble", isbn: "999999999333", author: { last:"Bumble", first: "Bee" }, copies: [ { warehouse: "A", qty: 2 }, { warehouse: "B", qty: 5 } ] }
])
STEP2、排除单个字段:
# 排除 copies 字段
db.books.aggregate([ { $unset: "copies" } ])
STEP3、结果:
{ "_id" : 1, "title" : "Antelope Antics", "author" : { "last" : "An", "first" : "Auntie" } }
{ "_id" : 2, "title" : "Bees Babble", "author" : { "last" : "Bumble", "first" : "Bee" } }
- 排除多个字段的栗子
STEP1、排除 isbn 、copies 字段:
db.books.aggregate([
   { $unset: [ "isbn", "copies" ] }
])
STEP2、输出结果:
{ "_id" : 1, "title" : "Antelope Antics", "author" : { "last" : "An", "first" : "Auntie" } }
{ "_id" : 2, "title" : "Bees Babble", "author" : { "last" : "Bumble", "first" : "Bee" } }
- 排除内嵌文档字段
STEP1、排除内嵌文档字段:
db.books.aggregate([
   { $unset: [ "isbn", "author.first", "copies.warehouse" ] }
])
STEP2、输出结果
{ "_id" : 1, "title" : "Antelope Antics", "author" : { "last" : "An" }, "copies" : [ { "qty" : 5 }, { "qty" : 15 } ] }
{ "_id" : 2, "title" : "Bees Babble", "author" : { "last" : "Bumble" }, "copies" : [ { "qty" : 2 }, { "qty" : 5 } ] }
$ unwind(aggregation)
【作用】展开文档中的数组,并输出每个元素的文档
【语法】{$unwind:{path: , includeArrayIndex: , preserveNullAndEmptyArrays:}}
【参数】

【栗子】
STEP1、数据库有以下文档
{ "_id" : 1, "item" : "ABC1", sizes: [ "S", "M", "L"] }
STEP2、使用 $ unwind 展开 sizes 数组
db.inventory.aggregate( [ { $unwind : "$sizes" } ] )
STEP3、输出结果
{ "_id" : 1, "item" : "ABC1", "sizes" : "S" }
{ "_id" : 1, "item" : "ABC1", "sizes" : "M" }
{ "_id" : 1, "item" : "ABC1", "sizes" : "L" }
- 包含数据数组索引 ( includeArrayIndex)
STEP1、数据库已有文档
{ "_id" : 1, "item" : "ABC", "sizes": [ "S", "M", "L"] }
{ "_id" : 2, "item" : "EFG", "sizes" : [ ] }
{ "_id" : 3, "item" : "IJK", "sizes": "M" }
{ "_id" : 4, "item" : "LMN" }
{ "_id" : 5, "item" : "XYZ", "sizes" : null }
STEP2、展开sizes数组,并要求标注数组索引位置
db.inventory.aggregate( [ { $unwind: { path: "$sizes", includeArrayIndex: "arrayIndex" } } ] )
STEP3、返回结果是一样的,如下
{ "_id" : 1, "item" : "ABC", "sizes" : "S", "arrayIndex" : NumberLong(0) }
{ "_id" : 1, "item" : "ABC", "sizes" : "M", "arrayIndex" : NumberLong(1) }
{ "_id" : 1, "item" : "ABC", "sizes" : "L", "arrayIndex" : NumberLong(2) }
{ "_id" : 3, "item" : "IJK", "sizes" : "M", "arrayIndex" : null }
- 保留null和空值的文档 ( preserveNullAndEmptyArrays )
STEP1、将preserveNullAndEmptyArrays设置为True
db.inventory.aggregate( [
   { $unwind: { path: "$sizes", preserveNullAndEmptyArrays: true } }
] )
STEP2、返回结果
{ "_id" : 1, "item" : "ABC", "sizes" : "S" }
{ "_id" : 1, "item" : "ABC", "sizes" : "M" }
{ "_id" : 1, "item" : "ABC", "sizes" : "L" }
{ "_id" : 2, "item" : "EFG" }
{ "_id" : 3, "item" : "IJK", "sizes" : "M" }
{ "_id" : 4, "item" : "LMN" }
{ "_id" : 5, "item" : "XYZ", "sizes" : null }
- 统计 $ count(aggregation)
【作用】统计传入到该阶段的文档数量。
【语法】{ $ count: }
是输出字段的名称,其计数值为其值。必须是非空字符串,不能以字符串开头$且不得包含该.字符。
【栗子】
STEP1、现有文档如下
{ "_id" : 1, "subject" : "History", "score" : 88 }
{ "_id" : 2, "subject" : "History", "score" : 92 }
{ "_id" : 3, "subject" : "History", "score" : 97 }
{ "_id" : 4, "subject" : "History", "score" : 71 }
{ "_id" : 5, "subject" : "History", "score" : 79 }
{ "_id" : 6, "subject" : "History", "score" : 83 }
STEP2、用两个管道阶段演示 $ count 功能
db.scores.aggregate(
  [
    {
      $match: {              #  =====》   在 $ match 阶段筛选出  score大于80的文档
        score: {
          $gt: 80
        }
      }
    },
    {
      $count: "passing_scores"      #  =====》   统计出上一阶段传到  $ count  阶段的总文档数,并将  passing_scores  作为结果的 key
    }
  ]
)
STEP3、输出结果
{ "passing_scores" : 4 } # 统计出 score 大于80 的文档有4个
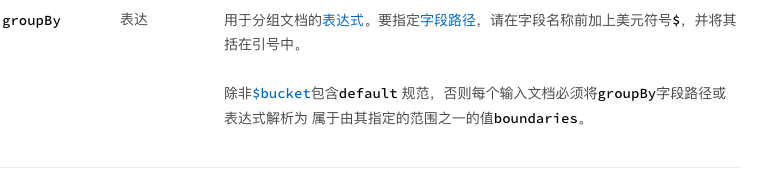
- $bucket (aggregation) 存储桶
【作用】根据指定的表达式和存储区边界,将传入的文档分组
【语法】
{
  $bucket: {
      groupBy: <expression>,
      boundaries: [ <lowerbound1>, <lowerbound2>, ... ],
      default: <literal>,
      output: {
         <output1>: { <$accumulator expression> },
         ...
         <outputN>: { <$accumulator expression> }
      }
   }
}
【参数】


【栗子】
STEP1、数据库中有以下文档
{ "_id" : 1, "title" : "The Pillars of Society", "artist" : "Grosz", "year" : 1926,
    "price" : NumberDecimal("199.99") }
{ "_id" : 2, "title" : "Melancholy III", "artist" : "Munch", "year" : 1902,
    "price" : NumberDecimal("280.00") }
{ "_id" : 3, "title" : "Dancer", "artist" : "Miro", "year" : 1925,
    "price" : NumberDecimal("76.04") }
{ "_id" : 4, "title" : "The Great Wave off Kanagawa", "artist" : "Hokusai",
    "price" : NumberDecimal("167.30") }
{ "_id" : 5, "title" : "The Persistence of Memory", "artist" : "Dali", "year" : 1931,
    "price" : NumberDecimal("483.00") }
{ "_id" : 6, "title" : "Composition VII", "artist" : "Kandinsky", "year" : 1913,
    "price" : NumberDecimal("385.00") }
{ "_id" : 7, "title" : "The Scream", "artist" : "Munch", "year" : 1893
    /* No price*/ }
{ "_id" : 8, "title" : "Blue Flower", "artist" : "O'Keefe", "year" : 1918,
    "price" : NumberDecimal("118.42") }
STEP2、根据price字段放入存储桶
db.artwork.aggregate( [
  {
    $bucket: {
      groupBy: "$price",              #  =====》  根据 price 放入存储桶
      boundaries: [ 0, 200, 400 ],                #  =====》   price 的值根据 0<=price<200  和 200<=price<400分成两组存入存储桶
      default: "Other",
      output: {
        "count": { $sum: 1 },                      #  =====》  统计每个阶段的总文档量
        "titles" : { $push: "$title" }                    #  =====》   title中push进 存储桶中文档的title值
      }
    }
  }
] )
- $ facet
在 $ facet 内可以使用多个 $ bucket 管道阶段。
【栗子】例子按price和year两个管道输出值
db.artwork.aggregate( [
  {
    $facet: {
      "price": [
        {
          $bucket: {                                  #   ======》 第一个  bucket  管道
              groupBy: "$price",
              boundaries: [ 0, 200, 400 ],
              default: "Other",
              output: {
                "count": { $sum: 1 },
                "artwork" : { $push: { "title": "$title", "price": "$price" } }
              }
          }
        }
      ],
      "year": [
        {
          $bucket: {              #      ======》 第二个  bucket  管道
            groupBy: "$year",
            boundaries: [ 1890, 1910, 1920, 1940 ],
            default: "Unknown",
            output: {
              "count": { $sum: 1 },
              "artwork": { $push: { "title": "$title", "year": "$year" } }
            }
          }
        }
      ]
    }
  }
] )
「输出结果如下」
{
  "year" : [                   #   ========》   由 year  管道产生出的值
    {
      "_id" : 1890,
      "count" : 2,
      "artwork" : [
        {
          "title" : "Melancholy III",
          "year" : 1902
        },
        {
          "title" : "The Scream",
          "year" : 1893
        }
      ]
    },
    {
      "_id" : 1910,
      "count" : 2,
      "artwork" : [
        {
          "title" : "Composition VII",
          "year" : 1913
        },
        {
          "title" : "Blue Flower",
          "year" : 1918
        }
      ]
    },
    {
      "_id" : 1920,
      "count" : 3,
      "artwork" : [
        {
          "title" : "The Pillars of Society",
          "year" : 1926
        },
        {
          "title" : "Dancer",
          "year" : 1925
        },
        {
          "title" : "The Persistence of Memory",
          "year" : 1931
        }
      ]
    },
    {
      // Includes the document without a year, e.g., _id: 4
      "_id" : "Unknown",
      "count" : 1,
      "artwork" : [
        {
          "title" : "The Great Wave off Kanagawa"
        }
      ]
    }
  ],
      "price" : [                              #   ========》   由   price  管道产生出的值
    {
      "_id" : 0,
      "count" : 4,
      "artwork" : [
        {
          "title" : "The Pillars of Society",
          "price" : NumberDecimal("199.99")
        },
        {
          "title" : "Dancer",
          "price" : NumberDecimal("76.04")
        },
        {
          "title" : "The Great Wave off Kanagawa",
          "price" : NumberDecimal("167.30")
        },
        {
          "title" : "Blue Flower",
          "price" : NumberDecimal("118.42")
        }
      ]
    },
    {
      "_id" : 200,
      "count" : 2,
      "artwork" : [
        {
          "title" : "Melancholy III",
          "price" : NumberDecimal("280.00")
        },
        {
          "title" : "Composition VII",
          "price" : NumberDecimal("385.00")
        }
      ]
    },
    {
      // Includes the document without a price, e.g., _id: 7
      "_id" : "Other",
      "count" : 2,
      "artwork" : [
        {
          "title" : "The Persistence of Memory",
          "price" : NumberDecimal("483.00")
        },
        {
          "title" : "The Scream"
        }
      ]
    }
  ]
}
- $bucketAuto (aggregation) 自动分组的存储桶
【作用】自动按给定的数量平均划分界限,并将文档分组到每个桶中
【语法】
{
  $bucketAuto: {
      groupBy: <expression>,
      buckets: <number>,
      output: {
         <output1>: { <$accumulator expression> },
         ...
      }
      granularity: <string>
  }
}
【参数】


【栗子】
STEP1、数据库有以下文档
{ "_id" : 1, "title" : "The Pillars of Society", "artist" : "Grosz", "year" : 1926,
    "price" : NumberDecimal("199.99"),
    "dimensions" : { "height" : 39, "width" : 21, "units" : "in" } }
{ "_id" : 2, "title" : "Melancholy III", "artist" : "Munch", "year" : 1902,
    "price" : NumberDecimal("280.00"),
    "dimensions" : { "height" : 49, "width" : 32, "units" : "in" } }
{ "_id" : 3, "title" : "Dancer", "artist" : "Miro", "year" : 1925,
    "price" : NumberDecimal("76.04"),
    "dimensions" : { "height" : 25, "width" : 20, "units" : "in" } }
{ "_id" : 4, "title" : "The Great Wave off Kanagawa", "artist" : "Hokusai",
    "price" : NumberDecimal("167.30"),
    "dimensions" : { "height" : 24, "width" : 36, "units" : "in" } }
{ "_id" : 5, "title" : "The Persistence of Memory", "artist" : "Dali", "year" : 1931,
    "price" : NumberDecimal("483.00"),
    "dimensions" : { "height" : 20, "width" : 24, "units" : "in" } }
{ "_id" : 6, "title" : "Composition VII", "artist" : "Kandinsky", "year" : 1913,
    "price" : NumberDecimal("385.00"),
    "dimensions" : { "height" : 30, "width" : 46, "units" : "in" } }
{ "_id" : 7, "title" : "The Scream", "artist" : "Munch",
    "price" : NumberDecimal("159.00"),
    "dimensions" : { "height" : 24, "width" : 18, "units" : "in" } }
{ "_id" : 8, "title" : "Blue Flower", "artist" : "O'Keefe", "year" : 1918,
    "price" : NumberDecimal("118.42"),
    "dimensions" : { "height" : 24, "width" : 20, "units" : "in" } }
STEP2、使用单个自动分组的存储桶
db.artwork.aggregate( [
   {
     $bucketAuto: {
         groupBy: "$price",
         buckets: 4
     }
   }
] )
STEP3、返回结果,按 buckets值分成4组
{
  "_id" : {
    "min" : NumberDecimal("76.04"),
    "max" : NumberDecimal("159.00")
  },
  "count" : 2
}
{
  "_id" : {
    "min" : NumberDecimal("159.00"),
    "max" : NumberDecimal("199.99")
  },
  "count" : 2
}
{
  "_id" : {
    "min" : NumberDecimal("199.99"),
    "max" : NumberDecimal("385.00")
  },
  "count" : 2
}
{
  "_id" : {
    "min" : NumberDecimal("385.00"),
    "max" : NumberDecimal("483.00")
  },
  "count" : 2
}
- 也可以使用 $ facet 创建多个存储桶
【栗子】
db.artwork.aggregate( [
  {
    $facet: {
      "price": [
        {
          $bucketAuto: {
            groupBy: "$price",
            buckets: 4
          }
        }
      ],
      "year": [
        {
          $bucketAuto: {
            groupBy: "$year",
            buckets: 3,
            output: {
              "count": { $sum: 1 },
              "years": { $push: "$year" }
            }
          }
        }
      ],
      "area": [
        {
          $bucketAuto: {
            groupBy: {
              $multiply: [ "$dimensions.height", "$dimensions.width" ]
            },
            buckets: 4,
            output: {
              "count": { $sum: 1 },
              "titles": { $push: "$title" }
            }
          }
        }
      ]
    }
  }
] )
输出结果如下:
{
  "area" : [                        #   ========》   area存储桶结果
    {
      "_id" : { "min" : 432, "max" : 500 },
      "count" : 3,
      "titles" : [
        "The Scream",
        "The Persistence of Memory",
        "Blue Flower"
      ]
    },
    {
      "_id" : { "min" : 500, "max" : 864 },
      "count" : 2,
      "titles" : [
        "Dancer",
        "The Pillars of Society"
      ]
    },
    {
      "_id" : { "min" : 864, "max" : 1568 },
      "count" : 2,
      "titles" : [
        "The Great Wave off Kanagawa",
        "Composition VII"
      ]
    },
    {
      "_id" : { "min" : 1568, "max" : 1568 },
      "count" : 1,
      "titles" : [
        "Melancholy III"
      ]
    }
  ],
  "price" : [                       #   ========》   price 存储桶结果
    {
      "_id" : { "min" : NumberDecimal("76.04"), "max" : NumberDecimal("159.00") },
      "count" : 2
    },
    {
      "_id" : { "min" : NumberDecimal("159.00"), "max" : NumberDecimal("199.99") },
      "count" : 2
    },
    {
      "_id" : { "min" : NumberDecimal("199.99"), "max" : NumberDecimal("385.00") },
      "count" : 2 },
    {
      "_id" : { "min" : NumberDecimal("385.00"), "max" : NumberDecimal("483.00") },
      "count" : 2
    }
  ],
  "year" : [                       #   ========》   year   存储桶结果
    { "_id" : { "min" : null, "max" : 1913 }, "count" : 3, "years" : [ 1902 ] },
    { "_id" : { "min" : 1913, "max" : 1926 }, "count" : 3, "years" : [ 1913, 1918, 1925 ] },
    { "_id" : { "min" : 1926, "max" : 1931 }, "count" : 2, "years" : [ 1926, 1931 ] }
  ]
}
-
$ currentOp(aggregate)
【作用】返回包含有关活动和/或休眠操作的信息的文档流,以及作为事务的一部分持有锁的非活动会话
原文地址: https://docs.mongodb.com/manual/reference/operator/aggregation/currentOp/ -
$ collStats(aggregate)
【作用】返回有关集合或视图的统计信息
原文地址: https://docs.mongodb.com/manual/reference/operator/aggregation/collStats/ -
$ facet(aggregate)
【作用】在同一组输入文档的单个阶段内处理多个聚合管道。每个子管道在输出文档中都有自己的字段,其结果存储为文档数组。
【语法】
{  $ facet :
   {
      < outputField1 >: [  < stage1 > , < stage2 > , ...  ],
      < outputField2 >: [  < stage1 > , < stage2 > , ...  ],
      ...

   }
}
原文地址: https://docs.mongodb.com/manual/reference/operator/aggregation/facet/
-
$ geoNear(aggregate) # ===》 这是一个基于地理信息的聚合阶段,暂时只贴出原文地址
【作用】以距离指定点最近的顺序输出文档。
原文地址: https://docs.mongodb.com/manual/reference/operator/aggregation/geoNear/ -
$ graphLookup(aggregate)
【作用】对集合执行递归搜索,其中包含通过递归深度和查询过滤器限制搜索的选项。
【语法】
{
   $graphLookup: {
      from: <collection>,
      startWith: <expression>,
      connectFromField: <string>,
      connectToField: <string>,
      as: <string>,
      maxDepth: <number>,
      depthField: <string>,
      restrictSearchWithMatch: <document>
   }
}
【参数】


原文地址: https://docs.mongodb.com/manual/reference/operator/aggregation/graphLookup/
