目录
参考:LearnOpenGL
最终结果
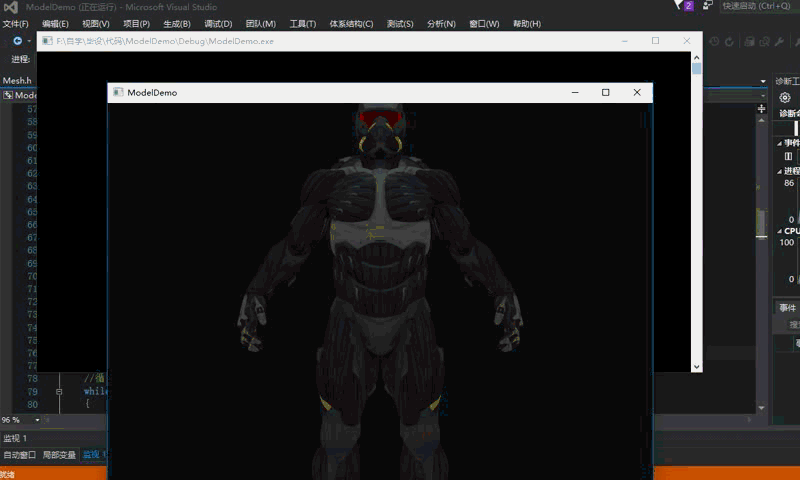

注:由于CSDN上传的gif不能超过5兆,所以比较模糊,最后有清晰结果截图。
加载前的准备
见上一篇文章:下载并编译Assimp
配置Assimp
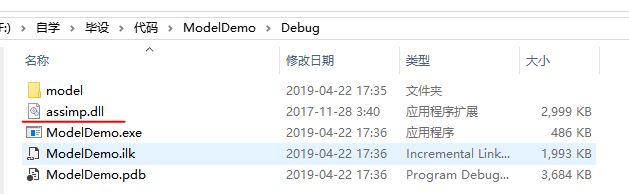
.dll文件的配置
将生成的.dll文件放在.exe文件的同级目录下
.lib文件的配置
将生成的.lib文件放到你的库目录下,并在项目的附加依赖中添加.lib文件

assimp文件的配置
在include下的assimmp文件放到你的库目录下

在你的模型加载类中包含头文件
#include <assimp/Importer.hpp>        //assimp库头文件
#include <assimp/scene.h>
#include <assimp/postprocess.h>
举个栗子
代码
Mesh.h
#pragma once
#include <glad/glad.h> // 所有头文件
#include <glm/glm.hpp>
#include <glm/gtc/matrix_transform.hpp>
#include "Shader.h"
#include <string>
#include <fstream>
#include <sstream>
#include <iostream>
#include <vector>
using namespace std;
//顶点
struct Vertex {
	// 位置
	glm::vec3 Position;
	// 法向量
	glm::vec3 Normal;
	// 纹理坐标
	glm::vec2 TexCoords;
	// u向量
	glm::vec3 Tangent;
	// v向量
	glm::vec3 Bitangent;
};
//纹理
struct Texture {
	unsigned int id;
	string type;
	string path;
};
//Mesh类
class Mesh {
public:
	/*  Mesh 数据  */
	vector<Vertex> vertices;
	vector<unsigned int> indices;
	vector<Texture> textures;
	unsigned int VAO;

	/*  函数  */
	// 构造函数 参数:顶点 索引 纹理
	Mesh(vector<Vertex> vertices, vector<unsigned int> indices, vector<Texture> textures)
	{
		this->vertices = vertices;
		this->indices = indices;
		this->textures = textures;
		// 现在我们拥有了所有必需的数据,设置顶点缓冲区及其属性指针。
		setupMesh();
	}

	// 画网格模型
	void Draw(Shader shader)
	{
		// 绑定适当的纹理
		unsigned int diffuseNr = 1;
		unsigned int specularNr = 1;
		unsigned int normalNr = 1;
		unsigned int heightNr = 1;
		for (unsigned int i = 0; i < textures.size(); i++)
		{
			glActiveTexture(GL_TEXTURE0 + i); // 绑定前激活适当的纹理单元
											  // 获取纹理编号(diffuse_textureN中的N)
			string number;
			string name = textures[i].type;
			if (name == "texture_diffuse")
				number = std::to_string(diffuseNr++);
			else if (name == "texture_specular")
				number = std::to_string(specularNr++);
			else if (name == "texture_normal")
				number = std::to_string(normalNr++);
			else if (name == "texture_height")
				number = std::to_string(heightNr++);
		    // 现在将采样器设置为正确的纹理单元
			glUniform1i(glGetUniformLocation(shader.ID, (name + number).c_str()), i);
			// 最后绑定纹理
			glBindTexture(GL_TEXTURE_2D, textures[i].id);
		}
		// 画网格
		glBindVertexArray(VAO);
		glDrawElements(GL_TRIANGLES, indices.size(), GL_UNSIGNED_INT, 0);
		glBindVertexArray(0);
		// 一旦配置完毕将一切设置回默认值总是很好的做法,。
		glActiveTexture(GL_TEXTURE0);
	}

private:
	/*  渲染数据  */
	unsigned int VBO, EBO;

	/*  函数    */
	// 初始化所有缓冲区对象/数组
	void setupMesh()
	{
		// 创建缓冲区/数组
		glGenVertexArrays(1, &VAO);
		glGenBuffers(1, &VBO);
		glGenBuffers(1, &EBO);

		glBindVertexArray(VAO);
		//将数据加载到顶点缓冲区中
		glBindBuffer(GL_ARRAY_BUFFER, VBO);
		// 关于结构的一个好处是它们的内存布局对于它的所有项都是顺序的。
		// 结果是我们可以简单地将指针传递给结构,并且它完美地转换为glm :: vec3 / 2数组,该数组再次转换为3/2浮点数,转换为字节数组。
		glBufferData(GL_ARRAY_BUFFER, vertices.size() * sizeof(Vertex), &vertices[0], GL_STATIC_DRAW);
		glBindBuffer(GL_ELEMENT_ARRAY_BUFFER, EBO);
		glBufferData(GL_ELEMENT_ARRAY_BUFFER, indices.size() * sizeof(unsigned int), &indices[0], GL_STATIC_DRAW);
		// 设置顶点属性指针
		// 顶点位置
		glEnableVertexAttribArray(0);
		glVertexAttribPointer(0, 3, GL_FLOAT, GL_FALSE, sizeof(Vertex), (void*)0);
		// 顶点法线
		glEnableVertexAttribArray(1);
		glVertexAttribPointer(1, 3, GL_FLOAT, GL_FALSE, sizeof(Vertex), (void*)offsetof(Vertex, Normal));
		// 顶点纹理坐标
		glEnableVertexAttribArray(2);
		glVertexAttribPointer(2, 2, GL_FLOAT, GL_FALSE, sizeof(Vertex), (void*)offsetof(Vertex, TexCoords));
		// u向量
		glEnableVertexAttribArray(3);
		glVertexAttribPointer(3, 3, GL_FLOAT, GL_FALSE, sizeof(Vertex), (void*)offsetof(Vertex, Tangent));
		// v向量
		glEnableVertexAttribArray(4);
		glVertexAttribPointer(4, 3, GL_FLOAT, GL_FALSE, sizeof(Vertex), (void*)offsetof(Vertex, Bitangent));
		glBindVertexArray(0);
	}
};
Model.h
#pragma once
#include <glad/glad.h>                 //所有头文件
#include <glm/glm.hpp>
#include <glm/gtc/matrix_transform.hpp>
#define STB_IMAGE_IMPLEMENTATION        //原作者没写
#include <stb_image.h>
#include <assimp/Importer.hpp>        //assimp库头文件
#include <assimp/scene.h>
#include <assimp/postprocess.h>
#include "Mesh.h"
#include "Shader.h"

#include <string>
#include <fstream>
#include <sstream>
#include <iostream>
#include <map>
#include <vector>
using namespace std;
//从文件中读取纹理
unsigned int TextureFromFile(const char *path, const string &directory, bool gamma = false);
//Model类
class Model
{
public:
	/*  Model数据 */
	//存储到目前为止加载的所有纹理,优化以确保纹理不会被加载多次。
	vector<Texture> textures_loaded;
	vector<Mesh> meshes;
	string directory;
	bool gammaCorrection;

	/*  函数  */
	// 构造汉化,需要一个3D模型的文件路径
	Model(string const &path, bool gamma = false) : gammaCorrection(gamma)
	{
		loadModel(path);
	}

	// 绘制模型,从而绘制所有网格
	void Draw(Shader shader)
	{
		for (unsigned int i = 0; i < meshes.size(); i++)
			meshes[i].Draw(shader);
	}

private:
	/*  函数   */
	// 从文件加载支持ASSIMP扩展的模型,并将生成的网格存储在网格矢量中。
	void loadModel(string const &path)
	{
		// 通过ASSIMP读文件
		Assimp::Importer importer;
		const aiScene* scene = importer.ReadFile(path, aiProcess_Triangulate | aiProcess_FlipUVs | aiProcess_CalcTangentSpace);
		// 检查错误
		if (!scene || scene->mFlags & AI_SCENE_FLAGS_INCOMPLETE || !scene->mRootNode) // 如果不是0
		{
			cout << "错误::ASSIMP:: " << importer.GetErrorString() << endl;
			return;
		}
		// 检索文件路径的目录路径
		directory = path.substr(0, path.find_last_of('/'));

		// 以递归方式处理ASSIMP的根节点
		processNode(scene->mRootNode, scene);
	}

	// 以递归方式处理节点。 处理位于节点处的每个单独网格,并在其子节点(如果有)上重复此过程。
	void processNode(aiNode *node, const aiScene *scene)
	{
		// 处理位于当前节点的每个网格
		for (unsigned int i = 0; i < node->mNumMeshes; i++)
		{
			// 节点对象仅包含索引用来索引场景中的实际对象。
			// 场景包含所有数据,节点只是为了有组织的保存东西(如节点之间的关系)。
			aiMesh* mesh = scene->mMeshes[node->mMeshes[i]];
			meshes.push_back(processMesh(mesh, scene));
		}
		// 在我们处理完所有网格(如果有的话)后,我们会递归处理每个子节点
		for (unsigned int i = 0; i < node->mNumChildren; i++)
		{
			processNode(node->mChildren[i], scene);
		}
	}

	Mesh processMesh(aiMesh *mesh, const aiScene *scene)
	{
		// 要填写的数据
		vector<Vertex> vertices;
		vector<unsigned int> indices;
		vector<Texture> textures;

		// 遍历每个网格的顶点
		for (unsigned int i = 0; i < mesh->mNumVertices; i++)
		{
			Vertex vertex;
           // 我们声明一个占位符向量,因为assimp使用它自己的向量类,它不直接转换为glm的vec3类,所以我们首先将数据传递给这个占位符glm :: vec3。
			glm::vec3 vector;
			// 位置
			vector.x = mesh->mVertices[i].x;
			vector.y = mesh->mVertices[i].y;
			vector.z = mesh->mVertices[i].z;
			vertex.Position = vector;
			// 法线
			vector.x = mesh->mNormals[i].x;
			vector.y = mesh->mNormals[i].y;
			vector.z = mesh->mNormals[i].z;
			vertex.Normal = vector;
			// 纹理坐标
			if (mesh->mTextureCoords[0]) // 网格是否包含纹理坐标?
			{
				glm::vec2 vec;
				// 顶点最多可包含8个不同的纹理坐标。 因此,我们假设我们不会使用顶点可以具有多个纹理坐标的模型,因此我们总是采用第一个集合(0)。
				vec.x = mesh->mTextureCoords[0][i].x;
				vec.y = mesh->mTextureCoords[0][i].y;
				vertex.TexCoords = vec;
			}
			else
				vertex.TexCoords = glm::vec2(0.0f, 0.0f);
			// u向量
			vector.x = mesh->mTangents[i].x;
			vector.y = mesh->mTangents[i].y;
			vector.z = mesh->mTangents[i].z;
			vertex.Tangent = vector;
			// v向量
			vector.x = mesh->mBitangents[i].x;
			vector.y = mesh->mBitangents[i].y;
			vector.z = mesh->mBitangents[i].z;
			vertex.Bitangent = vector;
			vertices.push_back(vertex);
		}
		//现在遍历每个网格面(一个面是一个三角形的网格)并检索相应的顶点索引。
		for (unsigned int i = 0; i < mesh->mNumFaces; i++)
		{
			aiFace face = mesh->mFaces[i];
			// 检索面的所有索引并将它们存储在索引向量中
			for (unsigned int j = 0; j < face.mNumIndices; j++)
				indices.push_back(face.mIndices[j]);
		}
		// 加工材料
		aiMaterial* material = scene->mMaterials[mesh->mMaterialIndex];
		// 我们假设着色器中的采样器名称约定。 每个漫反射纹理应命名为'texture_diffuseN',其中N是从1到MAX_SAMPLER_NUMBER的序列号。
		//同样适用于其他纹理,如下列总结:
		// diffuse: texture_diffuseN
		// specular: texture_specularN
		// normal: texture_normalN

		// 1. 漫反射贴图
		vector<Texture> diffuseMaps = loadMaterialTextures(material, aiTextureType_DIFFUSE, "texture_diffuse");
		textures.insert(textures.end(), diffuseMaps.begin(), diffuseMaps.end());
		// 2. 高光贴图
		vector<Texture> specularMaps = loadMaterialTextures(material, aiTextureType_SPECULAR, "texture_specular");
		textures.insert(textures.end(), specularMaps.begin(), specularMaps.end());
		// 3.法线贴图
		std::vector<Texture> normalMaps = loadMaterialTextures(material, aiTextureType_HEIGHT, "texture_normal");
		textures.insert(textures.end(), normalMaps.begin(), normalMaps.end());
		// 4. 高度贴图
		std::vector<Texture> heightMaps = loadMaterialTextures(material, aiTextureType_AMBIENT, "texture_height");
		textures.insert(textures.end(), heightMaps.begin(), heightMaps.end());

		// 返回从提取的网格数据创建的网格对象
		return Mesh(vertices, indices, textures);
	}

	// 检查给定类型的所有材质纹理,如果尚未加载纹理,则加载纹理。
	// 所需信息作为Texture结构返回。
	vector<Texture> loadMaterialTextures(aiMaterial *mat, aiTextureType type, string typeName)
	{
		vector<Texture> textures;
		for (unsigned int i = 0; i < mat->GetTextureCount(type); i++)
		{
			aiString str;
			mat->GetTexture(type, i, &str);
			// 检查之前是否加载了纹理,如果是,则继续下一次迭代:跳过加载新纹理
			bool skip = false;
			for (unsigned int j = 0; j < textures_loaded.size(); j++)
			{
				if (std::strcmp(textures_loaded[j].path.data(), str.C_Str()) == 0)
				{
					textures.push_back(textures_loaded[j]);
					skip = true;
					break;// 已加载具有相同文件路径的纹理,继续下一个(优化)。
				}
			}
			if (!skip)
			{   // 如果尚未加载纹理,请加载它
				Texture texture;
				texture.id = TextureFromFile(str.C_Str(), this->directory);
				texture.type = typeName;
				texture.path = str.C_Str();
				textures.push_back(texture);
				textures_loaded.push_back(texture);  //将其存储为整个模型加载的纹理,以确保我们不会加载重复纹理。
			}
		}
		return textures;
	}
};
//从文件读取纹理函数
unsigned int TextureFromFile(const char *path, const string &directory, bool gamma)
{
	string filename = string(path);
	filename = directory + '/' + filename;

	unsigned int textureID;
	glGenTextures(1, &textureID);

	int width, height, nrComponents;
	unsigned char *data = stbi_load(filename.c_str(), &width, &height, &nrComponents, 0);
	if (data)
	{
		GLenum format;
		if (nrComponents == 1)
			format = GL_RED;
		else if (nrComponents == 3)
			format = GL_RGB;
		else if (nrComponents == 4)
			format = GL_RGBA;

		glBindTexture(GL_TEXTURE_2D, textureID);
		glTexImage2D(GL_TEXTURE_2D, 0, format, width, height, 0, format, GL_UNSIGNED_BYTE, data);
		glGenerateMipmap(GL_TEXTURE_2D);

		glTexParameteri(GL_TEXTURE_2D, GL_TEXTURE_WRAP_S, GL_REPEAT);
		glTexParameteri(GL_TEXTURE_2D, GL_TEXTURE_WRAP_T, GL_REPEAT);
		glTexParameteri(GL_TEXTURE_2D, GL_TEXTURE_MIN_FILTER, GL_LINEAR_MIPMAP_LINEAR);
		glTexParameteri(GL_TEXTURE_2D, GL_TEXTURE_MAG_FILTER, GL_LINEAR);

		stbi_image_free(data);
	}
	else
	{
		std::cout << "纹理无法从此路径加载: " << path << std::endl;
		stbi_image_free(data);
	}
	return textureID;
}
main.cpp
//头文件
#include <glad/glad.h>
#include <GLFW/glfw3.h>
#include <glm/glm.hpp>
#include <glm/gtc/matrix_transform.hpp>
#include <glm/gtc/type_ptr.hpp>
#include "Shader.h"
#include "Camera.h"
#include "Model.h"
#include <iostream>
//-----------------------------------函数声明-------------------------------------------
void framebuffer_size_callback(GLFWwindow* window, int width, int height);
void mouse_callback(GLFWwindow* window, double xpos, double ypos);
void scroll_callback(GLFWwindow* window, double xoffset, double yoffset);
void processInput(GLFWwindow *window);
//-------------------------------------全局变量-------------------------------------------
//窗体宽高
const unsigned int SCR_WIDTH = 800;
const unsigned int SCR_HEIGHT = 600;
//摄像机相关
Camera camera(glm::vec3(0.0f, 0.0f, 3.0f));
float lastX = SCR_WIDTH / 2.0f;
float lastY = SCR_HEIGHT / 2.0f;
bool firstMouse = true;
// 时间
float deltaTime = 0.0f;
float lastFrame = 0.0f;
//主函数
int main()
{
	// glfw: 初始化和配置
	glfwInit();
	glfwWindowHint(GLFW_CONTEXT_VERSION_MAJOR, 3);
	glfwWindowHint(GLFW_CONTEXT_VERSION_MINOR, 3);
	glfwWindowHint(GLFW_OPENGL_PROFILE, GLFW_OPENGL_CORE_PROFILE);

#ifdef __APPLE__
	glfwWindowHint(GLFW_OPENGL_FORWARD_COMPAT, GL_TRUE); // uncomment this statement to fix compilation on OS X
#endif

	// glfw 窗体创建
	GLFWwindow* window = glfwCreateWindow(SCR_WIDTH, SCR_HEIGHT, "ModelDemo", NULL, NULL);
	if (window == NULL)
	{
		std::cout << "创建GLFW窗体失败" << std::endl;
		glfwTerminate();
		return -1;
	}
	glfwMakeContextCurrent(window);
	glfwSetFramebufferSizeCallback(window, framebuffer_size_callback);
	glfwSetCursorPosCallback(window, mouse_callback);
	glfwSetScrollCallback(window, scroll_callback);

	// 鼠标滑动回调函数
	glfwSetInputMode(window, GLFW_CURSOR, GLFW_CURSOR_DISABLED);

	// glad: load all OpenGL function pointers
	if (!gladLoadGLLoader((GLADloadproc)glfwGetProcAddress))
	{
		std::cout << "Failed to initialize GLAD" << std::endl;
		return -1;
	}

	// 设置全局opengl状态
	glEnable(GL_DEPTH_TEST);//开启深度测试

	//创建并编译shader
	Shader ourShader("vertexSource.txt", "fragmentSource.txt");

	// 加载模型
	//FileSystem::getPath("resources/objects/nanosuit/nanosuit.obj")
	//修改为相对路径
	Model ourModel("../Debug/model/nanosuit/nanosuit.obj");
	//Model ourModel("../Debug/model/warrior/arakkoa_warrior.obj");
	// draw in wireframe
	//glPolygonMode(GL_FRONT_AND_BACK, GL_LINE);

	//循环渲染
	while (!glfwWindowShouldClose(window))
	{
		//获取时间
		float currentFrame = glfwGetTime();
		deltaTime = currentFrame - lastFrame;
		lastFrame = currentFrame;
		// 键盘输入
		processInput(window);
		// 渲染
		glClearColor(0.05f, 0.05f, 0.05f, 1.0f);
		glClear(GL_COLOR_BUFFER_BIT | GL_DEPTH_BUFFER_BIT);
		// 设置uniforms前使用Shader
		ourShader.use();
		// view/projection矩阵
		glm::mat4 projection = glm::perspective(glm::radians(camera.Zoom), (float)SCR_WIDTH / (float)SCR_HEIGHT, 0.1f, 100.0f);
		glm::mat4 view = camera.GetViewMatrix();
		ourShader.setMat4("projection", projection);
		ourShader.setMat4("view", view);
		// 渲染加载的3d模型
		glm::mat4 model = glm::mat4(1.0f);
		//使其位于场景的中心
		model = glm::translate(model, glm::vec3(0.0f, -1.75f, 0.0f));
		//缩小它
		model = glm::scale(model, glm::vec3(0.2f, 0.2f, 0.2f));
		ourShader.setMat4("model", model);
		ourModel.Draw(ourShader);
		// glfw: 交换缓冲区和轮询IO事件(按下/释放按键,移动鼠标等)
		glfwSwapBuffers(window);
		glfwPollEvents();
	}

	// glfw: 终止,清除所有先前分配的GLFW资源。
	glfwTerminate();
	return 0;
}
//键盘按键控制
void processInput(GLFWwindow *window)
{
	if (glfwGetKey(window, GLFW_KEY_ESCAPE) == GLFW_PRESS)
		glfwSetWindowShouldClose(window, true);
	if (glfwGetKey(window, GLFW_KEY_W) == GLFW_PRESS)
		camera.ProcessKeyboard(Camera::FORWARD, deltaTime);
	if (glfwGetKey(window, GLFW_KEY_S) == GLFW_PRESS)
		camera.ProcessKeyboard(Camera::BACKWARD, deltaTime);
	if (glfwGetKey(window, GLFW_KEY_A) == GLFW_PRESS)
		camera.ProcessKeyboard(Camera::LEFT, deltaTime);
	if (glfwGetKey(window, GLFW_KEY_D) == GLFW_PRESS)
		camera.ProcessKeyboard(Camera::RIGHT, deltaTime);
}

// glfw: 窗口改变回调函数
void framebuffer_size_callback(GLFWwindow* window, int width, int height)
{
	glViewport(0, 0, width, height);
}

// glfw: 鼠标滑动回调函数
void mouse_callback(GLFWwindow* window, double xpos, double ypos)
{
	if (firstMouse)
	{
		lastX = xpos;
		lastY = ypos;
		firstMouse = false;
	}
	float xoffset = xpos - lastX;
	float yoffset = lastY - ypos;
	lastX = xpos;
	lastY = ypos;
	camera.ProcessMouseMovement(xoffset, yoffset);
}
// glfw: 鼠标滚轮回调函数
void scroll_callback(GLFWwindow* window, double xoffset, double yoffset)
{
	camera.ProcessMouseScroll(yoffset);
}
注意项
采用相对路径,.obj文件及所用图片放在同一文件夹内
着色器类增加了一个setMat4函数,照之前的坐标系统那一篇文章加上就好
Model类中,包含stb_image.h前需要宏定义 #define STB_IMAGE_IMPLEMENTATION

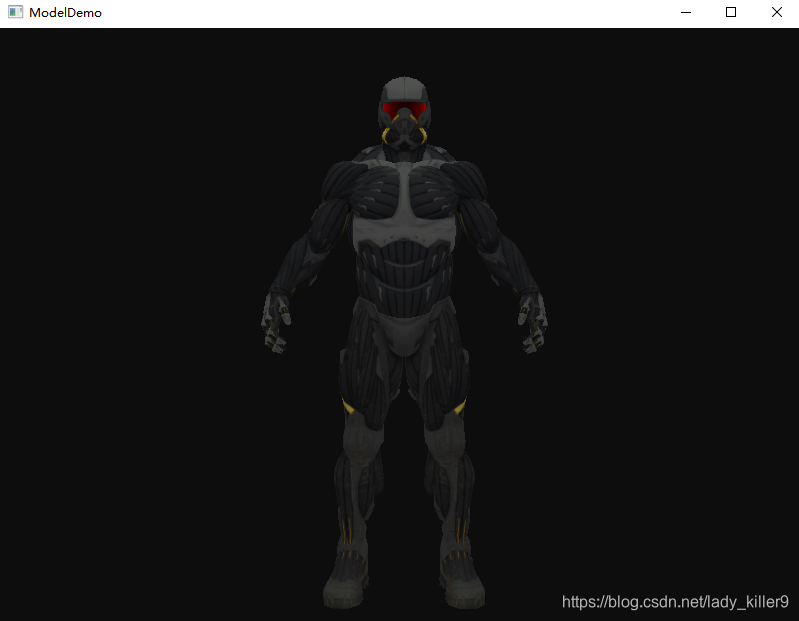
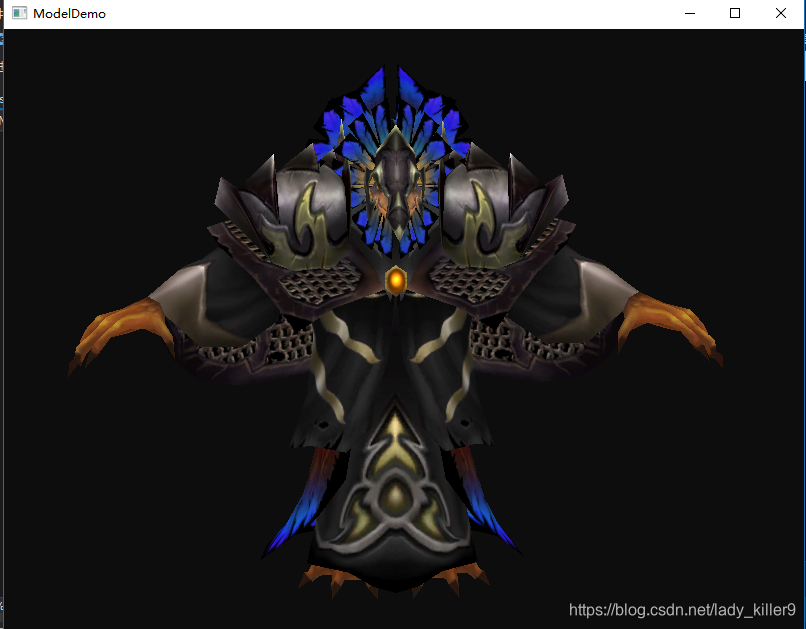
结果截图
资源下载
https://download.csdn.net/download/lady_killer9/11139745
更多OpenGL知识:现代OpenGL入门教程
有问题请下方评论,转载请注明出处,并附有原文链接,谢谢!如有侵权,请及时联系。
