先添加jar包
<dependencies>
        <dependency>
            <groupId>junit</groupId>
            <artifactId>junit</artifactId>
            <scope>test</scope>
        </dependency>
        <!--spring-core-->
        <dependency>
            <groupId>org.springframework</groupId>
            <artifactId>spring-core</artifactId>
        </dependency>
        <!--spring-bean-->
        <!-- https://mvnrepository.com/artifact/org.springframework/spring-beans -->
        <dependency>
            <groupId>org.springframework</groupId>
            <artifactId>spring-beans</artifactId>
        </dependency>
        <!--spring-context-->
        <dependency>
            <groupId>org.springframework</groupId>
            <artifactId>spring-context</artifactId>
        </dependency>
        <!--spring-expression-->
        <dependency>
            <groupId>org.springframework</groupId>
            <artifactId>spring-expression</artifactId>
        </dependency>
    </dependencies>
第二步创建配置文件spring.xml
<?xml version="1.0" encoding="UTF-8"?>
<beans xmlns="http://www.springframework.org/schema/beans"
       xmlns:xsi="http://www.w3.org/2001/XMLSchema-instance"
       xsi:schemaLocation="http://www.springframework.org/schema/beans http://www.springframework.org/schema/beans/spring-beans.xsd">

</beans>
第三步书写一个类User
package com.ioc10.entity;

import java.io.IOException;
import java.util.Properties;

/**
 * package_name:com.ioc10.entity
 * Author:徐亚远
 * Date:2020/1/29 11:48
 * 项目名:springDemo01
 * Desription:
 **/
public class User {
    private String username;
    private String password;
    private String sex;

    /*无参构造方法*/
    public User() {
        System.out.println("无参构造方法");
    }

    /*有参构造方法*/
    public User(String username, String password, String sex) {
        this.username = username;
        this.password = password;
        this.sex = sex;
        System.out.println("有参构造方法");
    }

    @Override
    public String toString() {
        return "User{" +
                "username='" + username + '\'' +
                ", password='" + password + '\'' +
                ", sex='" + sex + '\'' +
                '}';
    }

    public String getUsername() {
        return username;
    }

    public void setUsername(String username) {
        this.username = username;
    }

    public String getPassword() {
        return password;
    }

    public void setPassword(String password) {
        this.password = password;
    }

    public String getSex() {
        return sex;
    }

    public void setSex(String sex) {
        this.sex = sex;
    }

    public void init() {
        this.username = reveale(username);
        this.password = reveale(password);
        this.sex = reveale(sex);
    }

    private String reveale(String value) {
        if (value == null || "".equals(value)) {
            return value;
        }
        //截取字符串
        if (value.startsWith("${") && value.endsWith("}")) {
            String key = value.substring(2, value.length() - 1);
            try {
                return getproperty(key);
            } catch (Exception e) {
                e.printStackTrace();
            }
        }
        return value;
    }

    //根据Key获取value
    private String getproperty(String key) throws Exception {
        Properties properties = new Properties();
        properties.load(User.class.getClassLoader().getResourceAsStream("ioc10/info.properties"));
        if (properties.containsKey(key)) {
            return properties.getProperty(key);
        } else {
            throw new RuntimeException("not found key:" + key + "in this properties");
        }
    }
}
第四步 配置spring.xml文件
<?xml version="1.0" encoding="UTF-8"?>
<beans xmlns="http://www.springframework.org/schema/beans"
       xmlns:xsi="http://www.w3.org/2001/XMLSchema-instance"
       xsi:schemaLocation="http://www.springframework.org/schema/beans http://www.springframework.org/schema/beans/spring-beans.xsd">

    <!--
      通过构造方法实例化,无参形式
      <property name="username" value="${username}"/>
      <property/> 表示实例化之后进行数据装配
      -->
     <bean id="user" class="com.ioc10.entity.User" init-method="init">
         <property name="username" value="${username}"/>
         <property name="password" value="${password}"/>
         <property name="sex" value="${sex}"/>
     </bean>
</beans>
配置info.properties文件
username=admin
password=admin
sex=man
第五步书写测试方法UserController
package com.ioc10.controller;

import com.ioc10.entity.User;
import org.springframework.context.ApplicationContext;
import org.springframework.context.support.ClassPathXmlApplicationContext;

/**
 * package_name:com.ioc10.controller
 * Author:徐亚远
 * Date:2020/1/29 11:49
 * 项目名:springDemo01
 * Desription:
 **/
public class UserController {
    public static void main(String args []){
        ApplicationContext ac = new ClassPathXmlApplicationContext("ioc10/spring.xml");
       User user = (User) ac.getBean("user");
        System.out.println("user:"+user);
    }
}
运行结果如图

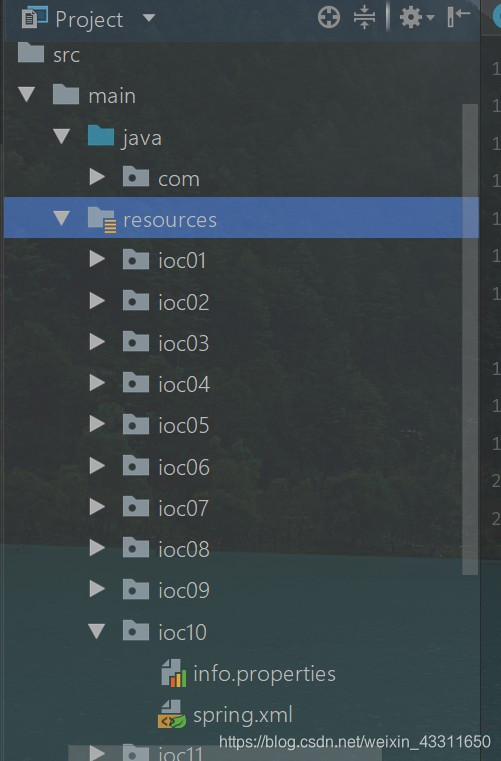
目录结构如图

