Aop原理
SpringAop 原理就是动态代理
对于实现接口的目标类使用的是jdk动态代理
对于没有实现任何接口的目标类,使用的是cglib的动态代理
代理类是程序在运行期间由JVM根据反射等机制动态生成的自动生成代理类和代理对象。
所谓动态就是指在程序运行前不存在代理类的字节码文件。
SpringAop的配置方式
三种配置方式
一:SpringAop1.x 使用ProxyFactoryBean手动埃利
二:SpringAop2.x 基于命名控件的配置
三:Annotation 基于注解的配置(推荐)
Advice类型
SpringAop支持五种类型的通知(增强)
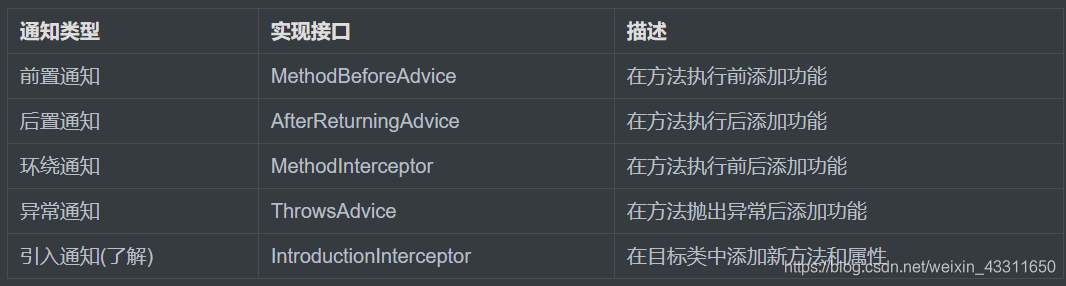
注意:多个Advice之间不允许有耦合,即多个Advice之间不允许有业务交叉。
(1):SpringAop1.x 使用ProxyFactoryBean 手动代理
配置方式:
基本用法: 添加jar包
<dependency>
            <groupId>junit</groupId>
            <artifactId>junit</artifactId>
            <version>4.11</version>
            <scope>test</scope>
        </dependency>
        <!--ioc01-core-->
        <dependency>
            <groupId>org.springframework</groupId>
            <artifactId>spring-core</artifactId>
        </dependency>
        <!--ioc01-bean-->
        <!-- https://mvnrepository.com/artifact/org.springframework/spring-beans -->
        <dependency>
            <groupId>org.springframework</groupId>
            <artifactId>spring-beans</artifactId>
        </dependency>
        <!--ioc01-context-->
        <dependency>
            <groupId>org.springframework</groupId>
            <artifactId>spring-context</artifactId>
        </dependency>
        <!--ioc01-expression-->
        <dependency>
            <groupId>org.springframework</groupId>
            <artifactId>spring-expression</artifactId>
        </dependency>
        <!--Aop依赖-->
        <dependency>
            <groupId>org.springframework</groupId>
            <artifactId>spring-aop</artifactId>
        </dependency>
        <dependency>
            <groupId>org.springframework</groupId>
            <artifactId>spring-aspects</artifactId>
        </dependency>
        <!--cglib技术-->
        <dependency>
            <groupId>cglib</groupId>
            <artifactId>cglib</artifactId>
        </dependency>
书写UserService接口
package springaop03.service;


/**
 * package_name:springaop01.service
 *
 * author:徐亚远 Date:2020/2/18 18:29
 * 项目名:springDemo01
 * Description:
 **/
public interface UserService {

    /**
     * @Author : 徐亚远
     * @Date : 2020/2/18 20:34
     * @param username
     * @param password
     * @Description :
     */
    void login(String username, String password);
}
书写实现UserService的实现类UserServiceImpl
package springaop03.service.impl;

import springaop03.service.UserService;

/**
 * package_name:springaop01.service.impl
 * Author:徐亚远
 * Date:2020/2/18 18:29
 * 项目名:springDemo01
 * Desription:
 **/
public class UserServlceImpl implements UserService {


    /**
     * @param password
     * @param username
     * @Author : 徐亚远
     * @Date : 2020/2/18 21:03
     * @Description :
     */

    @Override
    public void login(String username, String password) {
        System.out.println("loginUserServiceImpl登录方法执行:" + username + "    " + password);
    }
}
1:配置Advice通知
1定义增强类,实现相应的接口
package springaop03.advice;

import org.springframework.aop.AfterReturningAdvice;

import java.lang.reflect.Method;
import java.util.Arrays;

/**
 * package_name:springaop03.advice
 *
 * @author:徐亚远 Date:2020/2/19 16:33
 * 项目名:springDemo01
 * Description:后置通知 在方法执行后添加功能
 * Version: 1.0
 **/

public class AfterAdvice implements AfterReturningAdvice {
    /**
     * Callback after a given method successfully returned.
     *
     * @param returnValue the value returned by the method, if any
     * @param method      method being invoked
     * @param args        arguments to the method
     * @param target      target of the method invocation. May be {@code null}.
     * @throws Throwable if this object wishes to abort the call.
     *                   Any exception thrown will be returned to the caller if it's
     *                   allowed by the method signature. Otherwise the exception
     *                   will be wrapped as a runtime exception.
     */
    @Override
    public void afterReturning(Object returnValue, Method method, Object[] args, Object target) throws Throwable {
        System.out.println("后置通知:"+method.getName()+" "+"start at:["+System.currentTimeMillis()+"]"+"" +
                "  "+"args:"+Arrays.toString(args)
                +"target:"+target+" "+"returnValue:"+returnValue);
    }
}
配置sping.xml
<?xml version="1.0" encoding="UTF-8"?>
<beans xmlns="http://www.springframework.org/schema/beans"
       xmlns:xsi="http://www.w3.org/2001/XMLSchema-instance"
       xsi:schemaLocation="http://www.springframework.org/schema/beans http://www.springframework.org/schema/beans/spring-beans.xsd">

</beans>
配置spring.xml文件的
第一步 配置目标类实例
<bean id="userServiceTarget" class="springaop03.service.impl.UserServlceImpl"/>
第二步 配置后置通知
<bean id="afterAdvice" class="springaop03.advice.AfterAdvice"/>
第三步 配置advisor
<bean id="afterAdvisor" class="org.springframework.aop.support.NameMatchMethodPointcutAdvisor">
        <!-- 1 配置通知-->
        <property name="advice" ref="afterAdvice"/>
        <!-- 2 配置切点-->
        <property name="mappedNames">
            <list>
                <value>login</value>
            </list>
        </property>
    </bean>
第四步 配置代理
 <bean id="userService" class="org.springframework.aop.framework.ProxyFactoryBean">
        <!-- 1 目标类实例-->
        <property name="target" ref="userServiceTarget"/>
        <!-- 2 目标类实例接口列表-->
        <property name="interfaces">
            <list>
                <value>springaop03.service.UserService</value>
            </list>
        </property>
        <!-- 3交叉业务-->
        <property name="interceptorNames">
            <list>
                <value>afterAdvisor</value>
            </list>
        </property>
    </bean>
完整的spring.xml配置文件如下
<?xml version="1.0" encoding="UTF-8"?>
<beans xmlns="http://www.springframework.org/schema/beans"
       xmlns:xsi="http://www.w3.org/2001/XMLSchema-instance"
       xsi:schemaLocation="http://www.springframework.org/schema/beans http://www.springframework.org/schema/beans/spring-beans.xsd">


    <!--配置目标类实例-->
    <bean id="userServiceTarget" class="springaop03.service.impl.UserServlceImpl"/>

    <!--配置后置通知-->
    <bean id="afterAdvice" class="springaop03.advice.AfterAdvice"/>
    <!--配置advisor-->
    <bean id="afterAdvisor" class="org.springframework.aop.support.NameMatchMethodPointcutAdvisor">
        <!--配置通知-->
        <property name="advice" ref="afterAdvice"/>
        <!--配置切点-->
        <property name="mappedNames">
            <list>
                <value>login</value>
            </list>
        </property>
    </bean>
<!--配置代理-->
    <bean id="userService" class="org.springframework.aop.framework.ProxyFactoryBean">
        <!--目标类实例-->
        <property name="target" ref="userServiceTarget"/>
        <!--目标类实例接口列表-->
        <property name="interfaces">
            <list>
                <value>springaop03.service.UserService</value>
            </list>
        </property>
        <!--交叉业务-->
        <property name="interceptorNames">
            <list>
                <value>afterAdvisor</value>
            </list>
        </property>
    </bean>

</beans>
书写测试类
package springaop03.controller;

import org.springframework.context.ApplicationContext;
import org.springframework.context.support.ClassPathXmlApplicationContext;
import springaop03.service.UserService;

/**
 * package_name:springaop03.controller
 *
 * @author:徐亚远 Date:2020/2/19 13:06
 * 项目名:springDemo01
 * Description:TODO
 * Version: 1.0
 **/

public class AopOneController {
    public static void main(String [] args){
        ApplicationContext ac = new ClassPathXmlApplicationContext("/aop03/spring.xml");
    UserService userService = (UserService) ac.getBean("userService");
        //使用的是jdk的动态代理  class com.sun.proxy.$Proxy4
        System.out.println(userService.getClass());
        userService.login("admin","xu1230" );
    }
}
执行结果如图:

